gift
The Humble Soapnut - A Guide to the Laundry Detergent that Grows on Trees ebook by Kathryn Ossing
will be released to subscribers in: soon!
  • Post Reply Bookmark Topic Watch Topic
  • New Topic
permaculture forums growies critters building homesteading energy monies kitchen purity ungarbage community wilderness fiber arts art permaculture artisans regional education skip experiences global resources cider press projects digital market permies.com pie forums private forums all forums
this forum made possible by our volunteer staff, including ...
master stewards:
  • Nancy Reading
  • Carla Burke
  • r ranson
  • John F Dean
  • paul wheaton
  • Pearl Sutton
stewards:
  • Jay Angler
  • Liv Smith
  • Leigh Tate
master gardeners:
  • Christopher Weeks
  • Timothy Norton
gardeners:
  • thomas rubino
  • Jeremy VanGelder
  • Maieshe Ljin

Advice on a RMH build in Hokkaido Japan

 
pollinator
Posts: 464
Location: Toyoura Hokkaido
163
  • Likes 1
  • Mark post as helpful
  • send pies
    Number of slices to send:
    Optional 'thank-you' note:
  • Quote
  • Report post to moderator
Here’s something that’s been puzzling me.

At the moment, no matter what I try or how I try to apply, “high temperature” aluminum foil tape will not stick very well to my barrels. I have tried 3M and numerous Japanese high temperature tape brands none of them seem to work. All the packages say the tape is rated to around 315°C. My infrared thermometer says that the barrel where the tape is applied is not even close to that but did he sieve refuses to stick. I’ve cleaned the surfaces with alcohol I’ve tried vinegar I’ve tried a number of things and to no avail.

Does anyone have any tricks or tips to getting this stuff to stick better? Specific brands or anything else that they might have had better luck with?

🌞Sidenote, yesterday when I decided to test run the stove after adding the extension I failed to tape prior to firing. I only noticed after a small amount of smoke started coming out of the gap between the two barrels. That smoke went away quite quickly and never returned.

That leads me to believe that everything that Matt and others say is completely true. There is, in my mind, next to no way for carbon monoxide to enter the room through gaps because once the upper draft of the system takes hold everything is pulling inward, so the only problem you end up having is small leaks pulling air into the system compromising temperature and efficiency.

The only place I could see monoxide becoming an issue is during the coaling phase, once the upward thermal vacuum differential between the inside and the outside air is not so extreme.

Is that an accurate observation?

Peter🔥
AB0D290C-ED1F-406B-848C-7F81F9CA0243.jpeg
[Thumbnail for AB0D290C-ED1F-406B-848C-7F81F9CA0243.jpeg]
Ongoing problem
2296E492-0026-4025-BACA-E7ECB8023B6B.jpeg
Temperature reading at location of issue
7616DCC8-0876-425A-9BC2-F746E7F763CC.jpeg
$30 roll of tape🙄
$30 roll of tape🙄
 
Rocket Scientist
Posts: 1809
Location: Kaslo, BC
525
building solar woodworking rocket stoves wood heat greening the desert
  • Likes 2
  • Mark post as helpful
  • send pies
    Number of slices to send:
    Optional 'thank-you' note:
  • Quote
  • Report post to moderator
I think you answered your own question beautifully Peter.  All of your observations have been very similar to my own.
In those places that experience expansion and contraction or of dis-similar materials coming together that you would like to seal, a thin layer of ceramic fibre blanket works great.  Often goes by the name of ceramic fibre paper.
I’ve also used woodstove gasket rope with good success as well.
 
Peter Sedgwick
pollinator
Posts: 464
Location: Toyoura Hokkaido
163
  • Mark post as helpful
  • send pies
    Number of slices to send:
    Optional 'thank-you' note:
  • Quote
  • Report post to moderator

Gerry Parent wrote: I think you answered your own question beautifully Peter.  All of your observations have been very similar to my own.
In those places that experience expansion and contraction or of dis-similar materials coming together that you would like to seal, a thin layer of ceramic fibre blanket works great.  Often goes by the name of ceramic fibre paper.
I’ve also used woodstove gasket rope with good success as well.


That makes sense Gerry.

Where exactly would I put the rope? The only place I could imagine would be between the two barrels on the joint but that would spread them apart and make the tape harder to apply or am I missing something?

Also had the idea of just giving up on trying to get the adhesive to stick any better and just run a singed line of wire across the tape, one on each side of the top and bottom barrel lip. I will try that as well and send pictures so that it isEasier to understand what I am proposing.

Cheers, Peter
D5D7F2D4-B3A3-4CEA-AF1D-A9C791C4BEAF.jpeg
[Thumbnail for D5D7F2D4-B3A3-4CEA-AF1D-A9C791C4BEAF.jpeg]
 
gardener
Posts: 3471
Location: Southern alps, on the French side of the french /italian border 5000ft elevation
194
  • Likes 1
  • Mark post as helpful
  • send pies
    Number of slices to send:
    Optional 'thank-you' note:
  • Quote
  • Report post to moderator
Peter, you need to find this, for metal barrels.


https://www.google.fr/search?q=metal+barrel+lid+clamp&tbm=isch

And for your tape, clean with acetone.
 
pollinator
Posts: 293
Location: US, East Tennessee
34
  • Likes 1
  • Mark post as helpful
  • send pies
    Number of slices to send:
    Optional 'thank-you' note:
  • Quote
  • Report post to moderator
Hi Peter, Maybe the adhesive had gotten to old, dried out some, on your aluminum tape. I used a generic inexpensive aluminum tape rated for 350°F, and didn't have any trouble with it sticking to both the barrels (painted) and the flu pipe seams (bare metal ducting pipes) in the thermal mass bench.

To seal the main barrel to the lower half-barrel, small strips of aluminum tape are used to hold the rope gasket temporarily in place, then it is completely covered with aluminum tape. The barrel lid "band clamp" goes on over that, and compresses the rope gasket firmly in place.
barreltape.jpg
strips of aluminum tape hold "rope gasket" in place
strips of aluminum tape hold
bandclamp.jpg
band-clamp in place clamping barrel to the half-barrel manifold
 
Gerry Parent
Rocket Scientist
Posts: 1809
Location: Kaslo, BC
525
building solar woodworking rocket stoves wood heat greening the desert
  • Likes 1
  • Mark post as helpful
  • send pies
    Number of slices to send:
    Optional 'thank-you' note:
  • Quote
  • Report post to moderator
Yes the band clamp works great.  I personally didn’t need one because one of my barrels was slightly smaller than the other and they fit together perfectly with a friction fit.
I secured my rope gasket to one of the barrels with furnace cement.  I previously used high heat silicone as well with good results.
 
Peter Sedgwick
pollinator
Posts: 464
Location: Toyoura Hokkaido
163
  • Mark post as helpful
  • send pies
    Number of slices to send:
    Optional 'thank-you' note:
  • Quote
  • Report post to moderator

Satamax Antone wrote:Peter, you need to find this, for metal barrels.


https://www.google.fr/search?q=metal+barrel+lid+clamp&tbm=isch

And for your tape, clean with acetone.


Cool Max! Gotcha.
I’ll see what I can find. Acetone…👍🏽

Thanks
 
Peter Sedgwick
pollinator
Posts: 464
Location: Toyoura Hokkaido
163
  • Mark post as helpful
  • send pies
    Number of slices to send:
    Optional 'thank-you' note:
  • Quote
  • Report post to moderator

Gerry Parent wrote: Yes the band clamp works great.  I personally didn’t need one because one of my barrels was slightly smaller than the other and they fit together perfectly with a friction fit.
I secured my rope gasket to one of the barrels with furnace cement.  I previously used high heat silicone as well with good results.


Good to know…

Cheers Gerry😎
 
Peter Sedgwick
pollinator
Posts: 464
Location: Toyoura Hokkaido
163
  • Mark post as helpful
  • send pies
    Number of slices to send:
    Optional 'thank-you' note:
  • Quote
  • Report post to moderator

Byron Campbell wrote:Hi Peter, Maybe the adhesive had gotten to old, dried out some, on your aluminum tape. I used a generic inexpensive aluminum tape rated for 350°F, and didn't have any trouble with it sticking to both the barrels (painted) and the flu pipe seams (bare metal ducting pipes) in the thermal mass bench.

To seal the main barrel to the lower half-barrel, small strips of aluminum tape are used to hold the rope gasket temporarily in place, then it is completely covered with aluminum tape. The barrel lid "band clamp" goes on over that, and compresses the rope gasket firmly in place.


Hey Byron!

Tapes brand new actually and it sticks to everything, that’s what’s got me puzzled. I’ll have a look for the gasket rope. Might have to look next time we are in Sapporo. Don’t come out of the sticks very often these days, but will put it on my list for sure. Clamp as well.

Photos are super helpful.😎

Thanks… Peter
 
Peter Sedgwick
pollinator
Posts: 464
Location: Toyoura Hokkaido
163
  • Likes 1
  • Mark post as helpful
  • send pies
    Number of slices to send:
    Optional 'thank-you' note:
  • Quote
  • Report post to moderator
Here’s my tie wire solution to the foil tape issue. Ran two lines of wire, one on each side of the barrel joint. Then twisted to get it snug. I used small pieces of duct tape to hold the wire in place at the start then I went around the barrel moving the wire closer to the lip to create a snugger fit. Once the wire was in what I thought was the best position I pulled really hard and twisted the wire till there was no more slack. Removed duct tape after that.

I am sure a barrel clamp would be a better solution but this only cost me two dollars for stainless wire and should serve the purpose and I no longer have to worry about relying on the adhesive backing on the tape to do the heavy lifting. Wire is not going anywhere.

Also made a more permanent cover for the clean out at the end of the bell bench. Bit of a dusty mess grinding rust off a barrel buried in cob, but got it clean and degreased with acetone before applying tape. Will keep it in its present form for the time being watching to see how it holds.

At the moment this thing is just ripping.

Will find some time to mass in the next week is so and see if we can get the exit temps down a bit.

Smiles for miles… Peter & Co.🏔👨🏻‍🚀👩🏻‍🚀🏔

P.S. Quick fix for potential birds and bugs. Old strainer found in the yard. Perfect fit for a 15cm internal diameter ducting flue pipe.
B871F1F4-D59B-48FC-900A-9579EA03121E.jpeg
[Thumbnail for B871F1F4-D59B-48FC-900A-9579EA03121E.jpeg]
75085EAA-DF92-4CC3-90D1-598691677FF9.jpeg
[Thumbnail for 75085EAA-DF92-4CC3-90D1-598691677FF9.jpeg]
A6A55152-A5DD-4418-8F7F-A3B96F3209BC.jpeg
[Thumbnail for A6A55152-A5DD-4418-8F7F-A3B96F3209BC.jpeg]
4824A179-C81E-4393-9AA7-183E28CCD918.jpeg
[Thumbnail for 4824A179-C81E-4393-9AA7-183E28CCD918.jpeg]
83D05A89-CCAC-4699-A556-B666E2EDD0C6.jpeg
[Thumbnail for 83D05A89-CCAC-4699-A556-B666E2EDD0C6.jpeg]
029422CA-3BCE-40ED-8324-D15A2D4B5BC8.jpeg
[Thumbnail for 029422CA-3BCE-40ED-8324-D15A2D4B5BC8.jpeg]
 
Peter Sedgwick
pollinator
Posts: 464
Location: Toyoura Hokkaido
163
  • Likes 1
  • Mark post as helpful
  • send pies
    Number of slices to send:
    Optional 'thank-you' note:
  • Quote
  • Report post to moderator
By the way, I did make a DIY chimney brush last week and swept and cleaned from top to bottom throughout just to make sure there was nothing in the flue.

Here are the two bowls full of what was in the pipes. Larger bowl is from the first cleaning, smaller bowl is from the second cleaning after the chimney sweep.

This would be soot correct?

Found more ISB washed up on the beach the other day. Have a feeling the might have come from some kind of industrial plant near by. Going to investigate.😋
CF38AF97-69A5-4078-9AEF-2FD048AAB51D.jpeg
[Thumbnail for CF38AF97-69A5-4078-9AEF-2FD048AAB51D.jpeg]
F91B5D15-F1B6-45EF-B891-32BCEB09F93E.jpeg
[Thumbnail for F91B5D15-F1B6-45EF-B891-32BCEB09F93E.jpeg]
CF3847EC-2981-4F68-9E98-2F916B3541B8.jpeg
[Thumbnail for CF3847EC-2981-4F68-9E98-2F916B3541B8.jpeg]
B95842FE-A5AE-4BE4-A326-9EC06C9F4F2F.jpeg
More IFB!
More IFB!
 
Gerry Parent
Rocket Scientist
Posts: 1809
Location: Kaslo, BC
525
building solar woodworking rocket stoves wood heat greening the desert
  • Likes 1
  • Mark post as helpful
  • send pies
    Number of slices to send:
    Optional 'thank-you' note:
  • Quote
  • Report post to moderator
Hey Pete I would be very careful with that strainer on the end of the chimney pipe as fly ash will quickly plug it up and you will be back to having smoke in the house again!
Very coarse screening is about all you can get away with to prevent birds and critters from getting down the pipe.

Yes, soot is just a natural byproduct of wood combustion and still needs to be cleaned from pipes every so often.
It is soft, powdery and is removed easily.  On the other hand creosote is hard and shiny and is quite difficult to remove.
Great job on the wire tying and  homemade wire brush.
BTW ...  you must have horseshoes up your butt being able to manifest bricks floating right to your doorstep!
 
Peter Sedgwick
pollinator
Posts: 464
Location: Toyoura Hokkaido
163
  • Likes 2
  • Mark post as helpful
  • send pies
    Number of slices to send:
    Optional 'thank-you' note:
  • Quote
  • Report post to moderator

Gerry Parent wrote: Hey Pete I would be very careful with that strainer on the end of the chimney pipe as fly ash will quickly plug it up and you will be back to having smoke in the house again!
Very coarse screening is about all you can get away with to prevent birds and critters from getting down the pipe.

Yes, soot is just a natural byproduct of wood combustion and still needs to be cleaned from pipes every so often.
It is soft, powdery and is removed easily.  On the other hand creosote is hard and shiny and is quite difficult to remove.
Great job on the wire tying and  homemade wire brush.
BTW ...  you must have horseshoes up your butt being able to manifest bricks floating right to your doorstep!


Ok! Good to know. I’ll take out the screen tomorrow. Thanks.

Yeah, not really sure how the bricks got there on the beach.

I was invited to a house party the other day. It was getting late and everyone was getting loose and dancing. I danced by the wood stove. When I looked down there was a IFB near my feet. I asked the owner of the house where he got it. He said, “I found it on the beach when I was walking my dogs. I’ll take you there tomorrow if you like. There are lots of these.”

Next day heavy rain, but the guy called me and said let’s go to the beach. Long story short, I was chasing down floating bricks in the ocean in gail force winds. Managed to salvage about 10. Think the rest of them got washed away, but I’m keen to check around and try to figure out how they got there.

My best guess would be some factory workers from a near by plant took them from the trash and brought them to use for a BBQ. Leaving them there after they finished. Just speculation.

Totally random that’s for sure…

Peter🤔
 
Peter Sedgwick
pollinator
Posts: 464
Location: Toyoura Hokkaido
163
  • Likes 2
  • Mark post as helpful
  • send pies
    Number of slices to send:
    Optional 'thank-you' note:
  • Quote
  • Report post to moderator
Here’s a few things I’ve been doing in my spare time, that seem rather good, so I thought I’d share.

Had to move the stove thermometer that was stuck in my vertical flue pipe to check internal exiting gas temps. Original one was just stuck in without any sealant, but this time it seemed a bit loose so I used a bit of flue pipe sealant, that I  bought a while back and never used. Package says it’s for sealing stove pipe joints, heating vents and car exhaust pipes. Rated to 1100°C. Has the consistency of somewhere between toothpaste and high grit industrial hand soap. Was a bit tricky to get it to stay in place, but managed to squeeze it against the threads and pipe joint, filling all the holes. Started firing stove while it was still wet.

Now it’s cured after a few days and seems to be holding pretty well. Think it might be relatively useful in these types of situations where temperatures are not very high and don’t make dramatic swings.  

Also, decided to try mixing up some for the brown soot from the stove with a bit of white wine vinegar to make a homemade wood stain paste for a new splitting maul handle Yoshida san made. Just mixed it up over the stove in a bowl until all the powder was dispersed then applied several coats with paper towel on raw wood, sanding between each coat. More coat means darker color.

Sealed with a topcoat of beeswax, linseed oil, turpentine, and a dollop of Vaseline. Finally sealed with a quick pass of a blow torch to open the pores and get the wax inside. Rubbed off any excess and seemed good to go. Good grip and no mess.

Keep looking to find ways to use absolutely everything in the cycle. To me that’s the fun part.

More updates on the stove soon…🌞

Peter

8084D164-15C2-4292-A041-FE6BE98C8E8B.jpeg
[Thumbnail for 8084D164-15C2-4292-A041-FE6BE98C8E8B.jpeg]
4CFB1607-6D28-4868-8238-900A01B2CC44.jpeg
[Thumbnail for 4CFB1607-6D28-4868-8238-900A01B2CC44.jpeg]
Store bought goop
281C15B8-7137-4BF2-835D-2E902A69BDEE.jpeg
[Thumbnail for 281C15B8-7137-4BF2-835D-2E902A69BDEE.jpeg]
B4BD2B93-CEC7-4A37-8666-C7F7F9C98604.jpeg
Goop
Home made goop
830C9B1E-9A80-49EE-85AD-B009053F917A.jpeg
[Thumbnail for 830C9B1E-9A80-49EE-85AD-B009053F917A.jpeg]
FC86E608-5B75-475B-8BB3-22C4117295AF.jpeg
[Thumbnail for FC86E608-5B75-475B-8BB3-22C4117295AF.jpeg]
2E1F8320-2B3D-4891-A709-94376E14DA81.jpeg
[Thumbnail for 2E1F8320-2B3D-4891-A709-94376E14DA81.jpeg]
 
Peter Sedgwick
pollinator
Posts: 464
Location: Toyoura Hokkaido
163
  • Likes 3
  • Mark post as helpful
  • send pies
    Number of slices to send:
    Optional 'thank-you' note:
  • Quote
  • Report post to moderator
BTW, did remove the screen the other day. What I was trying to keep out of the pipes, mainly, where these “stink bugs”. These things are next level here in the fall. We end up with about this many of them on the windowsill every three or four days. Now it’s getting too cold so they aren’t as active but for about a month it’s pretty intense. I guess the best solution will be periodic brushing and checking, so they don’t clog up the system.
D035F9B8-0CD5-4B52-8944-D2663CD4F265.jpeg
[Thumbnail for D035F9B8-0CD5-4B52-8944-D2663CD4F265.jpeg]
B93E1FD5-295B-44AF-B367-E6D1B1E72BE0.jpeg
[Thumbnail for B93E1FD5-295B-44AF-B367-E6D1B1E72BE0.jpeg]
 
Satamax Antone
gardener
Posts: 3471
Location: Southern alps, on the French side of the french /italian border 5000ft elevation
194
  • Mark post as helpful
  • send pies
    Number of slices to send:
    Optional 'thank-you' note:
  • Quote
  • Report post to moderator
Vacuum cleaner! I do that for flies!
 
Peter Sedgwick
pollinator
Posts: 464
Location: Toyoura Hokkaido
163
  • Likes 2
  • Mark post as helpful
  • send pies
    Number of slices to send:
    Optional 'thank-you' note:
  • Quote
  • Report post to moderator

Satamax Antone wrote:Vacuum cleaner! I do that for flies!


Hey Max!

Vacuum cleaner for sure!

These bugs are everywhere here and even more so in the mountains. They come in durning the fall to hibernate and find a way in through any crack or crevice they can. Have a feeling they are likely to build up somewhere around the 45 bend in our exiting flue pipe. Push them down with the bush and then use vacuum to clean out at the bottom from our newly cut door just above the 90° elbow.

This is probably quite specific to our situation and not overly useful for other people.

Thanks! Peter


D254BE78-9D8A-4922-85B6-37594A2A1940.jpeg
[Thumbnail for D254BE78-9D8A-4922-85B6-37594A2A1940.jpeg]
 
Peter Sedgwick
pollinator
Posts: 464
Location: Toyoura Hokkaido
163
  • Likes 3
  • Mark post as helpful
  • send pies
    Number of slices to send:
    Optional 'thank-you' note:
  • Quote
  • Report post to moderator
On topic, off topic…

This tread is really about our RMH build, but part of that is the space we are heating. As you might know our “shack” in the woods is anything but well insulated, and at the moment most of our heat is being generated for radiant. Mass doesn’t have the same heating ability in a building with next to no insulation.

The house, as  I mentioned before, is really only serving as a place to buy us time, learn skills and experiment, so I’m looking for ways to insulate using materials that I can recycle into other projects and other buildings in the future.

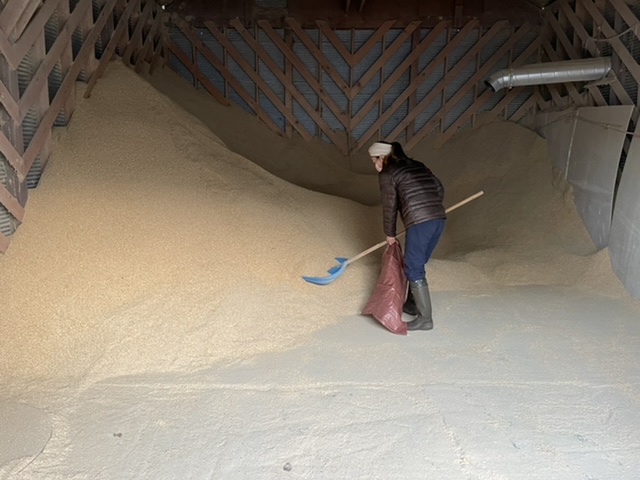
One part of that is an experiment in using rice hulls for insulation. Stawbales are not realistic here and the availability of rice hulls is pretty easy. Mimi and I recently sourced hulls at a local grain depo 20 minutes down the road, and found they are extremely cheap. Got a test batch of 7 large 60cm x 90cm bags for a total (with tax) of ¥177 (roughly $1.50 USD)
They told us we could fill up a two ton truck with rice hulls for $12.00. Should have access to a 2 ton truck soon I think…😋


Just got this grain bag sewing machine in the mail today. Plan is to fill bags about 3/4 full and sew them shut. Adding borax to the hulls before closing to deter the field mice from making a mess.
Then use each of the bags like blocks to stack and build walls Against pre-existing interior walls, as well as line the rafters.

None of the bags will be exposed to the elements. Basically just insulating the front three rooms of the house to create a space warm enough to stay relatively comfortable throughout the winter. Average January temperatures here are between -3 and -9°C.

I would like to experiment further with these hulls in more permanent structures in the future, but for the meantime this will serve as a temporary insulation solution and storage for the hulls.

Should give us a better idea of just how much insulation value they actually have for our space, matched with our 15cm (6”) heating system and our climate.

This is only a prototype and an experiment. I got the original idea from a previous thread I opened where someone mentioned the use of hulls. I’ve done some research. There isn’t a very large amount of literature available but what there is seems promising.

These are just stacked dry, sewn shut inside of bags.

Is there anyone who has any advice, tips or things to look out for that I might have overlooked. Will the borax work etc.?

Thanks in advance, Peter & Co. 🍚🔥🍚

P.S. not overly concerned about rice weevils at the moment, but will keep an eye out for them.


C7AC6BCD-12A3-4838-A0C6-7DF05B66BB4B.jpeg
Rice Hull Storage room
32845175-CCDB-4098-865F-FAD787F7AF12.jpeg
Look clean
Look clean
B437600E-1E06-4526-90C0-0751513B6D1C.jpeg
Test batch
Test batch
764B8905-6277-4A23-A780-DF3B83DBA49E.jpeg
Almost broke the Bank
6887D056-17B4-4F4E-9EF8-D3368AE44F35.jpeg
These are filled too much. Take out a bit, add borax and see shut.
8C3996BB-4903-4A79-A6B4-B6AB3ECBE644.jpeg
Never thought I’d own one of these things👨🏻‍🚀
 
Satamax Antone
gardener
Posts: 3471
Location: Southern alps, on the French side of the french /italian border 5000ft elevation
194
  • Likes 1
  • Mark post as helpful
  • send pies
    Number of slices to send:
    Optional 'thank-you' note:
  • Quote
  • Report post to moderator
What this males me think, earth rice bags!
 
Peter Sedgwick
pollinator
Posts: 464
Location: Toyoura Hokkaido
163
  • Mark post as helpful
  • send pies
    Number of slices to send:
    Optional 'thank-you' note:
  • Quote
  • Report post to moderator
Insulated Fire Brick (IFB) floor replacement turned out to be a total bust, both literally and figuratively.

It’s been about 10 days of regular burning, probably 6-7 hours a night. The IFB I cut and replaced has crumbled like a stale cookie. Not expected.

Wondering what might be the cause. IFB I used is a Japanese domestic brand made locally rated to a temp of 1500°C (2732°F) used “for Hot Surface and Back-up lining insulation.”

ISOLITE LBK 28

Here is a link for stats:
https://www.isolite.co.jp/en/products/taika/lbk_insulation/

Not sure if I’m missusing the product or the way I’m using it is outside of the products intended usage capacity.

The ISOLITE brand is the premier industrial grade domestic refractory product line here in Japan and  the go to for most large scale projects that require high heat and thermal shock resistant applications. In general Japanese products are rated extremely conservatively and the quality should be good. All of the CFB that I’ve used in the past has been from the same brand without any problems.

Was wondering if anyone else has tried using IFB in a J tube build and what their experiences is with the material.

Again, not a dealbreaker by any means.

I can just fill the holes with fire ash and use as is, but would like to get a better idea of what might be causing the issue in case I try to use the product again in future builds, including batch box or riserless core configurations. The only real danger would be spanning ceiling applications that might crack and fall apart compromising the safety of the firebox.

Hummmm… Peter🤔


300B719C-BE6C-4A2B-86AF-1FCA7658F242.jpeg
[Thumbnail for 300B719C-BE6C-4A2B-86AF-1FCA7658F242.jpeg]
 
Satamax Antone
gardener
Posts: 3471
Location: Southern alps, on the French side of the french /italian border 5000ft elevation
194
  • Likes 1
  • Mark post as helpful
  • send pies
    Number of slices to send:
    Optional 'thank-you' note:
  • Quote
  • Report post to moderator
Well, isn't it just spalling?

Iirc, it has been in water for a while?

What I could imagine, is the core of the brick being wetter than the outside, and not reacting the same.
 
Satamax Antone
gardener
Posts: 3471
Location: Southern alps, on the French side of the french /italian border 5000ft elevation
194
  • Likes 1
  • Mark post as helpful
  • send pies
    Number of slices to send:
    Optional 'thank-you' note:
  • Quote
  • Report post to moderator
Peter, one thing which crossed my mind.

Crush these dying isolite bricks, mix it with good clay and rice hulls.  To pour your feed tube bottom. I would try to put a sacrificial piece of steel over that, for a few days, to fire the "slab"

I wonder if you could wash some of that clay, to make a nice clean one.

 
Peter Sedgwick
pollinator
Posts: 464
Location: Toyoura Hokkaido
163
  • Mark post as helpful
  • send pies
    Number of slices to send:
    Optional 'thank-you' note:
  • Quote
  • Report post to moderator

Satamax Antone wrote:Peter, one thing which crossed my mind.

Crush these dying isolite bricks, mix it with good clay and rice hulls.  To pour your feed tube bottom. I would try to put a sacrificial piece of steel over that, for a few days, to fire the "slab"

I wonder if you could wash some of that clay, to make a nice clean one.


That’s a pretty groovy idea Max!

And one worth trying I think.
The IFBs I think you are referring to are the ones I recently found in the ocean/on the beach. The one that I used was from the group of 300+ I bought last year. They were sitting next to my heater for over a year. So can’t imagine why water would be a problem. I might first try to split one of the ISOLITE LBK - 3000 IFB first and try that. They are rated to 1600°C (2912°F) Then put a piece of sacrificial steel over that to potentially bring it up to temperature slowly as opposed to shocking it right off the bat. Could coating the IFB in water glass potentially help? Seems like the wood ash gets baked into the tinny holes of the IFB then chips off as I’m cleaning out the ash.

If that doesn’t work I’ll try your recipe. Might even try your recipe just cause it sounds cool. I would assume you’re adding rice hulls because of their high silica content. I do have a lot of clay that I cleaned and got to almost to pure clay. Shifted and screened last fall, then hung them and pillowcases and dried them. Adding fire ash to the recipe could help? Also have a bunch of ceramic fiber board dust I collected from all my cutting.

I’m open to anything.

Still have geopolymers on my mind.🌞

Pete


B49F026D-A5AD-4A7C-B30A-4B59F90DF750.jpeg
Refined clay
Refined clay
90757D1B-445E-4A59-BD2F-0A9018D44DC4.jpeg
Ceramic fiber dust
Ceramic fiber dust
D861B910-36AF-4A85-AA6A-21AED751C9FA.jpeg
This might be the bad boys
2DC9EEE5-72A7-49D7-A3C9-F76CE984AC1C.jpeg
Temporary IFB storage
 
Satamax Antone
gardener
Posts: 3471
Location: Southern alps, on the French side of the french /italian border 5000ft elevation
194
  • Likes 1
  • Mark post as helpful
  • send pies
    Number of slices to send:
    Optional 'thank-you' note:
  • Quote
  • Report post to moderator
Hi Peter, i was thinking about the IFB you found in the sea.

Crushed IFB as a mineral charge for your mortar, if it is insulative, that's even better. Clay as a binding agent,

and rice hulls as fiber reinforcement. The closest to the fire, these gonna burn. and leave tiny voids which will increase the insulation factor.  And further away, they gonna transform as carbon, which might help with strength. Ans even further it might say as fibers.

Dat's all theory!
 
Peter Sedgwick
pollinator
Posts: 464
Location: Toyoura Hokkaido
163
  • Mark post as helpful
  • send pies
    Number of slices to send:
    Optional 'thank-you' note:
  • Quote
  • Report post to moderator
Roger that Max!

It’s all worth a try.

At the end of the day, the “floor” brick is just there to protect the CFB insulation underneath from getting damaged. that’s what’s doing the heavy lifting.  But if I can make that floor brick more insulative and less heat retaining the better.

You never have issues with your IFB in your batchbox floor?

🤙🏽Pete🤙🏿
 
Satamax Antone
gardener
Posts: 3471
Location: Southern alps, on the French side of the french /italian border 5000ft elevation
194
  • Likes 1
  • Mark post as helpful
  • send pies
    Number of slices to send:
    Optional 'thank-you' note:
  • Quote
  • Report post to moderator

Peter Sedgwick wrote:
You never have issues with your IFB in your batchbox floor?

🤙🏽Pete🤙🏿


My batch hasn't IFB in the batch. But hard firebrick slabs, surrounded by air entrained concrete

 
Peter Sedgwick
pollinator
Posts: 464
Location: Toyoura Hokkaido
163
  • Mark post as helpful
  • send pies
    Number of slices to send:
    Optional 'thank-you' note:
  • Quote
  • Report post to moderator

Satamax Antone wrote:

Peter Sedgwick wrote:
You never have issues with your IFB in your batchbox floor?

🤙🏽Pete🤙🏿


My batch hasn't IFB in the batch. But hard firebrick slabs, surrounded by air entrained concrete


Ok, cool.

So your material set up is rather similar to mine.
You’re making your own IFB using aircreate made with refractory castable material?

Just need something to create a bit of an abrasion barrier especially on the floor.

I’m having another go right now.
Won’t stop until I find something that works.

Springtime batchbox build is in order…


E5B88261-F92D-4CD7-83CB-2B4EC4B200AD.jpeg
[Thumbnail for E5B88261-F92D-4CD7-83CB-2B4EC4B200AD.jpeg]
Late night ghetto shop set up
E24F2C6A-0FD8-468B-86EB-6ADF572CA446.jpeg
IFB, cut proud then sanded down on a concrete block
 
Satamax Antone
gardener
Posts: 3471
Location: Southern alps, on the French side of the french /italian border 5000ft elevation
194
  • Mark post as helpful
  • send pies
    Number of slices to send:
    Optional 'thank-you' note:
  • Quote
  • Report post to moderator
Peter, i'm just using available materials.

The air entrained concrete is called "siporex" here. The refractory slabs are stuff sold in Italy, on the other side of the border from me. 50x50x6cm. Made for pizza ovens. It's a bit expensive. 170 uros of slabs, when i made that one. And the refractory tubes are pieces of schiedel chimneys. I got that cheap at the time. But it's far from perfect. Peter van den berg, on his latest prototype, might have found better.   https://donkey32.proboards.com/post/36699/thread
 
master pollinator
Posts: 1744
Location: Ashhurst New Zealand (Cfb - oceanic temperate)
533
duck trees chicken cooking wood heat woodworking homestead
  • Likes 1
  • Mark post as helpful
  • send pies
    Number of slices to send:
    Optional 'thank-you' note:
  • Quote
  • Report post to moderator
Is it possible that salt from soaking in seawater is what's causing it to spall? I'd try soaking the remaining pieces in fresh water, possibly several times, to draw out the salt.
 
Peter Sedgwick
pollinator
Posts: 464
Location: Toyoura Hokkaido
163
  • Mark post as helpful
  • send pies
    Number of slices to send:
    Optional 'thank-you' note:
  • Quote
  • Report post to moderator

Satamax Antone wrote:Peter, i'm just using available materials.

The air entrained concrete is called "siporex" here. The refractory slabs are stuff sold in Italy, on the other side of the border from me. 50x50x6cm. Made for pizza ovens. It's a bit expensive. 170 uros of slabs, when i made that one. And the refractory tubes are pieces of schiedel chimneys. I got that cheap at the time. But it's far from perfect. Peter van den berg, on his latest prototype, might have found better.   https://donkey32.proboards.com/post/36699/thread


Cool Max.

I’ll have a look for some kiln shelf material. Probably Silicon Carbide Kiln Shelves it seems. Maybe cut them into smaller sections to avoid high temperature differentials across a single piece. Filling the gaps with fire ash and or CFB/IFB dust.

Start distilling potassium hydroxide (KOH) from fire ash in a bucket and see if I can get a simple geopolymer binder with kaolin clay. KOH & NaOH are a restricted substance here so will have to make myself.

Anyway, things to play with.

I’ll post what works and what doesn’t…

Cheers, Peter

 
Peter Sedgwick
pollinator
Posts: 464
Location: Toyoura Hokkaido
163
  • Mark post as helpful
  • send pies
    Number of slices to send:
    Optional 'thank-you' note:
  • Quote
  • Report post to moderator

Phil Stevens wrote:Is it possible that salt from soaking in seawater is what's causing it to spall? I'd try soaking the remaining pieces in fresh water, possibly several times, to draw out the salt.


Hey Phil,

That’s definitely a possibility with the bricks I found in the ocean. And a good call if I plan to use them for anything. I’ve had those bricks on the bench drying for over a week and they are still wet! Will try soaking in rain water for a while. Then maybe put them on top of the burn barrel for a while to fully redry.

*The IFB I am presently using inside of the stove have not been exposed to salt water.

I’m cutting some new bricks now and will try again. Could it be a result of the way you insert wood into a J-tube That’s causing the issue? i.e. vertical orientation. Unlike a batch box where are you place fuel into the burn box horizontally the J tube introduces fuel that impacts the already thermally stressed floor plane, like a small battling ram.

Just speculation.

Could just double up on CFB and put a piece of sacrificial steel plate as a cover in the floor of the front of the burn box to absorb shock from vertical fuel abrasion etc.

🔥✌🏽🔥
 
Peter Sedgwick
pollinator
Posts: 464
Location: Toyoura Hokkaido
163
  • Likes 1
  • Mark post as helpful
  • send pies
    Number of slices to send:
    Optional 'thank-you' note:
  • Quote
  • Report post to moderator
Any thoughts on what to do with a dog that insists on sitting too close to the drum barrel for extremely long periods of time?

Half joking, not joking…🐕🤔🐕
0BD3CFF5-1C56-4474-9865-70B0B77DDBB4.jpeg
Chimi, you’re going to fry your brain.
893D3811-CC47-43E7-A0CB-44D00B43C124.jpeg
Move away from the barrel please…🔥
 
Rocket Scientist
Posts: 790
Location: Guernsey a small island near France.
299
  • Likes 1
  • Mark post as helpful
  • send pies
    Number of slices to send:
    Optional 'thank-you' note:
  • Quote
  • Report post to moderator
I have a cat that likes doing that, my tip is give him some water …
40DFB0D2-9200-4563-8E7E-8EE5037ED7D2.jpeg
[Thumbnail for 40DFB0D2-9200-4563-8E7E-8EE5037ED7D2.jpeg]
 
Gerry Parent
Rocket Scientist
Posts: 1809
Location: Kaslo, BC
525
building solar woodworking rocket stoves wood heat greening the desert
  • Likes 2
  • Mark post as helpful
  • send pies
    Number of slices to send:
    Optional 'thank-you' note:
  • Quote
  • Report post to moderator
Perhaps a heat shield in that area?
... or maybe even something uncomfortable for her to lay on in that spot ?
 
Peter Sedgwick
pollinator
Posts: 464
Location: Toyoura Hokkaido
163
  • Likes 2
  • Mark post as helpful
  • send pies
    Number of slices to send:
    Optional 'thank-you' note:
  • Quote
  • Report post to moderator
Think a pile of rocks might be in order! And a big bowl of water…🔥🐕🔥
081A83B0-AFF0-4364-A1C2-1798DC5C1AE8.jpeg
[Thumbnail for 081A83B0-AFF0-4364-A1C2-1798DC5C1AE8.jpeg]
 
Peter Sedgwick
pollinator
Posts: 464
Location: Toyoura Hokkaido
163
  • Likes 2
  • Mark post as helpful
  • send pies
    Number of slices to send:
    Optional 'thank-you' note:
  • Quote
  • Report post to moderator

Fox James wrote:I have a cat that likes doing that, my tip is give him some water …


Cool set up by the way Mr. James!🐈‍⬛
 
The problems of the world fade way as you eat a piece of pie. This tiny ad has never known problems:
Back the BEL - Invest in the Permaculture Bootcamp
https://permies.com/w/bel-fundraiser
reply
    Bookmark Topic Watch Topic
  • New Topic