|

|
|
|
|

|

|
.png)
|

|

|
 1
1


Peter Sedgwick wrote: I've got access to tons of reclaimed cinder blocks. Thinking of using those, filled with cob, for the walls of the chamber then cobbing over and plastering with the same material I use on the floor.
Silence is Golden
For all your RMH needs:
dragontechrmh.com
![[Thumbnail for 72879408_2532601186996996_3898872501291188224_n.jpg]](/t/122458/a/92280/72879408_2532601186996996_3898872501291188224_n.jpg "Filename: 72879408_2532601186996996_3898872501291188224_n.jpg
Description: BENCH LAYOUT")
![[Thumbnail for 72374579_1280215895494790_4703386559494225920_n.jpg]](/t/122458/a/92281/72374579_1280215895494790_4703386559494225920_n.jpg "Filename: 72374579_1280215895494790_4703386559494225920_n.jpg
Description: ROUGH VOLUME DIMENSIONS OF BENCH")
Peter Sedgwick wrote:Should I pre-soak the straw? Seemed pretty stiff in my last test batch.
Silence is Golden
For all your RMH needs:
dragontechrmh.com
![[Thumbnail for 72356432_412994216264540_6889005131921096704_n.jpg]](/t/122458/a/92325/72356432_412994216264540_6889005131921096704_n.jpg "Filename: 72356432_412994216264540_6889005131921096704_n.jpg
Description: CHIMNEY ESCAPE ROUTE DRAWING")
![[Thumbnail for 2.jpg]](/t/122458/a/92326/2.jpg "Filename: 2.jpg
Description: ACTUAL HOUSE WITH BAD PHOTOSHOP OF HOW THE CHIMNEY LEAVES THE HOUSE")
![[Thumbnail for 73446316_2781004568792532_8082756502609199104_n.jpg]](/t/122458/a/92327/73446316_2781004568792532_8082756502609199104_n.jpg "Filename: 73446316_2781004568792532_8082756502609199104_n.jpg
Description: QUICK NEW HALF BERRAL SKETCH") 1
1
Peter Sedgwick wrote:Had some feed back from Matt earlier.
Quote from Matt:
"I think generally you are off to a pretty good start. The first thing that jumps out at me is the tops. That metal scaffolding is not going to work to your satisfaction I'm afraid. It will change size too much with the temperature changes and you will not be able to keep cob on top, it will just become a sand box as it continually breaks apart your top coat. I'd strongly suggest a masonry bench top if possible, stone or cast, or my half-barrel system…”
Go through the ceiling and then make a bit of adjustment with an angle joint to redirect out of the highest roof spine in the house. Big concern with snow drift build up along the edge where the two roofs meet so afraid of sending the chimney absolutely straight out vertically. Fell its safer out the higher roof. (Drawing for clarification)
Silence is Golden
For all your RMH needs:
dragontechrmh.com
2
1
![[Thumbnail for 861C2747-7BB7-4B25-98BC-7ACCDA34C8A1.jpeg]](/t/122458/a/92432/861C2747-7BB7-4B25-98BC-7ACCDA34C8A1.jpeg "Filename: 861C2747-7BB7-4B25-98BC-7ACCDA34C8A1.jpeg
Description:")
![[Thumbnail for F1865B7E-86C4-46B6-9D56-C7547A3B30A7.jpeg]](/t/122458/a/92433/F1865B7E-86C4-46B6-9D56-C7547A3B30A7.jpeg "Filename: F1865B7E-86C4-46B6-9D56-C7547A3B30A7.jpeg
Description:") 1
1
Silence is Golden
For all your RMH needs:
dragontechrmh.com
Gerry Parent wrote:Thanks for that bit of info Glenn. That sounds very plausible.
The only thing I don't like about the half barrels is the fact that there is a small strip along the top that gets most of the heat while the rest is barely warm. Perhaps this could be mitigated by putting a bit of insulation like rock wool along the top strip so that it would conduct towards the thicker mass areas more evening the heat distribution out?
1
Silence is Golden
For all your RMH needs:
dragontechrmh.com
Gerry Parent wrote:Peter, A link that might be helpful: half barrel bench In the post, Thomas gives some links to look over.
Not sure of the best way to make a nice angle cut. If it were me, I might make a template and use it to trace the angle on the barrels and then cut with a angle grinder, cleaning up to make it the best fit possible before sealing the seam.
![[Thumbnail for 72689086_10217874113856851_8068769331724419072_n.jpg]](/t/122458/a/92558/72689086_10217874113856851_8068769331724419072_n.jpg "Filename: 72689086_10217874113856851_8068769331724419072_n.jpg
Description:")
![[Thumbnail for 72673638_10217874113216835_8153847716120625152_n.jpg]](/t/122458/a/92559/72673638_10217874113216835_8153847716120625152_n.jpg "Filename: 72673638_10217874113216835_8153847716120625152_n.jpg
Description:") 1
1
Peter Sedgwick wrote:Trying to work out the discrepancies in my brick sizes so they fit with Matt's 6" CFB layout without losing any internal surface area in the feed tube and the burn tunnel.
Throwing the dimensions in Sketch-up one time now to double check. Looks like I'll have to shim the difference, with a perlite powder and and clay, as my splits are a bit shorter and narrower than the ones available in the US. Think that seems to make the most sense.
At $75 a sheet I'm a bit nervous...Peter
Silence is Golden
For all your RMH needs:
dragontechrmh.com
![[Thumbnail for Screen-Shot-2019-10-20-at-9.21.45.jpg]](/t/122458/a/92611/Screen-Shot-2019-10-20-at-9.21.45.jpg "Filename: Screen-Shot-2019-10-20-at-9.21.45.jpg
Description: TOO MUCH MATH")
![[Thumbnail for 72827596_2521854198036791_5509150788187848704_n.jpg]](/t/122458/a/92612/72827596_2521854198036791_5509150788187848704_n.jpg "Filename: 72827596_2521854198036791_5509150788187848704_n.jpg
Description: MUCH SIMPLER")
![[Thumbnail for 72707897_2601048180113979_4575442438683885568_n.jpg]](/t/122458/a/92613/72707897_2601048180113979_4575442438683885568_n.jpg "Filename: 72707897_2601048180113979_4575442438683885568_n.jpg
Description: FURNACE CEMENT")
![[Thumbnail for 73309390_2567735493287123_2611989991764525056_n.jpg]](/t/122458/a/92614/73309390_2567735493287123_2611989991764525056_n.jpg "Filename: 73309390_2567735493287123_2611989991764525056_n.jpg
Description: EXTRA NAILS TO KEY THE COB")
![[Thumbnail for 74489983_2362342767316215_1057921307670216704_n.jpg]](/t/122458/a/92615/74489983_2362342767316215_1057921307670216704_n.jpg "Filename: 74489983_2362342767316215_1057921307670216704_n.jpg
Description: MISS COBBER") 1
1
Peter Sedgwick wrote:I have 1/2 bag of blast furnace cement and a 1/2 bag of powdered insulation perlite. It would take me little time to custom make a few molds and cast some bricks that fit perfectly for my build. No more gaps and no more thickness issues.
It would simplify a lot and, I would imagine, make the RMH run better.
Does this sound like a good proposition?
If so how do I figure out the proper hight of the feed tube, length of the burn tunnel and length of the heat riser attachment?
Silence is Golden
For all your RMH needs:
dragontechrmh.com
 5
1
5
1
Glenn Herbert wrote:An accurate empirical method of making a 45 degree cutline on a barrel, if you have a good-sized tub available, would be to mark the barrel at exactly one diameter up from the end, and submerge it in water so one side of the end is exactly at water level, and the mark on the other side is at water level. Carefully take the barrel out of the water and mark the wet line with chalk, then make a paper template for future use with other barrels.
![[Thumbnail for D551163F-FA0A-477C-81BE-6A67292EE9A9.jpeg]](/t/122458/a/92663/D551163F-FA0A-477C-81BE-6A67292EE9A9.jpeg "Filename: D551163F-FA0A-477C-81BE-6A67292EE9A9.jpeg
Description:") 1
2
1
2
Fox James wrote:As a builder, I would just mark the barrel with a laser but I would think about leaving a flange or tabs so the barrels can be pop riveted or screwed together.
Probably the easy way to mark the cut is with a piece of wood set out on top of the barrel and just use a a level to plumb down and mark with chalk.
Anyway I would cut one inch back from he line, make cuts every inch or so and bend up the tabs so they can be fixed together.
2
1
Glenn Herbert wrote: I would consider using four or five half-barrels, and a plunger tube for the chimney so that the bottom can be raised or lowered to use as much of the ISA as turns out to
be desirable. If the bottom of the plunger is high above the floor, hot air will escape sooner and not reach low on the bell sides, reducing the heat absorbed.

Silence is Golden
For all your RMH needs:
dragontechrmh.com
1
Peter Sedgwick wrote:I'm over the idea of making bricks. Think you're right with the cutting brick idea. Gonna take some bricks over to the local grave stone guy in town tomorrow and see if I can get him to cut a few for me. His cuts will be dead on and better than trying to hack through rocks with a grinder.
Silence is Golden
For all your RMH needs:
dragontechrmh.com
![[Thumbnail for 7F5B4A54-111F-44E8-A926-E04173C67E25.jpeg]](/t/122458/a/92711/7F5B4A54-111F-44E8-A926-E04173C67E25.jpeg "Filename: 7F5B4A54-111F-44E8-A926-E04173C67E25.jpeg
Description:")
Glenn Herbert wrote:I would count a typical half barrel as about 9 square feet, including one end, and excluding a few inches at the bottom because that may well not get the full exposure to hot air.
Given that I found an 8" J-tube bell system to want around the same ISA as a 6" batch box (I think it can take a little more), I would guess that a 6" J-tube can handle around 30 square feet of ISA more or less, which would translate to at least 3 half-barrels. With absorption by the bottom sides of the barrels not very useful (since there is no lateral exposure of the mass at all), I would consider using four or five half-barrels, and a plunger tube for the chimney so that the bottom can be raised or lowered to use as much of the ISA as turns out to be desirable. If the bottom of the plunger is high above the floor, hot air will escape sooner and not reach low on the bell sides, reducing the heat absorbed. You might want to make another 45 degree joint and extend the last half-barrel across the middle of the room to get more of the floor warmed.
![[Thumbnail for Screen-Shot-2019-10-22-at-8.16.50.jpg]](/t/122458/a/92735/Screen-Shot-2019-10-22-at-8.16.50.jpg "Filename: Screen-Shot-2019-10-22-at-8.16.50.jpg
Description: 15CM J-TUBE CORE DESIGN 1")
![[Thumbnail for Screen-Shot-2019-10-22-at-8.24.58.jpg]](/t/122458/a/92736/Screen-Shot-2019-10-22-at-8.24.58.jpg "Filename: Screen-Shot-2019-10-22-at-8.24.58.jpg
Description: CORE CUT PANNEL LAYOUT ON 60CM X 90CM CFB SHEETS") 5
5
![[Thumbnail for DD5F2929-F003-473D-BA83-F825AB3CCFC4.jpeg]](/t/122458/a/92743/DD5F2929-F003-473D-BA83-F825AB3CCFC4.jpeg "Filename: DD5F2929-F003-473D-BA83-F825AB3CCFC4.jpeg
Description:") 1
1
Fox James wrote:Well I am reluctant to recommend anything too different as I only have my own stoves to judge by, where as, I assume the normal formula has been tried and tested by many.
I will say that having the fire box stepped down a little from the fire tunnel is a huge benefit a it stopes the wood from slipping into the tunnel.
Having some form of pre heated secondary air most definitely improves performance and in the form of a P plate, is very easy to incorporate.
Peter Sedgwick wrote:Thanks James.
My chimney exit pipe is 15cm. That’s .9cm shy of a true 6” ID pipe. That’s the closest I can get here in Japan. My dimensions I have used in the mock up are based on Glenn’s statement about treating a the internal volume of a square the same as the volume of a tube.
I’m more than open to adjust the dimensions. Is there anything you would suggest in particular?
Peter
4
Peter Sedgwick wrote:Plan to put the whole thing together raw and start firing it as soon as I have a working firebox, half barrels and an exhaust. Just seal the barrels at the bottom with cob and see how it runs. Then we can adjust and make barrels longer or shorter add brick hight to the feed tube etc.
Silence is Golden
For all your RMH needs:
dragontechrmh.com
1
1
2
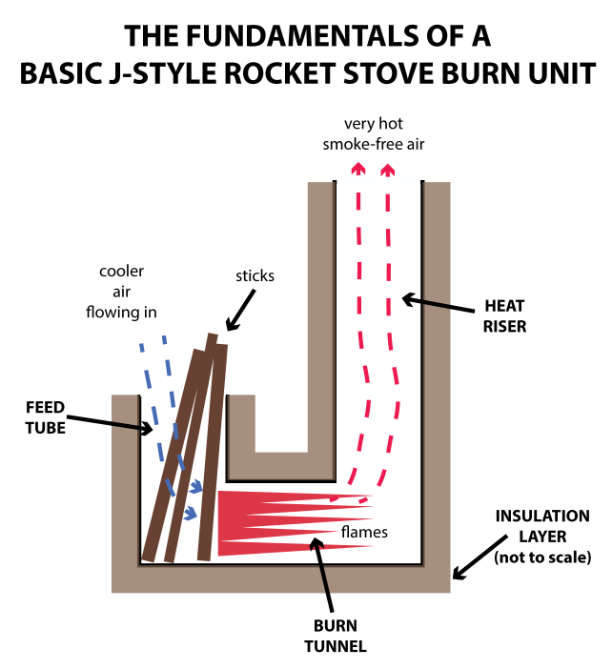
Glenn Herbert wrote: if feeding is done by the standard rule: lean the sticks forward against the riser side of the feed, not back against the room side.

![[Thumbnail for 00DF7004-5FCB-4DC8-81D6-F281B349C272.jpeg]](/t/122458/a/92922/00DF7004-5FCB-4DC8-81D6-F281B349C272.jpeg "Filename: 00DF7004-5FCB-4DC8-81D6-F281B349C272.jpeg
Description:") 1
1

| I agree. Here's the link: http://stoves2.com |