• Post Reply Bookmark Topic Watch Topic
  • New Topic
permaculture forums growies critters building homesteading energy monies kitchen purity ungarbage community wilderness fiber arts art permaculture artisans regional education skip experiences global resources cider press projects digital market permies.com pie forums private forums all forums
this forum made possible by our volunteer staff, including ...
master stewards:
  • Carla Burke
  • John F Dean
  • Nancy Reading
  • r ransom
  • Jay Angler
  • Timothy Norton
stewards:
  • paul wheaton
  • Pearl Sutton
  • Anne Miller
master gardeners:
  • Christopher Weeks
  • M Ljin
gardeners:
  • Jim Garlits
  • thomas rubino
  • William Bronson

Matt Walker continental stove build

 
Rocket Scientist
Posts: 372
151
  • Likes 8
  • Mark post as helpful
  • send pies
    Number of slices to send:
    Optional 'thank-you' note:
  • Quote
  • Report post to moderator
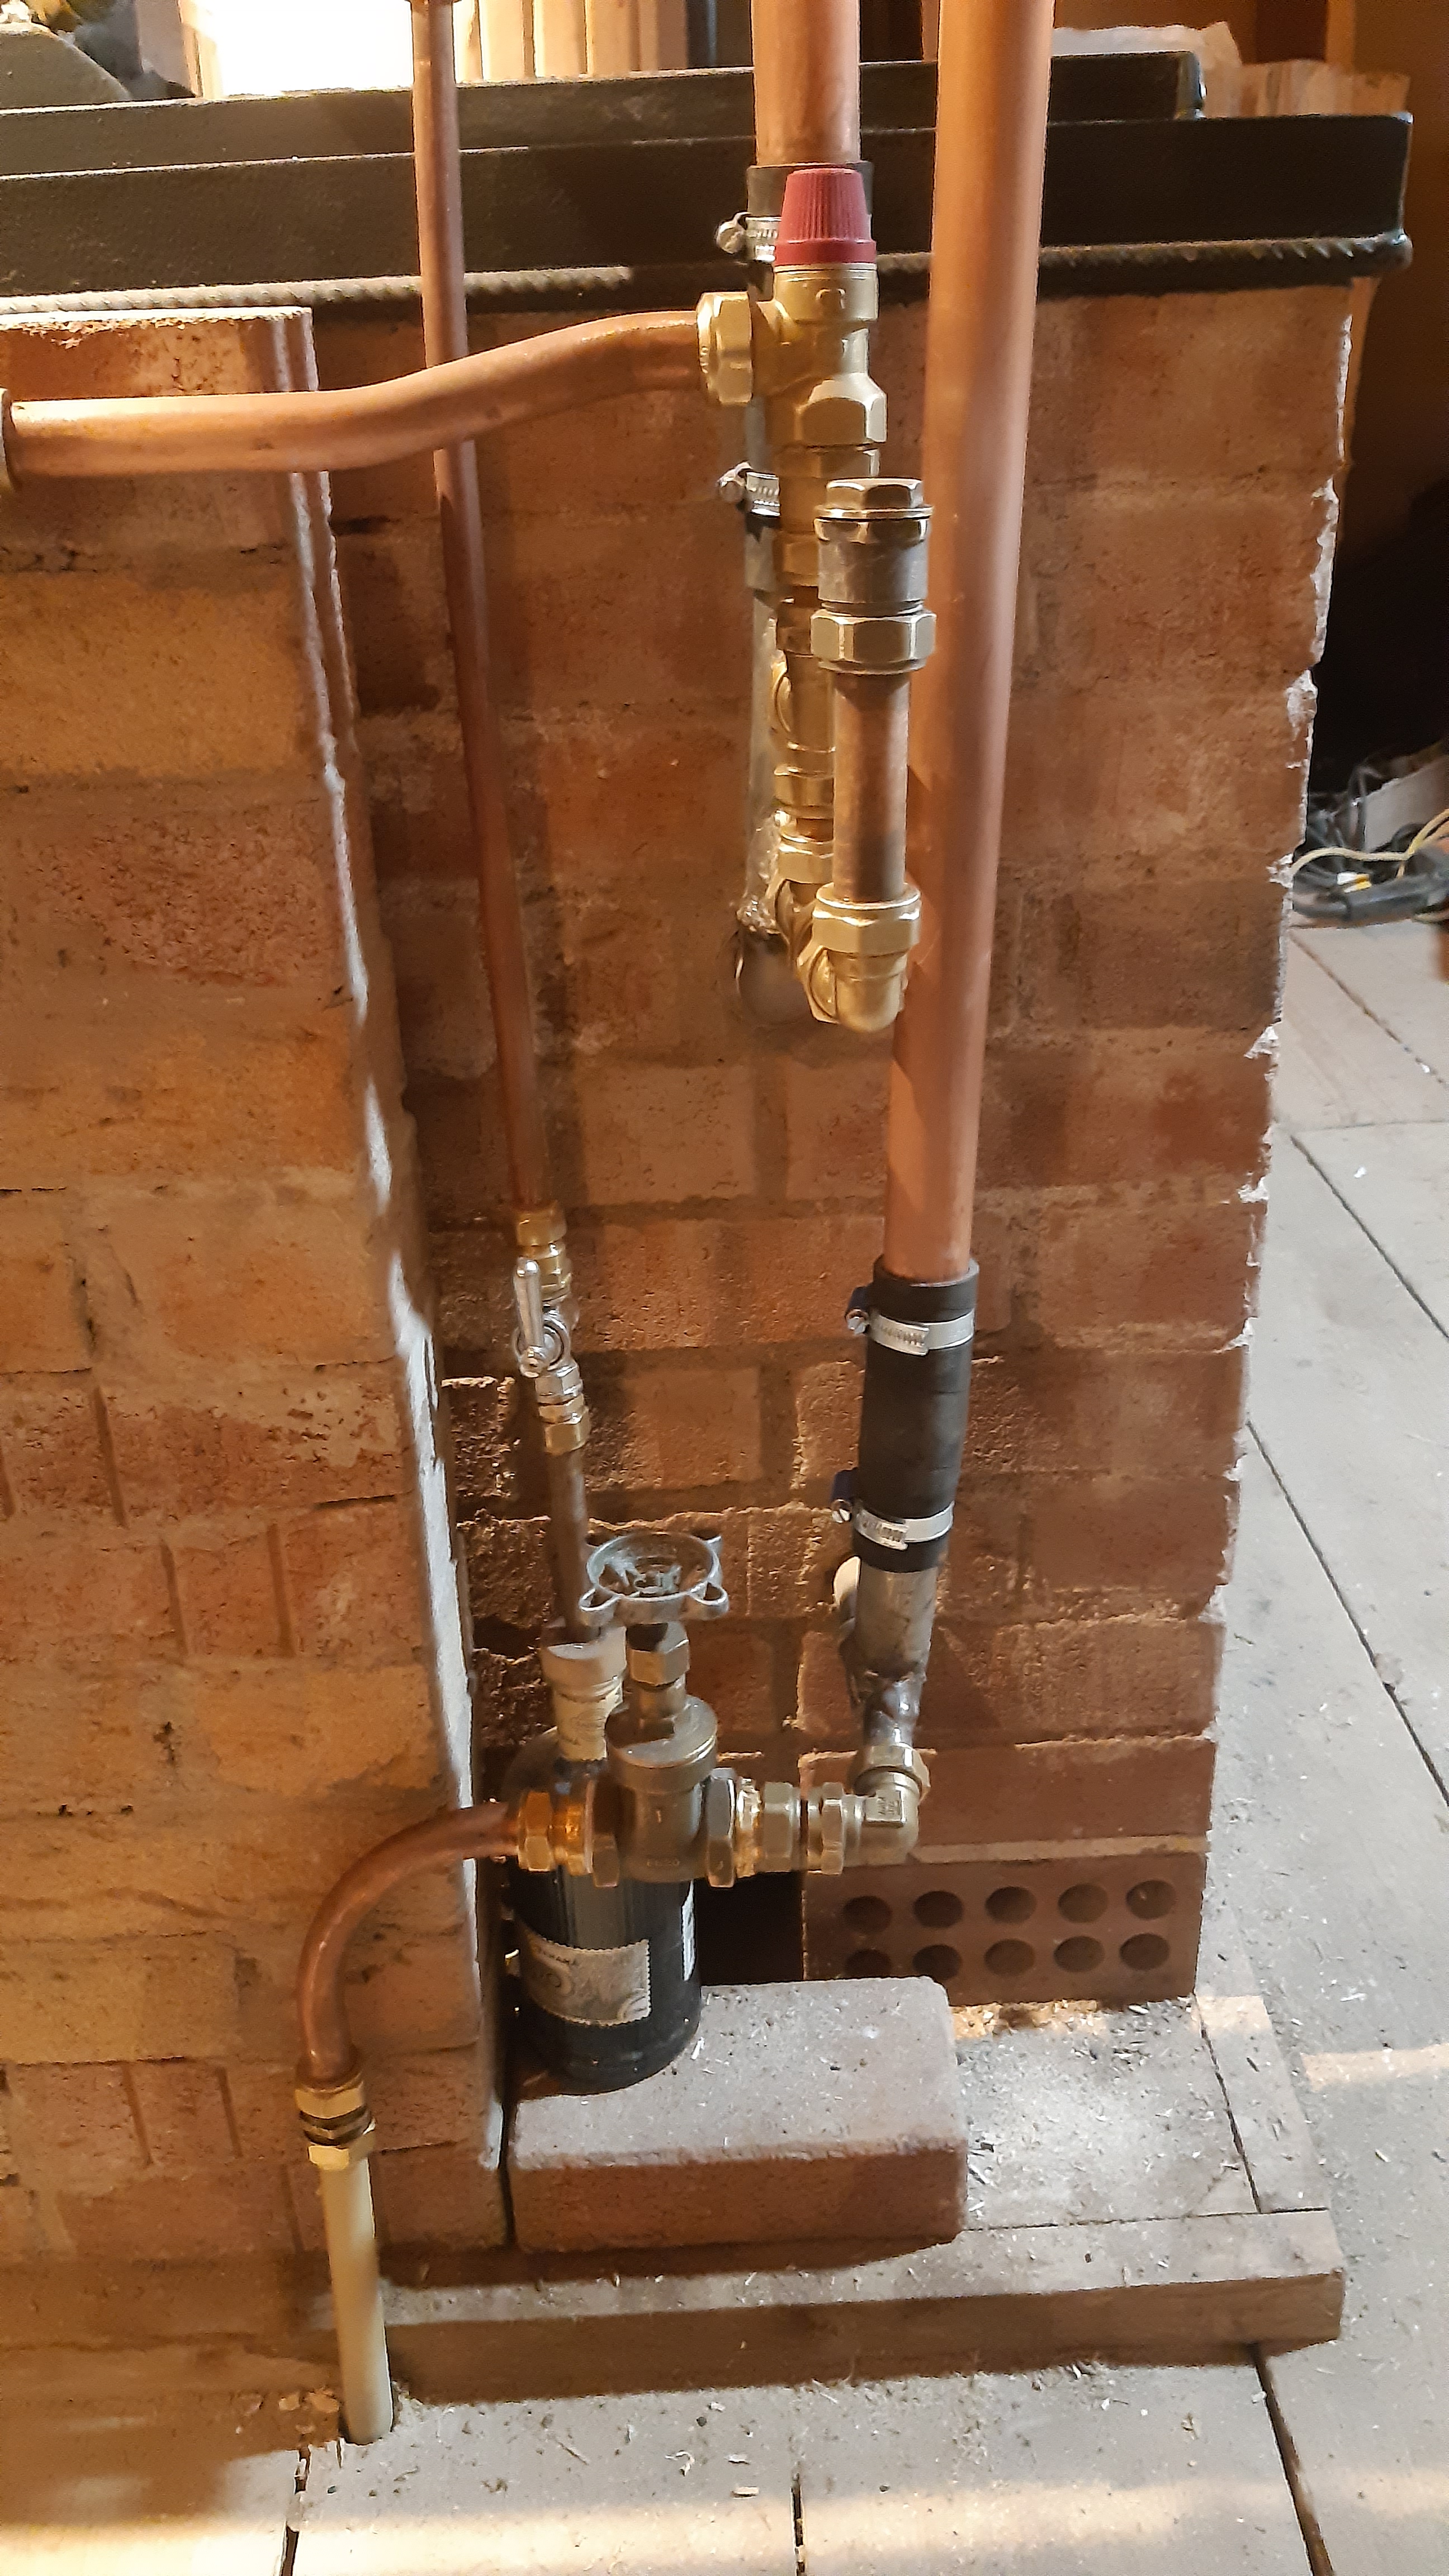
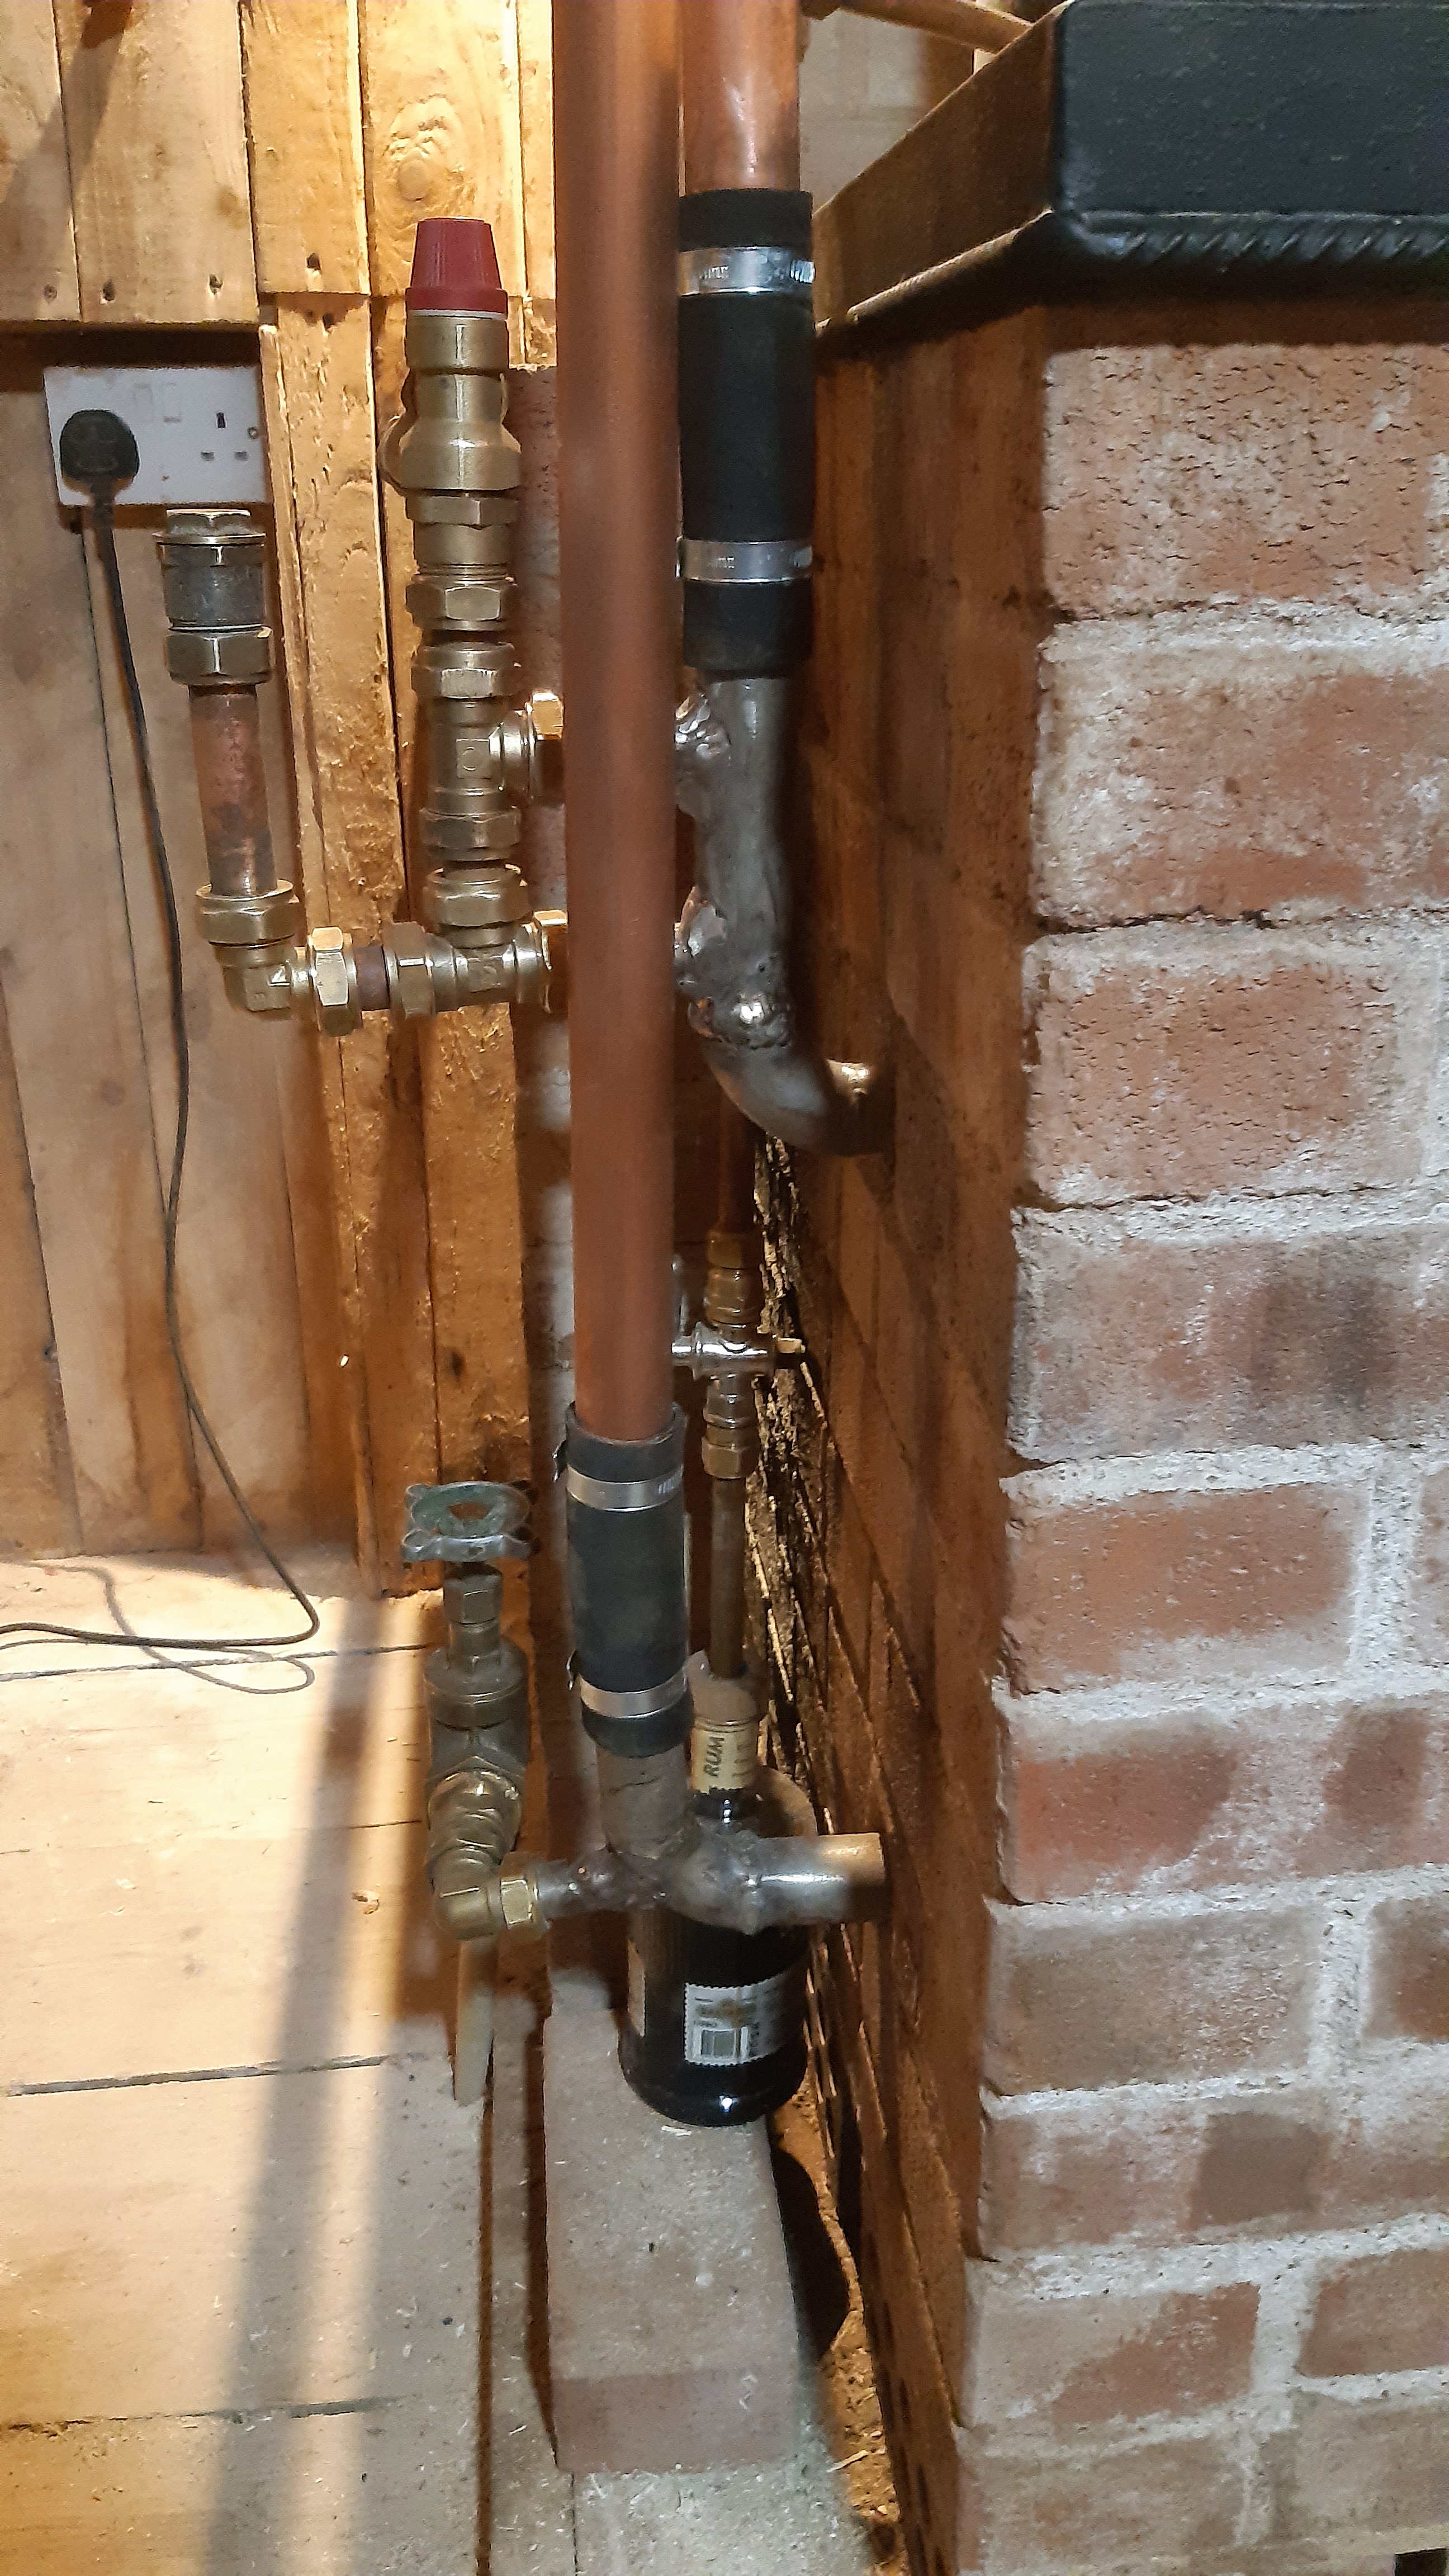
the hot water connection---top red knob is the temperature and pressure release valve --its rated at 90 C and 7 bar---too much really ---found another one rated at 85 C and 3 bar---the capped tube next to it ----will be used when i want to acid flush out the water jacket---which would require the system to be drained ----by opening the large valve at the bottom ----this drains into a pipe through the floor and exits outside into a runoff channel----the capped tube would be then opened and the flushing acid poured in ----cap back on and let it sit for awhile ----start to refill the system with some water -----start up the stove---to warm up the descaler mix ----then open lower valve and flush out the system with lots of water---the copper pipes are connected to the stainless pipes of waterjacket by truck/car radiator  hose rated at 120C and 20 psi -----as trying to find a brass connector to match the two differant OD of the pipes is not possible ----my small local hardware store just does not have the largest stock or hard to source items---and thats it for now ---hot water to fllow when the supply tank is connected and the main line in from my borehole.
20250527_003008.jpg
Temperature and pressure release valves for a rocket water heater built into a Contnental rocket stove
20250527_003039.jpg
front view of valves and pressure relief valves built into a rocket stove
 
tony uljee
Rocket Scientist
Posts: 372
151
  • Likes 8
  • Mark post as helpful
  • send pies
    Number of slices to send:
    Optional 'thank-you' note:
  • Quote
  • Report post to moderator
for Samuel , sorry did not answer a lot of what you asked , as i had not been running my stove for very long , my cooking experience on it is not much ---as it not in my main house , i have done a few experiments of boiling pots of water and keeping them warm on the stove top surfaces to try and establish the best spots or how to use the stovetop for best effect---the old cottage that the stove is in ---is still being worked on ---so lots of dust ----not good for cooking ----no water connected---plumbing is being  done ---and i need to make some concrete worktops either side of the stove---to  place the sinks in and for he taps to be positioned----asking about making the entire stove top from one piece of steel ----this would not work ---there would be too much distortion from the different levels of heat across its under surface---even if you used a steel plate of very thick cross section---perhaps 20 mm or thicker that might work ---but thats only a might ---there are fabrication methods and techniques to deal with this ---but then you are building a welded up steel stove ---look up the types of stove made by the Amish . I used a modular type build method /construction for my stove top-- to suit the size of the glass cooktop i had found---and to make best use of the granite paving slabs sizes ---these could have been steel plates cut to suit ---but i wanted the stone---the modular construction also allows the worktop to expand and move as it needs to with out distortion or warping---my stove top granite surface on the left side barely gets warm --whilest on the right side that can simmer pots of water.  My ceramic glasstop has the 4 sections , first one above the core exit goes to over 400 C within 10 mins of fire start up ---i can only read up to 400 with my meter ---the second plate area will read 380C --third one 320C , forth one reads 260C --this drops down after 30mins----will answer some more later
 
tony uljee
Rocket Scientist
Posts: 372
151
  • Likes 6
  • Mark post as helpful
  • send pies
    Number of slices to send:
    Optional 'thank-you' note:
  • Quote
  • Report post to moderator
Samuel , placement of the water heating jacket can be seen in the start of my build pictures , i did not make the unit ---was a lucky find ---i just modified/changed the water connection points to better suit my plan ----its rated for 4 or 5KW  according to the sizing ---for use in a traditional wood burning stove/range --and would be placed in the back or side of the firebox  ----plus be exposed to direct flame--- possibly in 400 to 600 C -----were as in the position in the continental stove this would be not in a direct flame and instead heated by the flue gas at a temperature of around the 200/230 C---maximum , so i am expecting it to be a slower build up of heated water---- and as my hot water tank is much smaller than the tanks needed to match a 4/5 Kw  plate water jacket----perhaps it will be a better match up ---of course a wood burner is not a constant heat source at a constant temperature---and i dont need the water to be supplied at a scalding heat ---50/55 C at most----temperature control you asked about ---well thats not a real precise option for wood burning ---and approximates can only be found by experience ----by using  my stove over a longer period---plus each stove is different and has its own quirks or tweaks to operate it.
 
Posts: 10
1
  • Likes 5
  • Mark post as helpful
  • send pies
    Number of slices to send:
    Optional 'thank-you' note:
  • Quote
  • Report post to moderator
Yes, Tony, I asked a bunch of questions at once. Sorry about that. I ended up being impressed with your system and asking too many questions.

I thought about using cast iron tops/plates instead of just one big one, maybe 2 or 3 smaller ones, since they are easy to find around here.

Well, as for the water, everything needs to be thought about and analyzed on a case-by-case basis, size of the stove, type of coil material, amount of water. I realized that there are many variables for a concrete answer.
But from what I understand, you have a bypass below the glass plate. After the heat rises, there is a passage on the left where you heat the water.
Is it used to heat the water faster? Or is it to provide air flow when you turn on the stove?

I will have to think of a project that is well adapted to what I expect from it and the materials I have access to.

Thank you very much for your attention. I look forward to more updates on your stove and hot water system. When you have more information about how everything works, and have time, make more videos of everything working. Thanks.
 
tony uljee
Rocket Scientist
Posts: 372
151
  • Likes 7
  • Mark post as helpful
  • send pies
    Number of slices to send:
    Optional 'thank-you' note:
  • Quote
  • Report post to moderator
all the Matt Walker stoves have a bypass system in the design , it exits as a short more direct path to the flue pipe --used when the fire is first started up ---very usefull when the stove is cold ---gets the fire to burn hotter/faster for the first 10 mins or so---heats up the flue pipe and the core ---gets the stove to start drawing the gasses through its channels ---then it is closed off to redirect the gasses to pass over the oven box---not over the hot water jacket-----you do not want to expose the water jacket to intense direct heat----there is a danger in trying to do this ---this object here is to safely build up heat in the hot water tank ---no need to make it boil as quick as possible----we are nt going to run a steam locomotive----if you want instant hot water ---place a pot of it over the glass were the core is exiting at over 400C  up to 600/700 C .
 
tony uljee
Rocket Scientist
Posts: 372
151
  • Likes 7
  • Mark post as helpful
  • send pies
    Number of slices to send:
    Optional 'thank-you' note:
  • Quote
  • Report post to moderator
sorry you mentioned videos ? ---i dont do those ---it takes all of my computtor skill as it is to just one finger type  replies on here-----making a video ---well thats all voodoo to me ---i would run the risk of tripping my brain switch.
 
Samuel Ri
Posts: 10
1
  • Likes 3
  • Mark post as helpful
  • send pies
    Number of slices to send:
    Optional 'thank-you' note:
  • Quote
  • Report post to moderator
It makes sense, the risk of explosion from steam must be really high. It could be photos, it's great.
 
tony uljee
Rocket Scientist
Posts: 372
151
  • Likes 9
  • Mark post as helpful
  • send pies
    Number of slices to send:
    Optional 'thank-you' note:
  • Quote
  • Report post to moderator
hope to install the oven side of the stove ---soon as some warmer dry weather returns --then i will be able to update some more running experiences of it ---till then ---heres another stove build picture ----from japan ---very nice build---and his permaculture documentry film ---Life at Kuras Hinone
kurashinone-life-at-kuras-hinone.jpeg
A Walker Continental stove in a kitchen in Japan. It is made from brick with a glass cooktop
 
pollinator
Posts: 98
Location: Suceava, Romania
11
  • Likes 4
  • Mark post as helpful
  • send pies
    Number of slices to send:
    Optional 'thank-you' note:
  • Quote
  • Report post to moderator
sorry i ask here , not sure if this is the right place .I ask about secondary air, i had different versions;
1 a tube through the bricks, entering in the middle of the bottom of the riser
2 a hallow channel at the back of the stove , which i covered , too cold air
3 a tube though the top of the fire entering in the middle of the port, seemed fine but was too thin and craked
Should I replace the tube ?make it enter further inside the venturi port ? or try experimenting with air coming through the ash tray 's front but near the door , that would go above the burning wood?
https://www.youtube.com/shorts/THGkDZXadu4 , and please tell me how to remove the shorts part pat in the url

 
tony uljee
Rocket Scientist
Posts: 372
151
  • Likes 7
  • Mark post as helpful
  • send pies
    Number of slices to send:
    Optional 'thank-you' note:
  • Quote
  • Report post to moderator
sorry i can t be much help on this , my stove build followed a set of plans from Matt Walker Stoves and these  are built very different to what you are trying out ,  i have no experience with other stove builds , i think your build is closer to the batch box style  ,perhaps advise from reading up on Peter v/d Berg s site or if you log into the Vortex type stoves from the donkey 32 site ,were they build experimental masonry stoves and its members would have tried out many more ideas ---they would have more valid experience and comments to offer, goodluck with the build.
 
tony uljee
Rocket Scientist
Posts: 372
151
  • Likes 2
  • Mark post as helpful
  • send pies
    Number of slices to send:
    Optional 'thank-you' note:
  • Quote
  • Report post to moderator
something trivial --- , i cut away a small section of the vermiculite concrete floor pad i had cast for the stove , a friend donated some off cuts of heavy black slate ,just enough to do some trim work around the stove --pics to follow ---but heres the piece ---firm enough to build the stove up on it ---but i can snap bits off it up by hand.
20251126_143139.jpg
[Thumbnail for 20251126_143139.jpg]
20251126_143147.jpg
[Thumbnail for 20251126_143147.jpg]
 
Samuel Ri
Posts: 10
1
  • Likes 4
  • Mark post as helpful
  • send pies
    Number of slices to send:
    Optional 'thank-you' note:
  • Quote
  • Report post to moderator
Hi Tony, how are you doing?

So, how is the Walker stove project coming along? Did you manage to finish it? How did it turn out? Did the water heating component work well? Tell us a bit more about it.

I have a few questions for you—and for anyone else who has built this type of masonry stove using both standard clay bricks and firebricks.

I’ve been researching which mortar to use, and I’d like to know what kind you used for your project. Did you run into any issues, like cracks or fissures?

For large Russian stoves, the recommendation is usually a standard clay-and-sand mortar; however, when firebricks are used, the recommendation is a fireclay-and-sand mortar.

The idea makes sense in principle: different materials have different rates of expansion and contraction. So, the logic is to use fireclay mortar with firebricks and standard clay mortar with standard clay bricks.
But I’d like to know how it works in practice: do you use the same mortar for the entire stove?

If I build the firebox using red bricks, which mortar would be best? The advantage of not using cement is that if the firebox doesn't last for many years, it’s easier to dismantle or replace the defective bricks.
 
tony uljee
Rocket Scientist
Posts: 372
151
  • Likes 7
  • Mark post as helpful
  • send pies
    Number of slices to send:
    Optional 'thank-you' note:
  • Quote
  • Report post to moderator
yes its finished in that i have been using it for a year or more for heating and occasional cooking, it was not situated in my main house so was only lit every 2nd or 3rd day , ---whilest i was working on the inside of the building ---but just over this past few weeks the building housing the stove has become our main house ----while i carry out a total refurbishment of our old cottage. ---the overall performance of the stove  has worked out good --the ceramic glass cooktop would leak out a few wisps of smoke---sometimes ---until i flatted and pinned down the fiberglass rope seal underneath it ---with the intense heat generated in the firebox and riserless core  these expand and contract with each firing----breaking the small contact area under the glass to the round shaped rope seal---this would not be a problem when i replace the  rope with some basalt fiber rectangular profile braided rope ----this would give a 25mm flat surface to make contact to the ceramic glass .My biggest problem has been to source very dry timber . ---my next plan is to build the oven side of the stove ---for some baking attempts ----the hot water system ----has not worked out ----but its not over yet ---lots more experimental work to be done---i have changed some parts of the first design build ---but that failed as well---only generating luke warm water even after 2 or 3 firings in one day.---- i am on my own path with this ---and will find a solution.
 
tony uljee
Rocket Scientist
Posts: 372
151
  • Likes 7
  • Mark post as helpful
  • send pies
    Number of slices to send:
    Optional 'thank-you' note:
  • Quote
  • Report post to moderator
I have had to read up a lot more on heat exchangers and the materials they are made from and so on , also had to re think my ideas i had used ---the stainless steel jacket type i have used is not best suited to this type of stove ---its designed to be placed in the firebox of a cast iron wood burning stove---to be heated by the flames /coals of the fire its self. ----this would not work in the walker stove----it gets to a much higher temp due to the firebricks used---and would be degraded a lot quicker----but more importantly ---i think it would be a heat sink effect in the firebox ---cooling it down ----causing a smokier startup burn ---creosote ,soot from an incomplete combustion---not what the stove is designed for ----possibly also increased risk of flash boiling inside the jacket when the stove does get up to temp.So i am sticking with the concept of placing the heat exchanger after the riserless core .----but to remade in copper pipe as a squared off coil shape ----to fit into the brick box shaped chamber next to the core----copper has a much higher ability for heat absorbing from hot gases coming out down stream from the fire box ----than does stainless steel .
 
Posts: 115
Location: La Bretagne
34
homeschooling solar rocket stoves
  • Likes 3
  • Mark post as helpful
  • send pies
    Number of slices to send:
    Optional 'thank-you' note:
  • Quote
  • Report post to moderator
Please let us all updated on the results of that.
 
Samuel Ri
Posts: 10
1
  • Likes 4
  • Mark post as helpful
  • send pies
    Number of slices to send:
    Optional 'thank-you' note:
  • Quote
  • Report post to moderator
It’s very important to know what works and what doesn’t. I was thinking about building a cookstove of this type in the future—likely for daily use, except during the hottest months.
However, one of the reasons I was considering this kind of stove was precisely to heat water in the winter, during those days—or sometimes weeks—without much sun.

So, it turns out the idea of ​​heating water using the stove's residual heat didn't work out properly.

Did you consider installing stainless steel or copper pipes or coils in the channel that leads from the cooking area down to the oven?
From what I gather from your reply—without seeing the actual design—that seems to be the area you're thinking about.

Or perhaps you could install stainless steel pipes further away from the flue that carries heat up to the stovetop or hotplate—specifically, in the space beneath the plate, on the side opposite where the flame rises. Theoretically, that would be a hot spot—not as hot as the combustion chamber, but hot enough to overcome stainless steel's limitations regarding heat transfer.

As for copper coils, I spoke with a seller of Canadian-style fireplaces and stoves here in my city. He told me that you should never use copper pipes or coils in the fire or in high-temperature areas near the fire, because it generates residual copper particles that end up interfering with hair chemistry and hair dyes—at least for people who dye their hair. He told me that if I didn't want to get into a fight with all the women in my house, I shouldn't use copper coils. I don't know if that's true or not, since I don't own a stove with a coil yet, but it might be something worth considering.
 
pollinator
Posts: 1116
Location: Inter Michigan-Superior Woodland Forest
222
7
transportation gear foraging trees food preservation bike building solar writing woodworking wood heat
  • Likes 6
  • Mark post as helpful
  • send pies
    Number of slices to send:
    Optional 'thank-you' note:
  • Quote
  • Report post to moderator
I would think that interfering with chemical hair dyeing was a non-issue for most Permies (or maybe a feature), but also suspect excess copper in drinking water has more troubling side effects on health. I recall a conversation with Alan Booker a couple of years ago where he warned me about a copper drinking bottle I was considering, though the details escape me...
 
You frighten me terribly. I would like to go home now. Here, take this tiny ad:
Experience months or even years of natural building and growing your own food
https://wheaton-labs.com/bootcamp
reply
    Bookmark Topic Watch Topic
  • New Topic