Hello,
What follows is about 3500 words on the planning of my batchbox. For those who can’t stomach that long of a read but are still willing to advise me, here are my burning questions:
-What is the minimum clearance between the top of a double skin bell and the ceiling?
-Is a 1950s poured slab basement floor easily able to handle the weight of an RMH? Thickness and reinforcing of slab are unknown.
-Proboards user Forsythe has recommended 60% as a minimum alumina content for firebrick used in the core. Can anyone else opine on that?
-Any recommendations for a minimum % alumina for firebricks in the top of the bell’s inner skin?
-What coating can be applied to the firebox to physically protect it from wood loading?
-Do I need an expansion joint between the core and the brick plinth upon which it sits?
-Expansion joint between clay brick and firebrick portions of inner bell wall?
-Expansion joint between the wall and roof of the inner bell skin?
-Is there a benefit to insulating between the bell skins, at least at the top of the bell where the inner skin is firebrick?
-Any good recipes for a thin mortar between firebricks? I want water soluble mortar so I can reuse the bricks.
-Any good recipes for a thick mortar between clay bricks? Again, water soluble for reusability.
-What is the safest flue pipe?
-Can I safely route the flue through a closet?
-Can I route my flue into an old (unused) 6” oven hood exhaust, right before it exits my roof?
For the past few months I have been soaking up a great deal of RMH information here on permies. I came for gardening advice and stayed for wood heating innovations.
I am a chemical engineer by education and I must admit the RMH discussions here stir up the nerdy sciency excitement I had back in middle and high school.
The biting winter wind of the Great Plains has turned my ‘wow that’s really cool’ to ‘wow I really wish I had one of these’.
In contrast to the pioneers of RMH innovation, I not an experimenter. I am a planner; my engineer job is basically construction planning. With my construction planning skills far outweighing my construction skills, I would like to spend more effort than necessary on planning. Perhaps my planning will end up as a worthy contribution to existing RMH design documentation. I am hoping to make complete set of drawings and material specifications for my build, before I even order materials, similar to how I would bid out a work project. Although the design would be to my personal specifications, I think a full set of specs and drawings would be a great starting point for a ‘standard issue’ RMH. My idea is that you could hand a modified version of my plans to a layman who just wanted efficient, safe wood heat, and he would be able to build it with minimal help from the experts.
To begin my excessive planning process, let’s just talk design. Below is my design logic to date. To anyone knowledgeable in RMHs, whether by experience or armchair theorizing: I would appreciate any criticism or suggestions.
Design goals
Effectiveness. I want the heater to do what it appears to do. I’m bothered by how typical fireplaces are more for looks than for actually warming you up.
Cool factor. I want to look at the finished heater and be amazed at its operation. I want to excitedly explain to my wife all the cool things about how it works and then for her to pretend to be interested and say, ‘that’s nice, dear’.
Practical. If we sell this house, I want the next owners to appreciate the heater. At minimum, I don’t want them to think it’s a burden and tear it out. I mean, maybe I’d tear it out anyway to recover the firebricks to build my next heater, but it’s the thought that counts.
Apparently safe. I have seen the temperature readings reported back from other folk’s heaters, and that is enough to convince me that a properly designed and built RMH is safe, even though building codes do not yet account for them. Many RMHs that are built seem to be in places without building codes or without code enforcement. I am subject to building codes, but I don’t mind following the spirit of the law rather than the letter of the law. For example, I replaced all my old two-prong outlets for three-prong -- a modification that would, by-the-letter, require an electrician and a permit. I happen to work with local code enforcers and the fire department in my job, and I know that they have bigger fish to fry than outlets. I believe they also have bigger fish to fry than RMHs built by hobbyists. However, since I work with them professionally, I need to be able to look them in the eye as a spirit-of-the-law-abiding citizen. Therefore, I need to be able to hypothetically convince our code enforcers and fire department that the heater is safe.
1. RMH location: In middle of not-yet-finished basement.
a. Must be central.
i. I want real heating; I want effectiveness. It would be a waste to put it on an exterior wall, where half of the heat goes outside.
ii. Replacing part of my insulated exterior walls with a heater would be bad for my cooling in the summer. I want to preserve the thermal envelope of my house.
b. Reasons not to be upstairs
i. Lack of free space upstairs
ii. Don’t want to cover up or the beautiful brand new maple floors
iii. Would need outside help on the structural analysis for the RMH weight
c. Reasons to be in the basement
i. Good concrete slab in the basement. Simpler structural analysis
ii. There are plans to further finish the basement for future kids living area and bedrooms. In several years, the center of gravity of our home may move downstairs a bit.
iii. Hot air rises. It’s better to place your heater low because you can move the heat up. If you have heat on the main floor, it’ll be tough to get it to the basement.
2. RMH style: First gen batchbox
a. Why you might want a J-tube
i. Simpler
ii. Cheaper
iii. More open to customization in design, fewer rules to break
b. Why I want a batchbox
i. Requires less attention to run
ii. Closed firebox. Important for the safety of our curious cat and soon-to-be-crawling baby, as well as much safer-looking to the hypothetical code enforcer.
iii. Has the design elegance that caught my attention to begin with
iv. Bricks are more aesthetically pleasing than cob. Yes, I understand that either cobs or bricks could be used on both J-tubes or batchboxes interchangeably, but many documented batchboxes are brick core and brick mass. The batchbox design seems to be optimized for brick.
v. I can honestly defend a batchbox as being a variant of a ‘masonry heater’ to an imaginary home inspector even though it may not exactly fit the ASTM E1602 definition of masonry heaters (my local code references IRC 2018 which references ASTM E1602, which I don’t have access to). I think it would be harder to defend a J-tube as a masonry heater.
c. Why a first gen batchbox instead of the newer variations?
i. First gen is a more proven design with more documentation
ii. The new variations seem to have been designed to solve problems that I don’t have. Ex. Shorty core designed for limited vertical space (I have plenty of vertical space)
3. Batchbox sizing
a. 6” size. I have a unique method of sizing that I have not seen anywhere else…
i. The spreadsheet from
batchrocket.eu says a 6” core gives off 3.4kW of heat on two batches per day. For reference, my furnace is rated for 58,000 BTU/h of heat output, which is 17kW. Yikes, seems like 3.4kW isn’t very much.
ii. The spreadsheet also gives equations for estimating heat loss… I have something even better: my utility bill! Why estimate my heating usage, when I can just measure it? This year, my highest gas bill (I have electric stove, electric water heater, and gas furnace; so the gas bill is 100% heating) was in February. It was 106 meter counts. Residential gas meters are set to 100 scf/count and the gas I get is 1070btu/scf (yours may vary from 900 to 1100 btu/scf). Therefore, I used 106*100*1070 BTU = 11.34 million BTU in February. February is 28*24 hours. 11.34 mmBTU / (28*24) = 16878 BTU/h = 4.95 kW. Now it seems like the 3.4 kW of a 6” batchbox could be a meaningful contribution to my heating! For reference, my house is about 1000 sq ft ground floor, 1000 sq ft basement. Basement exterior is uninsulated CMU walls, and the rest is insulated 2x4 stick. Located in central Nebraska.
b. Why not size up to a 7” batchbox so it can output enough kW to cover all my heating?
i. Because of the layout of my house, I don’t expect to replace my central heating. Specifically, the master bedroom is quite far from the proposed heater location. I’m alright with it being a little colder in the bedroom (my wife and baby daughter are heaters in their own right) but the bedroom has north-facing windows of dubious thermal performance. While I could size up the batchbox to cover the whole heating load, I don’t believe it would adequately distribute the heat to the whole house.
ii. I appreciate the thermostat-based, fast action of my gas furnace. I think a great hybrid system is to baseload my heating with the batchbox, while still allowing the furnace to intelligently maintain temperatures and respond to quick changes.
iii. In terms of construction, smaller is better. Less material, less cost, less space, less labor.
4. Batchbox features
a. Double skin bell: yes
i. Safer temperatures
ii. If using IRC code for masonry heaters, a double skin wall (8 nominal inches of solid masonry) allows a 4-in clearance to combustibles, compared to the 36-in clearance to combustibles that is ordinarily required for solid-fuel-burners (IRC2018 R1002.5, exception 1).
iii. Prettier. I plan to use firebrick for the top of the inner skin of the bell. By having a second skin, the visible portion of the heater will have a uniform brick type.
b. Bypass? Leaning towards no…
i. The prairie wind always blows. There are no large trees or tall buildings near my house. I am thinking I’ll have a really good natural draft and not need a bypass.
ii. Simpler construction
iii. Arguably safer, from a fire perspective? One of the fire hazards of wood heat is the flue going through my house. The bell is a physical obstacle that limits the gas going up the flue to something like 200F. The presence of a bypass is an opportunity for user error to leave it open, thus bypassing the bell, allowing something like 500F+ gas to go up the flue.
c. Insulation underneath? Leaning towards no…
i. Insulation could be good because I don’t know if my concrete slab is insulated below. It doesn’t seem insulated, so I will lose a lot of heat down into the ground.
ii. But I’m thinking that of the heat that goes from heater to slab, not all of it will be lost. Much of it will warm the slab and floor, which could be nice.
iii. The heater pulling up cold from the ground could be kind of nice in the summer. Might need to insulate the heater (throw a blanket over it) during the shoulder months when not running, tho.
iv. And since we are already 6 feet below grade and in the center of the house, the ground shouldn’t be very cold, so it shouldn’t suck up too much heat, right?
v. And with such a tall heater, I should have really strong stratification in the bell, right? The heat in the bell will concentrate on top, and the contents at the bottom of the bell won’t be that hot. So not too much heat will be lost to the slab.
d. Bell size
i. The bell size will follow the ISA requirements of batchrocket.eu. Tried and true.
ii. The shape of the bell will be square. Symmetry is pleasing to the eye. Symmetry is easier to build.
iii. The bell will be as tall as I think I can get away with.
1. This way it takes up the minimal amount of floor space.
2. Also, spanning the bell roof is a technical problem made easier by having a shorter span.
e. Limits to bell height
i. Physical: my basement ceiling is quite low, at 84” above top of slab. Any recommendations on a minimum clearance between top of heater and ceiling? I suppose it will depend on how the roof of the bell is designed. I’m not worried about warming up the ceiling, as I want the upstairs to get heat too. I want to know the minimum from a safety perspective.
ii. Fitting the core: the bell must be wide enough to fit the core plus enough space for the contents of the bell to slip past the core on its way to the flue.
iii. Weight: having a taller heater (at constant ISA) concentrates more mass on a smaller footprint. Some napkin math: a wall of bricks (110 lb/ft3 density) from floor to ceiling (7ft high) weighs 770 pounds per square foot = 5.34psi. A google search suggests that 2500psi is the minimum strength that basement slabs have historically been poured to.
1. The 2500psi rating only applies to point compressive strength. If, for example, there is a void under the slab where my heater is, then I will be applying a tension load on the slab, for which it is not rated. How likely is it that there is a void under the slab in the middle of my basement? It's a 1950s poured slab of unknown thickness capable of holding the weight?
iv. Heat transfer. Peter’s ISA guidelines are effective at aligning the heat output of the wood to the heat intake of the bell in such a way that the flue gas exits at the ideal temperature. The ISA guidelines have proven effective, which is great because it is not feasible to calculate the heat transfer of the bell. However, the ISA is still just a proxy for heat transfer, right? So, if you changed the heat transfer of the bell, even while maintaining the ISA, you might run into problems. Few people do run into problems with the correct ISA, because ISA is the largest factor in heat transfer. But I wonder if by having a very tall bell, the stratification effects may be amplified, potentially to the point of affecting the heat transfer? I’ll stick to the published ISA guidelines, but it’s an interesting thought experiment.
f. Flue thermometer. For the purposes of proving the safety of my flue pipe to a hypothetical fire department, I’d like to place a permanent thermometer where the flue exits the bell. Preferably an analog one so I never have to change the batteries. Also acceptable would be a permanent thermowell so that I can check the flue temp when I want.
5. Material specs
a. The goal here is to maximize longevity. I am not a tinkerer, so I want the design to work with minimal maintenance and no rebuilds for as long as possible. Longevity is important for my design goals of not-being-a-burden and safety.
b. Core:
i. 60% or more alumina content hard firebricks. According to
this proboards post by the user Forsythe, temperature rating is not the limiting factor of firebrick longevity. The limiting factor is resistance to chemical attacks from ash. Alumina content is the important factor in firebrick longevity.
1. From the proboards post: “60% Al2O3 is probably the *minimum* needed for the hottest zones exposed to the most ash, like the port, firebox walls, and transitional area to the secondary burn chamber. 70-80% Alumina is what I would recommend if you can find and afford it.” I haven’t yet priced any firebricks, so I don’t know if I can afford it. Meanwhile, can any rocket scientists corroborate these percentages as being more than Forsythe’s best guess?
ii. All interior faces of the riser and port, will be coated with zircon to protect from ash and contain heat.
iii. Interior face of firebox will need a coating to protect it from the physical wear of wood loading. Any thoughts on what coating to use? As a default I would probably use the same zircon coating as for the riser.
iv. Minimal thickness joints. Water soluble mortar. Any recipes for thin-joint, high-heat mortar? I suppose it should have high alumina content to match the bricks. Water solubility is important so that the firebricks can be removed and reused.
v. Firebox roof to be made of firebricks or tiles that are big enough to span the roof. For example, BNZ Materials advertises insulating firebrick in
'Zelie Jumbo Series', which has sizes up to 24”x9”x3”.
1. There are many documented fireboxes that use 9x4 firebrick for the roof. Since the bricks are too small to span it, they are supported by angle iron and superwool setups. The setups seem to be effective and have no apparent corrosion issues. However, I still want to minimize the use of metal because I lack metal working skills and a couple big masonry pieces are simpler construction than several small masonry pieces, supported by several angle irons, which in turn must be protected from heat and thermal expansion. Maybe the high price of larger-than-standard firebricks will change my mind on this.
2. Is the firebox roof also subject to the same degree of chemical attack as the rest of the core? Or do we expect that we could get away with less alumina content here because it will have little ash exposure? This could be an important area of cost cutting if using the expensive big firebricks.
vi. Secondary air tube: Quick change secondary air tube from Montana Masonry Heaters. RA253 stub also from Montana Masonry Heaters.
vii. Core support: The core will not sit on the concrete slab, but will sit on a plinth made of standard solid clay brick.
1. Do I need an expansion joint between the core and the plinth it sits on?
viii. Core insulation: Core wrapped in superwool insulation.
1. Probably like ¼ thickness or whatever is available
2. Held tight to the core by… what? Hardware cloth? Chicken wire? Baling wire? Should the metal be galvanized or epoxy coated or what? Are the temps here high enough for this to matter?
c. Bell interior skin
i. Wall below top of riser: whatever solid clay bricks I can get locally. Mortar will be water soluble clay, for ease of rebuild and repair.
1. Standard US nominal size 8”x4”x2.25”. Standard US joint thickness of 3/8”.
2. Anyone have a good recipe for water soluble clay mortar?
ii. Wall above top of riser: Firebrick with thin joint.
1. Any recommendations for minimum alumina%? Stick with 60%?
2. Firebricks will be 9”x4”x2.5” true size.
3. Could I stack the firebricks on edge to reduce the quantity needed?
4. Is there a benefit to insulating between the two skins in this higher heat zone?
iii. Brick to Firebrick expansion joint.
1.
Here Scott Weinberg uses a firewool expansion joint between the brick and firebrick.
Here Thomas Rubino does not use an expansion joint. Is an expansion joint here necessary?
iv. Roof of interior skin: firebricks or tiles large enough to span the bell.
1. See previous reasons for this is as opposed to angle iron assembly.
2. Would I need an expansion joint between the walls and the roof bricks/tiles?
3. Should there be insulation between the two layers of roof? Probably, since I expect to use angle iron for the outer skin roof.
d. Bell exterior skin
i. Standard nominal 8”x4”x2.25” solid clay bricks. 3/8” joint thickness. Mortar will be water soluble for repairability.
ii. Roof of exterior skin will be standard size clay bricks, supported by spanning angle irons.
1. Here, I don’t mind using angle irons as this assembly is naturally protected from the heat, especially if I already insulate with superwool between the two roofs.
e. Door
i.
The Montana Masonry Heater instruction book for door fabrication is on my Christmas wishlist.
ii. I know nothing of the expansion joints, seals, and structural supports involved in mounting a door. Perhaps the book will cover that? If not, I’d appreciate any advice.
f. Flue pipe
i. Not sure on a material spec for this yet. What is the safest flue pipe? I assume it would be some kind of insulated pipe?
ii. How do you make the joint between the bell and the flue pipe? I suppose it depends on the flue material.
6. Flue pipe routing.
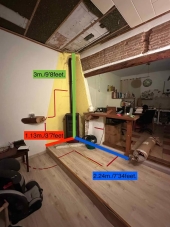
a. The selected location of the heater is next to a bathroom closet in the basement, which itself is directly under a hallway closet on the main floor. I’d happily sacrifice space in both closets to route the flue in a way that is hidden from sight. Sketch attached.
i. IRC has very strict requirements for flue clearance (IRC Section M1306). A batchbox’s high core temp and low flue temp probably render the strictness unnecessary.
ii. Is it safe to route an insulated flue through closets? Will the heat build up in the closets since the space is unventilated?
iii. The hallway closet currently has wood shelves which are in use. I would want to keep the function of the shelves if possible. For fire safety purposes, would I need a clearance between flue pipe and wood shelves? Should the wood shelves be removed altogether? If so, would it be fine to replace them with non-combustible shelves? Would it then be safe to store combustible things like blankets in that closet?
iv. According to the laws of thermodynamics, because the flue gas is limited to about 200F, it will be incapable of burning or lighting any wood, paper, or cloth. What other ways could it be dangerous to route a flue through the closet?
b. There is an old, non-functioning oven hood that exhausts out the roof. I want to use this roof penetration, so I don’t make a roofing project out of it. The exhaust piping in my attic is 6” diameter galvanized sheet. I have not been up to the roof to see how the exhaust terminates. When I do go up and look, what should I be looking for? Is an oven hood exhaust termination suitable for my purposes, or should I expect to change it out?
c. There is a total of 23ft travelled vertically and 9ft travelled horizontally from anticipated heater location to roof penetration. Is that too far? Would it help to use only 45deg elbows instead of 90deg elbows?


-A.png)

 6
6


![[Thumbnail for Flue-route-sketch.png]](/t/365686/a/279929/Flue-route-sketch.png "Filename: Flue-route-sketch.png
Description:")


