gift
Companion Planting Guide by World Permaculture Association
will be released to subscribers in: soon!
  • Post Reply Bookmark Topic Watch Topic
  • New Topic
permaculture forums growies critters building homesteading energy monies kitchen purity ungarbage community wilderness fiber arts art permaculture artisans regional education skip experiences global resources cider press projects digital market permies.com pie forums private forums all forums
this forum made possible by our volunteer staff, including ...
master stewards:
  • Nancy Reading
  • Carla Burke
  • r ranson
  • John F Dean
  • paul wheaton
  • Pearl Sutton
stewards:
  • Jay Angler
  • Liv Smith
  • Leigh Tate
master gardeners:
  • Christopher Weeks
  • Timothy Norton
gardeners:
  • thomas rubino
  • Jeremy VanGelder
  • Maieshe Ljin

Needing Feedback on design for a sidewind 8'' batchbox with 2 bells

 
Posts: 21
2
  • Mark post as helpful
  • send pies
    Number of slices to send:
    Optional 'thank-you' note:
  • Quote
  • Report post to moderator
Hello community,
I have already posted this here: http://donkey32.proboards.com/thread/3384/feedback-design-sidewind-batchbox-bells
but didn't get much feedback.
This is why I am posting it here also and hope to get more feedback.

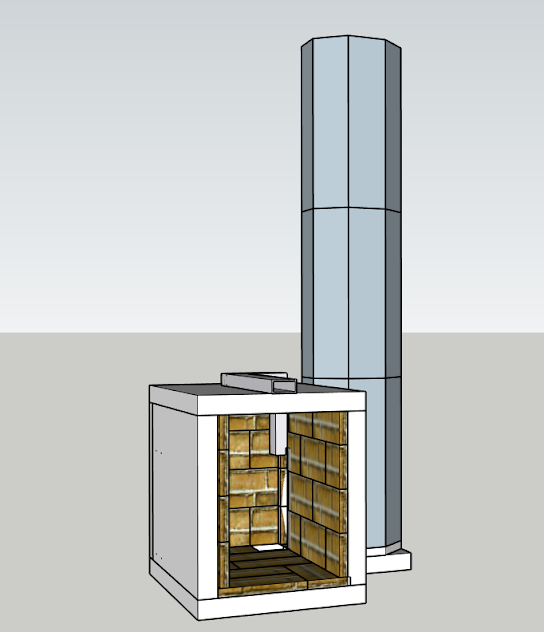
I am new to the batchbox and would like to build an 200mm system with two bells, one inside the house and one outside. Connection of both will be done through a 300mm hole in the wall. A 200mm Pipe surrounded with 50mm ceramic fibre blanket insulation will go through that hole. The wall is a strawbale lime plastered wall. This is why I am using 50mm thick fibre blanket insulation.
The back of both bells will be against the wall with a 50mm ceramic fibre blanket in between.

I have built the box out of 50mm ceramic fibre boards. The box will be lined inside (bottom, left and right) with 25mm fire bricks and the internal dimensions of the box will match that of an 200mm system as specified by Peter.
The heat riser will be octagonal and also built out of 50mm ceramic fibre boards. This will seat on 75mm of ceramic fibre board so as to be in line with the inside of the fire box.
The bells will be built out of clay bricks, 230mmx115mmx75mm (from a dismantled chimney), not firebricks as they will not be in direct contact with the fire.

Questions I have:
- What can I use to cap the top of the inside barrel? I was thinking about using 6mm steel plate to have immediate heat release.
- The bottom of the box will be 150mm from the floor seating on a steel frame. The top of the heat riser will be at 1665mm (150+50+25+1440). With the bell being 2200mm high, that will give me a 535mm clearance to the top of the steel plate. That way I hope to avoid having the steel plate exposed to too higher temperatures. Does that make sense or should I raise the bottom of the box by 235mm to have 300mm between the top of the heat riser and the steel plate cap?
- What temperatures can I expect at the transition between the two bells and will the 50mm fibre blanket around the pipe connecting both bells and between the back wall of the bell and the house wall be enough not to affect the straw bale wall? The straw bale wall and the wall penetration have a 30mm lime plaster on top of it.
- The floor is a concrete floor with ceramic tiles. Do I need to add an insulation layer on the floor or will the temperature be low enough as to not affect the tiles and the concrete below?
- I will be adding a clean out opening at the bottom right back of the inside bell and bottom right of the structure supporting the chimney. Is that enough?

Internal Dimensions
Inside bell: width=970mm, height=2200mm, depth=590mm. ISA = 7.4sqm
Outside bell: width=670mm, height=600mm, depth=370mm. ISA = 1.5sqm

I have attached some pictures of the design with some measurements and I am looking for your feedback. All the dimensions on the images are external dimensions
Pictures available here: https://drive.google.com/open?id=1TTte8ubv0mXUnUykzTdTiDUk3rx4VqcT

I have already got suggestion regarding adding a bypass hole up in the first bell directly into the chimney to avoid problems with cold starts.

But instead of a second hole in the wall I would rather just use the clean out opening near the chimney bottom to get the draw started by burning a piece of paper there? I have been advised that this could not work very well.
The big bell is in the living room. The small bell is in an enclosed outside area. We could call it greenhouse as well
I was looking to get enough heat so that we can seat outside comfortably in the winter. It does not get really cold here (Kerikeri, NZ) in the winter at night, lowest is around 6deg celcius outside at night. During the day around 14 deg celcius. But I guess because of the greenhouse effect and the massive outside lime plastered wall that is heated the day, we should get around 12deg celcius inside the greenhouse at night without heating.
I am happy if we can get this up to 18 deg celcius with the second bell.
The room is about 30sqm in total.

Here is videos of my first burn:

Heat riser:


Firebox:


I haven't run it with full load yet.
I intend to run some more tests to make sure that the firebox and heat riser are all air tight.
What should I look for to ensure that the whole system is properly working? I do not have all the tests instruments that Peter has.

Will it be enough to measure how hot it gets at the top of the heat riser?

I know those are lots of questions, so please feel free to answer even it is only one question.

I m looking forward for your feedback.
 
rocket scientist
Posts: 6322
Location: latitude 47 N.W. montana zone 6A
3199
cat pig rocket stoves
  • Likes 1
  • Mark post as helpful
  • send pies
    Number of slices to send:
    Optional 'thank-you' note:
  • Quote
  • Report post to moderator
Hi Nono; Welcome to permies!
Very nice looking build you have there!
I have built several J tubes but have not built a batch box as of yet.  I will try to answer a few of your questions. All are just my opinion.
#1)  I would increase your top gap to at least 300 mm, possibly more as it gets very hot under that riser.
#2) a 2"(50 mm) thick ceramic fiber blanket should provide plenty of protection for your bale wall....
#3)I would think your floor would, with ceramic tile and concrete would be fine. Although under your core could get over heated, was your batch box bottom ceramic fiber board ?
That is all I can try to answer for you Nono,  perhaps an experienced batch box builder may have better answers for you.
 
Nono Junang
Posts: 21
2
  • Likes 1
  • Mark post as helpful
  • send pies
    Number of slices to send:
    Optional 'thank-you' note:
  • Quote
  • Report post to moderator
Thanks thomas rubino!

#1) The top gap is planed to be 535mm from the heat riser. So that would align with what you've suggested. In addition I think I will fix around 25mm of ceramic fibre blanket on the steel plate cap in the area just above the heat riser, maybe 400mmx400mm to minimize heat impact on the steel plate.
#3) Yes the batchbox bottom is also 50mm ceramic fibre board as on the picture below. In addition the firebox will be 160mm away from the floor on a steel stand


I will update with pictures and videos as I make progress.

 
Nono Junang
Posts: 21
2
  • Mark post as helpful
  • send pies
    Number of slices to send:
    Optional 'thank-you' note:
  • Quote
  • Report post to moderator
I have uploaded additional pictures of my progress here: https://drive.google.com/drive/folders/1TTte8ubv0mXUnUykzTdTiDUk3rx4VqcT?usp=drive_open
I have simplified the whole design. No more opening at the back of the wall to a second bell. Instead I have kept the big bell and at the bottom left (view from front) I have an opening going into a second box of bricks and up to the chimney, currently missing.
The second box of bricks is not a bell but rather a channel flowing like a snake (not straight) with opening going right / left / right.
I have made this to increase the path of the exhaust so that it gives even more energy to the bricks. The height of that channel is 1.7m

I plan to cap the top of the first bell with a plate of stainless steel 1.5mm thick. I would also like to make a 200mmx200mm opening on that plate just on top of the heat riser and place a glass there. In addition I would like to have a mirror on the ceiling right on top of that glass so that I can have a view of what is happening inside the heat riser from the top.

Please let me know what are your thoughts
 
pollinator
Posts: 637
Location: Wellington, New Zealand
15
  • Mark post as helpful
  • send pies
    Number of slices to send:
    Optional 'thank-you' note:
  • Quote
  • Report post to moderator
Has the Far North District Council required any particular documentation from you for this build?
 
Nono Junang
Posts: 21
2
  • Mark post as helpful
  • send pies
    Number of slices to send:
    Optional 'thank-you' note:
  • Quote
  • Report post to moderator

Graham Chiu wrote:Has the Far North District Council required any particular documentation from you for this build?


Went there to talk about the system, but could not find someone who understands what I am planing to build. Best bet would have been to find an engineer that would stamp it, but then that would just drive the costs.
So I decided to build it and document each step, test and refine it to ensure that it meets the National Environmental Standards for Air Quality and then take care of the paper work later with all my test results and documentation.
The bricks are all mortared with lime mortar, so easy to dismantle and tweak.

Done few tests outside and could measure up to 943deg (until I got burned) at the bottom of the heat riser. And I was about 1.7m away from the bottom. So I guess much hotter down there.
Check here:  


Thanks for any feedback regarding the build.
 
gardener
Posts: 3471
Location: Southern alps, on the French side of the french /italian border 5000ft elevation
194
  • Likes 2
  • Mark post as helpful
  • send pies
    Number of slices to send:
    Optional 'thank-you' note:
  • Quote
  • Report post to moderator
Nono. To film the insides of the heat riser without burning myself, i use a mirror, angled at 45° Sometimes i have to raise it quite a bit to avoid the  steaming. But it's far safer than using the camera directly.

Like this for example.

 
gardener
Posts: 1054
Location: +52° 1' 47.40", +4° 22' 57.80"
447
woodworking rocket stoves wood heat
  • Mark post as helpful
  • send pies
    Number of slices to send:
    Optional 'thank-you' note:
  • Quote
  • Report post to moderator

Nono Junang wrote:The second box of bricks is not a bell but rather a channel flowing like a snake (not straight) with opening going right / left / right.
I have made this to increase the path of the exhaust so that it gives even more energy to the bricks. The height of that channel is 1.7m.


What you did is making the gas path longer, this is what the Austrians do. Just to let you know batch boxes are particular picky about friction in the smoke path, that's why I always advocate bell constructions cause they are virtually frictionless.

Nono Junang wrote:I plan to cap the top of the first bell with a plate of stainless steel 1.5mm thick. I would also like to make a 200mmx200mm opening on that plate just on top of the heat riser and place a glass there. In addition I would like to have a mirror on the ceiling right on top of that glass so that I can have a view of what is happening inside the heat riser from the top.


A steel plate of 1.5 mm thick will warp badly at that location. Think of 15 mm thick and possibly a cross welded underneath to make it more rigid.
That glass will stain with soot during the start of the burn, and will turn to white when the temperature goes up. But in my experience this isn't worth the effort, you won't see anything after a few burns.
 
Nono Junang
Posts: 21
2
  • Mark post as helpful
  • send pies
    Number of slices to send:
    Optional 'thank-you' note:
  • Quote
  • Report post to moderator
Thanks Peter for your feedback. I originally planed to have 2 bells in another configuration. But because I found it too complex to open the wall I changed that. And inside I am limited by the width of the wall so I could not build a proper second bell there.
The second brick box has 4 horizontal chambers.
The first horizontal chamber on that path has about the same CSA as the flue. The second one is about 3 times the CSA, the third one is 2 times and the last one where the flue will seat on top is same as CSA. There is no rationale behind it but I thought making the chambers a bit higher would slow down the gases like in a bell.
I fired some paper in the box directly at the port and had a bit of smokeback for a few seconds but after that I could have a draw even without chimney. So can't wait to see how it is going to perform when the chimney is added.
If not I will have to think about something else.

15mm steel would be quite expensive here in NZ and also quite heavy to put and remove. Any other alternatives? Would that work if I add some reinforcements to the 1.5mm stainless steel plate instead?
I have seen on one of your videos that you caped the top with angle steel and bricks. But I would like to be able to remove the top easily.
 
Graham Chiu
pollinator
Posts: 637
Location: Wellington, New Zealand
15
  • Likes 1
  • Mark post as helpful
  • send pies
    Number of slices to send:
    Optional 'thank-you' note:
  • Quote
  • Report post to moderator

Nono Junang wrote:

Graham Chiu wrote:Has the Far North District Council required any particular documentation from you for this build?


Went there to talk about the system, but could not find someone who understands what I am planing to build. Best bet would have been to find an engineer that would stamp it, but then that would just drive the costs.
So I decided to build it and document each step, test and refine it to ensure that it meets the National Environmental Standards for Air Quality and then take care of the paper work later with all my test results and documentation.
The bricks are all mortared with lime mortar, so easy to dismantle and tweak.


Well, I had a wood burner installed recently and this was from a major manufacturer.  I had to do the building consent myself and it's a painful procedure even with all the manufacturer's documentation.  You need to look at the consent forms to know what you have to be able to document, and I'd be surprised if the Council don't require that an engineer goes over your design, at your cost.

But in particular, you have this obstacle to overcome

Confirmation the appliance is approved for use under the National Environments Standards AS/NZS 4013, AS/NZ4012 - refer to the Ministry for the Environment.


https://www.fndc.govt.nz/services/building-consents-and-information/Guidance-Notes-for-building-in-the-Far-North/solid-fuel-appliances

I'm not sure how you propose to get your RMH approved for use.  Better to find out now than later.
 
Nono Junang
Posts: 21
2
  • Mark post as helpful
  • send pies
    Number of slices to send:
    Optional 'thank-you' note:
  • Quote
  • Report post to moderator

Graham Chiu wrote:

Nono Junang wrote:

Graham Chiu wrote:Has the Far North District Council required any particular documentation from you for this build?


Went there to talk about the system, but could not find someone who understands what I am planing to build. Best bet would have been to find an engineer that would stamp it, but then that would just drive the costs.
So I decided to build it and document each step, test and refine it to ensure that it meets the National Environmental Standards for Air Quality and then take care of the paper work later with all my test results and documentation.
The bricks are all mortared with lime mortar, so easy to dismantle and tweak.


Well, I had a wood burner installed recently and this was from a major manufacturer.  I had to do the building consent myself and it's a painful procedure even with all the manufacturer's documentation.  You need to look at the consent forms to know what you have to be able to document, and I'd be surprised if the Council don't require that an engineer goes over your design, at your cost.

But in particular, you have this obstacle to overcome

Confirmation the appliance is approved for use under the National Environments Standards AS/NZS 4013, AS/NZ4012 - refer to the Ministry for the Environment.


https://www.fndc.govt.nz/services/building-consents-and-information/Guidance-Notes-for-building-in-the-Far-North/solid-fuel-appliances

I'm not sure how you propose to get your RMH approved for use.  Better to find out now than later.


We live in a rural setting, so when time comes I plan to approach it as if it was an open fireplace. We'll see.
I think it would be easier to approach council with a working system they can see rather than something on paper. And yes I know the pitfall with having to have everything certified by an engineer. We built a strawbale house and lots of our money unfortunately went into engineer fees. It is a pity that even for common sense stuff you have to go an see an engineer.
 
Graham Chiu
pollinator
Posts: 637
Location: Wellington, New Zealand
15
  • Mark post as helpful
  • send pies
    Number of slices to send:
    Optional 'thank-you' note:
  • Quote
  • Report post to moderator

Nono Junang wrote:
I think it would be easier to approach council with a working system they can see rather than something on paper. And yes I know the pitfall with having to have everything certified by an engineer. We built a strawbale house and lots of our money unfortunately went into engineer fees. It is a pity that even for common sense stuff you have to go an see an engineer.


Well, good luck on that.  If you do manage to get it certified then it would pave the way for other RMHs in NZ.  The question was asked before if anyone had succeeded in getting a RMH installed in NZ and so far there has been no one coming forward to say that they had.
 
Graham Chiu
pollinator
Posts: 637
Location: Wellington, New Zealand
15
  • Mark post as helpful
  • send pies
    Number of slices to send:
    Optional 'thank-you' note:
  • Quote
  • Report post to moderator
I may have a solution for you. If you configure your rocket mass heater with an oven, then you appear to be exempted from the clean air regulations. That is you don't need for your stove to be certified.

http://www.homewoodstoves.co.nz/stove-resources/environmental-standards-for-wood-burners

So I know of Matt Walker's stoves which are also used for heating. Of course you don't need to cook with it but the oven is an essential part. A cooking plate over a burn chamber is not considered a cooking stove.
 
Nono Junang
Posts: 21
2
  • Mark post as helpful
  • send pies
    Number of slices to send:
    Optional 'thank-you' note:
  • Quote
  • Report post to moderator

Peter van den Berg wrote:Think of 15 mm thick and possibly a cross welded underneath to make it more rigid.


Hi Peter,
would it make sense to paint the underneath of the 15mm plate with heat resistant paint and/or some kind of rust protective paint?
Also would you protect the underneath of the steel plate with some ceramic fibre blanket (if so how thick) to minimize the heat shock? At least at the place directly above the heat riser? The plate is about 380mm above the heat riser.

Thanks!
 
Nono Junang
Posts: 21
2
  • Mark post as helpful
  • send pies
    Number of slices to send:
    Optional 'thank-you' note:
  • Quote
  • Report post to moderator

Graham Chiu wrote:I may have a solution for you. If you configure your rocket mass heater with an oven, then you appear to be exempted from the clean air regulations. That is you don't need for your stove to be certified.

http://www.homewoodstoves.co.nz/stove-resources/environmental-standards-for-wood-burners

So I know of Matt Walker's stoves which are also used for heating. Of course you don't need to cook with it but the oven is an essential part. A cooking plate over a burn chamber is not considered a cooking stove.


Thanks for the info. That would be a challenge in my case to include an oven.
I will make some firings and record the gas values coming out of the exhaust first to be sure that the rocket heater meets the clean air regulations.
 
Satamax Antone
gardener
Posts: 3471
Location: Southern alps, on the French side of the french /italian border 5000ft elevation
194
  • Mark post as helpful
  • send pies
    Number of slices to send:
    Optional 'thank-you' note:
  • Quote
  • Report post to moderator

Nono Junang wrote:

Peter van den Berg wrote:Think of 15 mm thick and possibly a cross welded underneath to make it more rigid.


Hi Peter,
would it make sense to paint the underneath of the 15mm plate with heat resistant paint and/or some kind of rust protective paint?
Also would you protect the underneath of the steel plate with some ceramic fibre blanket (if so how thick) to minimize the heat shock? At least at the place directly above the heat riser? The plate is about 380mm above the heat riser.

Thanks!

Nono, i don't think the ppaint would resist for long at the top of the bell, inside!

At what height will be the top of your bell?

Because, besides cooking, a steel plate doesn't serve much purpose, except if you want to heat a room above. Two over dimensioned metal I beams, supporting firebrick slabs is easier to do. Or a poured single slab.
 
Nono Junang
Posts: 21
2
  • Mark post as helpful
  • send pies
    Number of slices to send:
    Optional 'thank-you' note:
  • Quote
  • Report post to moderator

Satamax Antone wrote:At what height will be the top of your bell?


The top row of the bell is at 2130mm. You can have a look at pictures here: https://drive.google.com/drive/folders/1TTte8ubv0mXUnUykzTdTiDUk3rx4VqcT

Satamax Antone wrote:Because, besides cooking, a steel plate doesn't serve much purpose, except if you want to heat a room above. Two over dimensioned metal I beams, supporting firebrick slabs is easier to do. Or a poured single slab.


The steel plate is not for cooking but I wanted a cap solution that allows for easy removal just to be able to look inside the bell. So I am happy with any other alternatives.

Regarding the two over dimensioned metal beams supporting firebricks, do you have any pictures so that I can see what you mean?
I have thought of a poured slab with handles to lift it. But I was not sure what material to use to pour it and also had some concerns regarding the weight. The opening of the bell is 1070mmx700mm. I am also a bit concerned that it might crack and I wouldn't want to handle a cracked slab when the fire is burning

So I am open to any suggestions.
 
Peter van den Berg
gardener
Posts: 1054
Location: +52° 1' 47.40", +4° 22' 57.80"
447
woodworking rocket stoves wood heat
  • Mark post as helpful
  • send pies
    Number of slices to send:
    Optional 'thank-you' note:
  • Quote
  • Report post to moderator

Nono Junang wrote:Hi Peter,
would it make sense to paint the underneath of the 15mm plate with heat resistant paint and/or some kind of rust protective paint?
Also would you protect the underneath of the steel plate with some ceramic fibre blanket (if so how thick) to minimize the heat shock? At least at the place directly above the heat riser? The plate is about 380mm above the heat riser.


I've come to understand the steel top plate of the bell isn't meant for cooking in your case. My recommendation of making it more rigid isn't because of corrosion but warping instead. So paint is out of the question, it would burn off quite quickly as Satamax mentioned.
The second thought is doable and works, just one inch (25 mm) of superwool would be enough to take off the high heat. I am not sure this will prevent warping but since the 5 minutes riser is a lasting solution, shielding the top of the bell on the inside with superwool should be working. The only problem you are facing then is the need for a heat resistant adhesive to glue the superwool to the steel.
 
Satamax Antone
gardener
Posts: 3471
Location: Southern alps, on the French side of the french /italian border 5000ft elevation
194
  • Mark post as helpful
  • send pies
    Number of slices to send:
    Optional 'thank-you' note:
  • Quote
  • Report post to moderator
Peter, chicken wire, big washers and bolting through, to hold the superwool.
 
Nono Junang
Posts: 21
2
  • Mark post as helpful
  • send pies
    Number of slices to send:
    Optional 'thank-you' note:
  • Quote
  • Report post to moderator

Peter van den Berg wrote:

Nono Junang wrote:The second thought is doable and works, just one inch (25 mm) of superwool would be enough to take off the high heat. I am not sure this will prevent warping but since the 5 minutes riser is a lasting solution, shielding the top of the bell on the inside with superwool should be working. The only problem you are facing then is the need for a heat resistant adhesive to glue the superwool to the steel.


Hi Peter,
What do you think about using 25mm of ceramic fibre board instead of the steel plate and cross weld? I have used some for the bottom of the heat riser. They are rated 1260degC, come in 1000mmx500mm size and cost NZD30 and are also rigid enough to close the top of the bell. So since my opening is 1070mmx700mm, I would need max. 3 pieces glued together. I still have some leftover of ceramic board glue.
I wouldn't get much immediate heat release, but that would be ok. And that would be a lot cheaper and lighter than a steel plate.

 
Peter van den Berg
gardener
Posts: 1054
Location: +52° 1' 47.40", +4° 22' 57.80"
447
woodworking rocket stoves wood heat
  • Likes 1
  • Mark post as helpful
  • send pies
    Number of slices to send:
    Optional 'thank-you' note:
  • Quote
  • Report post to moderator

Nono Junang wrote:What do you think about using 25mm of ceramic fibre board instead of the steel plate and cross weld? I have used some for the bottom of the heat riser. They are rated 1260degC, come in 1000mmx500mm size and cost NZD30 and are also rigid enough to close the top of the bell. So since my opening is 1070mmx700mm, I would need max. 3 pieces glued together. I still have some leftover of ceramic board glue.
I wouldn't get much immediate heat release, but that would be ok. And that would be a lot cheaper and lighter than a steel plate.


Yes, temperature-wise this would do the job. I don't have any experience with the ceramic board glue you mention. Of course you could try it and see whether it leaks and how to solve that. Is it possible to build your bell a little smaller so it can be done with just two boards?
Hmmm... Actually, it should be bigger instead because the top plate doesn't extract heat in this case.
 
Graham Chiu
pollinator
Posts: 637
Location: Wellington, New Zealand
15
  • Mark post as helpful
  • send pies
    Number of slices to send:
    Optional 'thank-you' note:
  • Quote
  • Report post to moderator
What temperatures are you recording at the top of your riser, and at the point where the top of the bell is?
I see that Fox James is recording less than 600 deg C at the top of his riser ( not batch though ) even with ceramic blanket and so is able to use Neoceram glass https://permies.com/t/120/86886/Rocket-stove-hot-plate#797952
 
Peter van den Berg
gardener
Posts: 1054
Location: +52° 1' 47.40", +4° 22' 57.80"
447
woodworking rocket stoves wood heat
  • Mark post as helpful
  • send pies
    Number of slices to send:
    Optional 'thank-you' note:
  • Quote
  • Report post to moderator

Graham Chiu wrote:What temperatures are you recording at the top of your riser, and at the point where the top of the bell is?


During development of the batch box in 2012: highest recording directly above the riser 900 ºC. Top of the bell I don't know, at the time I was interested only what happened with the combustion core. All bells (and whistles) were there to extract heat otherwise I couldn't use the gas analizer.
 
Nono Junang
Posts: 21
2
  • Mark post as helpful
  • send pies
    Number of slices to send:
    Optional 'thank-you' note:
  • Quote
  • Report post to moderator

Graham Chiu wrote:What temperatures are you recording at the top of your riser, and at the point where the top of the bell is?
I see that Fox James is recording less than 600 deg C at the top of his riser ( not batch though ) even with ceramic blanket and so is able to use Neoceram glass https://permies.com/t/120/86886/Rocket-stove-hot-plate#797952


Good question. I haven't measure yet what temperature is at the top. Only thing I measured was the temperature at the bottom of the heat riser. And I stopped at 943DegC after I got burned. And I was probably about 30cm above the top of the heat riser. See here: https://www.youtube.com/watch?v=RQg0X1eReUk

I will put some sensor at those places to measure the temperatures.
 
Nono Junang
Posts: 21
2
  • Mark post as helpful
  • send pies
    Number of slices to send:
    Optional 'thank-you' note:
  • Quote
  • Report post to moderator

Peter van den Berg wrote:

Nono Junang wrote:What do you think about using 25mm of ceramic fibre board instead of the steel plate and cross weld? I have used some for the bottom of the heat riser. They are rated 1260degC, come in 1000mmx500mm size and cost NZD30 and are also rigid enough to close the top of the bell. So since my opening is 1070mmx700mm, I would need max. 3 pieces glued together. I still have some leftover of ceramic board glue.
I wouldn't get much immediate heat release, but that would be ok. And that would be a lot cheaper and lighter than a steel plate.


Yes, temperature-wise this would do the job. I don't have any experience with the ceramic board glue you mention. Of course you could try it and see whether it leaks and how to solve that. Is it possible to build your bell a little smaller so it can be done with just two boards?
Hmmm... Actually, it should be bigger instead because the top plate doesn't extract heat in this case.


Ok I will give it a try. I have used the same ceramic glue to stick the heat riser together. When getting hot for the first time it expands to fill any gaps and then hardens. I got it from a furnace components supplier.
Later on I could go higher with the bell if I find the exhaust temperature to be too high.
 
Graham Chiu
pollinator
Posts: 637
Location: Wellington, New Zealand
15
  • Mark post as helpful
  • send pies
    Number of slices to send:
    Optional 'thank-you' note:
  • Quote
  • Report post to moderator
How about copper?  It's melting and spalling temperatures are pretty close with the former at 1083 deg C.
 
Nono Junang
Posts: 21
2
  • Likes 1
  • Mark post as helpful
  • send pies
    Number of slices to send:
    Optional 'thank-you' note:
  • Quote
  • Report post to moderator
Hi @all,
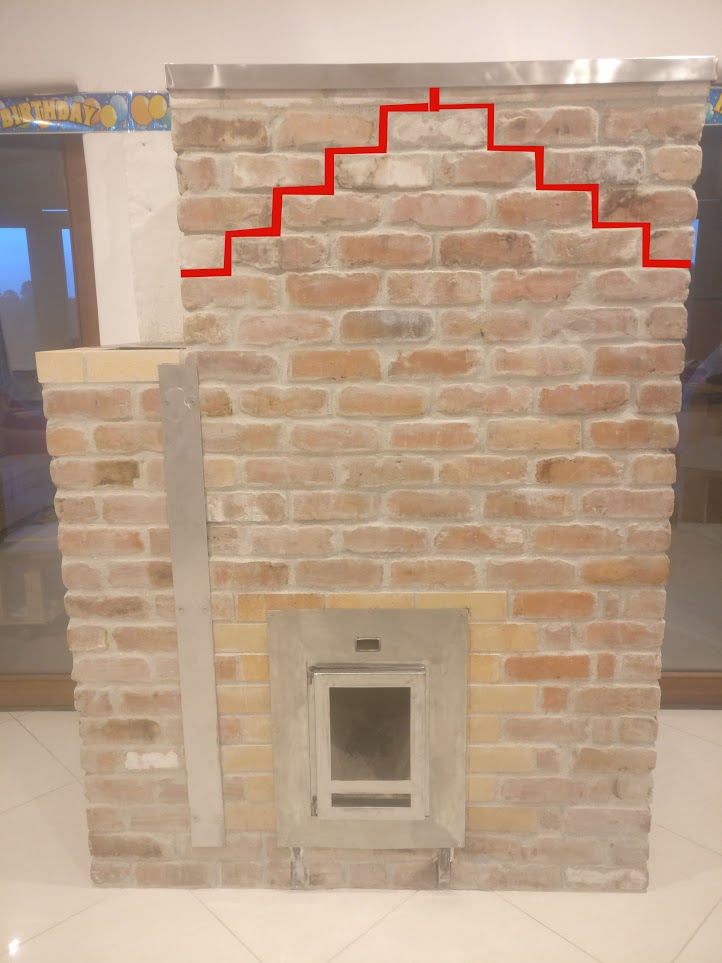
I have now fired the heater a few times and each time I noticed that after about an hour into the fire the lime mortar between the clay bricks of the bell starts to open starting from the top row of bricks down to about half the high of the bell. At that time I have the batch box about half-full.
And the hotter the fire gets the wider the crack in the mortar gets. At that point I have to remove some pieces of wood to reduce the heat inside the bell and pevent leakage.
Interestingly as the bricks cool down, those cracks also gets smaller and almost close.

I am wondering why this happens, is it because I am heating the bell too fast? If so any suggestions on the amount of wood to add per hour?
Is it because the bell is not high enough? It is currently at 2160mm, about 500mm above the top of the heat riser.

I have calculated the heat losses of the house to be heated to be 2.1kW based on the heat loss calculator sheet. On my 200mm system that would mean 1 fire per 24h with 14.2kg of wood.
During my test firing I never use all the 14.2kgs because the cracks in the mortar occurs well before.

I have the following ideas in mind:
1- Line the inside of the bell with some additional material that would absorb the heat and prevent the bricks/mortar to heat up too fast, for example 25mm thick plates of refractory castable, wide and high enough to limit the amount of joints. That would provide additional mass to store heat. There would be a small air gab between the lining material and the clay bricks.
2- Line the inside of the bell with 10mm thick ceramic fibre blanket to achieve the same without adding extra mass to the system.

But before I do anythign I would like to have your opinion.

Any suggestion is welcome.
Thanks
 
Rocket Scientist
Posts: 4527
Location: Upstate NY, zone 5
574
5
  • Likes 1
  • Mark post as helpful
  • send pies
    Number of slices to send:
    Optional 'thank-you' note:
  • Quote
  • Report post to moderator
In the US, masonry heater building code requires a double skin for pretty much the reason you are experiencing. Thermal expansion is obviously the culprit. Is the bell made of ordinary brick? Firebrick is recommended for at least the top half of a bell with the heat riser in it, because firebrick is formulated to not expand when heated (and to resist very high temperatures).

Adding refractory slabs or bricks inside the bell would probably completely solve the problem. An insulating blanket would be counterproductive.
 
Nono Junang
Posts: 21
2
  • Mark post as helpful
  • send pies
    Number of slices to send:
    Optional 'thank-you' note:
  • Quote
  • Report post to moderator

Glenn Herbert wrote:In the US, masonry heater building code requires a double skin for pretty much the reason you are experiencing. Thermal expansion is obviously the culprit. Is the bell made of ordinary brick? Firebrick is recommended for at least the top half of a bell with the heat riser in it, because firebrick is formulated to not expand when heated (and to resist very high temperatures).

Adding refractory slabs or bricks inside the bell would probably completely solve the problem. An insulating blanket would be counterproductive.


Thanks Glenn for the input. I have used old chimney bricks (about 230mmx115mmx75mm laid on flat) for the bell. Only the top row of the bell is done with firebricks and even there I can see the mortar open up.
How thick do you think the inside lining should be? 25mm? 50mm? 75mm?

I would like to use refractory slabs the following size (thickness x width x height):
25mmx650mmx435mm (10 pieces) and 25mmx990mmx435 (10pieces) and just dry stack them inside the bell in such a way that they interlock. And also would leave a small air gap between both skins.
And if one slab fails it is easier to replace.

What do you think?

 
Glenn Herbert
Rocket Scientist
Posts: 4527
Location: Upstate NY, zone 5
574
5
  • Mark post as helpful
  • send pies
    Number of slices to send:
    Optional 'thank-you' note:
  • Quote
  • Report post to moderator
I don't really have an opinion, other than making the slabs thick enough relative to their height and width that they will not be fragile to handle. You can tell best, being there with the material. I think 25mm would be adequate for heat tempering, though handling strength is an unknown for me.
 
Nono Junang
Posts: 21
2
  • Mark post as helpful
  • send pies
    Number of slices to send:
    Optional 'thank-you' note:
  • Quote
  • Report post to moderator

Glenn Herbert wrote:I don't really have an opinion, other than making the slabs thick enough relative to their height and width that they will not be fragile to handle. You can tell best, being there with the material. I think 25mm would be adequate for heat tempering, though handling strength is an unknown for me.


Yeah, I have spoken with a guy who is in the refractory industry and he said that handling 25mm slabs is tricky and he would go at least 50mm. And even at that thickness the slab could crack.

He suggested another solution which would consist of adding a 10mm expansion gap horizontally at the top of the bell and a 5mm one vertically every 1m of height. What do you think?
 
Nono Junang
Posts: 21
2
  • Mark post as helpful
  • send pies
    Number of slices to send:
    Optional 'thank-you' note:
  • Quote
  • Report post to moderator

Glenn Herbert wrote:I don't really have an opinion, other than making the slabs thick enough relative to their height and width that they will not be fragile to handle. You can tell best, being there with the material. I think 25mm would be adequate for heat tempering, though handling strength is an unknown for me.


here is an image of how the crack patter looks like
 
Nono Junang
Posts: 21
2
  • Mark post as helpful
  • send pies
    Number of slices to send:
    Optional 'thank-you' note:
  • Quote
  • Report post to moderator
I have found this video from a build from Peter:


It looks like somewhere around the top of the heat riser he uses a double skin with insulation in between to complete the bell.
The top of my heat riser is five rows below the top of the bell and this is exactly the area where I have the cracks.

So my idea now is to remove the top 7 rows of the bell to be well below the heat riser and use a double skin in that area as Peter did.
The double skin will be 40mm fire brick on the inside, 10mm ceramic fibre blanket and 75mm of the old chimney bricks.
Or do you think the double skin should be all the way down to the bottom of the bell?

What are your thoughts?
@Peter van den Berg, any suggestions?
 
Peter van den Berg
gardener
Posts: 1054
Location: +52° 1' 47.40", +4° 22' 57.80"
447
woodworking rocket stoves wood heat
  • Mark post as helpful
  • send pies
    Number of slices to send:
    Optional 'thank-you' note:
  • Quote
  • Report post to moderator
The construction as in the Mallorca build is used a dozen of times now and works well. Done in a number of different materials for the outer skin, raw stabilized bricks, mud bricks, normal building bricks, solid concrete bricks and hollow bricks filled with cob.
Anything above the riser in double skin with an expansion joint between the skins is what I would recommend. That said, a bit more won't hurt anybody.
The same construction is used in the Brussels build, see http://batchrocket.eu/en/applications#opensystems and scroll down to the second item.

Keep in mind that the top half of the bell will be slower to heat up and cool down this way as compared to the lower half.

The phenomenon of opening cracks on the outside during heating up is due to the inside of the bricks heating up too fast so the outside is lagging behind. Ultimately, those bricks could "walk apart" in time so the cracks won't close again when cooled off. Mark however, it's still quite normal to see a few hairline cracks in some places.

 
Nono Junang
Posts: 21
2
  • Mark post as helpful
  • send pies
    Number of slices to send:
    Optional 'thank-you' note:
  • Quote
  • Report post to moderator

Peter van den Berg wrote:The construction as in the Mallorca build is used a dozen of times now and works well. Done in a number of different materials for the outer skin, raw stabilized bricks, mud bricks, normal building bricks, solid concrete bricks and hollow bricks filled with cob.
Anything above the riser in double skin with an expansion joint between the skins is what I would recommend. That said, a bit more won't hurt anybody.
The same construction is used in the Brussels build, see http://batchrocket.eu/en/applications#opensystems and scroll down to the second item.

Keep in mind that the top half of the bell will be slower to heat up and cool down this way as compared to the lower half.

The phenomenon of opening cracks on the outside during heating up is due to the inside of the bricks heating up too fast so the outside is lagging behind. Ultimately, those bricks could "walk apart" in time so the cracks won't close again when cooled off. Mark however, it's still quite normal to see a few hairline cracks in some places.


Thanks Peter. I've looked at the skp from the Brussel build and will make the changes accordingly, starting a bit lower than the top of the heat riser. I have assumed that the expansion gap is 10mm filled with ceramic fibre blanket. Is that correct?
Is there any drawback if I have the bell a bit higher at say 2400mm instead of currently 2130mm? That would bring the top of the bell to about 800mm from the top of the heat riser, but still within the 9sqm recommendation.
 
You can tell that this tiny ad is in love
Rocket Mass Heater Jamboree And Updates
https://permies.com/t/170234/Rocket-Mass-Heater-Jamboree-Updates
reply
    Bookmark Topic Watch Topic
  • New Topic