• Post Reply Bookmark Topic Watch Topic
  • New Topic
permaculture forums growies critters building homesteading energy monies kitchen purity ungarbage community wilderness fiber arts art permaculture artisans regional education skip experiences global resources cider press projects digital market permies.com pie forums private forums all forums
this forum made possible by our volunteer staff, including ...
master stewards:
  • Nancy Reading
  • Carla Burke
  • r ranson
  • John F Dean
  • paul wheaton
  • Pearl Sutton
stewards:
  • Jay Angler
  • Liv Smith
  • Leigh Tate
master gardeners:
  • Christopher Weeks
  • Timothy Norton
gardeners:
  • thomas rubino
  • Jeremy VanGelder
  • Maieshe Ljin

Dale's Rocket Powered Mass Heater, Water Heater and Cookstove.

 
Posts: 9002
Location: Victoria British Columbia-Canada
707
  • Likes 6
  • Mark post as helpful
  • send pies
    Number of slices to send:
    Optional 'thank-you' note:
  • Quote
  • Report post to moderator
On Sunday, I decided I wanted a heating device that would heat my water, cook my food and retain heat well into the night. Actually, I decided those things quite a while ago, but put it into action starting on Sunday at 11:30 am.

As soon as I arrived at the property, I wandered about,  assessing available resources. I had dropped off some flues and bricks in the past. I brought with me 55 pounds of fireclay.

I must have spent an hour wandering around the small cabin and thinking of how to position things. I decided to divide the floor plan of the ground floor, into four quadrants; kitchen,  bathing,  workshop and sleeping areas. There may be curtains, but there will be no walls.

The heating device is placed between the kitchen and bathing areas. This will allow hot water to be gravity fed to both areas with pipe runs of three feet. All water heating will be in open to the atmosphere, non pressurized vessels.

In order to protect the floor from heat,  I decided to use the nice clean flues as legs. They are very strong. Since air flows beneath the entire stove, it's easy for me to check how hot things are getting.  This area, inside the flues,  will be kept open. I imagine it will become a favorite spot for drying shoes and for pets to hide in. The flues under the burn chamber are used, and have creosote on them. They will be filled with cob.

On the first day I built the base and got the burn chamber well on its way.

I spent an uncomfortable night in the cab of my Ford  F150. My drinking water froze.
20150118_145117.jpg
[Thumbnail for 20150118_145117.jpg]
20150118_150017.jpg
[Thumbnail for 20150118_150017.jpg]
20150118_174427.jpg
[Thumbnail for 20150118_174427.jpg]
 
Dale Hodgins
Posts: 9002
Location: Victoria British Columbia-Canada
707
  • Mark post as helpful
  • send pies
    Number of slices to send:
    Optional 'thank-you' note:
  • Quote
  • Report post to moderator
Monday morning was cold.

The clay and sand were just too cold to work properly and it was uncomfortable.  At noon on day two, I decided screw it, I'm going to light this thing!

Air is able to flow freely up the stairway hole, a few feet from the stove. The places is unfinished and there are plenty of doors, including the big door in the upper floor. I figured it would vent just like a tipi. It did.

I started a very small fire at first, to see how this thing would do with sparks. Many bricks were placed in a pattern on top of the flue, to restrict flow and to absorb heat before it reached the ceiling. I was able to hold my bare forearm one foot above the bricks. This showed me that I wouldn't be in danger of catching the ceiling on fire.

The smoke is mostly steam coming out of the wet bricks and fireclay.
20150119_091746.jpg
[Thumbnail for 20150119_091746.jpg]
20150118_225614.jpg
[Thumbnail for 20150118_225614.jpg]
20150120_121300.jpg
[Thumbnail for 20150120_121300.jpg]
 
Dale Hodgins
Posts: 9002
Location: Victoria British Columbia-Canada
707
  • Mark post as helpful
  • send pies
    Number of slices to send:
    Optional 'thank-you' note:
  • Quote
  • Report post to moderator
More photos.
20150120_121641.jpg
[Thumbnail for 20150120_121641.jpg]
20150120_123907.jpg
[Thumbnail for 20150120_123907.jpg]
20150120_123920.jpg
[Thumbnail for 20150120_123920.jpg]
 
Dale Hodgins
Posts: 9002
Location: Victoria British Columbia-Canada
707
  • Mark post as helpful
  • send pies
    Number of slices to send:
    Optional 'thank-you' note:
  • Quote
  • Report post to moderator
With in an hour, it was very comfortable to work. I wore my full face asbestos mask sometimes.

I experimented with different sorts of feed tubes.I will only use one of these flues as a feed tube in the future
.......
Despite extreme ventilation, it became much warmer to work, since the clay warmed up against the bricks and there was radiant heat.

I re-pointed all of the fireclay as the bricks and clay dried out. The rocks closest to the brick became warm and as the clay dried out.  More rocks were then added. Within two hours of lighting, the big four gallon pot had water that was ready for bathing.

 At night I closed off the upstairs door, so that heat would be retained.  There was still some heat in the wet thermal mass in the morning.

The cottage has been standing for 10 years. Day 2 of the build  was the first time that I slept in it.  I wonder if I've set any sort of record for speed, since I moved into it on day two of a one man build and had a hot bath.
20150120_124552.jpg
[Thumbnail for 20150120_124552.jpg]
20150120_145035.jpg
[Thumbnail for 20150120_145035.jpg]
20150121_095851.jpg
[Thumbnail for 20150121_095851.jpg]
 
Dale Hodgins
Posts: 9002
Location: Victoria British Columbia-Canada
707
  • Mark post as helpful
  • send pies
    Number of slices to send:
    Optional 'thank-you' note:
  • Quote
  • Report post to moderator
After building up the heat riser, I worked on building a stone platform to come up to match on the portion that will become the stove top.

Rather than cobbing over the horizontal burn chamber, I may cut a piece of aluminum to go there so that I can heat pots on it.

More later. It's 3/4 done.
20150121_143708.jpg
[Thumbnail for 20150121_143708.jpg]
20150121_143721.jpg
[Thumbnail for 20150121_143721.jpg]
20150121_144156.jpg
[Thumbnail for 20150121_144156.jpg]
 
Dale Hodgins
Posts: 9002
Location: Victoria British Columbia-Canada
707
  • Mark post as helpful
  • send pies
    Number of slices to send:
    Optional 'thank-you' note:
  • Quote
  • Report post to moderator
These aluminum plates will be the stovetops. The small one is 12 inches across and a large one is about 20 inches.

In order to get heat to penetrate deeper into the stone below the stove top, I'm going to insert some pieces of scrap aluminum.

The heat riser is six inches in diameter. The stovetop will be widened in a V-shape until it reaches 20 inches across.
...........
Look at the area of dirty floor just behind the pot and against the wall. That's where I intend to put a chair or possibly insert the bath tub.  When seated here, it's possible to put wood in the stove, check on things that are cooking and keep track of hot water production.

When first arriving at the cabin, I could plant myself in the chair here which would be the warmest area of the house and watch a movie on a TV that is less than six feet away, just beyond and above the pot.
20150121_152551.jpg
[Thumbnail for 20150121_152551.jpg]
20150121_152420.jpg
[Thumbnail for 20150121_152420.jpg]
20150121_152632.jpg
[Thumbnail for 20150121_152632.jpg]
 
gardener
Posts: 5171
Location: Cincinnati, Ohio,Price Hill 45205
1011
forest garden trees urban
  • Mark post as helpful
  • send pies
    Number of slices to send:
    Optional 'thank-you' note:
  • Quote
  • Report post to moderator
Looking good! I'm not seeing how the gasses are going to be directed under the plates. Will there be a barrel?
 
Dale Hodgins
Posts: 9002
Location: Victoria British Columbia-Canada
707
  • Likes 1
  • Mark post as helpful
  • send pies
    Number of slices to send:
    Optional 'thank-you' note:
  • Quote
  • Report post to moderator
No barrel. The sides will be built up to the desired height with firebrick. A gap of about 3 inches will allow the exhaust to flow toward the wall where it will exit.
............
I've gone over many possibilities on how to create the best bathtub for the space. And I think I've settled on one. Several years ago I made a part-time living, carving and selling bowls made from western red cedar driftwood.

I'm going to start watching the beaches closely for the perfect piece of driftwood to make a suitable giant bowl type tub. The piece of cedar would have to be a perfect specimen, since it represents about 20 hours of labor for me to make a bowl of that size and finish it with spar varnish.

The first photo shows a look down at my feet, from the area where the tub goes or where I would sit in a chair.
20150121_152713.jpg
[Thumbnail for 20150121_152713.jpg]
20150121_154642.jpg
[Thumbnail for 20150121_154642.jpg]
20150123_125437.jpg
[Thumbnail for 20150123_125437.jpg]
 
Dale Hodgins
Posts: 9002
Location: Victoria British Columbia-Canada
707
  • Mark post as helpful
  • send pies
    Number of slices to send:
    Optional 'thank-you' note:
  • Quote
  • Report post to moderator
I don't know what these rocks are called. I call them Bluestone.

They have a very fine grain and often, by the water, there are specimens so smooth that you could cook on them. They are the last ones to crack when used around a campfire. I'm sure that one nestled above the heat riser in the bed of fireclay will survive just fine. I will use the stone for cooking flatbreads, or for other purposes.

I've found lots of reasons to go for walks on the beach lately
................

There's no clay on the surface at my property. When I was in the city,  I checked on Used Victoria and found someone who was digging out a basement.

They dug out trenches and totally liquefied the clay in the process of getting it out. It was piled right beside the driveway.  I  loaded up my garbage cans with a sort of premix. I took about 500 pounds, which is more than is needed. This saved lots of labor.

The sand from under the slab was mixed with it. My cob mixture was about 60% clean sand from the property and 40% of it was this premix.
20150121_154352.jpg
[Thumbnail for 20150121_154352.jpg]
20150118_133025.jpg
[Thumbnail for 20150118_133025.jpg]
20150118_133721.jpg
[Thumbnail for 20150118_133721.jpg]
 
Dale Hodgins
Posts: 9002
Location: Victoria British Columbia-Canada
707
  • Likes 1
  • Mark post as helpful
  • send pies
    Number of slices to send:
    Optional 'thank-you' note:
  • Quote
  • Report post to moderator
It will probably be several weeks before I know how this has all turned out.

As the brick, clay and rock dry out, I'm sure that the heat movement characteristics will change. There is every possibility that I will put too much of the heat into the mass or too much of the heat into the hot water and not enough into the mass during some firings.

I expect slower firings to put a greater percentage of available heat into the mass, since hot gases encounter the mass before they travel as far as the hot water production area. I will adjust the quantity of water in my containers during the firing so that I maintain adequate exhaust temperature and draft.
....................
Cooking speed is another concern. At the beginning of a firing, it may cook things too slowly. If the early tests are any indication,  there's not much chance of sending too much of the heat outside. The firebrick seems to be absorbing plenty of the heat before it makes it to the cooktops.
......................
This heater has very little provision for instant heat. I'm willing to sacrifice instant heat for better storage and no barrel. I really don't like the idea of a barrel that could overheat the ceiling or walls in my small space when others use the stove. When I first arrive at the cabin after an absence, I'm expecting it to take a while to heat up.
.........
The cold nights during this project produced many frost flowers.
20150121_085738.jpg
[Thumbnail for 20150121_085738.jpg]
20150121_092720.jpg
[Thumbnail for 20150121_092720.jpg]
20150121_085730.jpg
[Thumbnail for 20150121_085730.jpg]
 
pollinator
Posts: 684
Location: Richmond, Utah
33
  • Mark post as helpful
  • send pies
    Number of slices to send:
    Optional 'thank-you' note:
  • Quote
  • Report post to moderator
Looks great Dale!

I think that stone is blueschist, a rock that is only found in plate bounding subduction zones like where you live. That should be a good choice and is rare outside of the SAF area.
 
Dale Hodgins
Posts: 9002
Location: Victoria British Columbia-Canada
707
  • Mark post as helpful
  • send pies
    Number of slices to send:
    Optional 'thank-you' note:
  • Quote
  • Report post to moderator
Thank you Bill. Some people told me I was looking for schist.

I'm walking the beaches today, in search of the perfect Bluestone. I'm finding lots of glacial trails and uniquely colored bedrock.
20150125_140550.jpg
[Thumbnail for 20150125_140550.jpg]
20150125_140355.jpg
[Thumbnail for 20150125_140355.jpg]
20150125_132116.jpg
[Thumbnail for 20150125_132116.jpg]
 
Dale Hodgins
Posts: 9002
Location: Victoria British Columbia-Canada
707
  • Mark post as helpful
  • send pies
    Number of slices to send:
    Optional 'thank-you' note:
  • Quote
  • Report post to moderator
I managed to get a few good specimens but none of them big enough for the main cap on the heat riser. The smoother two at the top will be used for cooking things and the rougher ones are chosen because of nice color, for areas that don't need to be smooth. 
20150125_153549.jpg
[Thumbnail for 20150125_153549.jpg]
20150125_132213.jpg
[Thumbnail for 20150125_132213.jpg]
20150125_131729.jpg
[Thumbnail for 20150125_131729.jpg]
 
gardener
Posts: 3471
Location: Southern alps, on the French side of the french /italian border 5000ft elevation
194
  • Mark post as helpful
  • send pies
    Number of slices to send:
    Optional 'thank-you' note:
  • Quote
  • Report post to moderator
Dale, if you are using rock above the heat riser. Do a big gap, something in the order of a foot above. So it doesn't heat too much.

If you find schist or shale, you could cut some nice slabs with wood spliting wedges and a maul. Also, oven dried wedges, you insert a lot of theses in little holes made with a cold chisel. Along a seam which looks promissing. Then you wet thoses, then they expand and lift the stone slab.
 
Dale Hodgins
Posts: 9002
Location: Victoria British Columbia-Canada
707
  • Mark post as helpful
  • send pies
    Number of slices to send:
    Optional 'thank-you' note:
  • Quote
  • Report post to moderator
My area has been glaciated and there are nice smooth specimens to be found.

I did some cooking on blueschist this morning. It works quite well.
.....................
I've decided to include a small oven and I will keep some thin pieces of schist inside, that I can put on top of things being grilled. This will speed up the process.

I can't have a microwave. I'll  keep heavy porcelain bowls in the oven and be able to place cold food in the bowls, and then put a piece of hot schist on top for very quick reheating of leftovers.

French toast is cooking in the photo. The egg didn't stick.
20150126_110957.jpg
[Thumbnail for 20150126_110957.jpg]
20150126_111749.jpg
[Thumbnail for 20150126_111749.jpg]
20150126_122620.jpg
[Thumbnail for 20150126_122620.jpg]
 
Dale Hodgins
Posts: 9002
Location: Victoria British Columbia-Canada
707
  • Mark post as helpful
  • send pies
    Number of slices to send:
    Optional 'thank-you' note:
  • Quote
  • Report post to moderator
The masonry stove is near completion. I have about 35 hours into it so far. I expect to spend five more hours on the initial build.  This leaves me with a raw unit that functions. I need to put a cob finish over the brick parts.

 I'm leaving the top unfinished,  so that I can easily remove a couple of bricks and access the duct under the burners.
...........
 I haven't really been able to test how much wood it takes. I've been running it with the doors and windows open in order to allow it to exhaust.
........
The stove is in full burn in most of these photos. It runs pretty clean.

I cut the hole with my electric chainsaw.

After I have run heat through the clay for an hour or so, I re-point the joints.
20150218_100146.jpg
[Thumbnail for 20150218_100146.jpg]
20150218_135353.jpg
[Thumbnail for 20150218_135353.jpg]
20150219_105656.jpg
[Thumbnail for 20150219_105656.jpg]
20150219_122405.jpg
[Thumbnail for 20150219_122405.jpg]
20150219_153853.jpg
[Thumbnail for 20150219_153853.jpg]
20150219_153903.jpg
[Thumbnail for 20150219_153903.jpg]
20150219_153921.jpg
[Thumbnail for 20150219_153921.jpg]
20150220_094230.jpg
[Thumbnail for 20150220_094230.jpg]
 
Dale Hodgins
Posts: 9002
Location: Victoria British Columbia-Canada
707
  • Likes 1
  • Mark post as helpful
  • send pies
    Number of slices to send:
    Optional 'thank-you' note:
  • Quote
  • Report post to moderator
I finished the initial build the next day. I've been at the property since then, doing other work and firing it regularly.

The two level stove top was the most complex item. Tight spaces.
......
The passage under the burners is V-shaped, becoming wider as it approaches the larger burner and exhaust. By the time gasses meet the support in the center, the area is larger than that of the J-tube.
20150220_112818.jpg
[Thumbnail for 20150220_112818.jpg]
20150220_112804.jpg
[Thumbnail for 20150220_112804.jpg]
20150220_114830.jpg
[Thumbnail for 20150220_114830.jpg]
20150220_115226.jpg
[Thumbnail for 20150220_115226.jpg]
20150220_121524.jpg
[Thumbnail for 20150220_121524.jpg]
20150220_121531.jpg
[Thumbnail for 20150220_121531.jpg]
 
Dale Hodgins
Posts: 9002
Location: Victoria British Columbia-Canada
707
  • Likes 1
  • Mark post as helpful
  • send pies
    Number of slices to send:
    Optional 'thank-you' note:
  • Quote
  • Report post to moderator
More pictures.

I dried firewood as I went along. Several hours were wasted on this.
20150221_075409.jpg
[Thumbnail for 20150221_075409.jpg]
20150221_133126.jpg
[Thumbnail for 20150221_133126.jpg]
20150221_133109.jpg
[Thumbnail for 20150221_133109.jpg]
20150221_133140.jpg
[Thumbnail for 20150221_133140.jpg]
 
Dale Hodgins
Posts: 9002
Location: Victoria British Columbia-Canada
707
  • Likes 1
  • Mark post as helpful
  • send pies
    Number of slices to send:
    Optional 'thank-you' note:
  • Quote
  • Report post to moderator
The stove will be the only privacy blind on the lower floor. Morning light passes under to the private area.
.........
The dirty used flues that support the burn floor, will be filled with cob and rocks.
20150222_125700.jpg
[Thumbnail for 20150222_125700.jpg]
20150222_135557.jpg
[Thumbnail for 20150222_135557.jpg]
20150222_123849.jpg
[Thumbnail for 20150222_123849.jpg]
20150222_140454.jpg
[Thumbnail for 20150222_140454.jpg]
20150222_135719.jpg
[Thumbnail for 20150222_135719.jpg]
 
Dale Hodgins
Posts: 9002
Location: Victoria British Columbia-Canada
707
  • Mark post as helpful
  • send pies
    Number of slices to send:
    Optional 'thank-you' note:
  • Quote
  • Report post to moderator
I did a hot water production test. The garbage cans full of water outside,  had an inch of ice on top. I broke that ice and used the very cold water. The Dutch oven took 20 minutes to reach bathing temperature. The big 4 gallon pot is last in line before the exhaust. It took 50 minutes to reach bathing temperature.

 The aluminium plates are awesome at extracting heat.  I was not able to place my hands on the aluminium before the pots of cold water were placed on top. With the unit in full burn, I am able to place my hands on the large aluminium plate closest to the exhaust and hold it there indefinitely.

 Aluminium also draws heat from the surrounding brick and cob. A few minutes after placing the cold water on the rear plate, I was able to hold my finger against the hot fireclay that makes the seal.
.........
 When the stove is not in use,  hot air rises to the top where the burners are. It can be allowed to radiate to the room or if cold water is placed in the pots, it will heat that.
.....
 The 12 inch aluminium plate is useful for cooking. The larger plate,  near the exhaust,  would probably be too slow for most cooking.
20150222_103812.jpg
[Thumbnail for 20150222_103812.jpg]
20150222_103857.jpg
[Thumbnail for 20150222_103857.jpg]
20150222_104210.jpg
[Thumbnail for 20150222_104210.jpg]
 
Dale Hodgins
Posts: 9002
Location: Victoria British Columbia-Canada
707
  • Mark post as helpful
  • send pies
    Number of slices to send:
    Optional 'thank-you' note:
  • Quote
  • Report post to moderator
I may extend the horizontal burn in the future.  It is unfinished and would simply require the addition of another flue leg and continuation of the bricks.
.......
The heat riser will be extended about two feet higher than it currently stands. This will require the removal of two bricks. I will do it when I come into more free firebricks.
.......
Ovens ...  I am going to include at least three small ovens. These will be made from recycled flue material with a cap in one end and a door in the other.

 The ovens will rest upon the horizontal burn chamber, just after the feed and continuing to the heat riser. This area gets very hot. I expect the hottest oven to be the one that resides in the L-shaped space between the horizontal burn and the heat riser. Some ovens will rest directly on the burn chamber and others will be placed above them and receive heat from the other ovens and from the surrounding cob. This area also serves as a partition for bathing privacy, so I may bring ovens up to 4 feet above the floor.
.......
Blueschist stones will be stored in one of the ovens,  so that I always have hot rocks available for grilling, whenever the stove has been running recently. They are particularly good at reheating food that has already been cooked. Most foods are ready in about four minutes.

 This will be my replacement for a microwave.
......
My only cost, so far, has been $55 for fireclay. I've used 3/4 of the bag.
20150121_144156.jpg
[Thumbnail for 20150121_144156.jpg]
20150129_224054.jpg
[Thumbnail for 20150129_224054.jpg]
20150129_224502.jpg
[Thumbnail for 20150129_224502.jpg]
 
Satamax Antone
gardener
Posts: 3471
Location: Southern alps, on the French side of the french /italian border 5000ft elevation
194
  • Likes 3
  • Mark post as helpful
  • send pies
    Number of slices to send:
    Optional 'thank-you' note:
  • Quote
  • Report post to moderator
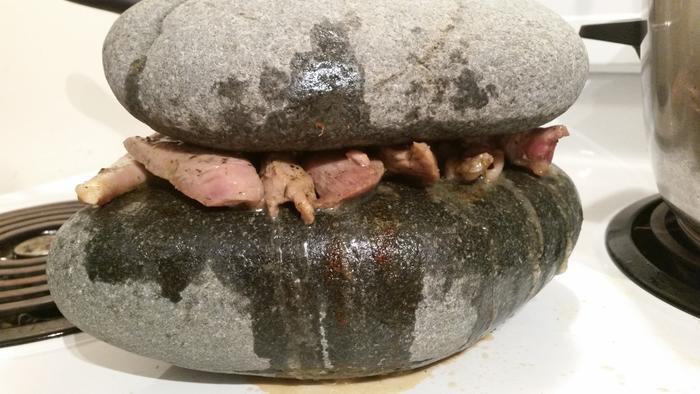
Such a burger might be a tad tough on the teeth, innit?

 
Dale Hodgins
Posts: 9002
Location: Victoria British Columbia-Canada
707
  • Likes 1
  • Mark post as helpful
  • send pies
    Number of slices to send:
    Optional 'thank-you' note:
  • Quote
  • Report post to moderator
Yes, but we need our minerals. Instead of selling a 12 ounce burger, it could be a 12 pounder. Finish the whole thing and it's free.
 
William Bronson
gardener
Posts: 5171
Location: Cincinnati, Ohio,Price Hill 45205
1011
forest garden trees urban
  • Likes 2
  • Mark post as helpful
  • send pies
    Number of slices to send:
    Optional 'thank-you' note:
  • Quote
  • Report post to moderator
Bet you could cook a steak real nice between two hot rocks!
 
Dale Hodgins
Posts: 9002
Location: Victoria British Columbia-Canada
707
  • Mark post as helpful
  • send pies
    Number of slices to send:
    Optional 'thank-you' note:
  • Quote
  • Report post to moderator
I can cook it, but it's almost impossible to burn it, since this grill turns itself off as it cools. The perfect cooking companion for the man with a remote control and a laptop.
......
I'm looking at installing some crock pot porcelain parts into a cook top. These pots are often thrown away when the electrical components fail. A clay lid could be installed over the glass one for extra heat retention.
20150224_163053.jpg
[Thumbnail for 20150224_163053.jpg]
20150224_163021.jpg
[Thumbnail for 20150224_163021.jpg]
20150224_162829.jpg
[Thumbnail for 20150224_162829.jpg]
 
Dale Hodgins
Posts: 9002
Location: Victoria British Columbia-Canada
707
  • Mark post as helpful
  • send pies
    Number of slices to send:
    Optional 'thank-you' note:
  • Quote
  • Report post to moderator
I used  very dense firebrick, since that is what was readily available. I may add a new,  light weight, insulated heat riser to the beginning of the system. This would add length to the system and would give me a cleaner burn.

 I would like to have the descending gas come to waist height and then move horizontally through a kitchen which includes cook tops, ovens, sunken crock pots and a hot rock grill.
.......
In order to create a pump,  without a barrel,  I will put a metal top to this heat riser and heat water on top. This will cool off the gases and help them to sink and move along the system.

 The area under the burners can be cooled by outside air,  when the stove is not in use. There is currently no airlock to prevent that. If and when I build a new riser, a water cooled bell will be constructed just before the exit.
 
Dale Hodgins
Posts: 9002
Location: Victoria British Columbia-Canada
707
  • Likes 1
  • Mark post as helpful
  • send pies
    Number of slices to send:
    Optional 'thank-you' note:
  • Quote
  • Report post to moderator
I filled my truck with free fire bricks and flues yesterday. I got 55 firebricks and 45 lengths of flue material. One house had replaced both wood burners in 2004 and used them very little.  38 of the flues are from there and are nearly new in appearance.

 I always ask plenty of qualifying questions before going on a free material hunt. With heavy material,  access is of prime importance. I was able to back my truck right up to both piles.  All of this gathering was accomplished in under two hours with less than 10 miles travelled. A metal clad door with a good frame was obtained at the second house.
20150316_121231.jpg
[Thumbnail for 20150316_121231.jpg]
20150316_121253.jpg
[Thumbnail for 20150316_121253.jpg]
20150316_131001.jpg
[Thumbnail for 20150316_131001.jpg]
20150316_131050.jpg
[Thumbnail for 20150316_131050.jpg]
 
Posts: 27
Location: NE Arizona
3
forest garden trees greening the desert
  • Mark post as helpful
  • send pies
    Number of slices to send:
    Optional 'thank-you' note:
  • Quote
  • Report post to moderator
Hi Dale. I see this is an older post, but I wanted to first thank you for your details and photos. Your ideas are helping me on a plan I am working on for my upcoming yurt-cabin: a) To use of the heater as a wall itself! and b) to pile up mass in the back of the stove (instead of building a bench) by zig zagging the mass ducting in an upward path before it exits out the wall.

Also I wanted to ask you...
  • Can these flu pieces like in your photos be used to build the combustion chamber of the rocket mass heater? I am interested in rocket mass heaters, but the huge barrel system seems a bit of overkill for the little yurt-cabin I will be building soon, so I am looking for ways to make the chamber a little smaller.
  • How do these flu pieces usually get joined?
  • In your photos it looks like there are two different sizes. Do you know if there are other sizes?


  • Did you finish your project? If so, are you happy how it came out?

    Thank you.

     
    Satamax Antone
    gardener
    Posts: 3471
    Location: Southern alps, on the French side of the french /italian border 5000ft elevation
    194
    • Mark post as helpful
    • send pies
      Number of slices to send:
      Optional 'thank-you' note:
    • Quote
    • Report post to moderator

    Jennifer Brownson wrote:Hi Dale. I see this is an older post, but I wanted to first thank you for your details and photos. Your ideas are helping me on a plan I am working on for my upcoming yurt-cabin: a) To use of the heater as a wall itself! and b) to pile up mass in the back of the stove (instead of building a bench) by zig zagging the mass ducting in an upward path before it exits out the wall.

    Also I wanted to ask you...

  • Can these flu pieces like in your photos be used to build the combustion chamber of the rocket mass heater? I am interested in rocket mass heaters, but the huge barrel system seems a bit of overkill for the little yurt-cabin I will be building soon, so I am looking for ways to make the chamber a little smaller.
  • How do these flu pieces usually get joined?
  • In your photos it looks like there are two different sizes. Do you know if there are other sizes?


  • Did you finish your project? If so, are you happy how it came out?

    Thank you.


    http://heatkit.com/research/2009/lopez-rocket.htm
     
    Jennifer Brownson
    Posts: 27
    Location: NE Arizona
    3
    forest garden trees greening the desert
    • Mark post as helpful
    • send pies
      Number of slices to send:
      Optional 'thank-you' note:
    • Quote
    • Report post to moderator
    Wow, Satamax, that is awesome information! There is my wall! (and no big barrel hogging the attention). I read the whole thing. Not sure I understood it all, but love how they tweak it along and get different results. And the links to the different thermo-simulators at http://energy.concord.org/energy2d/double-bell2.html is amazing as well. I can see why so many people are 'playing around' with this stuff... there seems to be so much to learn, and so many ways to work with the laws of physics to come up with very useful devises.

    I love how Ksenia built it so simply and in a way they could change things as they wished.

    I wonder what they have discovered or created since that was done (2009). Do you happen to know?

    Do you build these stoves as well?

    I may end up playing with bricks and cob as well, to come up with a double bell stove that is a cook-top on one section and a baking oven in the other... and a beautiful wall as well!
     
    Dale Hodgins
    Posts: 9002
    Location: Victoria British Columbia-Canada
    707
    • Mark post as helpful
    • send pies
      Number of slices to send:
      Optional 'thank-you' note:
    • Quote
    • Report post to moderator
    Since working on the stove in February, I have only returned to the property twice, to drop off salvaged materials. Work has kept me very busy. I've raised prices for my services, in an attempt to free up some time. Components will be added as time allows.
    .....
    I have decided on a few other small refinements.

    I'm purchasing some 12 volt water pumps to move water through the cabin. One will be used like a small bilge pump, to move water from the bathtub to a big pot that rests on the stove top. The pot will be filled to overflowing,  with the warmed water flowing right back into the tub.

     Another pump will run water from the restaurant sized kitchen sink, to a stove top pot. Hot water will overflow from this pot, back into the sink.

     Another pump will reside in a small pond, just outside of the cabin. Water from the pond,  will be pumped into the kitchen sink. Overflow from the sink, will go back into the pond, via a small wetland/ gravel filter.  A simple switch will allow the pond water to be pumped into the big pot, to be heated before it enters the sink.

    These little pumps and the associated wiring are very inexpensive. I expect to do all of this plumbing for somewhere around $50.
    -_1.jpeg
    [Thumbnail for -_1.jpeg]
     
    straws are for suckers. tiny ads are for attractive people.
    rocket mass heater risers: materials and design eBook
    https://permies.com/w/risers-ebook
    reply
      Bookmark Topic Watch Topic
    • New Topic