• Post Reply Bookmark Topic Watch Topic
  • New Topic
permaculture forums growies critters building homesteading energy monies kitchen purity ungarbage community wilderness fiber arts art permaculture artisans regional education skip experiences global resources cider press projects digital market permies.com pie forums private forums all forums
this forum made possible by our volunteer staff, including ...
master stewards:
  • Nancy Reading
  • Carla Burke
  • r ranson
  • John F Dean
  • paul wheaton
  • Pearl Sutton
stewards:
  • Jay Angler
  • Liv Smith
  • Leigh Tate
master gardeners:
  • Christopher Weeks
  • Timothy Norton
gardeners:
  • thomas rubino
  • Jeremy VanGelder
  • Maieshe Ljin

Clay Rocket core/Bell/RMH system?

 
gardener
Posts: 3489
Location: Fraser River Headwaters, Zone3, Lat: 53N, Altitude 2750', Boreal/Temperate Rainforest-transition
689
hugelkultur forest garden fungi trees books food preservation bike solar woodworking
  • Likes 1
  • Mark post as helpful
  • send pies
    Number of slices to send:
    Optional 'thank-you' note:
  • Quote
  • Report post to moderator
In a recent thread titled "Theoretical Survival Rocket Stove Space Heater Question", there is a curious post by F Styles with the idea of building a RMH core and bell top using clay mixed with fine sawdust as the medium for the structure. I am wondering whether it will work, considering the insulative characteristics needed for a proper rocket burn, as well as the ability in such a system for the core and bell to sustain the rockety blast without cracking and breaking. Has anybody tried to build a RMH using clay as the main structure of all components as described here, by F Styles (and which I have italicized):


"the answer is yes you can do this with no modern metals or fire bricks. the best natural material i can think of is natural clay and if found in the wild you can build a very nice RMH. the better the natural clay the better the RMH. to make a RMH core without any modern materials i would mix the purest clay you got with fine saw dust you make from your hand saw... you will have a hand saw in the bush right? mix the clay and sawdust and lay out a good flat base the side of your RMH core. then pile moist sand (not too moist) into a RMH core along the flat clay sawdust foundation you made and then cover it with a good 4'' of clay sawdust mix. once that dries, build a sand stack to match the interior of your heat riser and then line the out side of it with the clay sawdust mix and let it all dry. once dry you carefully and i mean carefully dig out the sand. you can also replace the sand with hollow 6'' to 8'' logs to use as support to build your core and heat riser and then layer the 4'' clay sawdust mix on the out side. wait for the clay to set and then burn out the hollow log core and it will for a nice insulated fire clay core and the sawdust will create air pockets and make your clay insulative. if you feel you need to build an outer "bell" do the same with hollow logs or sand and coat it with clay and straw mix. make your ducts out of clay and rocks and build a rock and clay chimney. thats how i would build my bush craft RMH if i had no modern materials.

this clay does not build a very rugged core but if you are not rough with it, it should last a while. just dont jam your sticks into the feed area and dont get rough with cleaning it out
."


My only thought, to do this in a primitive way and possibly improve on this idea, would be to pre-fire some tiny clay balls, and utilize them as part of the cobbish mix, thus creating a more refractory clay mix.

Other questions: Would fine wild straw and grass chaff be useful in the mix? How about sand?


Anybody with experience with an experiment like this? ...please weigh in.

Many thanks
 
Posts: 455
Location: climate zone 6b
3
  • Mark post as helpful
  • send pies
    Number of slices to send:
    Optional 'thank-you' note:
  • Quote
  • Report post to moderator
the reason you would use sawdust is to create air pockets that would make the clay insulative. you could use tiny broken up "straw" and it may do the same thing but sand will not create air pockets and ultimately not make your clay insulative.


Great improvement idea buddy! if you want to "prefire" clay may i suggest making 2 to 3inch high 6" to 8" in diameter clay rings with inter locking "dove tails" (make them small in height for easy firing and to be able to stand the temp change shock) and fire them in a "throwaway" RMH you built just to fire the clay rings and then stack and lock the dove tailed rings together to make a RMH core to the size of your liking. after that you may be able to build larger rings and fire them to stack on the out side of the heat riser and then fill the gap between the two rings with some kind of natural insulative material in your area you find in your wild.
 
Roberto pokachinni
gardener
Posts: 3489
Location: Fraser River Headwaters, Zone3, Lat: 53N, Altitude 2750', Boreal/Temperate Rainforest-transition
689
hugelkultur forest garden fungi trees books food preservation bike solar woodworking
  • Mark post as helpful
  • send pies
    Number of slices to send:
    Optional 'thank-you' note:
  • Quote
  • Report post to moderator
Hi Styles:

I do understand the insulative effect of the air pockets created by the sawdust. This effect would be increased if the sawdust was first saturated so that when the clay and sawdust matrix dried the sawdust would shrink creating little air spaces around each particle. I am just not sure that the clay of the burn tunnel would be insulated enough to reduce conduction for the proper burn temperature.

The reason I mentioned sand was not to make it insulative, but because it is used in cob mixes.

That is a pretty cool idea about firing dovetailed ring sections and building a core that way. That seems like a SH%T ton of work, though!
 
F Styles
Posts: 455
Location: climate zone 6b
3
  • Mark post as helpful
  • send pies
    Number of slices to send:
    Optional 'thank-you' note:
  • Quote
  • Report post to moderator
if i was doing that, i would not "saturate" the sawdust since that may create a larger amout of steam and cause the clay to crack when fired. if i wanted larger air pockets i would just use larger sawdust. the sawdust will burn up into charcoal then burn off eventually leaving sawdust holes the size of the sawdust you choose. good clay has a melting point of 2000 degrees F and the air pockets will definitely make it insulative enough for a hot fire for sure.
 
Rocket Scientist
Posts: 4529
Location: Upstate NY, zone 5
575
5
  • Likes 1
  • Mark post as helpful
  • send pies
    Number of slices to send:
    Optional 'thank-you' note:
  • Quote
  • Report post to moderator
I have been building experimental small-sized medieval style pottery kilns every summer for a decade or more, using native clay and dried grass, which makes for good wet strength and some insulation when the grass burns out. The more grass you mix in, the better the insulation will be. A stove built this way should work fine. You want to make sure the whole heated area is well separated from the ground unless you have very sandy soil. Depending on the character of your native stones, it could be dangerous to use those too near the combustion zone. Flat smooth stones are likely to have good cleavage planes, and if heated too rapidly may explode as trapped water turns to steam. I have seen this happen plenty of times.
 
Posts: 525
Location: Northern Germany (Zone 8a)
27
  • Mark post as helpful
  • send pies
    Number of slices to send:
    Optional 'thank-you' note:
  • Quote
  • Report post to moderator
heya.... nice ideas.

as far as i know, cob without sand will very often develop cracks when drying. it totally depends on the mixture of your clay. the clay will need the sand particles to form a structure.
often it s 1 part of clay to 1-2 parts of sand along with some short fibres for tensile strenght (chopped straw, animal hair ...). your mixture will need testing at different ratios.

one could hand-form clay bricks or make a mold from wood. pre-dried (or fired?) bricks will reduce shrinking, but you will have to watch if your clay-mortar will develop cracks.

in this vid they make a rocket cooker from clay:
 
Glenn Herbert
Rocket Scientist
Posts: 4529
Location: Upstate NY, zone 5
575
5
  • Likes 2
  • Mark post as helpful
  • send pies
    Number of slices to send:
    Optional 'thank-you' note:
  • Quote
  • Report post to moderator
The stove the women are making is not a rocket, but the techniques are applicable.

I have built a rocket bake oven and a rocket stove of cob. The oven has a cob L-tube with about 6" diameter, 2'+ horizontal and 30" vertical splitting into several channels under the (firebrick) oven floor and entering the oven at the edges, then leaving through a chimney. It takes some time to heat up, but bakes well. By the charring on the wood door, it gets to at least 400F inside.

The stove is all cob, formed around a sacrificial scrap wood inner 6" J-tube form, with a 1/8" steel cooktop, and a 6" stovepipe chimney leaving the space under the cooktop. It seems to work well in early trials after adjusting the gap between the riser and cooktop. 4" was too much, 2" or so is better. The riser is about 34" tall from burn tunnel floor, and could be shorter and would probably heat the cooktop better.

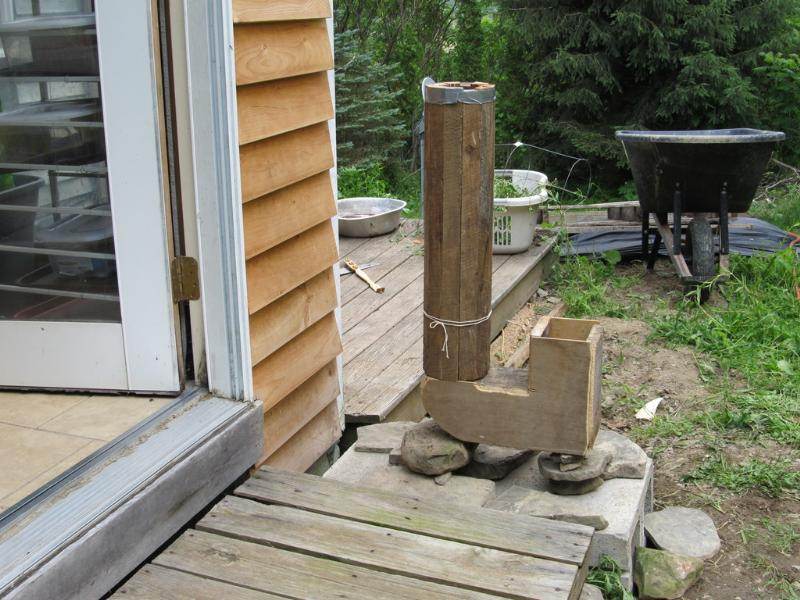
The inner form set in place on the base:


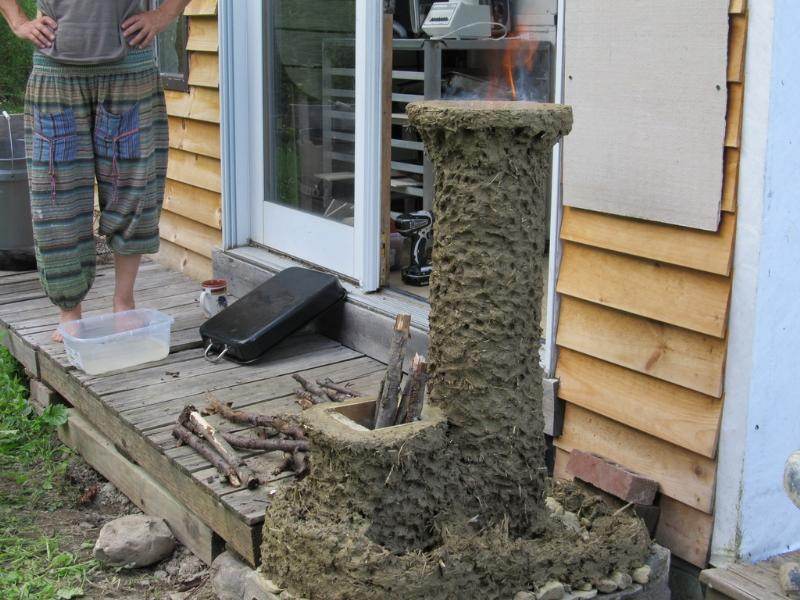
Burning out the form after applying the first layer of cob:


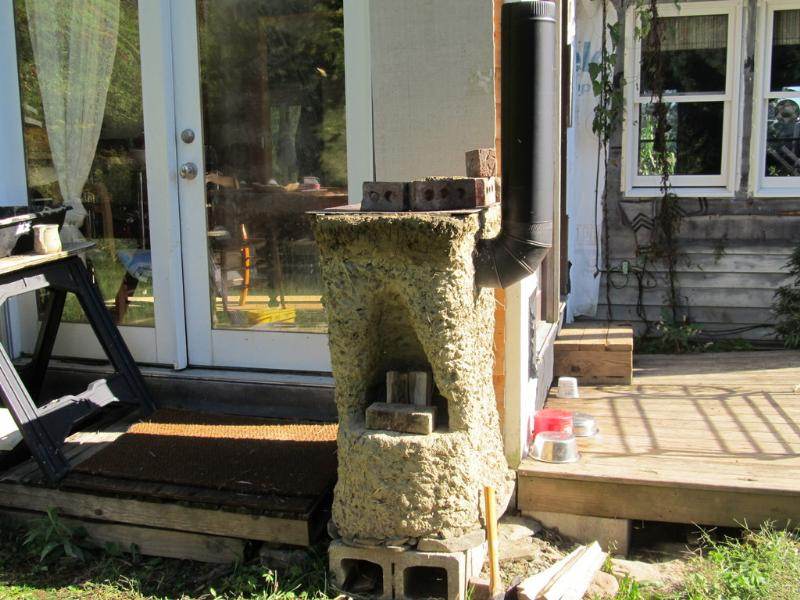
The finished stove:


The photobucket images don't want to show up apparently...
 
gardener
Posts: 3471
Location: Southern alps, on the French side of the french /italian border 5000ft elevation
194
  • Mark post as helpful
  • send pies
    Number of slices to send:
    Optional 'thank-you' note:
  • Quote
  • Report post to moderator
Hi Glenn, i've fixed your images. The trick with photobucket is, to right click on the image, go to properties, to have the proper link, and not the "viewer" link. You can either highlight it in the dialog box which has apeared, or triple click on the link, then copy; and paste here. HTH.

Max.
 
Glenn Herbert
Rocket Scientist
Posts: 4529
Location: Upstate NY, zone 5
575
5
  • Mark post as helpful
  • send pies
    Number of slices to send:
    Optional 'thank-you' note:
  • Quote
  • Report post to moderator
Thanks a lot, Max! For practice:

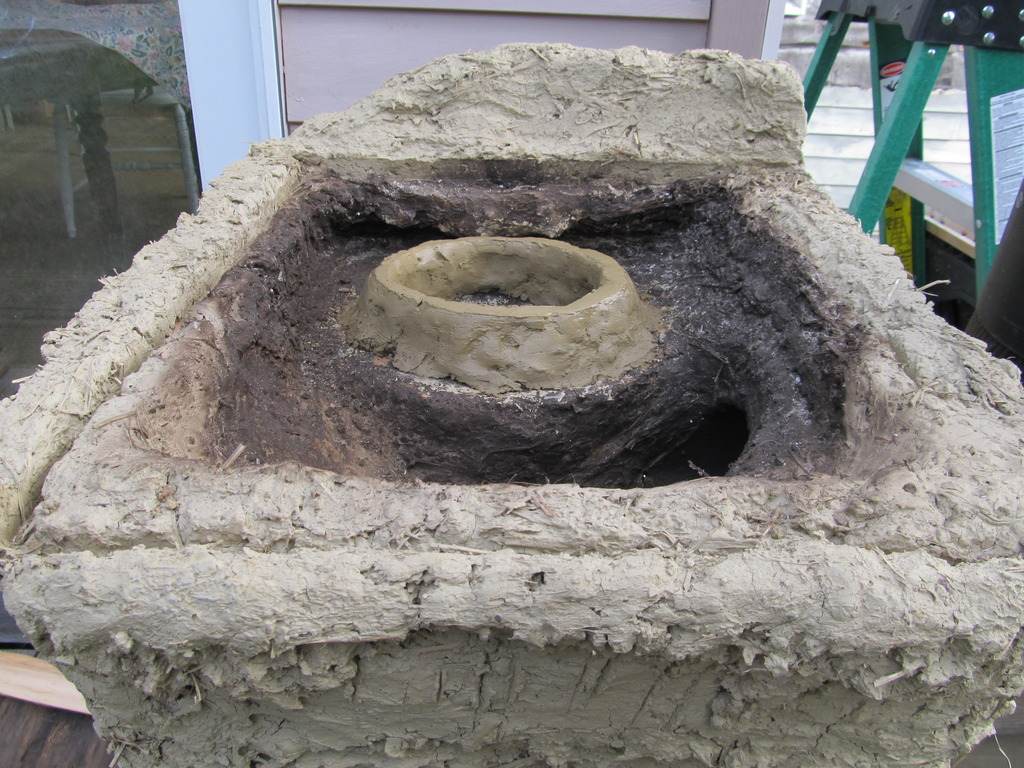
The riser brought up to narrow the gap with the cooktop:
 
Roberto pokachinni
gardener
Posts: 3489
Location: Fraser River Headwaters, Zone3, Lat: 53N, Altitude 2750', Boreal/Temperate Rainforest-transition
689
hugelkultur forest garden fungi trees books food preservation bike solar woodworking
  • Mark post as helpful
  • send pies
    Number of slices to send:
    Optional 'thank-you' note:
  • Quote
  • Report post to moderator
Sorry for my lack of response to this thread. There have been some really cool stuff posted by everryone that deserves bumping to the top, if nothing else.

Thanks for posting these images, Glen. I guess the question of the Bell chamber sort of remains. I think the only way to go forward is to try it, somehow. There are two reasons that I think that it might not be a great idea to do a cob bell for a RMH.

1.) The cob will have to be thick enough to be structural and to take the heat; the problem with this being that I see is that this will absorb too much heat before going to the bench, reducing draft. Perhaps it's a non-issue.

2.) The cob bell removes the opportunity to inspect the heat riser.

Hi F. Styles; I do get what you are saying here:

i would not "saturate" the sawdust since that may create a larger amout of steam and cause the clay to crack when fired.


The idea of saturating the sawdust from the cordwood construction technique of adding saturated sawdust to the mortar for a rebar like effect as well as for it's insulating effect. Wet sawdust is considerably larger than dry sawdust, and thus the pockets after drying are that much larger. The way that I would get around the issue of steam pockets would be to slowly dry the cob with many little cooler fires, rather than blazing rocket style right off. I have done the slow heating to dry technique with success with a clay Orno oven when I was at Boulder Outdoor Survival School in Utah.

Hi Tobias Ber; I get this nature of cob that you mention.

as far as i know, cob without sand will very often develop cracks when drying. it totally depends on the mixture of your clay. the clay will need the sand particles to form a structure.
often it s 1 part of clay to 1-2 parts of sand along with some short fibres for tensile strenght (chopped straw, animal hair ...). your mixture will need testing at different ratios.


Using tiny pebbles of pre-fired clay that I mentioned in the original post in this thread would probably eliminate or replace the need for sand in the cob mix (while adding insulation, in relation to sand). I would think that this, as well as grass fibres and sawdust (both saturated) would create a fairly insulated structure when dried and burned out. I was thinking that, if I was wanting it to really have an insulated burn tunnel and riser, I could make a double system, and fill the gap with bone dry pre fired clay pebbles. But I don't know if that would be necessary, or if the saturation would be necessary. I would just like to maximize the insulative qualities that can be incorporated in the cob in a more primitive way.
 
F Styles
Posts: 455
Location: climate zone 6b
3
  • Mark post as helpful
  • send pies
    Number of slices to send:
    Optional 'thank-you' note:
  • Quote
  • Report post to moderator
Roberto, if you goal (by saturating) is to have larger air pockets then make larger sawdust? right? keep it simple.

i would love to see your all cob rocket stove.
 
Satamax Antone
gardener
Posts: 3471
Location: Southern alps, on the French side of the french /italian border 5000ft elevation
194
  • Mark post as helpful
  • send pies
    Number of slices to send:
    Optional 'thank-you' note:
  • Quote
  • Report post to moderator
Roberto, using expanded clay balls has been done, but not directly in the clay i think. Under it as a bed for the bench.

Crushing thoses would make something rather similar to grog, which you find in firebricks.

And for inspection of your bell. Use an insert door.

 
Roberto pokachinni
gardener
Posts: 3489
Location: Fraser River Headwaters, Zone3, Lat: 53N, Altitude 2750', Boreal/Temperate Rainforest-transition
689
hugelkultur forest garden fungi trees books food preservation bike solar woodworking
  • Mark post as helpful
  • send pies
    Number of slices to send:
    Optional 'thank-you' note:
  • Quote
  • Report post to moderator

i would love to see your all cob rocket stove.


Yeah. Me too. But I'm more apt to build a more 'conventional' rocket mass heater on first try in the house I hope to build this year. It may share an exhaust chimney with a mud bread oven and an antique wood cookstove. We shall see. Might eliminate (sell) the antique.


Crushing thoses would make something rather similar to grog, which you find in firebricks.


Yeah. That's the idea, Max.


And for inspection of your bell. Use an insert door.


Cool. I haven't seen an access door in the bell like that. I was thinking of looking down the riser. I guess I could put a hole in the top of the bell and just insert a thick enamel pot or something there.


Posts: 145
Location: MA
purity forest garden trees
  • Mark post as helpful
  • send pies
    Number of slices to send:
    Optional 'thank-you' note:
  • Quote
  • Report post to moderator
Here's a list of thermal conductivity of selected materials in increasing order: perlite 0.031 (W/m*K), mineral wool 0.04, Diatomaceous earth 0.06, vermiculite 0.065, Charcoal 0.084 .  I couldn't find data on the type of charcoal this refers to but softwood char is probably more insulating than hardwood char because it is more porous and lower density.  Char isn't as good an insulator as the other materials but it isn't too bad either.  

If oxygen is present, char will ignite at a temperature slightly high than the temperature the char was produced at.
"Charcoal made at 300 °C (572 °F) is brown, soft and friable, and readily inflames at 380 °C (716 °F); made at higher temperatures it is hard and brittle, and does not fire until heated to about 700 °C (1,292 °F)."  source:  http://en.wikipedia.org/wiki/Charcoal#History

I suppose this isn't high enough to use in the hottest parts of a RMH, since steel and glass melt at 1400 °C and the rocket gets even hotter than that.  In theory you could use this graphitic material if no oxygen was present, but unfortunately it's probably not possible to ensure an air-tight seal.  In theory the char will also ignite before reaching ceramic sintering temperatures, so there could still be spalling as seen with the other outgassing materials.  

Another idea is to use foamed refractory cement or foamed clay-slip casting.  Mix up a batch of dish soap, water and corn starch (google: "bubble blowing recipe").  Whip it into a foam.  Mix it into the refractory cement or clay-slip.  Then cast it.  I haven't tried this, but people make aerated-concrete all the time with portland cement , so presumably it would work the same with refractory cement or clay-slip of a suitable viscous thickness.  In theory the outgassing should be negligible and of comparable effect to perlite, as long as only air is being trapped and little or no mass that decomposes at high temperatures.  (For this reason, a very lightweight insulation like polystyrene foam (Styrofoam) might also work, although maybe that wouldn't be considered green.  It would also really stink on the first firing.)

One might be able to make an artificial perlite-like material.  For example, use the above casting method to cast a thin sheet, then break it up into smaller pieces.  

 
Posts: 154
14
2
  • Mark post as helpful
  • send pies
    Number of slices to send:
    Optional 'thank-you' note:
  • Quote
  • Report post to moderator

Glenn Herbert wrote:The stove the women are making is not a rocket, but the techniques are applicable.

I have built a rocket bake oven and a rocket stove of cob. The oven has a cob L-tube with about 6" diameter, 2'+ horizontal and 30" vertical splitting into several channels under the (firebrick) oven floor and entering the oven at the edges, then leaving through a chimney. It takes some time to heat up, but bakes well. By the charring on the wood door, it gets to at least 400F inside.

The stove is all cob, formed around a sacrificial scrap wood inner 6" J-tube form, with a 1/8" steel cooktop, and a 6" stovepipe chimney leaving the space under the cooktop. It seems to work well in early trials after adjusting the gap between the riser and cooktop. 4" was too much, 2" or so is better. The riser is about 34" tall from burn tunnel floor, and could be shorter and would probably heat the cooktop better.

The inner form set in place on the base:


Burning out the form after applying the first layer of cob:


The finished stove:


The photobucket images don't want to show up apparently...


Glenn, this is AMAZING!   I had friends who were potters and made their own kiln every couple years, but I never had the opportunity to watch them build it or see it in action.  

Would you be willing to give an update on this cob cooktop RMH you built, such as how has it held up, is it still effective, etc. ?  Did you use different cob mixes for different parts of it or all the same stuff?

Also, do you hav pictures of the oven and would you give an update on that as well?

Again, this is awesome!!!  Ever since I spent a day at a farm in Wisconsin and toured the cob home of the farmer who built it all with clay from his land, mixed with a pitchfork on a plywood board, i've been fascinated by what can be done with just cob.  
 
Glenn Herbert
Rocket Scientist
Posts: 4529
Location: Upstate NY, zone 5
575
5
  • Mark post as helpful
  • send pies
    Number of slices to send:
    Optional 'thank-you' note:
  • Quote
  • Report post to moderator
My wife rented out her house not too long after we built the stove shown, so we have not had a chance to really use it. The tenants will be moving out and her daughter moving in pretty soon, so we should have a chance to test it well this coming summer or maybe fall, I think. It has been under a shield and tarp for a couple of years now, and I hope it is still intact.

I didn't do much special with the cob mix; most if not all of it was my native clay with all stones larger than small gravel picked out, and dried grass or straw worked in. (It has a high percentage of sand and gravel as is and makes fine cob with just straw added.)

Because I had to bring in the clay from my house 75 miles away, I was very frugal with its use and built in as many honeycombed air cavities as I could around the core, which was a couple of inches thick.


There is a complete series of photos of the rocket cob oven on facebook; I can see about posting a thread here when I get time.
 
That which doesn't kill us makes us stronger. I think a piece of pie wouldn't kill me. Tiny ad:
Grant Schultz PV3 Presentation - Making Permaculture Pay: Proven Business Blueprints
https://permies.com/wiki/176736/Grant-Schultz-PV-Presentation-Making
reply
    Bookmark Topic Watch Topic
  • New Topic