gift
100th Issue of Permaculture Magazine
will be released to subscribers in: soon!
  • Post Reply Bookmark Topic Watch Topic
  • New Topic
permaculture forums growies critters building homesteading energy monies kitchen purity ungarbage community wilderness fiber arts art permaculture artisans regional education skip experiences global resources cider press projects digital market permies.com pie forums private forums all forums
this forum made possible by our volunteer staff, including ...
master stewards:
  • Carla Burke
  • Nancy Reading
  • r ransom
  • John F Dean
  • paul wheaton
  • Jay Angler
stewards:
  • Timothy Norton
  • Pearl Sutton
  • Tereza Okava
master gardeners:
  • Christopher Weeks
  • M Ljin
gardeners:
  • Jeremy VanGelder
  • Matt McSpadden
  • thomas rubino
  • Mark post as helpful
  • send pies
    Number of slices to send:
    Optional 'thank-you' note:
  • Quote
  • Report post to moderator
This is a badge bit (BB) that is part of the PEP curriculum.  Completing this BB is part of getting the straw badge in Electricity.

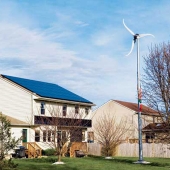
In this Badge Bit, you will install a powerwall for your house.  Whether to store grid power during off-peak rates or for a renewable energy system, they're nifty.  Let's install one!

You can use an official Tesla powerwall or build your own


Here's an installation on a grid tied system:


There are two point options for this BB:
  - properly (to code) install in a grid tied house - 20 points
  - properly (to code) install in an off-grid house - 10 points

The minimum requirements are:
  - install one or more powerwalls (or rough equivalent)
  - follow local codes
  - you are doing 90+% of the work

To show you've completed this Badge Bit, provide proof of the following as pics or video (less than two minutes):
  - the parts of your system as purchased
  - the system at two points during the installation
  - clear description of the components of your system and how they work together
  - the finished installation
COMMENTS:
 
Posts: 17
1
  • Likes 1
  • Mark post as helpful
  • send pies
    Number of slices to send:
    Optional 'thank-you' note:
  • Quote
  • Report post to moderator
Submission pending approval
This can be at best, delayed gratification, but I at least have photos of the adventures, whereas I don't have any of the "sand" level tasks I've done - they were done prior to me being aware of the existence of badge bits, and usually completed too quickly to get pics...

(Disclaimer) This install is a paid job I did for a client recently. I am a professional IT consultant and technician.

A client is running a startup business, housing their servers in their (residential) basement. I've never met most of the employees, as everyone works remotely, but the residential grid power isn't always the most reliable, and they found out the hard way, that their typical computer UPSs would only keep the servers running for about 15 minutes. After an hour and a half downtime, they decided to seek my help/advice. There's a small standby generator, but it's only sized to keep the sump pumps running and the furnace. It preceded the startup, and the property owner didn't want to replace it with a higher capacity one.

I measured their power usage for the server room (I think that's one of the lower tasks, but I don't have any pics of that part), and I proposed an expandable "DIY" version of a powerwall, because they mentioned that they needed to expand their server capacity to keep up with their business growth. They were drawing about 5Kw, just from the server room, so I suggested a 6Kw system that could be expanded by adding more units and networking them. We discussed their preferred up-time (hours, not minutes), and where the powerwall could/should be installed. Initially, the server room was supplied by 2x 20 amp 120V branch circuits for the servers, and a 30 amp 240V circuit for the minisplit AC system that cooled the room. Their planned expansion would increase their power usage to possibly 8 Kw.

I ended up installing a 100 Amp sub-panel to supply the inverter(s) - allowing for the planned expansion, a manual transfer switch (to be able to do maintenance on the inverters and bypass them while keeping the servers running, and a load-side breaker box for the branch circuits of all the server room equipment. I also installed a new light fixture in the space, to make it easier/safer to work in the room, and a separate 20 amp GFCI outlet on its own breaker, mostly for tool/utility use in the space. If I can find pics of that, I'll post them to the lower level task threads...

All high voltage wiring in this area, is required to be in metal conduit, so new conduit runs were needed. I hadn't previously ever worked with bending 1" EMT conduit, so that was an adventure and a learning experience for me. I did have a helper, but as they were skittish about working on high voltage, they worked on assembling the battery boxes while I worked with the conduit, the hydraulic knockout cutter, populating the breaker boxes and connecting the AC wiring.

They helped with the heavy lifting to mount the unit on the wall, and pulling wires through the conduit, among other things that aren't relevant to this submission.

The lithium iron phosphate batteries were ordered directly from a Chinese supplier, prior to the tarrif wars, as were the first 2 battery boxes. The initial system capacity was 6 Kw continuous and 32 Kwh battery storage. The following year (6 months later) they decided to go thru their planned upgrades and a second inverter was installed, along with 2 more battery boxes, bringing the system capacity up to 12 Kw and 64 Kwh of battery capacity. The initial system proved itself well, as there was a 4 hour 19 minute outage during a major storm, where the residents were out of town, got notified by the utility company of the outage, and couldn't do anything about it... The system ran flawlessly and none of the remote users even knew that power was out!

After that, they accepted my recommendations to expand the battery capacity to 4 boxes, as the inverter capacity can be independently expanded, separate from expanding the battery capacity.

It's hard to assess how much of the time was spent on the powerwall part, as there was a lot of other things going on during this project. The relevant processes we went through were:
1) site location and capacity planning {30 minutes}
2) installing new conduit for the sub-panel feeder {2 hrs}
3) locating/mounting the sub-panel {30 minutes}
4) pulling wire from the main breaker box 60' to the sub-panel {45 minutes}
5) locating/mounting the bypass transfer switch and load breaker box {60 minutes}
6) installing new conduit from the server room for the branch circuits, since we were moving them to the new load panel
through the existing walls/ceiling {4 hrs}
7) running wiring and installing new breakers to bring mission-critical systems back online {1.5 hrs}

(We'd gotten permission for a 24-hr maintenance window, to shut everything down for this, with the promise that everything would be back up in 24 hrs, and that future expansion wouldn't cause additional downtime. During this window, several of the rackmount cabinets were rearranged to make more room for more servers and more conventional UPSs, in addition to installing operating systems on the new servers in an adjacent room, replace aged UPS batteries on the old UPSs, install the new UPSs, etc.  Most of that isn't documented here because it's not relevant to the BB)

After the power was restored to the server room, we could install the inverter and batteries with less pressure to "get back up ASAP, so we took the night off and came back the next day. We did build a rolling platform for the battery boxes, because of their weight, but that time isn't relevant to this submission.

installing the plywood mounting board with blocking behind it {60 minutes}
9) installing the concrete backer board (the inverters are supposed to be installed on a non-combustible surface) {15 minutes}
10) mounting the inverter on the wall {10 minutes}
11) running wiring for the inverter supply and load {30 minutes}
12) making custom battery cables {30 minutes}
13) connecting the batteries to the inverter, and bringing it online {2 hrs}
14) testing power outages to see if the system works {5 minutes}

Some time afterwards, we were called to upgrade the server room with more servers, which required adding 2 new 30 amp branch circuits to the load panel, the related new conduit, an additional inverter, and a pair of additional battery boxes. I include a picture of the expanded "DIY" powerwall setup, although I don't think it's a hard requirement for meeting this BB.


1000009267.jpg
The selected spot to install the powerwall (before)
1000009280.jpg
The initial UPSs needed & got replacement batteries, but not enough to keep it running more than 15 minutes...
1000009247.jpg
New batteries for the conventional UPSs
1000009250.jpg
The main breaker box before the sub (thankfully there's a spot for another ground lug)
The main breaker box before the sub-panel wiring (thankfully there's a spot for another ground lug)
1000009244.jpg
Open spot for the ground lugs - just need to find the compatible part!
1000009233.jpg
100 amp sub-panel, fed from the top of the box
1000009222.jpg
100 amp sub-panel further along - both inverter breakers are in, although initially only the right one was put into service
1000009221.jpg
The bypass transfer switch
1000009231.jpg
The load-side breaker box
1000009223.jpg
The groundwork is done, server room power now restored, as batteries & inverters can be added separately
1000009218.jpg
Initial inverter is mounted.
1000009224.jpg
The servers are up and running on grid power while the powerwall system is being installed
1000009219.jpg
The battery boxes are being assembled in place, too heavy to not be (275 lbs/each)
1000009209.jpg
All high voltage wiring needs to be in metal conduit in this county
1000009208.jpg
The low voltage (battery cables) isn't required to be in conduit
1000009207.jpg
EG4-6000XP wired up
EG4-6000XP wired up
1000009200.jpg
EG4-6000XP set up, programmed, and put into service
1000009203.jpg
The completed (first phase) powerwall in service
1000009198.jpg
The old & new conventional UPSs in place
1000009172.jpg
After expanding the setup to 12 Kw/64 Kwh
 
Allen Jackson
Posts: 17
1
  • Mark post as helpful
  • send pies
    Number of slices to send:
    Optional 'thank-you' note:
  • Quote
  • Report post to moderator
Everything I've done in this job could be done similarly in any residential or commercial location, provided one has the space to put it.

The BB submission was primarily "what" I did, while this post is much more about "why" did I do it that way.

In the client board meeting I was invited to attend, where they were discussing this project, it was suggested that I install a Tesla Powerwall, and I suggested that they could do much better, and for much less money too.

How does this compares to the genuine Tesla Powerwall?  Both of them are 120V/240V (split-phase).

According to published specs, the Powerwall V3 has an inverter capable of 11.5 Kw power output continuously (V2 was only 5.5 Kw), with peak capacity of?? (They publish a 185 LRA*, but no duration I've found, like most of the other manufacturers), for starting heavier inductive loads with high inrush currents. The battery pack is rated at 13.5 Kwh, and V3 can have up to 3 additional 13.5 Kwh battery packs added.  It also uses the same LiIon battery chemistry that the cars use, which is more energy dense than LiPO4, but more dangerous and typically with a useful service life of about 500 cycles.

For this, one only has to pay $8-9K, plus installation costs, and I don't know if one can buy just the hardware and install it themselves, because of the 10-year warranty. Typical installed costs are $12-16.5K for a single unit, no extra battery packs. While it does have a 10 year warranty, it also has NO user-serviceable parts inside, so when the batteries degrade, one can only send it back to Tesla for service...

This "DIY" version uses LiPO4 battery chemistry (although that's up to the builder), and they take up much more space than the equivalent LiPoly batteries would, but much safer/not subject to thermal runaway or fire if abused. They also have a useful service life of 8000 cycles, so their TCO is much lower. I used the fairly common EVE MB31 cells, rated at 314 Ah, which gives each box of 16 a capacity just over 16 Kwh, at a cost of about $2.2 K/each (last time I checked), although pre-tarrif costs were below $2K before. The BMS the boxes come with can support daisy-chaining up to 16 battery boxes together, for a maximum capacity of 256 Kwh of storage.

These boxes are Basen-Greene branded, and they can be purchased as empty boxes ready to add your own batteries, or as a kit including batteries from US stock, or shipped directly from China, depending on stock on hand, and there are many other very similar options from a variety of manufacturers. As a downside, nobody will offer a system-wide warranty on something that you assemble yourself, but OTOH, if you build it, you can probably fix anything that might go wrong, AND you can replace or upgrade any of the components, as you see fit.

I chose the EG4 6000XP inverter, because it can scale in a variety of ways, and it DOES have a UL listing, so that will make your inspectors happy, and possibly your insurance agent too. Rated at 6 Kw continuous with peak power output of 12 Kw, these can be ganged in parallel to combine their power output ratings, up to 9 units, and EG4 makes larger ones if that's not enough power. They can even be ganged to provide 3-phase power, if that suits the need, although it will require at least 3 of them to do so.  The EG4 6000XP can be stacked, up to 16 units, for a maximum output of 256 Kw, so this size seemed a good fit for that job, and probably good for most single family residences.

Currently, they're priced about $1630/each, and vendors will sell directly to the consumer. That makes the cost of going this route:

$3260 for a pair of EG4 6000XP inverters
$2300 for a single battery box & batteries

For the comparable capacity of the Tesla Powerwall 3 = $5560, plus tax & shipping (many vendors offer free shipping from time to time too)
Buying an actual Tesla Powerwall 3 = about $9000 plus tax, shipping, and probably mandatory installation to tack on an additional $5K+

Now factor in the cost to expand the system, and the "DIY" leaves the Tesla in the dust, in my opinion. Granted my opinion is heavily colored by the fact that I CAN install my own, as my wife is quick to point out and it will never occur to me to consider the Tesla system... Your mileage may vary.

For anyone considering similar, keep in mind, the lifecycle and replacement costs make lead-acid batteries a caustic money pit and the total cost of ownership is MUCH less with LiPO4 battery chemistry and while LiPoly offers much less space/weight, that's probably not a critical factor in a stationary installation - at least not nearly as much as it would be in a moving vehicle.

 
This tiny ad is suggesting that maybe she should go play in traffic.
Back the BEL - Invest in Permaculture
https://permies.com/w/bel-fundraiser
reply
    Bookmark Topic Watch Topic
  • New Topic