A couple of years ago I built a mockup of a 4" batch box as a test, and I wanted to share the details for reference. I used ordinary hard firebricks, full size and splits (1 1/4" thick), as that was what I had on hand. A ceramic fiber board version would be more efficient for a critical installation, but this would serve for testing and occasional use, without major expense.
The pictures tell most of the story. I followed the specs at
batchrocket.eu as closely as possible given the standard firebrick dimensions, 4 1/2" x 9" x 2 1/2" or 1 1/4". The port had to be a slightly different shape, but I made it the same cross sectional area, a bit shorter and a bit wider. The firebox ends up 6" wide x 9" high x 13 1/2" deep, the port is 2" wide x 4 1/2" high, sharing the firebox floor, and the riser is 3 3/4" x 4 1/2" (oriented long way in line with the firebox) x 27" high. I wired the riser bricks together for this test; you would want a more rigid and durable containment for a permanent installation. I had all new or clean firebricks, so dry fitting gave tight joints. If you have rough or chipped bricks, you would need some sealant for the joints. I used no insulation for the test, but you could easily wrap fiberglass around the core for the small heat source. Rockwool would be more durable.
It lit easily and burned fast and hot, giving pretty double rams horns from the port into the riser, and burning so clean when properly adjusted that I could stand on the ladder with my face over the riser and comfortably breathe the exhaust.


 3
3


![[Thumbnail for IMG_1234.JPG]](/t/101845/a/71312/IMG_1234.JPG "Filename: IMG_1234.JPG
Description: during assembly - it gets another course of firebricks on the riser")
![[Thumbnail for IMG_1237.JPG]](/t/101845/a/71313/IMG_1237.JPG "Filename: IMG_1237.JPG
Description: firebox and port opening")
![[Thumbnail for IMG_1238.JPG]](/t/101845/a/71314/IMG_1238.JPG "Filename: IMG_1238.JPG
Description: front view")
![[Thumbnail for IMG_1248.JPG]](/t/101845/a/71315/IMG_1248.JPG "Filename: IMG_1248.JPG
Description: loaded")
![[Thumbnail for IMG_1241.JPG]](/t/101845/a/71316/IMG_1241.JPG "Filename: IMG_1241.JPG
Description: burning, flames headed to port")
![[Thumbnail for IMG_1293.JPG]](/t/101845/a/71317/IMG_1293.JPG "Filename: IMG_1293.JPG
Description: looking down the riser - double rams horns")
![[Thumbnail for IMG_1296.JPG]](/t/101845/a/71318/IMG_1296.JPG "Filename: IMG_1296.JPG
Description:")
![[Thumbnail for IMG_1301.JPG]](/t/101845/a/71319/IMG_1301.JPG "Filename: IMG_1301.JPG
Description: firebox closed for proper air supply, no primary/secondary for the test")
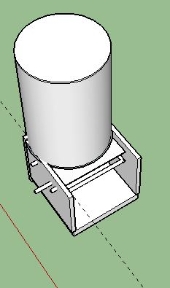
![[Thumbnail for IMG_1283.JPG]](/t/101845/a/71320/IMG_1283.JPG "Filename: IMG_1283.JPG
Description: overall view in operation")