• Post Reply Bookmark Topic Watch Topic
  • New Topic
permaculture forums growies critters building homesteading energy monies kitchen purity ungarbage community wilderness fiber arts art permaculture artisans regional education skip experiences global resources cider press projects digital market permies.com pie forums private forums all forums
this forum made possible by our volunteer staff, including ...
master stewards:
  • Nancy Reading
  • Carla Burke
  • r ranson
  • John F Dean
  • paul wheaton
  • Pearl Sutton
stewards:
  • Jay Angler
  • Liv Smith
  • Leigh Tate
master gardeners:
  • Christopher Weeks
  • Timothy Norton
gardeners:
  • thomas rubino
  • Jeremy VanGelder
  • Maieshe Ljin

First Stove Build (with Water Glass)

 
Posts: 33
Location: Ireland
12
trees bike rocket stoves ungarbage
  • Mark post as helpful
  • send pies
    Number of slices to send:
    Optional 'thank-you' note:
  • Quote
  • Report post to moderator
Hi all, my first post here :)
I'm using size 14 text because its better for my eyesight.

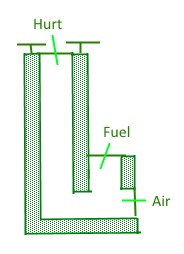
I'm going to build a J type stove, 4 inch inner diameter, 6 inch outer, and a concrete/Perlite insulation.
I want it to be as light as possible so that it can be used and transported without causing weight-lifting injuries.
It was going to be all tin cans and insulation, but having seen some recent posts here about metal wearing away, I have decided to go with just the outer cans, the insulation, and make it with an inner cardboard tube which will burn off.
Because there is less metal overall, I think the riser needs to be very strong so that someone can put 14-20 pounds of water on it without it collapsing.


My planned insulation mix is this,
Perlite to reduce weight and provide insulation
Water Glass to provide insulation and strength
Portland cement to provide strength (it gives off Carbon Dioxide when curing, this causes the Water Glass to cure also)
Although the Portland cement is not an insulator, my hope is that this will be offset by the other two insulators.
I figure a 1:1 ratio of Water Glass to Portland Cement is sufficient for curing.

As you can imagine I have a few questions so I can get going in the right direction...

What is a good ratio of Perlite, Water Glass and cement so that the 1 inch thick riser is strong enough but still be as light as possible?
Will the Perlite absorb water and if so, should I add more Water Glass or just extra Water on its own?
Should the height be measured from the inner tube's top, center or bottom?
Height should be 3x times the inner diameter? (4 inch x 3 = 12 inches tall)

Thanks
Joe
 
master pollinator
Posts: 1749
Location: Ashhurst New Zealand (Cfb - oceanic temperate)
533
duck trees chicken cooking wood heat woodworking homestead
  • Likes 4
  • Mark post as helpful
  • send pies
    Number of slices to send:
    Optional 'thank-you' note:
  • Quote
  • Report post to moderator
Hi Joe, and welcome to permies. This is an interesting project and it looks like you've been doing some research and planning. Two things jump out at me that may cause you trouble (but then again, they might be valid questions that should be tested). A 4-inch system is at the lower limit of what is deemed workable -- I've got one that I've been running for over two years and I can attest that it's touchy at times.

First, a J-tube design typically draws its air through the feed tube. Having a secondary air inlet that size shouldn't be necessary, and although it will make cleanout really easy it could mess with pressure gradients. Maybe consider an adjustable plate so that you can modulate the amount of airflow through the horizontal port.

Second, portland cement does not handle high temps. It will spall and degrade. Use fireclay or silica-based refractory cement as a binder and you will be far happier in the long run. It is possible to make a decent riser with perlite, fireclay slip and waterglass. Use as little of the slip mixture as possible...I didn't and it slumped and took forever to dry, and now it robs a lot of heat from the fire after I light it.
 
Joe Moon
Posts: 33
Location: Ireland
12
trees bike rocket stoves ungarbage
  • Likes 2
  • Mark post as helpful
  • send pies
    Number of slices to send:
    Optional 'thank-you' note:
  • Quote
  • Report post to moderator
Thanks Phil

They have Fire Clay at my local Woodies so I'll use that instead of Portland.
Hope it helps cure the Water Glass with CO2
What do you mean "slip", like a powder form?
I intend to use about 4 times as much Perlite as cement.

The air intake is mainly for clean-out and lighting the stove.
I was thinking of making a thing to block it, perhaps a thin adjustable plate like you say with a simple wire hinge in the center, but it might get in the way.
The other option is make a plug with a slight taper to wedge it in, or a shaped channel to sit in. It would be simpler in the end, but easier to lose the plug while out and about.
I let simplicity be my guide in the end, so a plug it may be, perhaps with a couple of 1/4 inch holes.

I want to stick to the small and portable idea as much as possible, and its easier for me to access the 4 inch tube than anything bigger.
 
Rocket Scientist
Posts: 794
Location: Guernsey a small island near France.
299
  • Likes 1
  • Mark post as helpful
  • send pies
    Number of slices to send:
    Optional 'thank-you' note:
  • Quote
  • Report post to moderator
If you are looking for lightness and ease of build then you may care to look at the 5 min riser system.
If a 5 minute riser suits you, then you might as well make a 6” system as the weight saved will be substantial.
 
Phil Stevens
master pollinator
Posts: 1749
Location: Ashhurst New Zealand (Cfb - oceanic temperate)
533
duck trees chicken cooking wood heat woodworking homestead
  • Mark post as helpful
  • send pies
    Number of slices to send:
    Optional 'thank-you' note:
  • Quote
  • Report post to moderator
Slip is a runny mixture of clay and water. You want just enough to coat the perlite and help it stick together, not fill all the voids and make a massive riser.
 
Joe Moon
Posts: 33
Location: Ireland
12
trees bike rocket stoves ungarbage
  • Mark post as helpful
  • send pies
    Number of slices to send:
    Optional 'thank-you' note:
  • Quote
  • Report post to moderator

Fox James wrote:If you are looking for lightness and ease of build then you may care to look at the 5 min riser system.
If a 5 minute riser suits you, then you might as well make a 6” system as the weight saved will be substantial.


I have looked around for a "5 minute riser" and can't find anything on it.
If I'm going to consider it I will need to know what it is, what it does and how to make one.
It would be handy if there was a thread about it.
 
Joe Moon
Posts: 33
Location: Ireland
12
trees bike rocket stoves ungarbage
  • Mark post as helpful
  • send pies
    Number of slices to send:
    Optional 'thank-you' note:
  • Quote
  • Report post to moderator

Phil Stevens wrote:Slip is a runny mixture of clay and water. You want just enough to coat the perlite and help it stick together, not fill all the voids and make a massive riser.


I appreciate that a more liquid mix is good for getting everywhere it needs to go.
My plan was to mix the dry cement with the perlite to coat it, then add the water glass until its pour-able enough to get into the mould.
Do you think I need to dampen the perlite first with water?
A lot of people on you tube have made very dry mixes for their pizza ovens, but some of them crumble in the hand.

When you add water glass to cement it goes rock hard in about 30 minutes, so once you mix it you only have a few minutes to form it before it gets too thick and stodgy.
 
Phil Stevens
master pollinator
Posts: 1749
Location: Ashhurst New Zealand (Cfb - oceanic temperate)
533
duck trees chicken cooking wood heat woodworking homestead
  • Mark post as helpful
  • send pies
    Number of slices to send:
    Optional 'thank-you' note:
  • Quote
  • Report post to moderator
Hi Joe - my experience with fireclay slip and waterglass has been that I can get a nice low-viscosity mixture that works well for coating perlite. My error when I cast the first riser was simply using too much of it, and not only did it slump badly, but it took weeks to dry out and now acts more as mass than insulation. When I refashion the RMH after this winter, I will rebuild the burn tunnel and make a five-minute riser.
 
Joe Moon
Posts: 33
Location: Ireland
12
trees bike rocket stoves ungarbage
  • Mark post as helpful
  • send pies
    Number of slices to send:
    Optional 'thank-you' note:
  • Quote
  • Report post to moderator

Phil Stevens wrote:Hi Joe - my experience with fireclay slip and waterglass has been that I can get a nice low-viscosity mixture that works well for coating perlite. My error when I cast the first riser was simply using too much of it, and not only did it slump badly, but it took weeks to dry out and now acts more as mass than insulation. When I refashion the RMH after this winter, I will rebuild the burn tunnel and make a five-minute riser.


Thank you for the link.
Its good to know that there is a roll-out ceramic fibre blanket (Superwool) that can give an almost instant insulation (five minute riser), and will make designing future burners much easier. However I won't be using it on this build, as I need to keep things strong and simple.
I'm essentially making a camping / glamping stove in one piece, where the riser needs to support over 20 pounds of weight sitting on top. I'm hoping the 6" tin cans I put around the riser will be reinforcement enough.

How do you mean "slump", did it collapse the mould?
Maybe fill the mould with sand or something when placing it, to prevent collapse.

Using concentrated water glass instead of water should cure the mixture very quickly, maybe quick enough that you can hold things in place by hand until its set. (maybe test a small bit first)
 
Joe Moon
Posts: 33
Location: Ireland
12
trees bike rocket stoves ungarbage
  • Mark post as helpful
  • send pies
    Number of slices to send:
    Optional 'thank-you' note:
  • Quote
  • Report post to moderator
Some extra strength can be added using fibers....
https://permies.com/t/61033/Adding-structural-integrity-perlite-clay#520147

Roberto pokachinni wrote: I did read about someone using fibreglass.
I was thinking about doing this as well.  My thoughts on this: The fibers might be small, but that is not a bad thing, as you are looking for micro re-bar.  They will bind bit by bit throughout the mix.  Wear a mask.  Mix them into your dry mix so that you get them evenly distributed, and then add your water.  Make a mix of just the fiberglass fibers (in higher quantity with clay slip) and run that over the internal surface to give it super strength.  


Phil Stevens
master pollinator
Posts: 1749
Location: Ashhurst New Zealand (Cfb - oceanic temperate)
533
duck trees chicken cooking wood heat woodworking homestead
  • Mark post as helpful
  • send pies
    Number of slices to send:
    Optional 'thank-you' note:
  • Quote
  • Report post to moderator
I cast my riser inside 4L paint tins with the ends cut out. They were taking forever to dry, so I slid them out of the forms and they slumped. Basically, I think I overdid it on the waterglass, but I also should have used a much "drier" mix and only enough slip to coat the perlite and make it stick together. My riser wound up being pretty massive.

Since you plan on leaving the cans around the outside that should add plenty of strength. If you do a version 2.0 you could try superwool lining the inside of the cans.
 
Fox James
Rocket Scientist
Posts: 794
Location: Guernsey a small island near France.
299
  • Likes 2
  • Mark post as helpful
  • send pies
    Number of slices to send:
    Optional 'thank-you' note:
  • Quote
  • Report post to moderator

Joe Moon wrote:

Fox James wrote:If you are looking for lightness and ease of build then you may care to look at the 5 min riser system.
If a 5 minute riser suits you, then you might as well make a 6” system as the weight saved will be substantial.


I have looked around for a "5 minute riser" and can't find anything on it.
If I'm going to consider it I will need to know what it is, what it does and how to make one.
It would be handy if there was a thread about it.


Hi Joe, there are lots of threads on this forum relating to the 5min riser but basically it involves the use of ceramic fibre insulation that is rolled into the desired shape and size to produce a very effective and efficient heat riser.
As this process takes so little time and effort is has been named the five minute riser.

The most common method is to obtain an 8” metal tube, air conditioning ducting is often used as it is cheap, light and readily available.
The you need a piece of 1” ceramic fibre matting, this is cut to the correct dimensions and inserted into the tube to produce a 6” heat riser.
The matting is extremely effective and allows the system to reach high temperature very quickly.

Many people also use ceramic fibre board, this is a ridged version of the matting and can be used to construct parts of the rocket stove or the complete stove.
The board can be quite expensive but generally the matting is very reasonably priced.
However... there are one or two people who have shown concern about ceramic fibres being dangerous if inhaled. This does not concern me but you may want to study more on that aspect ?
Apart from the ease of construction, the 5min riser offers very fast warm up times, with my own cooking stove, we are talking about 500c on the top plate in around 15 minutes compared to around one hour using a high mass riser.
1C4E827E-51EB-4904-BB76-26E099C5420A.jpeg
[Thumbnail for 1C4E827E-51EB-4904-BB76-26E099C5420A.jpeg]
 
Joe Moon
Posts: 33
Location: Ireland
12
trees bike rocket stoves ungarbage
  • Mark post as helpful
  • send pies
    Number of slices to send:
    Optional 'thank-you' note:
  • Quote
  • Report post to moderator
Thanks Fox,
That one looks a very tidy job.
I can see why its called the 5 min riser, however searches for "ceramic fiber" and "superwool" give more results.
I will definitely consider this if I'm ever building a mass heater, as the superwool is available on ebay from Italy and the US. (being reamed for postage as the item is bulky)

This first stove I'm building is not a heater, its for camping. Its more of an experiment to see how strong and light I can make a concrete j-type stove. It has to be able to support a very heavy cooking pot.
The tin cans I will be using are not coming fast enough from the local take-away so I am looking into getting some ducting instead. I can't start making a form without the metal.
Also thinking about little stand-offs for the cooking pot, I might use small L shaped shelf brackets embedded in the top of the riser. Need to make a simple jig to get the height and spacing right.

I still have 2 questions.....
Are measurements taken from the dead center of the inner tube?
Does dry Perlite absorb much water?
 
Joe Moon
Posts: 33
Location: Ireland
12
trees bike rocket stoves ungarbage
  • Mark post as helpful
  • send pies
    Number of slices to send:
    Optional 'thank-you' note:
  • Quote
  • Report post to moderator
On the subject of inhaling the fibers...

I cannot find where I read that any particles inhaled are dissolved in the lungs. If its true then it doesn't really solve the problem as that same newly transformed inorganic chemical is now in the bloodstream, and if the body is not able to process the contaminants out, they may cause problems later on down the road.
Best to wear a mask!

If my lungs become chronically contaminated over many years of industry, I would get a friend to "spot me" down the beach (someone who knows CPR), I would inhale 2 lung-fulls of seawater and spend the next 20 minutes coughing up my guts to clean my lungs. Its an extremely risky thing to do, a person could die doing it, pass out from drowning shock or choke on a jellyfish. Not recommended for anyone.

According to the manufacturer's data sheet for the products, both superwool plus and HT give off less large dust particles during handling and use.
The thermal properties are negatively affected by strong alkali (water glass), molybdenum (used to make steel) and phosphoric acid (found in fertilizers, cola, acidic foods).

Data sheet
http://www.morganthermalceramics.com/media/1814/sw_blanket_data_sheet_english_1.pdf
Wiki Molybdenum
https://en.wikipedia.org/wiki/Molybdenum
 
Posts: 576
Location: Richwood, West Virginia
12
  • Likes 2
  • Mark post as helpful
  • send pies
    Number of slices to send:
    Optional 'thank-you' note:
  • Quote
  • Report post to moderator

Joe Moon wrote:
This first stove I'm building is not a heater, its for camping. Its more of an experiment...


Since the draft will go up the riser once started, you could cast the pieces separately to be assembled at camp, adding maybe a sturdy A-frame support bracket that could double as the pot stand.

 
Fox James
Rocket Scientist
Posts: 794
Location: Guernsey a small island near France.
299
  • Likes 1
  • Mark post as helpful
  • send pies
    Number of slices to send:
    Optional 'thank-you' note:
  • Quote
  • Report post to moderator
Ok Joe you must do what ever you want but I am a Little confused with your design?
As I am sure you know, metal  inside the fire box and heat riser will not fair well over time, for occasional use some metal will last but tin cans will degrade very quickly
A steel tube lined on the inside with insulation with be very strong but a perlite and clay riser will be quite fragile.
There are lots of potable “steel construction” rocket stoves on YouTube (hundreds possibly) but without insulation I am not sure how effective they are at heating large containers or how long they will last.
Rocket stoves are most efficient when correctly sized and very well insulated, you can expect very hot temperatures above the heat riser around 500c or more.

From my own experiences using, perlite and vermiculite,  the end results are never very strong. The more binder you use ie clay, cement, fondu etc the stronger but less insulating the end result will be.
Fine if the riser is left inside a barrel and left alone but not so good if it will be moved around, the ones I have built would most certainly fracture if allowed to fall over!
For casting purposes you may find cardboard tube is very good and of course will burn out , any carpet suppler with have empty 4” 6” and 8” cardboard  tubes.

Do you have problems importing from England, I live in Guernsey but buy my ceramic products from Wales!

 
Joe Moon
Posts: 33
Location: Ireland
12
trees bike rocket stoves ungarbage
  • Mark post as helpful
  • send pies
    Number of slices to send:
    Optional 'thank-you' note:
  • Quote
  • Report post to moderator

Fox James wrote:Ok Joe you must do what ever you want but I am a Little confused with your design?
As I am sure you know, metal  inside the fire box and heat riser will not fair well over time, for occasional use some metal will last but tin cans will degrade very quickly
A steel tube lined on the inside with insulation with be very strong but a perlite and clay riser will be quite fragile.
There are lots of potable “steel construction” rocket stoves on YouTube (hundreds possibly) but without insulation I am not sure how effective they are at heating large containers or how long they will last.
Rocket stoves are most efficient when correctly sized and very well insulated, you can expect very hot temperatures above the heat riser around 500c or more.

From my own experiences using, perlite and vermiculite,  the end results are never very strong. The more binder you use ie clay, cement, fondu etc the stronger but less insulating the end result will be.
Fine if the riser is left inside a barrel and left alone but not so good if it will be moved around, the ones I have built would most certainly fracture if allowed to fall over!
For casting purposes you may find cardboard tube is very good and of course will burn out , any carpet suppler with have empty 4” 6” and 8” cardboard  tubes.

Do you have problems importing from England, I live in Guernsey but buy my ceramic products from Wales!


I think you are mixing up my post with someone else's.
I'm not using tin cans for the inner burn tube (only the outside structure)
I'm not using clay in the riser (did you mean clay like sand or pottery clay?)
Its not going to be steel construction, the outside cans will be riveted together
My design will be made from Fire Clay (cement), Water Glass (cement) and Perlite, all of which are insulating.
There will be as much Perlite as I can get away with without skimping on the cement. Ideally the finished riser will more resemble stone than brick.

With the superwool being so light it seems perfect for a riser, and if I ever make a rocket heater I will seriously consider the superwool.
Perhaps I may use it in the second cooking stove I make, with the focus on lightness and portability, perhaps even with strong PVC pipe as the outside, and cardboard as the inside.

The cardboard I'm going to use is from packets of porridge from the supermarket, 4 inch diameter by around 12 inch long. Quite thin so I might have to fill them with something during casting.

As far as ebay goes, I only looked at half a page of results to get a quick idea of the prices, only saw Italy and the US, didn't get as far as Wales yet, but when I'm more serious about stove number 2, I will do full searches.
 
Fox James
Rocket Scientist
Posts: 794
Location: Guernsey a small island near France.
299
  • Mark post as helpful
  • send pies
    Number of slices to send:
    Optional 'thank-you' note:
  • Quote
  • Report post to moderator
Ok well good luck with your build and please keep us informed as to how it all works out.
 
Joe Moon
Posts: 33
Location: Ireland
12
trees bike rocket stoves ungarbage
  • Mark post as helpful
  • send pies
    Number of slices to send:
    Optional 'thank-you' note:
  • Quote
  • Report post to moderator

Fox James wrote:Ok well good luck with your build and please keep us informed as to how it all works out.


Thanks, I will post pictures when its done and let everybody know how long it took to fall apart
 
Joe Moon
Posts: 33
Location: Ireland
12
trees bike rocket stoves ungarbage
  • Mark post as helpful
  • send pies
    Number of slices to send:
    Optional 'thank-you' note:
  • Quote
  • Report post to moderator

Burl Smith wrote:
Since the draft will go up the riser once started, you could cast the pieces separately to be assembled at camp, adding maybe a sturdy A-frame support bracket that could double as the pot stand.


Thanks Burl,
A couple of great ideas there.

I like the tripod idea taking the weight off the riser and also providing stability.
I know a few campers who'd be happy assembling stuff like that in camp, especially the young lads, so I may design something about it in the future.
Cannot always depend on someone to assemble it right though, and level for example, that's why I design for simplicity over the complicated way.

I really like the idea of the stove being assembled on location from, say, 2 pieces.
There are a few engineering challenges with that idea that have to be figured out.
Mainly....
1, the structural strength will need to be very good, and the design needs to allow for good stability
2, heat leaks from the join can burn other stuff in the camp
3, wear and damage from assembly and disassembly
4, wear from general handling and transport, especially if the insulation is superwool
If the outer material is PVC then additional insulation is needed around the top on the outside, so heat reflected from the pot does not melt the plastic.  Likewise for the join, if its plastic it needs some special attention there aswel, because melting means collapse.

I may take on some of these ideas after this first build.
At the moment still waiting for more 6 inch cans to make the mould.
 
I wish I could be half as happy as this tiny ad!
Rocket Mass Heater Jamboree And Updates
https://permies.com/t/170234/Rocket-Mass-Heater-Jamboree-Updates
reply
    Bookmark Topic Watch Topic
  • New Topic