• Post Reply Bookmark Topic Watch Topic
  • New Topic
permaculture forums growies critters building homesteading energy monies kitchen purity ungarbage community wilderness fiber arts art permaculture artisans regional education skip experiences global resources cider press projects digital market permies.com pie forums private forums all forums
this forum made possible by our volunteer staff, including ...
master stewards:
  • r ranson
  • Nancy Reading
  • Carla Burke
  • John F Dean
  • Jay Angler
  • paul wheaton
stewards:
  • Nicole Alderman
  • Pearl Sutton
  • Anne Miller
master gardeners:
  • Christopher Weeks
  • Timothy Norton
gardeners:
  • Nina Surya
  • Matt McSpadden
  • thomas rubino

Breaking News! Shop Dragon admitted to I.C.U. !!

 
rocket scientist
Posts: 6528
Location: latitude 47 N.W. montana zone 6A
3398
cat pig rocket stoves
  • Likes 6
  • Mark post as helpful
  • send pies
    Number of slices to send:
    Optional 'thank-you' note:
  • Quote
  • Report post to moderator
Hi All;
Today was the day!
My shop dragon had her last fire in the J tube and was admitted to rocket general for surgery ... while her coals were still glowing! Oh No! It must have been Bad!
The good news is, almost all the unneeded pieces have been safely removed.
Some in place, brick cutting still needs to be done and much cosmetic surgery still to go! She will remain in I.C.U. until rocket scientists can restart her fire hopefully by the end of the week.
Her 5 minute riser is perfect , lifted right out no problems.
The C.F. board core was in great shape until.... I tried to remove it.
Sorry to say, it did not survive the operation!  Much more fragile after heating.  
Glad I ordered new board to use in the batch!
Using c.f. blanket to seal a metal barrel to masonry was a 100% success!  No leaks at the barrel at all.

Step one will be to construct a base for the box to sit on.
20200414_125339.jpg
And so it starts
And so it starts
20200414_125323.jpg
look ma she's got no mass on!
20200414_125330.jpg
There it is, extra mass
20200414_130020.jpg
under the barrel
under the barrel
20200414_130246.jpg
under the barrel
under the barrel
20200414_134328.jpg
open hole
open hole
20200414_130900.jpg
inside the bell
inside the bell
20200414_133358.jpg
the C.F. core
the C.F. core
20200414_130845.jpg
5 minute riser after 1.5 years
20200414_125344.jpg
Last fire before surgery
20200414_133420.jpg
Rocket scientist safe from silicosis and corona virus too!
 
Rocket Scientist
Posts: 1810
Location: Kaslo, BC
525
building solar woodworking rocket stoves wood heat greening the desert
  • Likes 1
  • Mark post as helpful
  • send pies
    Number of slices to send:
    Optional 'thank-you' note:
  • Quote
  • Report post to moderator
It was a nail biter in the waiting room and tensions were high, but I'm sure happy to hear that stage 1 was a success and that we got to see what a Montana dragon looks like from the inside.
Something only a fellow rocket scientist can appreciate I'm sure!

Curious to know a few facts on the CF board:

1) Was it glued or pinned together that made it bust apart or was it strictly the fact that it just gets so brittle from the heat that it becomes delicate?
2) If you had to take a guess, how long would you say a core like this could last? (Assuming you don't handle it)
3) How deep does the brittleness go? All the way through, halfway etc.  Perhaps an autopsy of a few slices can be performed?
4) Can't tell by the photo but is it a single or double layer? Did you use any other insulation around the core?
5) Any recommendations to a future CF core J tube builder out there?

All in the name of scientific research and development!
 
thomas rubino
rocket scientist
Posts: 6528
Location: latitude 47 N.W. montana zone 6A
3398
cat pig rocket stoves
  • Likes 3
  • Mark post as helpful
  • send pies
    Number of slices to send:
    Optional 'thank-you' note:
  • Quote
  • Report post to moderator
Well I'll answer the ones I can.
But first ,let me say that 2 out of 3 family members(Shop dog and I) were devastated by the impending lack of warmth in the shop.
Liz seemed rather distanced about it all ... maybe it was her way of showing grief ... others  might say she just didn't care??? Kinda like a cat....She is, a crazy cat lady after all.
Oh yeah, and meanwhile her dragon is roaring just fine out in the warm studio...

#1) Not glued , not pinned but it was double wrapped with HD foil.
I think my own heavy handed approach caused the failure. Had I used a wide blade putty knife gently and removed several layers more brick.
I think it might have come out better.
#2) Indefinitely,  I only saw 2 wear spots. One was my fault. I should have put a split brick on the floor inside the burn tunnel.
The other wear spot was minimal. The leading edge of the roof board had some wear.  Probably heat related as my Peter channel protected it from abrasion but no doubt raised the temp's in that area.
#3) Autopsy report delayed due to dinner and overall laziness... Oh and its raining out there... I could melt !
#4) Single layer, 1" thick.  No other insulation,  surrounded by heavy firebrick.

#5) Follow Matts design, put a split brick inside the burn tunnel  on the floor. They might consider using 2" thick cf on the roof.  
Absolutely build a 5 minute riser for it, or if you prefer use cf boards to build a square riser.
With a J tube, build a sacrificial wooden form inside the burn tunnel to keep an even size throughout the build.  Let it burn away in the first fire.
Use a hacksaw blade to perfectly cut your cf board. Shop Ebay and Amazon to find your cf products.
Locate a masonry supply house  to purchase, fireclay , split firebrick and full firebrick.
download.jpg
[Thumbnail for download.jpg]
 
Gerry Parent
Rocket Scientist
Posts: 1810
Location: Kaslo, BC
525
building solar woodworking rocket stoves wood heat greening the desert
  • Likes 1
  • Mark post as helpful
  • send pies
    Number of slices to send:
    Optional 'thank-you' note:
  • Quote
  • Report post to moderator
That was an excellent post-mortem review you gave Thomas. Lets hope that shop dog and Liz will recover from the shock of it all soon.
In fact, I bet they will be both back hanging out in the shop by the end of the week to gawk at the newest arrival and they will praise you as their hero.
Well, a guy can dream can't he?
 
pollinator
Posts: 464
Location: Toyoura Hokkaido
163
  • Likes 1
  • Mark post as helpful
  • send pies
    Number of slices to send:
    Optional 'thank-you' note:
  • Quote
  • Report post to moderator
Super cool Thomas!

Looking forward to what you cook up in the doctors office. Good luck and may the force be with you...

Peter✌️🌞✌️
 
thomas rubino
rocket scientist
Posts: 6528
Location: latitude 47 N.W. montana zone 6A
3398
cat pig rocket stoves
  • Likes 1
  • Mark post as helpful
  • send pies
    Number of slices to send:
    Optional 'thank-you' note:
  • Quote
  • Report post to moderator
Quick update;  Last of the problem spots cut out today. Patient is doing well, no complications so far...
In 2014 I removed my very first J tube core. A Walker style cast fireclay perlite core.  
Some of the mix had baked into brick but the rest was very usable... So 6 years ago I saved this mix in a garbage can.
Going to use it anytime now...(what I told Liz)  Well 6 years later and I finally found a good use for it!
It is filling in my entire J tube core space to create a nice level flat spot to set the BB on.
Liz is happy to see some of my "mess" get used up. I'm happy to have it!
DSCN0639.JPG
Gutted and ready to fill
DSCN0643.JPG
looking good
looking good
DSCN0644.JPG
plenty left to finish
 
thomas rubino
rocket scientist
Posts: 6528
Location: latitude 47 N.W. montana zone 6A
3398
cat pig rocket stoves
  • Likes 1
  • Mark post as helpful
  • send pies
    Number of slices to send:
    Optional 'thank-you' note:
  • Quote
  • Report post to moderator
Good News !
Today's operation at Rocket General went well.
Brick rebuilding commenced. Needed to bring the back up to the level of the old feed tube.
Filled and packed the old J tube area with more resurrected old core.
Cut and seated what I had of the split firebrick and  used a couple full size bricks to finish the new floor.
There is one old brick all the way at the back that "might" need  trimming.
Other than that, hopes are high that tomorrow the new core can start moving into place!  
20200416_112052.jpg
Propane Heat!!
Propane Heat!!
20200416_130850.jpg
box building
box building
20200416_140358.jpg
Full
Full
20200416_144437.jpg
A new floor
A new floor
20200416_144450.jpg
The Mess
The Mess
 
Gerry Parent
Rocket Scientist
Posts: 1810
Location: Kaslo, BC
525
building solar woodworking rocket stoves wood heat greening the desert
  • Likes 1
  • Mark post as helpful
  • send pies
    Number of slices to send:
    Optional 'thank-you' note:
  • Quote
  • Report post to moderator
So it looks like your platform is about 16" high?  Looks like a nice comfortable height to load wood.
Keep up the good work Thomas!
 
thomas rubino
rocket scientist
Posts: 6528
Location: latitude 47 N.W. montana zone 6A
3398
cat pig rocket stoves
  • Likes 1
  • Mark post as helpful
  • send pies
    Number of slices to send:
    Optional 'thank-you' note:
  • Quote
  • Report post to moderator
Hi  Gerry;
Thank You!
You were close, I had to go out and check, but its at 19.5" ! Much better for feeding a dragon than floor level!

Also, I did a biopsy on the "brittle" C.F. board.
After several slices I've come to the following conclusions.
As reported in the past, the CF got a harder face when heated.  After slicing, it became apparent what happened with mine...
I happened... my Brutal brother side apparently just ripped it apart! Maybe I had a green tint and extra muscles popped out???
I'm not sure, I came to and my clothes were all ripped??? Its all rather foggy...

Hopefully in the morning I'll avoid the jagged brick in the back and be able to just start assembling the core!


thomas rubino
rocket scientist
Posts: 6528
Location: latitude 47 N.W. montana zone 6A
3398
cat pig rocket stoves
  • Likes 3
  • Mark post as helpful
  • send pies
    Number of slices to send:
    Optional 'thank-you' note:
  • Quote
  • Report post to moderator
Hi All;
Short visit to the operating room today.  Sunny outside and too many other projects to do.
The new deck I put down yesterday needed the mock core partly moved over.
Measurements made to see exactly where it all sat and the secondary air feed needed marked as well.
The problem brick at the back needed something done.  Luckily I was able to notch the brick that it was hitting!

After marking the secondary air channel , I removed the center row of firebrick and cut each to fit up to the floor channel.
Some of my reconstituted perlite/clay needed scrapped down to inset the channel, as the bricks were 1.25" and the floor channel is 1.75"Wanted it smooth to the floor.
Needed to notch out the front row of clay brick to allow air in to the channel as well.
Tomorrow, I'll start mudding core bricks in place!
20200417_111905.jpg
mock core
mock core
20200417_112046.jpg
mock core with form
mock core with form
20200417_121706.jpg
Seating the floor channel
20200417_132120.jpg
Front bricks notched
20200417_132127.jpg
Ready to mud
Ready to mud
20200417_133907.jpg
finished floor
finished floor
20200417_133916.jpg
finished floor
finished floor
 
Gerry Parent
Rocket Scientist
Posts: 1810
Location: Kaslo, BC
525
building solar woodworking rocket stoves wood heat greening the desert
  • Likes 1
  • Mark post as helpful
  • send pies
    Number of slices to send:
    Optional 'thank-you' note:
  • Quote
  • Report post to moderator
Nothing like it when the pieces of a well laid out plan starts falling into place. Sure you haven't done this before?

My! what a shiny floor channel you have. I remember when mine was almost that nice too. A definite bonus that it will be easy to replace when its lifespan is up though.
 
thomas rubino
rocket scientist
Posts: 6528
Location: latitude 47 N.W. montana zone 6A
3398
cat pig rocket stoves
  • Likes 1
  • Mark post as helpful
  • send pies
    Number of slices to send:
    Optional 'thank-you' note:
  • Quote
  • Report post to moderator
Slow going in the operating room today!
Laying the first 5 bricks took forever! They must be exactly in the correct place, they must be level and you must not bump them as you go...
Needless to say I bumped a few! The sliding wood frame for the box is important for keeping it all square.
With the insulated bricks it is important to float them in water for a moment before putting on clay slip. If you forget ,the slip will dry in seconds and it will Not stick!
When you place one, they grab fast! If its not in the correct spot you must use a lever to pop it free.
Things should progress a little faster tomorrow.
20200418_140707.jpg
7" Batch box
7" Batch box
20200418_140724.jpg
7" Batcb box
7" Batcb box
20200418_140730.jpg
Soon to have double ram horns of fire
20200418_140814.jpg
7" Batch box
7" Batch box
 
Gerry Parent
Rocket Scientist
Posts: 1810
Location: Kaslo, BC
525
building solar woodworking rocket stoves wood heat greening the desert
  • Likes 1
  • Mark post as helpful
  • send pies
    Number of slices to send:
    Optional 'thank-you' note:
  • Quote
  • Report post to moderator
Remember the game "operation" where you had a pair of tweezers to extract the organs of some person lying on the table and if you touched the metal sides, his nose light up and accompanied by a loud buzz indicating you failed?  I take it you didn't play it much or at all as a kid?
Who would ever think that some games we played as a kid like this would ever come in handy for building a RMH?

That's a good tip on the insulated bricks to know in case one day I use them. Thanks for sharing.
 
thomas rubino
rocket scientist
Posts: 6528
Location: latitude 47 N.W. montana zone 6A
3398
cat pig rocket stoves
  • Likes 1
  • Mark post as helpful
  • send pies
    Number of slices to send:
    Optional 'thank-you' note:
  • Quote
  • Report post to moderator
Got some time in today on the batch.  Its coming along.
Heading up to Big Fork in the morning to buy 50 more skamol insulated bricks.
I used 45 to build my 7" but I'm not taking any chances.
I'll have 54 to play with when I turn the studio J tube into a 6" batch!


20200420_120626.jpg
7" Batch
7
20200420_120634.jpg
7" Batch
7
20200420_120703.jpg
primary and secondary air inlets
20200420_124739.jpg
7" Batch
7
20200420_124750.jpg
7" Batch
7
 
Gerry Parent
Rocket Scientist
Posts: 1810
Location: Kaslo, BC
525
building solar woodworking rocket stoves wood heat greening the desert
  • Likes 2
  • Mark post as helpful
  • send pies
    Number of slices to send:
    Optional 'thank-you' note:
  • Quote
  • Report post to moderator
Looking very uniform and proper now Thomas! That form work really helped you stay in the lines.
Now that I see the door on temporarily, do you think the floor channel will have enough weight to it to counter balance the door when it swings open?
I know the door is fairly light ..... oh wait.... this just came to me.... the 45 degree floor bricks will probably overlap the horizontal part of the channel and add plenty of weight so forget it....carry on!

So with the floor channel welded to the door frame, when it comes time to replace the floor channel, your idea (if you already haven't said this) is to grind off the weld, install the new one, then weld it back in place?

As for the new skamols -  are you thinking of converting the other J soon or wait until later?
 
thomas rubino
rocket scientist
Posts: 6528
Location: latitude 47 N.W. montana zone 6A
3398
cat pig rocket stoves
  • Likes 2
  • Mark post as helpful
  • send pies
    Number of slices to send:
    Optional 'thank-you' note:
  • Quote
  • Report post to moderator
Hey Gerry;
I am a firm believer in using a form box!  It takes all the checking out of the equation.The only thing you should keep checking is that your box still lifts out.

I am, going to tack the door frame to the floor channel. But two things dawned on me this afternoon.
First was, after I brick over the roof the door will not be able to tip and fall out! Only way out will be sliding.
Second was, when I go to repair the stub on the secondary air. Why not just leave the door frame attached?
The horizontal tubing will not wear out , only the stub.  Clamp the whole thing in my vise and cut off the old stub and weld on the new! Done deal.

I want all the parts here for the 6" batch before I tear it apart. It also must absolutely be beyond burning season....
I suspect that I will end up going back to work before I get started but maybe not.  
As soon as my shop dragon roars, my focus will switch to preliminary work on the studio batch.
 
thomas rubino
rocket scientist
Posts: 6528
Location: latitude 47 N.W. montana zone 6A
3398
cat pig rocket stoves
  • Likes 3
  • Mark post as helpful
  • send pies
    Number of slices to send:
    Optional 'thank-you' note:
  • Quote
  • Report post to moderator
Only got a little done today.  Started adding the second layer of brick over the soft insulated bricks. Trimmed the roof CF board to fit.
Successfully clamped the two barrels together with out any more grinding on the bung barrel.
Can't do any more today as I want to watch Stove chat Live with Matt!

Went back up to Big Fork yesterday and bought 50 more Skamol's to use on the new 6" batch for Liz's studio!
20200422_120839.jpg
Covering it up!
Covering it up!
20200422_122241.jpg
Roof CF all trimmed
Roof CF all trimmed
20200422_120834.jpg
Barrels fit perfectly
20200422_142849.jpg
7" batch
7" batch
20200422_142915.jpg
7" batch
7" batch
20200422_142904.jpg
7" batch
7" batch
 
thomas rubino
rocket scientist
Posts: 6528
Location: latitude 47 N.W. montana zone 6A
3398
cat pig rocket stoves
  • Likes 1
  • Mark post as helpful
  • send pies
    Number of slices to send:
    Optional 'thank-you' note:
  • Quote
  • Report post to moderator
And just a little bit more.
Bricks on top are decorative at the moment, until I decide exactly how the barrel will sit.
But they sure are pretty!
20200427_133657.jpg
7" Batch
7" Batch
20200427_133645.jpg
7" Batch
7" Batch
 
thomas rubino
rocket scientist
Posts: 6528
Location: latitude 47 N.W. montana zone 6A
3398
cat pig rocket stoves
  • Likes 2
  • Mark post as helpful
  • send pies
    Number of slices to send:
    Optional 'thank-you' note:
  • Quote
  • Report post to moderator
Today I got my barrel plan finalized in my head and started laying brick and cutting aluminum.
Using the Morgan super wool & CF board salvaged from my J tube makes filling odd spaces and gaps a breeze!
Working with clay it is always a good idea to build a little and then go do something else until it drys.
Other things take up a good portion of my day (like posting at Permies) I just keep plugging away at it.
20200428_121618.jpg
aluminum plate
aluminum plate
20200428_131205.jpg
7" batch
7
20200428_143254.jpg
7" batch
7
20200428_143306.jpg
7" batch
7
20200428_150216.jpg
7" batch
7
 
thomas rubino
rocket scientist
Posts: 6528
Location: latitude 47 N.W. montana zone 6A
3398
cat pig rocket stoves
  • Likes 4
  • Mark post as helpful
  • send pies
    Number of slices to send:
    Optional 'thank-you' note:
  • Quote
  • Report post to moderator
Started cutting the heavy firebrick on 45's to line the floor.  Dirty dangerous work. Only a few more to go though!
A little extra grinding and the barrel is where I want it. No riser inside yet , its all props for the photo opp!
Cleaned the floor up and straightened the bricks.for the first time since the operation started!
I must be getting close if I'm sweeping up the floor.
20200429_144717.jpg
7" batch
7" batch
20200429_144707.jpg
Yes ma i swept the floor
20200429_144723.jpg
cutting 45's for the floor
20200429_145047.jpg
cleanest its been in months
20200429_144855.jpg
Tools of the rmh builders trade
20200429_144921.jpg
spare parts or left over CF product
 
Gerry Parent
Rocket Scientist
Posts: 1810
Location: Kaslo, BC
525
building solar woodworking rocket stoves wood heat greening the desert
  • Likes 1
  • Mark post as helpful
  • send pies
    Number of slices to send:
    Optional 'thank-you' note:
  • Quote
  • Report post to moderator
Looks good Thomas!  The only extra I would add to your floor 45's is to fill in that void right next to the stub. Definitely gonna be an ash/charcoal catcher and be really hard to clean.....or perhaps you could just never clean it out and always leave the ash there to fill in the void. Not a biggie either way.
 
thomas rubino
rocket scientist
Posts: 6528
Location: latitude 47 N.W. montana zone 6A
3398
cat pig rocket stoves
  • Likes 4
  • Mark post as helpful
  • send pies
    Number of slices to send:
    Optional 'thank-you' note:
  • Quote
  • Report post to moderator
Good Morning Gerry;
Yup those cracks are going to get filled with an outstanding insulator... ASH !  
Clean ??? what does this mean?? Is it a Canadian word again???
I told you I am only learning Italian not Canadian... hmm wonder if duolingo teaches Canadian???  

download-(29).jpg
Next model prototype, Heat North America
 
Gerry Parent
Rocket Scientist
Posts: 1810
Location: Kaslo, BC
525
building solar woodworking rocket stoves wood heat greening the desert
  • Likes 1
  • Mark post as helpful
  • send pies
    Number of slices to send:
    Optional 'thank-you' note:
  • Quote
  • Report post to moderator
Sorry, I keep forgetting who I'm speaking with!  My appoligies.

Glad we now know the real cause behind global warming  :)
 
thomas rubino
rocket scientist
Posts: 6528
Location: latitude 47 N.W. montana zone 6A
3398
cat pig rocket stoves
  • Likes 5
  • Mark post as helpful
  • send pies
    Number of slices to send:
    Optional 'thank-you' note:
  • Quote
  • Report post to moderator
Its time to fire her up!
I think that early tomorrow morning... we will see if my dragon survived her operation!
The only thing I haven't done is tack weld the door frame to the secondary air channel.
With the roof mudded on and held down with bricks. The frame can not tip out anymore , the only way for it to move is by sliding out.
New welder will be here Tuesday I'll tack it then.
The lower barrel went on without the riser inside. After i was happy with it, I just lowered the new 5 minute riser down into place. It just sits there.
I had to set up the scaffold to lift the second barrel up and over the riser and to get the clamp in place.
During my mockup with the first barrel I was not able to get it completely level.
After a full install of both barrels it is sitting dead level!!! All I did different was to seat it on super wool.
That Morgan Super wool is handier than a pocket on a shirt!

Just too sunny and warm (60 ish) this afternoon to give it a try.  But it will be in the thirty's again in the morning.
20200501_101700.jpg
Door frame mudded in place
20200501_101644.jpg
super wool in place
super wool in place
20200501_102501.jpg
Lower barrel in place
20200501_102756.jpg
Riser in place
Riser in place
20200501_104531-(1).jpg
second barrel in place
20200501_105524.jpg
Clamped and level
Clamped and level
20200501_120017.jpg
7" Batch Dragon
7" Batch Dragon
20200501_120027.jpg
7" Batch Dragon
7" Batch Dragon
 
Gerry Parent
Rocket Scientist
Posts: 1810
Location: Kaslo, BC
525
building solar woodworking rocket stoves wood heat greening the desert
  • Likes 3
  • Mark post as helpful
  • send pies
    Number of slices to send:
    Optional 'thank-you' note:
  • Quote
  • Report post to moderator
The day has finally come. Hoooray!  Now, all we need is for you to post one of those large countdown timers along with a live web feed so all your fans can watch the blastoff!


source

 
Posts: 86
Location: Skokie, IL
19
2
forest garden cooking bike
  • Likes 1
  • Mark post as helpful
  • send pies
    Number of slices to send:
    Optional 'thank-you' note:
  • Quote
  • Report post to moderator
Looks awesome Thomas! Can't wait to see a video of her being fired up!
 
thomas rubino
rocket scientist
Posts: 6528
Location: latitude 47 N.W. montana zone 6A
3398
cat pig rocket stoves
  • Likes 5
  • Mark post as helpful
  • send pies
    Number of slices to send:
    Optional 'thank-you' note:
  • Quote
  • Report post to moderator
Permies!    We have ignition!
My shop Dragon has lifted off.
A few photo's for now.
20200502_074112.jpg
count down commencing
20200502_075942.jpg
We have ignition
We have ignition
20200502_080409.jpg
We have lift off
We have lift off
download-(32).jpg
Shop Dragon Fly's Again
 
thomas rubino
rocket scientist
Posts: 6528
Location: latitude 47 N.W. montana zone 6A
3398
cat pig rocket stoves
  • Likes 4
  • Mark post as helpful
  • send pies
    Number of slices to send:
    Optional 'thank-you' note:
  • Quote
  • Report post to moderator
Hi All;
Here is a partial report from the recovery room.
For the time being the live video is in transit to another facility...expected delivery date may be delayed... due to covid 19 OR ... possible irreparable damage  to this laptop...

Dragon started up no problem. I did not need to crack the door to aid draft.
Smoke found it's way up then down and back up and out the chimney quickly.
It also found anyplace that needed better sealing. The seam between the drums smoked steadily until things started heating up.
The cement board roof where it sits on the brick walls leaked in several places.
Some spots just took a dab of clay to seal up, others took the draft to start pulling before they stopped.
Chimney temps taken with the T&G Dragon breath monitor never rose above 110 F thru the whole burn. Normally 130 F is considered as a minimum running temp. Stone cold stove start ups are an exception. When warmed up with a J tube burner I was getting exhaust temps in the 250 F range.
Barrel temps were lower than I expected .
Near the end of the burn I had 300 F + on the lower barrel and 400 F + on the upper barrel.  (Temps taken from the side )
Quite a bit of heat was coming off the front door during the burn. Temps were 200 -230 F.
The brick bell was 51 F at start up and a whopping 81 F after the first burn.
Wood burned was three 16" pieces of dry Douglas fir and some cedar kindling.
Burn time was a solid 1.5 hrs with coal still glowing when I left. Combustion was thorough with only a little ash left over.
Chimney was throwing smoke for a few  minutes and then switched to steam and never did warm up enough to switch to heat shimmers.

Cool and rainy tonight and tomorrow.  I'll run several loads thru her then and really get her warmed up.


download.jpg
[Thumbnail for download.jpg]
 
Gerry Parent
Rocket Scientist
Posts: 1810
Location: Kaslo, BC
525
building solar woodworking rocket stoves wood heat greening the desert
  • Likes 3
  • Mark post as helpful
  • send pies
    Number of slices to send:
    Optional 'thank-you' note:
  • Quote
  • Report post to moderator
Thank you for all the juicy details of the launch Thomas! Recording it all here will be something to show to the grand kids so they too one day will be able to look back and say.."Gosh, Great Uncle Thomas really was a mad scientist after all....COOL!"

And don't worry, any science organization (or shop) that plays with rocket tech is bound to have its fair share of delays....not from the rockets themselves, but from the fact that most dinosaurs have such small arms that they can't work a phone or computer that well to record the whole thing.


source
 
thomas rubino
rocket scientist
Posts: 6528
Location: latitude 47 N.W. montana zone 6A
3398
cat pig rocket stoves
  • Likes 3
  • Mark post as helpful
  • send pies
    Number of slices to send:
    Optional 'thank-you' note:
  • Quote
  • Report post to moderator
Hi All ;
Took the dragon out for a long flight this morning!  Five loads of fuel later... We were cruising!
My shop was warmer than it has ever been! Admittedly it was in the 40's outside.
Barrel temps of 320 on the lower and 465 on the upper.
Brick bell temps were 120  near the barrel and 90's down at the floor. Those numbers would have continued to rise had I kept burning.
Exhaust stack, gas temperature , checked with a T & G dragon breath monitor, reached 145 F at the end of the last load.That is significantly lower than I was getting before with a single barrel.
That temperature would also have continued to rise.
After  the last load went out. I fabricated a ceramic board plug to seal my primary air off when not burning. The secondary air just got a piece of cf board propped in front.
Both will help keep all that generated heat right there in my mass and not being sucked up the chimney.
20200503_151025.jpg
New primary air plug
20200503_151009.jpg
Primary and secondary air shut off for the night
 
thomas rubino
rocket scientist
Posts: 6528
Location: latitude 47 N.W. montana zone 6A
3398
cat pig rocket stoves
  • Likes 2
  • Mark post as helpful
  • send pies
    Number of slices to send:
    Optional 'thank-you' note:
  • Quote
  • Report post to moderator
Good Morning All;
Second test flight this morning. Just a short one, only one charge of wood. It was 33 but is rapidly headed to 60 and sunny.
Yesterday I had a horrible leak between barrels until the system warmed up, then it completely stopped.
This morning before takeoff, I removed the locking ring and placed cut strips of my favorite product...
Morgan Super Wool in the ring.  Clamp it nice and tight and no more leak!
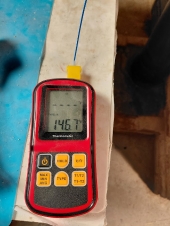
If fact having warmed things up yesterday there were no unwanted smokes at all.
Flue gas temps only reached 105 before falling off.
Brick bell temps went up from 58 to 68.
I have no good way to monitor room temp, but you could feel, it went up as well.
20200504_104130.jpg
Coaling out after first load
20200504_104208.jpg
Flue gas temp only 105 F after first load
 
Gerry Parent
Rocket Scientist
Posts: 1810
Location: Kaslo, BC
525
building solar woodworking rocket stoves wood heat greening the desert
  • Likes 1
  • Mark post as helpful
  • send pies
    Number of slices to send:
    Optional 'thank-you' note:
  • Quote
  • Report post to moderator
So even with such low exhaust temps, your not having any issues whatsoever with draft, in particular at startup?
If not, then I'd say you're really sucking out every last drop of heat you possibly can before it heads out into the great outdoors. No wonder why you're getting so much visible steam coming out the chimney for such long periods of time.
 
thomas rubino
rocket scientist
Posts: 6528
Location: latitude 47 N.W. montana zone 6A
3398
cat pig rocket stoves
  • Likes 2
  • Mark post as helpful
  • send pies
    Number of slices to send:
    Optional 'thank-you' note:
  • Quote
  • Report post to moderator
Well funny you should mention startup...
Today I had to leave the door ajar to reach take off velocity.
I needed to leave it that way for quite a while,  but no smoke at all tried coming back out.
Minimal ash left after yesterdays long flight. I'm getting complete ignition on my wood.
Looking forward to Wednesdays Stove chat with Matt, I have questions for the master!
Hope to see plenty of Permies rocket scientists there as well.
20200504_133102.jpg
Sealed barrels
Sealed barrels
20200504_133031.jpg
Morgan Super Wool to the rescue
 
Gerry Parent
Rocket Scientist
Posts: 1810
Location: Kaslo, BC
525
building solar woodworking rocket stoves wood heat greening the desert
  • Mark post as helpful
  • send pies
    Number of slices to send:
    Optional 'thank-you' note:
  • Quote
  • Report post to moderator
Including a link to Peters way of lighting a batch, remembering that he left the door open too for about 10 minutes at the beginning:

J tube-Batch-Box-Conversion

Not having to worry about smoke back, which I think everyone at some point in time has experienced with a J tube is one of the wonderful benefits to the batch box.

Curious if you have you experienced any pulsing at all?
 
thomas rubino
rocket scientist
Posts: 6528
Location: latitude 47 N.W. montana zone 6A
3398
cat pig rocket stoves
  • Likes 3
  • Mark post as helpful
  • send pies
    Number of slices to send:
    Optional 'thank-you' note:
  • Quote
  • Report post to moderator
I had mine slightly open over 30 minutes.
Tomorrow , I definitely plan on trying it backwards... aka Gerry's way!
My fire today I lit from the top, although I did also have a mid point kindling spot as well.
My next fire will be laid and lit from the bottom back... directly downwind of the primary air intake... Seems like an obvious choice to me.
I'm guessing I will not need to leave a door open ...and I reach escape velocity quickly!

EDIT)  Nope no pulsing
download-(1).jpg
It's Rocket Science
It's Rocket Science
 
gardener
Posts: 1068
Location: +52° 1' 47.40", +4° 22' 57.80"
455
woodworking rocket stoves wood heat
  • Likes 1
  • Mark post as helpful
  • send pies
    Number of slices to send:
    Optional 'thank-you' note:
  • Quote
  • Report post to moderator
Hi Thomas,
Correct me if I am wrong, but I think you rebuilt the core area only. Which would mean moist that need to be driven out isn't that much. The Skamol bricks however, are reluctant to release their moist, I experienced during the 2017 Innovators Gathering. So in future the end temp might rise a bit. Which is good as it's markedly low now, is that thermometer a surface one or one with a probe?

I'd recommend to install a threshold in the shape of an angle iron at right angles over the floor channel's feed. It would conveniently hold ashes out of the way. In your case that's easy, two angled bricks could hold the horizontal flange in place. No need for welding it to the floor channel then.
 
thomas rubino
rocket scientist
Posts: 6528
Location: latitude 47 N.W. montana zone 6A
3398
cat pig rocket stoves
  • Likes 2
  • Mark post as helpful
  • send pies
    Number of slices to send:
    Optional 'thank-you' note:
  • Quote
  • Report post to moderator
Hi Peter;
Yes, I did a core only rebuild. But I did fill the entire old J tube with a wet perlite clay mix. And then built on top of it. I imagine that moisture is slowly being pulled up thru the floor bricks.
The skamals I floated in water at least for a few moments before slipping , some floated long enough to sink... so plenty of moisture to evaporate from them as well.

I do use a probe in the exhaust stack,to monitor gas temperature. Much more accurate than pipe surface temp.

Not sure I understand your suggestion about the threshold for the floor channel.  I saw what Gerry Parent built for his floor feed secondary air.
Mine however is different than his, in that I brought the floor channel out past the door frame. The same way Matt feeds his floor channel. Floor channel air is drawn in from the room.

EDIT)  I believe I see your intent now Peter.  I had not had much morning coffee yet when I posted.
By using a piece of angle , held in place by the last two angled bricks. This would deflect possible sparks but not impede the airflow!
Is this correct ?

I do have thoughts of changing my door style.
One thing I am unhappy with is the open primary air hole.  I watched a spark fly out and land on my concrete floor.
I'm thinking of a round steel cap with a center rod. Possibly threaded or a smooth slider. So it would be open or closed not adjustable.
Any knots popping and throwing sparks would hit the metal and deflect down to the floor.

I am wondering if my primary air hole is large enough? I went with 5" wide by 1.25 tall = 6.25 " The secondary air is 1.75 x 3.5 = 6.12"
I am getting a complete burn with very little ash left at the end, so maybe those are the correct sizes?  I believe I followed your parameters.
It just feels like it would burn even better with a larger primary air. Or would adding extra primary air change the burn to be less than optimal?


thomas rubino
rocket scientist
Posts: 6528
Location: latitude 47 N.W. montana zone 6A
3398
cat pig rocket stoves
  • Likes 3
  • Mark post as helpful
  • send pies
    Number of slices to send:
    Optional 'thank-you' note:
  • Quote
  • Report post to moderator
Daily report;
Each day there is improvements in performance of the stove and improvements by the new, obviously apprentice operator!
Today I built my fire like I would in a box stove. Kindling and paper in the vee. Smaller wood increasing in size to the top of the box.
So far, I like this method of lighting. Ignition was immediate and I quickly had a nice roaring fire. No need at all to open the door for extra air.
After of 45 minutes of burning, I had an acceptable amount of steam from the stack, the flue gas temp was above 100 F and still rising.

Yesterday at one point, by looking thru the window.  I thought the fire should have been burning better.
I noticed one piece of my wood was almost touching the back wall... I remember Peter saying this would create a smoky poor fire.
I opened the door and using a welding glove quickly pulled the offending piece of wood back just a little bit... Instant improvement in the burn!
This morning I thought that maybe my wood was a little too close to the door (again by looking thru the glass) Open door , tap wood in just a little bit and ... Instant improvement in the burn!
Lesson learned;  Air space most be maintained around wood to allow proper gas flow or ignition will be impeded. No sneaking longer wood in the stove!

Yes Children ; There is an operating learning curve switching from a J tube to a batchbox!
download-(2).jpg
[Thumbnail for download-(2).jpg]
 
thomas rubino
rocket scientist
Posts: 6528
Location: latitude 47 N.W. montana zone 6A
3398
cat pig rocket stoves
  • Likes 1
  • Mark post as helpful
  • send pies
    Number of slices to send:
    Optional 'thank-you' note:
  • Quote
  • Report post to moderator
Further update;
Had a car customer come by this morning before the 1st load died out.
At his request ,I added a partial second load. It took rite off , impressed my customer to no end.
What impressed me.  Was flue gas temp went from 100 F to 125 with just a partial load second load.
I do believe a full second load would have taken it above the 140 F threshold.
And again, the steam trail is getting smaller with each burn.
 
Gerry Parent
Rocket Scientist
Posts: 1810
Location: Kaslo, BC
525
building solar woodworking rocket stoves wood heat greening the desert
  • Likes 1
  • Mark post as helpful
  • send pies
    Number of slices to send:
    Optional 'thank-you' note:
  • Quote
  • Report post to moderator
Hard to believe that so much moisture could be coming just from the core to cool the fire, but so far all your observations are pointing in this direction. Perhaps with more burning, it will begin to settle into a more consistent output.
Its details like this that are important to know so that the conditions are better understood and not seen as mistakes but rather just 'burn-in growing pains'.

Also, sounds like its becoming an attraction that you could somehow include in your car sales advertising slogan:  "Come feed the dragon at Rubino Motors" ... Sure to entice the kids and wives even to come see a real dragon....and maybe be even make a future purchase!


source
 
I agree. Here's the link: http://stoves2.com
reply
    Bookmark Topic Watch Topic
  • New Topic