• Post Reply Bookmark Topic Watch Topic
  • New Topic
permaculture forums growies critters building homesteading energy monies kitchen purity ungarbage community wilderness fiber arts art permaculture artisans regional education skip experiences global resources cider press projects digital market permies.com pie forums private forums all forums
this forum made possible by our volunteer staff, including ...
master stewards:
  • r ranson
  • Nancy Reading
  • Carla Burke
  • John F Dean
  • Jay Angler
  • paul wheaton
stewards:
  • Nicole Alderman
  • Pearl Sutton
  • Anne Miller
master gardeners:
  • Christopher Weeks
  • Timothy Norton
gardeners:
  • Nina Surya
  • Matt McSpadden
  • thomas rubino

Regarding the space between The Bell and the top of the Heat Riser

 
Posts: 21
Location: Catskill Mountains, NY
3
fungi medical herbs rocket stoves
  • Likes 1
  • Mark post as helpful
  • send pies
    Number of slices to send:
    Optional 'thank-you' note:
  • Quote
  • Report post to moderator
Hey gang! Thanks for letting me pick your collective Brain!

Recently completed my first RMH build; 6", based on the info contained in Ernie and Erika's wonderful book.

I originally had the outlet from the bell (standard 55gal drum) going into two levels of ductwork/thermal mass, then dumping out the side of my yurt, at floor level. RMH did not draft well (lots of back-drafting), so I removed all ducting except a short run out of the bell directly out the side of the yurt (still at floor level). Drafted a bit better, but still too much back-drafting. I changed the duct again, this time so it went up through the roof of yurt, chimney-style, instead. Much improved now, but still not drafting strong enough to create the roaring rocket sound, nor strong enough to once again introduce at least one level of ducting through a thermal mass. Very rarely does it backdraft, and once it is burning well there is zero smoke out of the chimney.

MY QUESTION IS: How important is the distance between the top of the heat riser and the bell? I think I am at about 4-5 inches. I know most info suggest between 1.75 and 2.25 inches. Could this be a significant factor in how strong it is or isn't drafting? It would be a fairly easy fix, but I don't want to bother if it is not likely to have a significant impact.

Thank you all for helping me fine tune this delightful piece of technology!

Best wishes,

Joe
 
rocket scientist
Posts: 6533
Location: latitude 47 N.W. montana zone 6A
3401
cat pig rocket stoves
  • Likes 2
  • Mark post as helpful
  • send pies
    Number of slices to send:
    Optional 'thank-you' note:
  • Quote
  • Report post to moderator
Hi Joe;   Welcome to Permies!  And congratulations on building your first RMH!
Running a RMH with a horizontal outlet is almost always doomed to suffer smokeback.
So moving your chimney to vertical is a good step in the right direction.

You asked about top gap on your riser to barrel.  I ran 2.5" on an 8" J for 7 years with no issues. That is about the smallest gap I would recommend.  I know originally they suggested tighter clearance's but we have learned that it is not optimal.  
The biggest difference is barrel top temperature.  The closer to the barrel the riser is, the hotter your barrel top will be.
If your cooking on top then you might like higher temps or if your wanting a lot of heat off your barrel rather than in your mass.

So you mentioned first a double run and then a single run thru a horizontal mass. And you still feel your not rocketing well?
We need pictures of your piping.  No bare metal after the barrel should be exposed until your pipe has gone vertical and exited the mass.
What kind of mass are you using ?  How large ?  How many turns?  
 
gardener
Posts: 3471
Location: Southern alps, on the French side of the french /italian border 5000ft elevation
194
  • Likes 1
  • Mark post as helpful
  • send pies
    Number of slices to send:
    Optional 'thank-you' note:
  • Quote
  • Report post to moderator
4 or 5 inches should be no problem.

How's you side gap? How's the transition area?

But a saying, from someone here. Might have been Peter, or Allen Lumley.

When the barrel goes on, the chimney goes up.

You need a vertical chimney. https://en.m.wikipedia.org/wiki/Stack_effect
 
Joe Krein
Posts: 21
Location: Catskill Mountains, NY
3
fungi medical herbs rocket stoves
  • Likes 1
  • Mark post as helpful
  • send pies
    Number of slices to send:
    Optional 'thank-you' note:
  • Quote
  • Report post to moderator
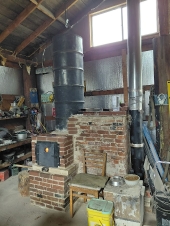
Thanks, Thomas and Satamax! The piping coming out of the bell is currently 100% exposed, as I did not want to spend the time and energy covering in cob until I had all the kinks worked out.... good to know that this may be a problem.... does the exposed pipe cool down the gases too quickly, making efficient draw more difficult to achieve? I have taped all seams so that no air can infiltrate through joints... no duct through mass yet, still direct to chimney. Side gap clearance should be more than adequate- approx 3" at the outlet duct from bell. Transition area? Do you mean between fuel feed and heat riser? That is according to specs in RMH book... worth noting that I did not insulate under the RMH, only around the heat riser....

I've attached a photo...

Thanks again!

Joe
IMG_20201122_153012832.jpg
Joe's first RMH attempt in yurt
 
Joe Krein
Posts: 21
Location: Catskill Mountains, NY
3
fungi medical herbs rocket stoves
  • Mark post as helpful
  • send pies
    Number of slices to send:
    Optional 'thank-you' note:
  • Quote
  • Report post to moderator
Note that most of the ducting is not currently connected - only that which comes directly out of the bell and goes up through the chimney. All other ducting was originally connected, but was removed to troubleshoot/simplify...
 
thomas rubino
rocket scientist
Posts: 6533
Location: latitude 47 N.W. montana zone 6A
3401
cat pig rocket stoves
  • Likes 3
  • Mark post as helpful
  • send pies
    Number of slices to send:
    Optional 'thank-you' note:
  • Quote
  • Report post to moderator
Hi Joe;
Yes, you got it.  The exposed pipe sheds heat so fast that it can not / does not need to heat the chimney.
Your build needs mass over the pipes.
But start by using cob and straw mix under your pipes And a cob perlite (if you have it) under your core.
If you don't insulate under the core and mass your loosing a lot of your heat to the earth.
It does not need to be all cob. Larger rocks are a better heat sink than cob. Use as many as you can.
Your "cob" over the pipes should be goopy mud with very little rock.  After your pipes are covered just a bit then start adding rock. Leave no air spaces.

Be warned that mud will need to dry before the whole thing starts working properly!

Your transition area is the space in the bottom of the barrel. Where the heat changes direction and goes into your horizontal pipes.
Yours looks OK, but I would suggest using a 8" to 6" adapter when leaving the barrel to start your horizontal run.
This will encourage the gasses to start their journey down a flat pipe to escape up a warm vertical chimney.
 
Satamax Antone
gardener
Posts: 3471
Location: Southern alps, on the French side of the french /italian border 5000ft elevation
194
  • Likes 1
  • Mark post as helpful
  • send pies
    Number of slices to send:
    Optional 'thank-you' note:
  • Quote
  • Report post to moderator
Joe, how much length do you have in horizontal pipes, accounting for the elbows?

About your transition, Thomas sees it good. I'm dubious.

6 x 6 x pi/4 = 28.27 sqin.

6 x pi = 18.84 inches perimeter. X3 inch gap = 56.52 square inches.

About X2 your CSA, that should do the job, as long as the pipe is about 3 inches from the barrel's floor.

Otherwise, you subtract 1/4 of the perimeter.

18.84 x 0.75= 14.13.  

14.13 x 3 inch gap. = 42.39 square inches.

42.39 / 28.27 = 1.499. That's really close to the lower limit of 1.5 CSA for the transition.

Plus a sub optimal chimney. The pipes shedding all the heat. And a seemingly rather long horizontal pipe. And you end up with problems.

If that makes sense.

A 8 or 10 inch funnel going down to 6 at the transition would be better. No protrusion of the pipe in the "gap" either.

An insulated vertical chimney, would be better. Raising 3 feet above the "ridge line"

And if you want to test in situ, your horizontal pipes, before cobbing. You cover these with roxul.

HTH.
 
Rocket Scientist
Posts: 4587
Location: Upstate NY, zone 5
600
5
  • Likes 1
  • Mark post as helpful
  • send pies
    Number of slices to send:
    Optional 'thank-you' note:
  • Quote
  • Report post to moderator
As you have a short vertical chimney without insulation, I think you need to give the draft all the help you can. A half-barrel bell instead of winding ducts will give you almost no drag for the same amount of heat exchange surface. Cut one 55 gallon drum in half lengthwise and connect them end to end to make one space, run the duct from the manifold in and the chimney out from near the bottom. Insulate under and cob over and you have an effective mass radiator.
 
Joe Krein
Posts: 21
Location: Catskill Mountains, NY
3
fungi medical herbs rocket stoves
  • Mark post as helpful
  • send pies
    Number of slices to send:
    Optional 'thank-you' note:
  • Quote
  • Report post to moderator
Thanks again for all the thoughtful and rapid responses! As I mentioned, right now the only duct connected is the chimney. The other duct in the photo was originally connected, but was disconnected once backdrafting problem began.

Thomas, regarding insulation under the core, I should also have noted that this yurt is approximately 18" off the ground, on a deck. I might be able to squeeze under the yurt and put some rigid foam insulation on the bottom of the plywood decking. Also, the RMH itself was built on top of 2 layers of 3/4" plywood in order to effectively distribute the weight. In addition to the 1/2" plywood of yurt deck under that, I think I've got a bit of "lumber insulation," though I'm very aware that that will not be as effective as a perlite mix...

Regarding your suggestion about transitioning from 8" to 6" coming out of the bell, it is already 6" pipe used throughout... I could transition from 6" down to 5" or 4", but I've obviously got a bit of $ invested in the 6" pipe and components, so hopefully I can make that work....
I will insulate what pipe is currently exposed (with rockwool, per Satamax's suggestion, though there's not much before it goes vertical...)

The insulation around the heat riser is a composite of refractory cement (same as was used to bind the fire bricks together in the core) and perlite. It's rather thick, but there is generally at least 3" in the transition area, and I made sure the exit duct does not protrude into this zone, also in keeping with Satamax's recommendation).

I should also mention that the core is not level - the exit from the bell is lower than the burn chamber, which is lower than the bottom of the feed tunnel.... I'm not sure if this is due to the yurt settling (it's deck is only on cinder blocks, no real foundation per se...) or from the weight of the RMH causing that part of the yurt to sink into the soil below....


Again, my great appreciation goes out to all of you!

Joe
 
Satamax Antone
gardener
Posts: 3471
Location: Southern alps, on the French side of the french /italian border 5000ft elevation
194
  • Likes 1
  • Mark post as helpful
  • send pies
    Number of slices to send:
    Optional 'thank-you' note:
  • Quote
  • Report post to moderator
Joe, first of all, insulate that vertical chimney.  Do you have internal pics of the transition?
 
thomas rubino
rocket scientist
Posts: 6533
Location: latitude 47 N.W. montana zone 6A
3401
cat pig rocket stoves
  • Likes 1
  • Mark post as helpful
  • send pies
    Number of slices to send:
    Optional 'thank-you' note:
  • Quote
  • Report post to moderator
OK Joe;
You have a serious fire hazard your about to build.
The bottom of your core can and will char right thru your 3/4" plywood.
Here is how to fix that. Build a box with 2x4 or better 2 x 6 on edge . place concrete board on the bottom and fill with a cob perlite or refractory / perlite mix! Put your core on it.
You will burn your yurt floor if you leave it as is.

I was referring to an  8" to 6" adapter leaving the barrel. Then by all means connect the 6" pipe to that.
You are just helping funneling those gasses into a smaller round pipe.
 
Satamax Antone
gardener
Posts: 3471
Location: Southern alps, on the French side of the french /italian border 5000ft elevation
194
  • Likes 1
  • Mark post as helpful
  • send pies
    Number of slices to send:
    Optional 'thank-you' note:
  • Quote
  • Report post to moderator
Ring projection.

https://donkey32.proboards.com/thread/1406/calculating-ring-circumference-projection-gap
 
Joe Krein
Posts: 21
Location: Catskill Mountains, NY
3
fungi medical herbs rocket stoves
  • Likes 2
  • Mark post as helpful
  • send pies
    Number of slices to send:
    Optional 'thank-you' note:
  • Quote
  • Report post to moderator
Thanks, Thomas! Glad you told me that - funny, I have been getting this sweet-but-sort-of funky smell (sort of like someone farted in the kitchen while baking cookies....)  during my test firings...  I thought it might be the slightly green black locust that I've been burning, but that didn't quite sit right in my mind... it must be the plywood baking!

Hope I can lift the Rocket Stove off of the plywood all in one piece, as I don't relish the thought of a complete rebuild!

Thanks again for all the valuable insight, and I'll switch the exit tube to 8" when I do the above modification...can level it then, as well...

Fingers crossed, and thanks for saving a newbie from burning down his yurt!!!

I'll keep you all updated


Joe
 
Joe Krein
Posts: 21
Location: Catskill Mountains, NY
3
fungi medical herbs rocket stoves
  • Likes 1
  • Mark post as helpful
  • send pies
    Number of slices to send:
    Optional 'thank-you' note:
  • Quote
  • Report post to moderator
Satamax, thanks for the link to the crazy math/ ring projection.... the thing that immediately comes to mind is, "Rather than do the math, why not just avoid any projection at all (of the exit tube into the gap)?
 
Satamax Antone
gardener
Posts: 3471
Location: Southern alps, on the French side of the french /italian border 5000ft elevation
194
  • Likes 1
  • Mark post as helpful
  • send pies
    Number of slices to send:
    Optional 'thank-you' note:
  • Quote
  • Report post to moderator

Joe Krein wrote:Satamax, thanks for the link to the crazy math/ ring projection.... the thing that immediately comes to mind is, "Rather than do the math, why not just avoid any projection at all (of the exit tube into the gap)?


There is no projection of the tube into the gap, but a theoretical projection of it, into the gap, which gives you a "free from obstacles" surface area (like a curved section of a tube) into which the gases can flow freely. Minus the "hindrances" of turbulence created by the sharp 90° turn, and the boundary layer sticking to the barrel, to the tube and to the corner linking the two.

Duh, sorry, i might have not explained well there. But that's all 5th grade maths!

Thomas suggested using a funnel going from 8 to 6 inches, as a "plenum" or transition area.

Let's do the calculation.

8 x PI = 25.13 inches of circumference, or perimeter.

Multiplied by the 3 inch gap you have between your heat riser and the barrel.

25.13 x 3 = 75.39 square inches of "free of obstacles"  surface for the gases to flow.

If the 8 inch end of the funnel is touching the barrel bottom, you subtract 1/4 of the surface, because the gases don't have much ways to get down there.

75.39 x 0.75 = You have 56.54 "good" square inches for your "flow"

A 6 incher CSA (cross sectional area) is as calculated above 28.27 square inches, doesn't matter if it's square or round, the corners of a square drag soo much on the flowing gasses that they are nearly stalling in the corners.

56.54 / 28.27 =2.000 something.  You're at spot on 2 times the size of your rocket's CSA.

The absolute minimum; accounting for drag, turbulences boundary layer etc is X1.5 the CSA, best case scenario, X3 is good.

And this goes for the top gap, and the plenum or transition area. The side gap ought to be bigger, because of the big surface dragging on the gases, creating a boundary layer (stalled gasses sticking on the heat riser and barrel's walls)  Anything bellow 2 inches, i wouldn't recommend.  (even 6cm minimum for me i would say)

HTH.

 
Joe Krein
Posts: 21
Location: Catskill Mountains, NY
3
fungi medical herbs rocket stoves
  • Likes 1
  • Mark post as helpful
  • send pies
    Number of slices to send:
    Optional 'thank-you' note:
  • Quote
  • Report post to moderator
Wow, learning something every time one of you responds..... Satamax, thanks for crunching the numbers... what I find especially intriguing is your assertion regarding the roughness of the insulation I have around my heat riser (probably about 90% perlite, 10% refractory cement, just enough to make the perlite stick together) creating a boundary layer, dragging on the exhaust gases... it is very rough, indeed! I'll address this (and the gap ratios/ 5th grade math) when I reassemble, after getting that baby off the plywood! Maybe I'll glaze that insulation so it will be smoother against the descending gases....

You guys are the best - thanks again and again!

Joe
 
Satamax Antone
gardener
Posts: 3471
Location: Southern alps, on the French side of the french /italian border 5000ft elevation
194
  • Likes 1
  • Mark post as helpful
  • send pies
    Number of slices to send:
    Optional 'thank-you' note:
  • Quote
  • Report post to moderator
Joe, you don't have to glaze the insulation, everything does it. Some gases stick to even the finest polish you can find. Actually there is a science studying just that.

https://en.wikipedia.org/wiki/Tribology

https://en.wikipedia.org/wiki/Adhesion

Just keep your gaps wide enough, and you're good.

And i didn't assess or guessed the roughness of your heat riser or barrel. I just know, after a while, any stove will have fly ash and soot sticking to the surfaces, making these rough. Hence increasing the boundary layer.
 
Joe Krein
Posts: 21
Location: Catskill Mountains, NY
3
fungi medical herbs rocket stoves
  • Mark post as helpful
  • send pies
    Number of slices to send:
    Optional 'thank-you' note:
  • Quote
  • Report post to moderator
That's great, Satamax! Thanks again! Seems I have a bit of a project ahead of me- only wish I had discovered all this before winter was coming on, but I had no real impetus to run the stove while the weather was warm...

Anyway, one "last" question: am I understanding correctly that the bottom of the exit tube coming out of the bell should be an equivalent distance from the bottom of the barrel as the gap distance? Or is 3" just a safe standard?


Best wishes,

Joe
 
Satamax Antone
gardener
Posts: 3471
Location: Southern alps, on the French side of the french /italian border 5000ft elevation
194
  • Likes 1
  • Mark post as helpful
  • send pies
    Number of slices to send:
    Optional 'thank-you' note:
  • Quote
  • Report post to moderator
Well, safe standard. Kindof.
 
Wait for it ... wait .... wait .... NOW! Pafiffle! A perfect tiny ad!
Learn Permaculture through a little hard work
https://wheaton-labs.com/bootcamp
reply
    Bookmark Topic Watch Topic
  • New Topic