• Post Reply Bookmark Topic Watch Topic
  • New Topic
permaculture forums growies critters building homesteading energy monies kitchen purity ungarbage community wilderness fiber arts art permaculture artisans regional education skip experiences global resources cider press projects digital market permies.com pie forums private forums all forums
this forum made possible by our volunteer staff, including ...
master stewards:
  • Nancy Reading
  • Carla Burke
  • r ranson
  • John F Dean
  • paul wheaton
  • Pearl Sutton
stewards:
  • Jay Angler
  • Liv Smith
  • Leigh Tate
master gardeners:
  • Christopher Weeks
  • Timothy Norton
gardeners:
  • thomas rubino
  • Jeremy VanGelder
  • Maieshe Ljin

Small greenhouse to heat garage during the day, and garage to heat the greenhouse at night?

 
Posts: 672
Location: St. George, UT. Zone 8a Dry/arid. 8" of rain in a good year.
207
trees bike greening the desert
  • Likes 1
  • Mark post as helpful
  • send pies
    Number of slices to send:
    Optional 'thank-you' note:
  • Quote
  • Report post to moderator
This is just some thinking out loud I'm doing.  If anyone has advice on what's worked for them of what they've seen work it would be helpful.  

So I saw a youtube video about a woman who built a lean to greenhouse against her home and she uses the greenhouse to heat her living space behind it.  I love this idea.

I am considering building a 6' X 8' or so lean to greenhouse against the south facing wall of my garage (right where an existing window is for the garage).  It's a stucco wall on the garage, and the greenhouse would sit on top of a section of a long concrete driveway that goes into my backyard.  I live in zone 8a so it gets below freezing often, but rarely does it go into the teens or lower.  The spot gets full sun all day after the trees drop their leaves behind it.  It's sunny almost every day here.
The garage never drops below freezing, ever, at least not that I've noticed.  High 30's is the lowest it's ever gotten that I've seen.  The garage is attached to a heated house, so that helps.  During the warmest part of winter days, the garage rarely gets above 55 inside.  

I'm hoping that with a small fan blowing probably 24 hours a day, I could heat the inside of the garage a bit while cooling the greenhouse down a lot, and in turn the same air circulation would provide enough heat from the garage to prevent the greenhouse from freezing on all but the most extreme of cold nights using just a fan.  That's what I'm hoping/thinking.  In my mind it's a closed system.  No ventilation other than from one space to the other (the garage bleeds a lot of air through the roll up door, so it's not like it's truly ever "closed").  I'd like the ability to vent the greenhouse if I wanted to, but not by necessity.  

IF I do build it, I plan on building SIP raised beds in a keyhole type shape inside the greenhouse mainly just for winter crops like greens, and maybe some shelves above to start annual veggies in the spring.  The beds would all be about 2' wide and probably 3' tall.  I'm thinking it would be good to have the water sitting in the bottom as a type of heat battery sort of thing.  Also, I might add shelving on the stucco wall of the garage for water jugs for more heat storage.

I'd like to integrate two fifty five gallon water barrels fed from a nearby garage gutter downspout connected to a swamp cooler float that automatically allows water to keep the SIP beds topped off  (not sure if I worded that well enough to make sense?).  There's not enough room in the greenhouse for the barrels, so they'd be located on a stand near the greenhouse.

So a few years ago I picked up five sheets of 1/8" X 3' X 6' tempered glass panels for free off of craigslist.  They're a bit stained from something but I think they'd work great for this project.  They're just unframed glass, and so I'd have to make some sort of frame to hold them (which I'm not quite sure if I'd make metal frames or wood).
That being said, it would be a lot easier to just use a couple of cattle panels cut down and cover them with some plastic like so many people do with traditional hoop greenhouses.  I like the idea of being able to completely remove the plastic and allow 100% airflow during the summer.  The reason being is because in the summer I use a swamp cooler on the same window I'd be building the greenhouse at to cool the garage, so I need the ability to have good airflow to that window that hopefully isn't super heated because it's in an enclosed space.
EDIT, oh yeah, I also have the crazy idea of thinking I might be able to incorporate the swamp cooler so that it could work in such a way as to cool the garage and then exit it through the greenhouse thus cooling the greenhouse enough to be able to use it during the summer.  I basically live in my garage in the summer, and the swamp cooler is on all day anyway.

I want to keep the building to as minimal as possible.  The glass panels while much more permanent would require a ton more work and expense.  I also might get hassled more from the city I live in if I build a "permanent" type structure vs cattle panels with plastic.

I could probably spend up to $1,000 on this (merry christmas to me!), but keeping it well below $500 would be ideal.  I think the SIP raised beds will be the biggest expense.  

Again, I'm just writing down the ramblings of thoughts going on in my head, feel free to tell me it's all a bad idea, or whatever.  I'm listening.

I blame this video for the idea.  


gardener
Posts: 2514
Location: Ladakh, Indian Himalayas at 10,500 feet, zone 5
838
trees food preservation solar greening the desert
  • Likes 5
  • Mark post as helpful
  • send pies
    Number of slices to send:
    Optional 'thank-you' note:
  • Quote
  • Report post to moderator
Thanks for that video! I love it!

I heat my house with an attached greenhouse too. Mine is seasonal -- I attach it on the south side of the house in October, and remove it in spring when it overheats or when spring winds get too bothersome.

I love having it. It enables me to grow winter veggies (mostly leafy vegetables) when no vegetables are available in the market in winter, and it enables me to keep tender perennials such as rosemary. It provides a green space and plant love (and oxygen) through the winter when there is nothing green outdoors here, and it heats the house, especially the downstairs of my house. Because of the planted area, it does produce a lot of moisture, which does condense on windows in the colder northern part of the house, but I expected that and hope it doesn't cause too much problems over the years. my house is rammed earth, so the thick earth walls can absorb some of the humidity. Also the thick earth walls provide thermal mass which stabilizes the temperature so that indoors does not suffer the wild temperature swings of the greenhouse itself. I don't have a fan like the woman in the video above, though that would probably be better. I just rely on opening as many doors and windows as I can between the indoors and the greenhouse whenever the temperature in the greenhouse is advantageous.

With sloping glazing, overheating in summer could be a real problem, so that's why I stick with the the removable greenhouse, and don't have any plastic there in summer. in fact some summers I put up shade cloth on part of the greenhouse frame, since I don't have any shaded places to sit around outdoors yet, until my trees grow up.

I don't much trust the sun that would come through deciduous leafless trees in winter to provide serious heat. The shade of leafless winter trees is still a lot chillier than direct sun. But you're in zone 8, which isn't very cold, so maybe that filtered sunlight would give enough warmth to help. If the same trees help against overheating in summer, that would be great.

I've never embedded a youtube video here before and I'm not sure this will work. Anyway this video doesn't have much about my greenhouse, and no internal shot.


And some still photos:
2019-09-27_greenhouse-garden-in-summer-without-glazing.jpg
[Thumbnail for 2019-09-27_greenhouse-garden-in-summer-without-glazing.jpg]
2019-10-31_greenhouse-garden-with-worm-bin.jpg
[Thumbnail for 2019-10-31_greenhouse-garden-with-worm-bin.jpg]
 
Joshua Bertram
Posts: 672
Location: St. George, UT. Zone 8a Dry/arid. 8" of rain in a good year.
207
trees bike greening the desert
  • Mark post as helpful
  • send pies
    Number of slices to send:
    Optional 'thank-you' note:
  • Quote
  • Report post to moderator
Rebecca, your greenhouse looks great!  I really like the rock lined beds that naturally curve around.  Thanks for posting the pictures, and the success you're having heating your space.  I basically want to accomplish the same thing.  Use it during the winter sealed up, and then have the ability to air it out in the summer.  I'm considering using some tin roofing panels I have to cover the roof and just have the front be the glass panels.  Then when it starts to get warm out, I can pull the tin panels off pretty easily, and maybe do like you're doing and cover the room in shade cloth.  
The nice thing about it being the garage is that I really don't care about the reverse cooling I'd like to accomplish.  I doubt if most people would like their living space to have the heat pumped out of it to heat their growing space.  I feel like it could be a win/win situation.  It doesn't matter how cold the garage gets inside during the night.

I'm pretty sure I saw the video I linked on this site a few years ago, but I don't remember what thread I saw it in.


I'll have to take some pictures of the location and post them up when I get a chance.

Thanks again for the pictures and information!

Josh
 
Joshua Bertram
Posts: 672
Location: St. George, UT. Zone 8a Dry/arid. 8" of rain in a good year.
207
trees bike greening the desert
  • Likes 3
  • Mark post as helpful
  • send pies
    Number of slices to send:
    Optional 'thank-you' note:
  • Quote
  • Report post to moderator
I really put a lot of thought into this project and finally came to a "kind of" idea of how I'm going to build it.  Like most things I build, there is no plan, just some ideas in my head and as I start to put things together the ideas change, and the design changes.  

For now, I'm not going to worry about the planter boxes/sip beds.  I want to get a frame up, cover it in plastic, and see what the temperatures are like.  I'll probably just use buckets if I do decide to grow something for now.  I want it to be easy to remove if I don't like it.  I'm pretty sure I'll like it though.  I think covering it in plastic during the cold season, and then covering it with shade cloth in the summer is the way to go.  Much like Rebecca is doing.
I really wanted to use the glass panels I have, but they're too permanent for what I want.  Maybe I'll make some cold frames out of them someday, or sell them.
Then, I was set on using cattle panels.  Then I got the idea to enclose the garage door/lengthen the design by five feet which would make it impossible to have a door at the end of the lean to, and I don't want to deal with framing a door into the curved side of cattle panel.  Cattle panels would have cost more too.  I'd need at least four of them, and they're about $26 a piece here.
Then I was set on bending emt 1/2" conduit, but that didn't make sense either because the span I needed to cover was about thirteen feet, and I can only get emt in ten foot lengths.  Plus I'd have to buy or make a bender.  Then I'd have to frame out the last three feet I'd need to complete the span.  Welding emt sucks, and it's dangerous because of the gas.

So I went with 1/2" square mild steel tubing.  I've used it for many projects, it's easy to weld and to cut.  I can bend it by cutting several slots/kerfs where I want the bend, and it's only eight cents per foot more than the emt.  It also comes in 20' lengths which will make everything easier for me.  I bought 140' of it yesterday @ $0.46 per foot.  I have a bunch of other scrap steel I can use for the base rail/frame, and some wood furring strips for some other areas.  So less than $70 and I have almost everything besides the plastic.  

I found out liquid nails doesn't stick to concrete yesterday.  I cleaned it but I'll need to buy a tube of epoxy.  I figure that will cost me $20 more.  I'm using some 1 1/4" concrete screws also, but I'd like to have a more secure bond to the concrete.  I don't really trust the concrete screws, and I don't have a hammer drill to put anything much bigger in.

The pictures of where I'm at as of yesterday.  Got the bottom rail cut out using some angle iron for the length of it, and some flat iron spliced in where the door will go.   Figuring out where I need to put the notches to bend the tube.  I still need to tweak a bit more on the lengths/pitch of the roof.  We rarely get snow, and when we do it's not much, so I think it'll be fine.  Also need to come to an idea on how I'll cover and attach the plastic.  I'm thinking wood furring strips.  I just need to make sure I can get to all the corners when it comes time to put it on.  
Took a picture of the sun at  noon yesterday.  The tree branches behind me aren't in the way but a very tiny amount.  The area gets pretty much full sun except the area right next to the block wall where the gate is.  
I want to put shelves to the right of the garage door/left of the a/c unit and use that for starting seeds or microgreens or?  The area all to the left of the door I would like to build the keyhole raised beds in eventually.


I
IMG_20210116_121109984.jpg
This is where it's going. From the block wall to about a foot to the left of the a/c unit.
IMG_20210116_121126818.jpg
The sun and trees behind me at noon.
IMG_20210116_154524942.jpg
Fail with liquid nails. Had 40lb weights and it wouldn't bond. This is the bottom frame that I'll attach the 1/2" tube to.
IMG_20210116_164255178.jpg
About the angle I'm going for. I'll attach the metal to the garage using a hole and a set screw in a wood furring strip.
IMG_20210116_164321238.jpg
Cutting slits in the steel for the bend. I'll have to weld it back up.
 
Joshua Bertram
Posts: 672
Location: St. George, UT. Zone 8a Dry/arid. 8" of rain in a good year.
207
trees bike greening the desert
  • Mark post as helpful
  • send pies
    Number of slices to send:
    Optional 'thank-you' note:
  • Quote
  • Report post to moderator
Progress, and more $$$ unfortunately.  I was hoping to keep it pretty cheap, but I'm pumping money into it.  For good reason, it should be more functional with the additions I've made.

I've spent $327 total so far on it, but There's extra material that can be used for other projects, either for the lean to I'm building, or elsewhere.

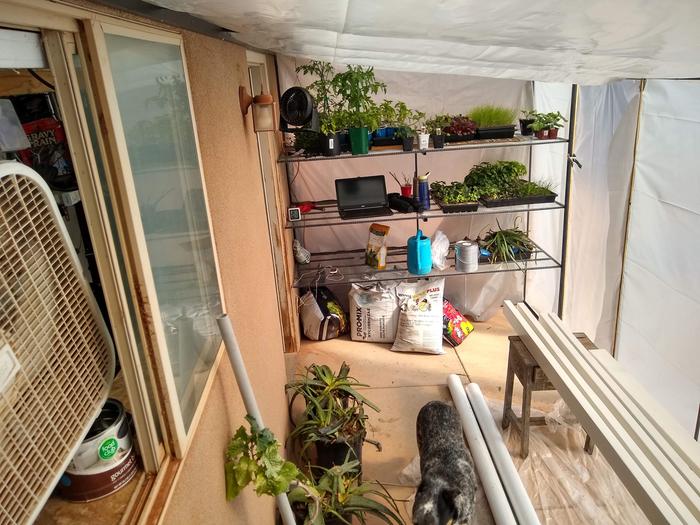
I put up a big set of shelves on one side.  It'll be for starting seeds.  I also think during the summer I can enclose just the right side/shelves in plastic, and I might be able to rig it up as an area to dry food out.  I don't know, it's just an idea right now.  I might even build a little solar box that could collect the heat and pump it into that area.  
Those shelves cost a lot of extra money.  It was about $50 for the steel framing for the shelves plus some old scrap I had laying around.  I'm waiting for 1/2" hardware cloth to come in the mail from Amazon to put on top of the steel beams.  They're super solid.  I stood on the lowest shelf and it held my entire weight no problem.  The hardware cloth was $60 for 50' X 36".  I only need about 21' of it for the shelves.

I also bought some magnetic strip tape for the door.  I haven't installed it yet, but I hope that it'll keep the door sealed shut pretty well.  That was $6.
Also got a door sweep for the bottom of the door to keep the draft out.  Another $6

I bought some epoxy for gluing the steel angle iron to the cement.  It cost $22, and it seems like it was worth it.  It's rock solid fastened to the concrete now.

It pained me to buy the plastic.  It was $100 for a 20' X 100' roll.  I should be able to get three coverings out of that size, though.  I might be able to get a couple of seasons out of each piece if I take care of the plastic when it's removed in the spring, so maybe six years worth of plastic?  I don't know.  I'm trying to justify it in my mind.

All that's left is to finishing priming and painting the steel, put the hardware cloth on the shelves, put the magnet tape on the door along with the sweep, and cover it up in plastic.  I'm guessing I'll have to install vents at either end, but I'm going to try having it completely sealed to start.  I'll leave both the window and the garage door open and have a fan running 24/7.  Hopefully it'll heat the garage during the day, and the garage will heat the greenhouse enough to keep it above freezing?  


Part of me wants to omit building any permanent planters, and maybe just build lot's of shelves around the perimeter.  Maybe start selling seedlings and stuff?  I don't know.  lol  It's all just for fun.

Pictures of the progress as of yesterday.


IMG_20210213_162030242_HDR.jpg
[Thumbnail for IMG_20210213_162030242_HDR.jpg]
IMG_20210213_162042486_HDR.jpg
[Thumbnail for IMG_20210213_162042486_HDR.jpg]
 
Joshua Bertram
Posts: 672
Location: St. George, UT. Zone 8a Dry/arid. 8" of rain in a good year.
207
trees bike greening the desert
  • Mark post as helpful
  • send pies
    Number of slices to send:
    Optional 'thank-you' note:
  • Quote
  • Report post to moderator
I really dislike the way it looks, but I LOVE how it's heating the garage!

The garage is almost 70F by 2pm (which is when I get off of work)!!!  Who care about growing plants in the dang thing!  :)

Seriously, though, after just about four days, it seems like it's working well as both a greenhouse and a heater.
The 6 mil regular plastic was a pain to get on, and it isn't perfect by any means.  I could probably fuss with it more to get it better, but since I'll probably be pulling it all off in a month or so, I'm not going to bother.

The lowest temperature it's been outside is 30F.  Inside the greenhouse it was 41F at the same time.  Success.  The garage at that same time was just over 50F.  That's with heavy winds so I'm guessing in less windy conditions the greenhouse would probably stay a few degrees warmer.  Also, the garage would probably also be warmer because there is a lot of airflow that bleeds through the roll up door.

I just took a video a few minutes ago, and during the warmest part of the day it was 57F outside in the shade.  Inside the greenhouse was about 90F in a shady spot.  Inside the garage was just under 70F.  A little warm in the greenhouse, but nothing terrible.  It's supposed to hit almost 70F here next weekend, so it'll surely have to leave the greenhouse door open.
Here's the cheesy video.  


It's all just rigged for now, but I'm really looking forward to dialing it in next fall/winter.

I've decided to try using a rain gutter grow system instead of the sip style beds I originally was thinking about.  When the plastic comes down, I can trellis the plants to the frame of the greenhouse.  I'll post some pictures when I'm done.

IMG_20210228_143426745_HDR.jpg
Trying to make the most of my concrete jungle.
IMG_20210228_143449749_HDR.jpg
I don't know I'd say it's ugly, but it sure isn't aesthetically pleasing. It works, though.
IMG_20210228_135802460_HDR.jpg
Fan blows cool air out of garage, and a smaller fan blows hot air into the garage.
IMG_20210228_135858716_HDR.jpg
The stuff for the rain gutter grow system, and my sorry looking purple tree collard, and aloe plants.
 
Joshua Bertram
Posts: 672
Location: St. George, UT. Zone 8a Dry/arid. 8" of rain in a good year.
207
trees bike greening the desert
  • Mark post as helpful
  • send pies
    Number of slices to send:
    Optional 'thank-you' note:
  • Quote
  • Report post to moderator
Snow day..

It was 80F here last weekend, and today the forecast says a low of 31F for today, although it doesn't seem like it'll get that low.  It's 37F outside and 45F inside the greenhouse.   It's working great so far.

Built a modified "Rain Gutter Grow System" using a 3" pvc drain pipe rather than a gutter.  Everything else is pretty much the same.
I did make a unique wick for the 15 gallon nursery pots (slightly larger than 5 gallon plastic buckets) that cost me $1.25 each at the local nursery here.  For the wick, I used old tube socks (most of them a wool blend, but some of them plain cotton) and filled them with peat moss (that I get free from work!!!...bags that get torn they give me for free along with fertilizers, paint, chemicals, caulking, potting soil, and on and on...).  Then I pack the peat moss filled sock into the net cup that sits in the water in the 3" pipe.  I also put a couple of inch layer of packed peat moss at the very bottom of each bucket, then filled them with a homemade blend of my made on site compost along with perlite and vermiculite.
Planted some nursery bought tomatoes, eggplant, squash, strawberries, and some peppers I started from seed a couple of days ago.

IMG_20210313_073559287_HDR.jpg
Snow day.
Snow day.
IMG_20210313_073623787_HDR.jpg
Not much sticking to the ground. We get a handful of days a year like this. Average last frost date here is tomorrow.
IMG_20210308_143104236.jpg
Using a pvc pipe to fill sock with peat moss. Made it a lot easier to get to the bottom of the sock.
IMG_20210308_143330776_HDR.jpg
Filled sock stuffed into net pot. I tie wrapped both ends of the sock (their were holes in the toe section).
Filled sock stuffed into net pot. I tie wrapped both ends of the sock (there were holes in the toe section).
IMG_20210310_145635636.jpg
Sock/wick surrounded by homemade potting mix.
IMG_20210313_073610670.jpg
About 37F this morning outside.
IMG_20210313_073714467.jpg
45F inside the greenhouse. 8F warmer than outside with just one tiny fan running, and no heat source.
IMG_20210313_073649941.jpg
Finished rain gutter grow system, and snow on the outside.
 
Rebecca Norman
gardener
Posts: 2514
Location: Ladakh, Indian Himalayas at 10,500 feet, zone 5
838
trees food preservation solar greening the desert
  • Likes 2
  • Mark post as helpful
  • send pies
    Number of slices to send:
    Optional 'thank-you' note:
  • Quote
  • Report post to moderator
Great! I'm glad it's working for you already! I feel I have company. Next winter it will be much more full of greenery because you'll have it from fall onwards.

A warning about trellising climbing plants on the greenhouse frame -- if those plants will still be there when you want to put the plastic on in fall, it gets problematic. The plants prevent the plastic from lying flat, which is already difficult, right? And the plastic can rub or squeeze and damage the plants. So it's a useful idea only for things that will surely be done and gone by the time the plastic needs to go on.

Those racks will be great for drying vegetables in your dry summers. I don't think in Utah it will require additional heat or any complicated solar collector. If flies are not a problem you can dry vegetables on trays on the shelves, open to the sky, and they will dry quickly. If flies might be a serious problem, you can screen around the shelves with cheap screenlike cloth, not even bothering with metal screen initially. If rain is a possibility when you won't be home, throw sheet metal over the top, leaving the sides open. I dry a lot of different vegetables because we don't have vegetables available in winter here, but I also dry more and more tomatoes every year and still never have enough. Dried tomatoes intensify in flavor and sweetness, so in summer I buy the rather disappointing tasteless local tomatoes and dry them in halves, quarters or sections on trays, open to the sky or under a mesh cloth/tent. They are super yummy when thrown in food, or when powdered in the blender they are amazing on everything.
 
Joshua Bertram
Posts: 672
Location: St. George, UT. Zone 8a Dry/arid. 8" of rain in a good year.
207
trees bike greening the desert
  • Mark post as helpful
  • send pies
    Number of slices to send:
    Optional 'thank-you' note:
  • Quote
  • Report post to moderator
Rebecca!  Thanks for pointing that out to me about using the frame as a trellis.  You're absolutely right I was planning to use it as a trellis when the plastic came down, but I hadn't thought about recovering it when I wanted to prolong the season in the fall.  I don't think I'll do that now.  I'm kind of bummed, but at the same time thankful that I didn't get myself painted into a corner.  
Thanks again.

Yeah, I only had a short amount of time to play around with it this year, so hopefully next year it will be overwintering tomatoes and peppers and such.  I want to install another set of buckets in the middle exactly like the set in the pictures, and then I'm thinking a series of shelves built onto the back wall of the garage for starting seeds and stuff.  

You're absolutely right about not needing any extra heat to dehydrate here.  The humidity is in the low teens or single digits most days during the summer, and we're over 100F pretty much every day from the end of June to the Middle of September.  Last year I dehydrated tons of tomatoes in the back of my 4runner with the windows rolled up and parked in a sunny spot all day.  It got over 120F inside and it took about three days to get them leathery dry if I remember right.  You're right, they taste great, and they were gone in no time.  First time I'd ever tasted dehydrated tomatoes before.

Flies, yup, I've got a cattle farmer a couple of blocks away from me, and horses are nearby as well.  I'll definitely have to screen it off or enclose it somehow.  I'm also concerned that the fire ants will figure a way to get up there too.  Maybe piles of d.e. around the legs.....oh yeah, roaches......the roaches will be the hardest thing of all to keep away.  They're everywhere out here, and the slightest bit of moisture draws them like a magnet.  It'll be a challenge with the bugs for sure.

Thanks again for the advice and comments.  Your setup is so much more aesthetically pleasing.  I'm very envious of that setup you have.  Great job with it.
IMG_20200716_123131967_HDR.jpg
Last year's dehydrator. Ghetto, but it worked, and it kept the bugs off.
 
Rebecca Norman
gardener
Posts: 2514
Location: Ladakh, Indian Himalayas at 10,500 feet, zone 5
838
trees food preservation solar greening the desert
  • Likes 1
  • Mark post as helpful
  • send pies
    Number of slices to send:
    Optional 'thank-you' note:
  • Quote
  • Report post to moderator
For trellising plants, you can tie strings up to the frame, just don't have plants twined around the frame when fall comes.
 
Whatever you say buddy! And I believe this tiny ad too:
Heat your home with the twigs that naturally fall of the trees in your yard
http://woodheat.net
reply
    Bookmark Topic Watch Topic
  • New Topic