• Post Reply Bookmark Topic Watch Topic
  • New Topic
permaculture forums growies critters building homesteading energy monies kitchen purity ungarbage community wilderness fiber arts art permaculture artisans regional education skip experiences global resources cider press projects digital market permies.com pie forums private forums all forums
this forum made possible by our volunteer staff, including ...
master stewards:
  • Nancy Reading
  • Carla Burke
  • r ranson
  • John F Dean
  • paul wheaton
  • Pearl Sutton
stewards:
  • Jay Angler
  • Liv Smith
  • Leigh Tate
master gardeners:
  • Christopher Weeks
  • Timothy Norton
gardeners:
  • thomas rubino
  • Jeremy VanGelder
  • Maieshe Ljin

Chicken coop remodel

 
gardener
Posts: 1744
Location: N. California
811
2
hugelkultur kids cat dog fungi trees books chicken cooking medical herbs ungarbage
  • Likes 8
  • Mark post as helpful
  • send pies
    Number of slices to send:
    Optional 'thank-you' note:
  • Quote
  • Report post to moderator
In 2004 my daughters kindergarten teacher talked me into taking two chicks the class had hatched.  We got our new baby's some friends, and had chickens ever since.  My son 10 at the time and I built a 4 box nester.  I'm not a builder, and made many mistakes.  I also used only what I could scrounge up so it didn't cost me anything to build it.  I put it at one end of the coop, so you could get the eggs without going into the coop.  The biggest mistake I made was not treating the wood with anything.  This made it almost impossible to clean.  At some point I scrubbed it down and painted it.  This didn't help much.  It is actually still standing. I could have probably fixed it up with a few repairs, but I still can't keep it clean.  So out with the old in with the new.
The same son who is now 25 helped me again.  It was nice.  This time I bought a piece of 3/4 inch plywood a whopping 45.00 and a couple of 2X4s, they cost a little over 5.00. the rest of the wood we used was some boards we salvaged from a box spring bed that had to go, and some redwood fencing my daughter's boyfriends family was getting rid of.  My prime objective was to be able to clean it.  I also made it the opposite from the other, so now you have to go into the coop to get the eggs.  I liked the other way, but this created a low roof on the outside and the chickens used this as a way to get out.  I put linoleum on the bottom of each box.  That cost me 27.00.  I put hinges on both pieces of wood going into the box.  The first piece of wood will lift to make it easy to get the eggs.  The second piece of wood is hinged to make it easy to clean.  One of the guys I watched on Youtube used  that fake grass in his, and I have had some I got on clearance years ago and didn't end up using, so I thought why not.  I didn't attach it so it is easy to clean, or remove if I decide I don't like it. We put it on cement blocks to keep the wood off the ground.  I'm happy with the results.  We still made lots of mistakes.  The only one I'm worried about is somehow the angel on the top boxes is steeper then we meant them to be.  I may have to do something about that, time will tell.  The picture I took makes it look like the roof is very uneven, but it's not.  I'm also redoing there roosting bars and ran out of time last night. The tin was bent up and I'm going to attach chicken wire to it and take it to the top of the coop so the chickens don't poop up there.  Since I didn't get that done, of course several chickens slept up there, pooping and bending the tin.  Oh well, not a big deal to clean it off and bend the tin back.  The total was about 100.00.  More then I wanted to spend, but not to bad.  Next I will redo the roosting bars, make a new gate to get into the chicken yard (an old horse corral next to the barn) extend the fence, and put wood chips in the inside and yard.  My goal is to be done by the end of the week.  We will see if I can make it.  My hope it to keep the chickens in the chicken yard, only to have free range once in a while when I choose to let them out.  We shall see.  
IMG_20210223_142432272_HDR.jpg
The old nesting boxes. chickens still using it in the yard.
IMG_20210223_142525204_HDR.jpg
Open and ready to get your eggs.
IMG_20210223_142511119_HDR.jpg
New nesting boxes
New nesting boxes
IMG_20210223_142701807.jpg
Open and ready to clean.
 
Jen Fulkerson
gardener
Posts: 1744
Location: N. California
811
2
hugelkultur kids cat dog fungi trees books chicken cooking medical herbs ungarbage
  • Likes 5
  • Mark post as helpful
  • send pies
    Number of slices to send:
    Optional 'thank-you' note:
  • Quote
  • Report post to moderator
For a couple of days the chickens were only using the new boxes as a place to sleep.  I was a little bummed, especially since they are still using the old one.  I figured once all the chicken projects are done with luck the chickens won't be able to get out of the chicken yard, and start using it then.  Worst case scenario I lock them in the coop for a couple of days until they figure it out.  
Today I found 4 eggs in the new boxes, so a few of them have figured it out.  The best part is they're totally clean, not a speck on them.
So far I love the fake grass.  For the most part all I have to do is shake it off and it is pretty clean.  I plan to shake it off each day when I get the eggs, and maybe wash it once a week or two.  It's so nice to have clean nesting boxes, and know it won't be hard to keep them clean.
I finished the new roosting bars tonight.  The old bar is attached to the top of the nesting boxes. I read if it's higher than the boxes instinct will make them sleep there instead of in the boxes.  The problem is it's only 8 feet long, not enough for 14 chickens.  Also it's 4 1/2 feet off the ground, and I guess this can cause them problems with there feet. ( My old chickens fly down from the coop roof, which is 7' high and never had a problem)???  Any way in wanting to do it right I built  free standing nesting bars.  6' long one is 3' high, and the other is 18" high.  It didn't take very long to build, and made it mostly out of the wood my son and I salvaged from a box spring mattress that needed to go to the dump.  ( It reduced the amount that actually had to go to the dump way down, and we got a lot of useful wood. I think hardwood). The only cost was the exterior paint I got for 8.00 on clearance, and there's lots left.  I know most of the hens will want the tall bar, but the other is there if they need them.  I figured it may get more use in the summer when it's super hot, and they need more room to be cool.  Even if it is never used for anything but a ladder I learned a lot, and enjoyed the process.
 
Jen Fulkerson
gardener
Posts: 1744
Location: N. California
811
2
hugelkultur kids cat dog fungi trees books chicken cooking medical herbs ungarbage
  • Likes 8
  • Mark post as helpful
  • send pies
    Number of slices to send:
    Optional 'thank-you' note:
  • Quote
  • Report post to moderator
I have a couple of pictures of the roosting bars I wanted to share.
IMG_20210226_180355484_BURST000_COVER.jpg
[Thumbnail for IMG_20210226_180355484_BURST000_COVER.jpg]
IMG_20210226_180305326.jpg
[Thumbnail for IMG_20210226_180305326.jpg]
 
Jen Fulkerson
gardener
Posts: 1744
Location: N. California
811
2
hugelkultur kids cat dog fungi trees books chicken cooking medical herbs ungarbage
  • Likes 4
  • Mark post as helpful
  • send pies
    Number of slices to send:
    Optional 'thank-you' note:
  • Quote
  • Report post to moderator
I almost made my goal.  My son and I made and installed a new gate to get into the chicken yard.  I'm very happy with it.  It looks totally wonky, but it's actually level, the barn is what is leaning.  Oh well.  It works great.  We used a new 2 x4s for each side and attached to the existing post.  The slats that go across are the recycled redwood fence boards I got for free, and the cross brace I got on clearance for .90. I already had the chicken wire.  I carved the handle out of a scrap of wood that was salvaged from an old box spring.  Gate latch was 6.00. Total cost was 25.00, not to bad, and so nice to be able to get into and out of the chicken yard easily.
IMG_20210227_201456839_HDR.jpg
Wood for the handle
Wood for the handle
IMG_20210301_173744814.jpg
Gate handle
Gate handle
IMG_20210301_173843882_HDR.jpg
New gate
New gate
 
Jen Fulkerson
gardener
Posts: 1744
Location: N. California
811
2
hugelkultur kids cat dog fungi trees books chicken cooking medical herbs ungarbage
  • Likes 4
  • Mark post as helpful
  • send pies
    Number of slices to send:
    Optional 'thank-you' note:
  • Quote
  • Report post to moderator
The gate is 4 1/2 feet wide, and 7 feet high.  I made it extra large because I want to make it so the chickens can't fly out.  If it doesn't do the trick I can put chicken wire over the top.  My husband is 6' 8", so I wanted him to be able to go into the chicken yard, even if I have to put wire across the top.
I rewired a couple of holes.  I cleaned up.  The only thing left is to add the wood chips.  I will wait until my son can dump them in with the bobcat.  I also added one more task.  I will put one piece of tin on the back by where they sleep, and one on the front.  I will wait till one of my son's can help me.  Then I will call it done.  
Today is the first day the chickens staid in there yard.  Now if I can get the 5 older hens into the chicken yard I can have my yard back.  Can't wait. Thanks Jen
 
Jen Fulkerson
gardener
Posts: 1744
Location: N. California
811
2
hugelkultur kids cat dog fungi trees books chicken cooking medical herbs ungarbage
  • Likes 5
  • Mark post as helpful
  • send pies
    Number of slices to send:
    Optional 'thank-you' note:
  • Quote
  • Report post to moderator
Every time I think I am done, I end up adding something new.  I plan on adding a piece of tin to the front and back of the coop to give the chickens more protective space. I'm waiting for one of my kids to help. It seems like the kind of job that will be quick and easy with help, or a total pain to do by myself.  Last but not least add wood chips.  My oldest will use the bobcat for this.  I was going to spread it around, but besides putting some into the coop itself I think I will leave it in a pile.  I think the chickens will enjoy doing it themselves.  So it should be done, move on to the next project.  
Nope.  I'm feeding the hens, and gathering eggs, and I notice my little salmon faverolle pacing in front of the nesting boxes.   Then she jumps on the roosting bars, then back to pacing. It seems like she wants to get into the nesting boxes, but just can't do it.  So you guessed it I made chicken ladders today.  They didn't take very long to make.  I made them with with redwood fence boards I got for free, and wood salvaged from a box spring mattress. So 0 cost.  I attached a piece of wood to the bottom of each level, and drilled holes in the ladder and the board. I attached them with wire.  It holds it secure, and it's removable when I clean.  
While I was working on this project I discovered how one of my older chickens gets out.  We have a grape vines that grows on the back fence.  The main part of the trunk is shaped like a chair.  The chicken flys to the grape, then to the top of the fence ( it's a strong sturdy fence). Then she flys down. Tomorrow I will put chicken wire around this section of the grape.  I hope this does the trick, I really need to be working on my garden.  Thanks.
IMG_20210303_180906530.jpg
[Thumbnail for IMG_20210303_180906530.jpg]
 
Jen Fulkerson
gardener
Posts: 1744
Location: N. California
811
2
hugelkultur kids cat dog fungi trees books chicken cooking medical herbs ungarbage
  • Likes 3
  • Mark post as helpful
  • send pies
    Number of slices to send:
    Optional 'thank-you' note:
  • Quote
  • Report post to moderator
I'm having mixed feelings about the fake grass.  On one hand it is great, makes keeping the coop clean very easy.  I either shake it off and put it back in the cubby, or rinse it off with the hose, it dry's fast and I put it back.  But the grass seems to keep the eggs from rolling into the place to keep them safe.  So a couple of times with the grass I did get eggs that were crushed, probably stepped on.  So I'm still playing around with that.  Not sure what way I will go.  Most important is it is super easy to keep clean, and the eggs are clean.  
I put chicken wire around the grapevine in the back of the coop, and that seem to do the trick.  No escapees!  I'm so happy, now I can plant things in my garden.  I do kind of miss them hanging out with me when I do stuff in the back, but if I let everyone out, all the New chickens go into the coop at night.  The 5 older chickens don't go into the coop at night any more.  They go in to eat, but like to sleep on top of the coop.  It makes it hard to let them out knowing I'm going to have to catch 5 hens that aren't as friendly as the young ones, and don't want to stay in the chicken area.  
Only two more jobs that are waiting on my son's to help me with and I will call it done.
 
Jen Fulkerson
gardener
Posts: 1744
Location: N. California
811
2
hugelkultur kids cat dog fungi trees books chicken cooking medical herbs ungarbage
  • Likes 10
  • Mark post as helpful
  • send pies
    Number of slices to send:
    Optional 'thank-you' note:
  • Quote
  • Report post to moderator
I'm calling it done.  My son dumped a load of wood chips into the chicken yard. There was only one place he could dump them. It was late in the day. I was trying to get the pile as low as I could, but lost the light.  I just knew I would get up to chickens everywhere.  Nope, even though the pile was high enough the chickens could easily fly out, they were so busy digging in the wood chips everyone was in the yard.  I left the pile for the chickens to spread around.  I will probably dump more chips in the near future, but it is good for now.  
I added another roosting bar the same height in hopes of getting them to stop sleeping in the nesting boxes.
I attached tin to the top of the front and back of the coop, by the roosting bar.  I went horizontal instead of vertical.  I was thinking this will give them more security.  The tin is a little shorter than the roosting bar, but I put a tarp up until the weather warms up. Once it's hot I will remove the tarp. I think it will be good to get some air on their feet. The tin should also give a little more shade.  
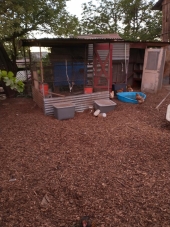
My son and I made the front addition in the fall 2020. The original coop long and narrow. Now it's an L.  We made it to give the chicks a safe place until they were big enough to join the older hens.  I opened a space up so it's all one coop.  If I get babys in the future I can easily close it up.
When we made the door I thought it would be cool to stain it with pomegranate.  Then I used Thompson's seal on it.  It looked great, and I was very happy with it.  After about a week it didn't look red any more.  Oh well no biggie.  Unfortunately after a few months it was covered with black mold.  I'm so bummed 😞.  I sanded it down, and bleached it.  Once it was dry I painted it.  It looks good.  And safer than mold city.  For kicks I painted some of the layer boxes.  Not all because the red is a flat paint, and the white is a satin that should be easier to clean.  I just added the red to bring it together.  
My son added a water faucet to the back of the chicken yard to make it easier for me to clean, and fill the waterers.
It may not be fancy, but it's a 100% better than before.  It's easy to clean, and the chickens seem to be happy scratching away, and staying in the yard and coop.
IMG_20210315_164418412.jpg
details of run and chickens
IMG_20210315_164440622_HDR.jpg
details of run
details of run
IMG_20210315_164641842_HDR.jpg
happy hen with details of run equipment
IMG_20210315_164709634_HDR.jpg
chicken yard and woodchips
 
Jen Fulkerson
gardener
Posts: 1744
Location: N. California
811
2
hugelkultur kids cat dog fungi trees books chicken cooking medical herbs ungarbage
  • Likes 2
  • Mark post as helpful
  • send pies
    Number of slices to send:
    Optional 'thank-you' note:
  • Quote
  • Report post to moderator
Not done sigh. I just happened to be taking a break from digging my hugel beet, and watched 4 of my chickens fly over the fence.  They didn't even need to stand on the high spot where the wood chips are.  Darn I'm going to have to extend the fence.  I was hoping I wouldn't have to do that.  What is it they say? No rest for the wicked.  The worst part is I don't even remember being wicked.  Oh well back to work.
 
Jen Fulkerson
gardener
Posts: 1744
Location: N. California
811
2
hugelkultur kids cat dog fungi trees books chicken cooking medical herbs ungarbage
  • Likes 5
  • Mark post as helpful
  • send pies
    Number of slices to send:
    Optional 'thank-you' note:
  • Quote
  • Report post to moderator
Little update. I did ditch the fake grass. It was just to much matinence. Not to mention the chickens were eating it.  
The pin in hinges broke.  Since the chickens eat and break eggs on a regular basis I decided to extend the flap.  The only wood I had that's wide enough  was particle board.  To try to get it to last I painted it and gave it a polyurethane coat. Then I covered it with linoleum. I hope it will last a while.  I also hope it's deep enough the chickens can eat there eggs.  Time will tell. To make cleaning easier I cut the support board on both ends. Now when I spray the boxes out there's a space for the water and everything else to go.
While I was at it I scrubbed the nesting box, and roosting bars, and gave them a new coat of paint where needed.  I cleaned up and trash that had found it's way into the yard. Sprayed the wire and roof to wash the dust and spider webs away.  I finished up by adding new bedding in the coop.  It looks and smells so much better.
IMG20230622184316.jpg
New front of nesting box 6/22/23
IMG20230622184344.jpg
6/22/23
6/22/23
IMG20230622184401.jpg
detail of new additions
IMG20230622184430.jpg
Fresh coat of paint
Fresh coat of paint
 
gardener
Posts: 673
Location: South-southeast Texas, technically the "Golden Crescent", zone 9a
481
3
foraging books chicken food preservation fiber arts homestead
  • Likes 3
  • Mark post as helpful
  • send pies
    Number of slices to send:
    Optional 'thank-you' note:
  • Quote
  • Report post to moderator
It looks fabulous and that hen seems to agree! I love the color and work you've done. I hope that board lasts and keeps the hens from eating the eggs before you can collect them.

Great update for the coop. I'm sure it's much cleaner and you are really taking good care of your flock.
It doesn't surprise me that the chickens were eating the fake grass. It's funny, but unsurprising.

Your summer cleaning of the coop is fantastic and very motivating. Thank you.

 
Jen Fulkerson
gardener
Posts: 1744
Location: N. California
811
2
hugelkultur kids cat dog fungi trees books chicken cooking medical herbs ungarbage
  • Likes 5
  • Mark post as helpful
  • send pies
    Number of slices to send:
    Optional 'thank-you' note:
  • Quote
  • Report post to moderator
Thanks Kristine.
I was thrilled yesterday to get 12 eggs. I've been getting 4.  From 20 hens.  4 of my girls are 4 or 5 years old. 8 of them are going to be 3 in September and they are Isa Brown and Safire Gem, and I have read the super layers lay most of there eggs in the first year, and then drop off dramatically.  The last 8 are a little more than a year. Besides the 2 Rhode Island Red the rest are Oliver egger, and blue  maran. They are good layers, but not the powerhouses the others are.  So a dozen is great.  Not only wear there a dozen eggs, but they were clean. It was lovely to gather clean eggs.
Time will tell if this is the new norm, but fingers crossed it is.  Thanks.
IMG20230625204354.jpg
On dozen eggs
On dozen eggs
 
Jen Fulkerson
gardener
Posts: 1744
Location: N. California
811
2
hugelkultur kids cat dog fungi trees books chicken cooking medical herbs ungarbage
  • Likes 2
  • Mark post as helpful
  • send pies
    Number of slices to send:
    Optional 'thank-you' note:
  • Quote
  • Report post to moderator
Unfortunately it hasn't really made a difference.  Back to getting 4 or 5 eggs a day, and at least one that's broken.  Back to the drawing board.
I think I will attach something a thin rubber would be great, but I don't have any. I need a flexible material that will let the egg roll through, but the hens won't eat.  The out of sight out of mind concept.  A solution will come to me sooner or later.
 
pollinator
Posts: 968
Location: Greybull WY north central WY zone 4 bordering on 3
284
hugelkultur trees solar woodworking composting homestead
  • Likes 2
  • Mark post as helpful
  • send pies
    Number of slices to send:
    Optional 'thank-you' note:
  • Quote
  • Report post to moderator
This was my mother's answer.

Nest boxes
 
Kristine Keeney
gardener
Posts: 673
Location: South-southeast Texas, technically the "Golden Crescent", zone 9a
481
3
foraging books chicken food preservation fiber arts homestead
  • Likes 3
  • Mark post as helpful
  • send pies
    Number of slices to send:
    Optional 'thank-you' note:
  • Quote
  • Report post to moderator
Chickens are effected by heat. The longer they stay at a particular temperature, the better they adjust and start to compensate, but there's a problem with them not drinking enough water which reduces how much and what they eat, as well as how well they lay. Anything over 80F (26.6 C) is high enough to throw them off.
Weather changes also throw them off in their patterns, so typical summer weather changes will stop/pause them temporarily and before they can get in a pattern, things change again. It means that chickens in warm weather have a similar "slow-down" as they do in winter, but for opposite reasons (and not including light-triggered laying troubles).

Finding ways to convince your hens to eat more and drink more (to get the necessary things moving around in their systems) is what can make the difference between half-hearted laying and "full production".

I accept that my birds aren't amazing layers, have a tendency to wander off and lay their summer eggs in hidden nests, and only expect 2/3 egg per day per hen at the best of times. We're in a summer slump here, which is why I put some eggs into storage back in the Spring. I also have an egg eater of some sort - either one of the new birds or a rodent variant. I'll try to solve that problem while encouraging them to eat as much as possible and moving them to "summer water mode" (which means they get extra water bowls and dispensers, I make their soaked feed extra soupy, and they get cold leftovers and treats when I have them. I also make sure I dampen some shady ground for them to  bed down on.
I wish you luck with figuring out your flock's preferences for coping with summer's heat or weather changes.
IMG_20230714_105822964.jpg
Hen wading in water container
 
Jen Fulkerson
gardener
Posts: 1744
Location: N. California
811
2
hugelkultur kids cat dog fungi trees books chicken cooking medical herbs ungarbage
  • Likes 1
  • Mark post as helpful
  • send pies
    Number of slices to send:
    Optional 'thank-you' note:
  • Quote
  • Report post to moderator
Kristine your probably right about the heat.  Silly of me not to factor that in.
In the summer I put ice packs, or freeze large chunks of ice and add it to the water.  I also have a kiddy pool that gets about 3" of water. I've actually seen Salmon Faverolles standing  in it. The rest as far as I can tell just use it as a giant water dish. On the very hot days I put ice in that as well.  
I guess I should be happy to get eggs at all.  My hens are troopers. They have made it through 111, and  I think we had a couple of weeks where it was over 100 every day.  They are some tough ladies.
 
Kristine Keeney
gardener
Posts: 673
Location: South-southeast Texas, technically the "Golden Crescent", zone 9a
481
3
foraging books chicken food preservation fiber arts homestead
  • Likes 1
  • Mark post as helpful
  • send pies
    Number of slices to send:
    Optional 'thank-you' note:
  • Quote
  • Report post to moderator
We just hit some nasty local spells and I wasn't getting a single egg for a few days. That's pretty unusual for my flock, so I understand your concern. I just checked, did a headcount and made sure I knew where everyone was, and made sure to Do The Things.

Their current favorite treat is "Anything Cold".

I haven't give them ice this year, we don't have an icemaker and the freezers are full until I start canning in a couple of weeks, so I haven't had a chance to make them anything fancy. They get extra bowls, the damp shady zones, as much shade and breeze as I can manage, and I soak their feed.

I had one egg in the nesting boxes and one hen deciding to go off script and lay in a nest in the open in the front yard - it's in the shade, all day, and *near* a clump of cast iron plant, so I guess she was thinking ahead?
Good luck with yours. Those are some tough hens to be putting up with those temperatures! It's been a wild few years, temperature-wise.
 
Joel Salatin has signs on his property that say "Trespassers will be Impressed!" Impressive tiny ad:
rocket mass heater risers: materials and design eBook
https://permies.com/w/risers-ebook
reply
    Bookmark Topic Watch Topic
  • New Topic