• Post Reply Bookmark Topic Watch Topic
  • New Topic
permaculture forums growies critters building homesteading energy monies kitchen purity ungarbage community wilderness fiber arts art permaculture artisans regional education skip experiences global resources cider press projects digital market permies.com pie forums private forums all forums
this forum made possible by our volunteer staff, including ...
master stewards:
  • Carla Burke
  • Nancy Reading
  • John F Dean
  • r ranson
  • Jay Angler
  • paul wheaton
stewards:
  • Pearl Sutton
  • Leigh Tate
  • Devaka Cooray
master gardeners:
  • Christopher Weeks
  • Timothy Norton
gardeners:
  • thomas rubino
  • Matt McSpadden
  • Jeremy VanGelder

4.5" rocket stove with pellet feeder and ashbox

 
Posts: 91
Location: Spokane, Washington
6
  • Likes 1
  • Mark post as helpful
  • send pies
    Number of slices to send:
    Optional 'thank-you' note:
  • Quote
  • Report post to moderator
<check out the video>

this is the little 4.5" system i built to test induction, but with the induction port removed. instead, the feed tube has been rebuilt with one brick removed on the bottom. in that space is a sideways facing ashbox that i made by using an old cheap-o wood chip smoker box. i cut a grate in one end of the lid with tin snips (6 cuts, 7 vanes) and bent the strips to a 45 degree angle such that the incoming draft is directed up, forward through the fire, and into the burn tunnel. the box w/the lid on leaves about a 1/2" gap at the top of the space left by the missing brick. the dried piece of clay/perlite mix, leftover from the old induction port, fits perfectly into this gap and is an awesome little draft control device .

i have also installed a little pellet feeder made from a piece of 2"x4" steel channel with a rectangular hole cut out on one long side. it sits right on top of the grate and feeds the pellets quite nicely across the entire grate without overflowing into the burn tunnel. a full load is ~3lbs and burns for almost an hour.

In the first part of the video, i have the clay plug out as i have just lit the fire and the pellets are just starting to burn across the entire grate. you can see how this allows air to draft in across the top of the fire as well as the bottom to get this going.

i then shine a flashlight on the little bugger so you can see it in all its slap-together glory. this is just a mock up to test geometry and things like the pellet feeder.

in the second part of the video, the fire is really cookin' as i have now plugged up that gap with the clay plug and i've thrown in a stick of maple for good measure. you can hear the stupendous draft ripping through the pellets now and see the gasification that is giving that jet-rocket roar

i plan to use this feeder and ashbox combo as a removable element in a 4" one-piece cast system, but i'll use a piece of removable steel channel as a grate.
 
Posts: 519
Location: Wisconsin
12
  • Mark post as helpful
  • send pies
    Number of slices to send:
    Optional 'thank-you' note:
  • Quote
  • Report post to moderator
YES! awesome, can you show photos of it in the daylight, and or sketches of your design?
 
Chris Burge
Posts: 91
Location: Spokane, Washington
6
  • Likes 1
  • Mark post as helpful
  • send pies
    Number of slices to send:
    Optional 'thank-you' note:
  • Quote
  • Report post to moderator
Sure... here's some deconstruction photos:

here it is before demo


here you can see how the pellet feeder takes up half of the feed tube


Here's a good cross-section...


...you can see from the soot pattern that the high temp zone is even, front to back, since the riser is not insulated. something else to note here is that while the feed tube is 4.5" wide, it's only as long as the ash box is wide (4"), giving it a smaller CSA than the burn tunnel (4.5"x4.25")-- but this is made up for by the total 4"x1" additional gap left by the ashbox


just under the riser tube...you can see the clay slip that I used to stick things together with is spalling


not a shot you get to see very often
 
Posts: 91
1
  • Mark post as helpful
  • send pies
    Number of slices to send:
    Optional 'thank-you' note:
  • Quote
  • Report post to moderator
Chris, thanks for the cutaway pics, much easier to see what you're doing.
Glad to see someone else also working with smaller CSA's and pellets!
 
Andor Horvath
Posts: 91
1
  • Mark post as helpful
  • send pies
    Number of slices to send:
    Optional 'thank-you' note:
  • Quote
  • Report post to moderator
p.s. I scour the secondhand stores for perforated stainless steel (obtanium) for grates...think spatulas, colanders etc.
 
John Master
Posts: 519
Location: Wisconsin
12
  • Mark post as helpful
  • send pies
    Number of slices to send:
    Optional 'thank-you' note:
  • Quote
  • Report post to moderator
Thank you, looks great, helps me with my design to see what's out there. Mine is 6" and I think after I get it running I will want a 4" one...
 
Chris Burge
Posts: 91
Location: Spokane, Washington
6
  • Mark post as helpful
  • send pies
    Number of slices to send:
    Optional 'thank-you' note:
  • Quote
  • Report post to moderator
here's a tune-up...

pellet feeder tune-up

here's the same 4.5" system, completely re-built, with a new HSS 2x4 grate/sleeve for the ashbox. naturally, the old lid i was using for a grate was getting a bit haggered-- but it was tin-snip thin. still, it was holding up over about a total of 30-40 hrs of burn time.

this new grate works even better with the pellet feeder...nice consistent 'rockety' fire.

this is going to be the core of the small system i'm going to build into the fireplace in the video.
 
Andor Horvath
Posts: 91
1
  • Mark post as helpful
  • send pies
    Number of slices to send:
    Optional 'thank-you' note:
  • Quote
  • Report post to moderator
nice job, glad you're having success, I'm still working on sub 3" CSA here in sub-zero weather
 
Chris Burge
Posts: 91
Location: Spokane, Washington
6
  • Mark post as helpful
  • send pies
    Number of slices to send:
    Optional 'thank-you' note:
  • Quote
  • Report post to moderator
woot!

So, after burning pellets non-stop for 6hrs without ever slowing down, I took out the pellet feeder and switched over to pallet slats...and that's when she really took-off ! It gladly self-fed full loads of 2' sections without a single flame up of smokeback-- and halfway through the second load the steel riser finally started to glow red hot! I tried to take another video, but my little camera is apparently not sophisticated enough to capture the subtlety of glowing red metal in the dark .
 
Chris Burge
Posts: 91
Location: Spokane, Washington
6
  • Mark post as helpful
  • send pies
    Number of slices to send:
    Optional 'thank-you' note:
  • Quote
  • Report post to moderator
woot!

So, after burning pellets non-stop for 6hrs without ever slowing down, I took out the pellet feeder and switched over to pallet slats...and that's when she really took-off 
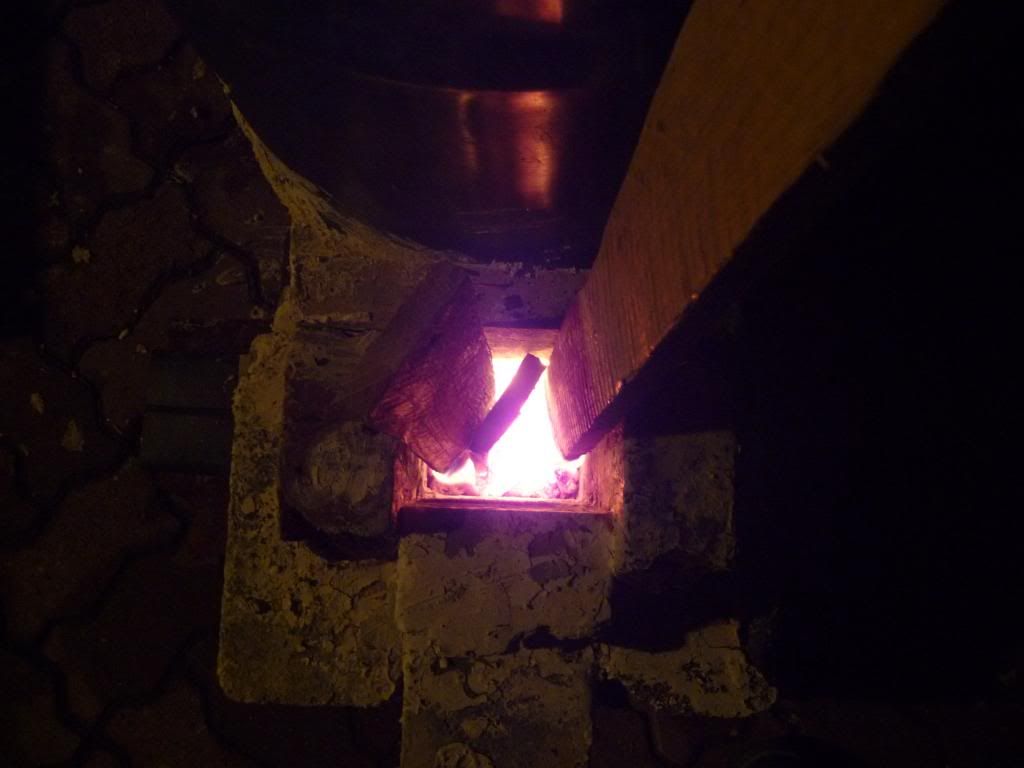
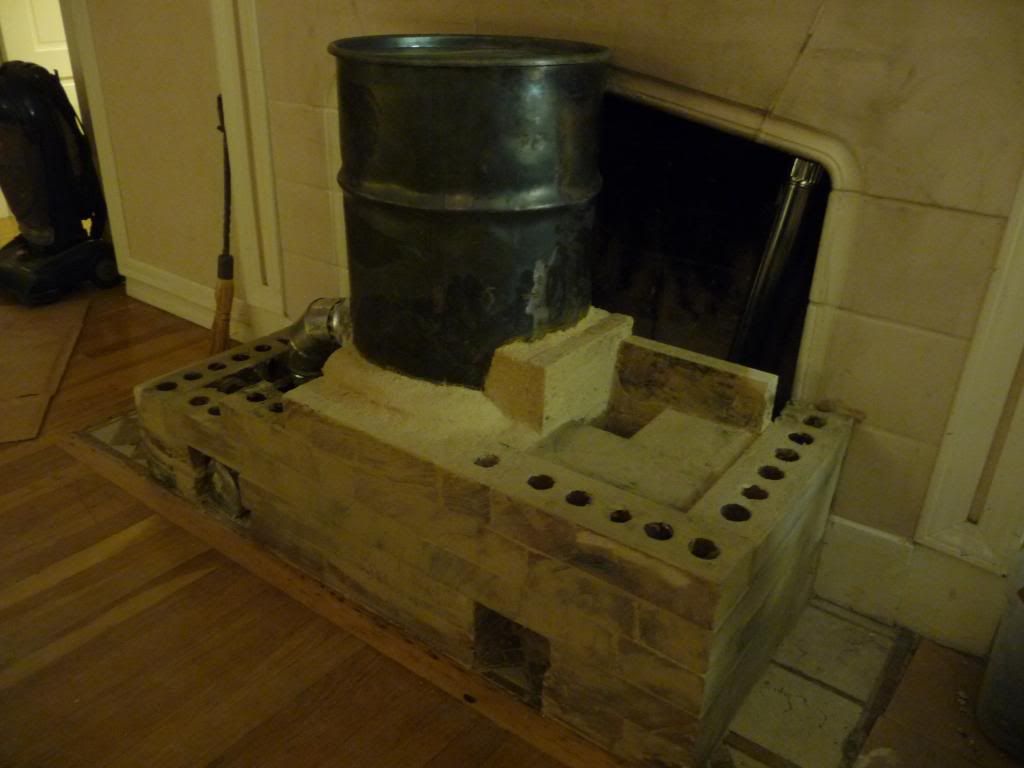
! It gladly self-fed full loads of 2' sections without a single flame up or smokeback-- and halfway through the second load the steel riser finally started to glow red hot! I tried to take another video, but my little camera is apparently not sophisticated enough to capture the subtlety of glowing red metal in the dark .
 
Chris Burge
Posts: 91
Location: Spokane, Washington
6
  • Likes 1
  • Mark post as helpful
  • send pies
    Number of slices to send:
    Optional 'thank-you' note:
  • Quote
  • Report post to moderator
progress update:

I finally got the time to conduct an outside test burn of this entire system's core components and I would dub it to be a definite success. I lit it at 7:15 pm, with the outside temp at ~38F and the clay slip and perlite mortar still wet. It drafted immediately and never looked back. I burned it for over 7 hours without any smokeback or flame up the feed tube. It purred right along on a mix of fuel-- first pellets, then pellets and wood, then I took out the pellet box and burned a mix of oak and pine. It burned nice and clean most of the time, but it took about 3 hrs to cook out all of the moisture before it really took off. The temp on the top of the barrel slowly climbed to ~550F, until it dried out and I switched to wood, then it shot right up to ~825F. I plan to encase the entire exhaust within some type of small mass... I just haven't decided what to use yet. The riser is what I would consider temporary (4"dia. by 17" sched40 steel wrapped with ceramic (alumina) wool-- total outside diameter: ~10"). It's offset with one side in full contact with the inside of the barrel on the feed tube side. Not only is this structurally necessary, it keeps the feed tube side of the barrel cool with it being so close to the fire. The permanent riser will be far more substantial so that when the steel burns out, there will be a refractory conglomerate behind it.


Chris Burge
Posts: 91
Location: Spokane, Washington
6
  • Likes 1
  • Mark post as helpful
  • send pies
    Number of slices to send:
    Optional 'thank-you' note:
  • Quote
  • Report post to moderator
installation update:


dry stack


core and riser


barrel and manifold


...other side


starting to come together...

I plan to have it finished and fired up by tomorrow evening. Will post more pics then
 
pollinator
Posts: 4154
Location: Northern New York Zone4-5 the OUTER 'RONDACs percip 36''
67
hugelkultur fungi books wofati solar woodworking
  • Mark post as helpful
  • send pies
    Number of slices to send:
    Optional 'thank-you' note:
  • Quote
  • Report post to moderator
Chris Burge : I am impressed with your R.M.H. And your ability to think outside the box, your rocket contains many sections while your uniqueness shines out like a beacon!

I am interested in how your Rocket Mass Heater has worked for you as we enter the Fall of 2013. Most people would have decided that any use of thermal mass was impossible ,
and therefor no practicable in this location, you saw the opportunity to Use the Rocket burner as a'Franklin Stove moved away from the hearth, and get increased efficiencies
not possible with a fire place, and increase the amount of heat being Radiated out into your room . All this with a beautiful D.I.Y. with sub 6'' Sections !

Can we get an update from you on your system, and also how well yourPellet handling parts have worked and held up ! For the Craft Big AL!
 
Chris Burge
Posts: 91
Location: Spokane, Washington
6
  • Likes 1
  • Mark post as helpful
  • send pies
    Number of slices to send:
    Optional 'thank-you' note:
  • Quote
  • Report post to moderator
Thanks, Allen. Here's a link to the 'completion' of this project, including a video of full operation and subsequent modifications:

mini rocket mass heater

I did make a larger pellet hopper that allowed for a 3hr burn time, which worked rather well as this system proved itself to be more of an 'on-demand' heat source rather than a mass that would deliver heat over an extended period of time. The whole construction held up rather well throughout its use, but i am sad to say that it is no longer in existence-- as you will find out in reading the above post, it was largely an experiment to prove the viability of a sub-6" system and I have converted the living room fireplace to a pseudo-rumford style. I have kept the riser and barrel/manifold and plan to use them to construct a similar system in a future wilipini/greenhouse.

This season's project will consist of a 6" system in the basement with an isolated mass and a forced-air heat exchanger that will be able to deliver heat throughout the house per the demand of the thermostat in the main living area. I am still gathering materials, but construction will begin soon, so be on the lookout for a new thread.
 
allen lumley
pollinator
Posts: 4154
Location: Northern New York Zone4-5 the OUTER 'RONDACs percip 36''
67
hugelkultur fungi books wofati solar woodworking
  • Mark post as helpful
  • send pies
    Number of slices to send:
    Optional 'thank-you' note:
  • Quote
  • Report post to moderator
CHRIS BURGE : A great Job! I am sending you this to look at as it is in line with something that Ernie and Erica Wisner have been saying to us all along ! Specifically why rocket
stoves and basements are a iffy mix !

This is a great resource on so many levels, there is research into high temperature Geopolymer Cement that Even Jay White Cloud could grow to love like!
Explore,and like !

The Web address for this research facility-connected with the University of Alaska is - ' cchrc.org ' - specifically I want you to look at the stack effect in Houses, rather than
stack affect in chimneys, or why houses act like chimneys!

Again, specifically - makinghouseswork.cchrc.org/2013/what-is-stack-effect-and how-does-it-affect-your-home/ - while you are there check out their alaskan wall, it is our future,
/we just have not gotten to the point we are willing to accept the change ! for the good of Permies and the Planet ! Think, Flow, Act! Big AL

Late note Pay attention to the explanation of what is happening at 5:50 >>> A.L.
 
I agree. Here's the link: https://woodheat.net
reply
    Bookmark Topic Watch Topic
  • New Topic