|

|
|
|
|

|

|

|

|
-A.png)
|


find religion! church
kiva! hyvä! iloinen! pikkumaatila
get stung! beehives
be hospitable! host-a-hive
be antisocial! facespace
John Eee wrote: I have a insulated shipping container with aluminum t bars as the floor.
"It is a miracle that curiosity survives formal education." -- Albert Einstein

find religion! church
kiva! hyvä! iloinen! pikkumaatila
get stung! beehives
be hospitable! host-a-hive
be antisocial! facespace
John Eee wrote:what's a little heat stress going to go you know?

"It is a miracle that curiosity survives formal education." -- Albert Einstein
John Master wrote:Is this a flat floor or ribbed? I see no reason to put down an extra floor, perhaps if you have an air gap under the burn chamber area it would be perfect. Have thought many times to getting an old reefer trailer and turning it into a snowmobiling/hunting shack. They can be had cheap due to the complexity in removing all of the metal from the insulation for recycling.
Shane McKenna wrote:You have obviously spent a lot more time thinking about your needs, so your plan of running down the length of the trailer probably meets those needs better than my ideas.
I had a brain flash, and shared how I can see a system working in the space, but I was thinking your whole trailer was being used as an office, and that the thermal mass would take up work space. I was also mainly considering how the channeled floor lends itself to moving heat down the whole length of the trailer with a forced air system. Also, I have seen these trailers with a simple tarped ducting system to move cold air from the front to the back along the ceiling. That same system could be used to move warm air from the front to the back. However, since you are going to be dividing the space, that changes my conception of the project, and how best to distribute the heat.
Overall, the insulation, sealed envelope, existing air moving components, weight capacity, and thermally conductive floor of your trailer makes for an excellent project, and a wonderful repurposing of a refrigerated trailer. In several projects I have used them as working modules for mobile systems, and at least one of them became a permanent installation with very little conversion. Considering these trailers are designed to move 50K+ worth of cooled or frozen goods over varied road conditions, they are likely over-designed in frame, and weather proofing than any building you could purchase at the same price.
One thing to factor into your design, is that a trailer is designed to carry the weight over the whole length of the trailer. That weight is spanned between the rear axles and the king pin. The floor has a slight crown over this span. If you evenly distribute the design capacity weight the crown flattens out. In the case of our install with the water tank, boiler, and pumps, we loaded everything in dry, and watched the crown flatten out as we filled the system. once it was flat, we braced up the center of the trailer. With the bracing in place, the trailer could then carry well over the design capacity. We could have braced it without letting it flatten out first, but we wanted a relatively flat grade to keep our tank water level flat.
Shane McKenna wrote:Chris you bring up an important issue that should be thought about in any stove installation.
My next door neighbor painted their front door black, and it melted all the foam out of the door one hot summer afternoon.
Most of the insulating foams are rated in the 150° to 180° range, except for polyisocyanurate at around 300°. I highly doubt your trailer is using the later. However, like all good installations, a heat shield/heat spreader should be used to prevent any elevated temps from contacting any combustible or meltable materials. Most trailers have FRP, or plywood panels that are not good heat spreaders.
I scroundged up some used commercial heat ducting from a project rebuild. These are sheet metal lined with 1" fiberglass insulation that we are putting on the walls and ceiling around our install (sheet metal side towards the stove). This reflects the heat out into the room, and spreads and deflects the hottest temps from our wood basement ceiling. By the time the heat migrates past the heat shield it has diluted enough to be perfectly safe.
If you are trying to do a project on the super cheap, another source of insulated sheet metal can be found on used ovens, and dishwashers for free. The sheet metal sides usually have insulation on the inside of them, or around the central vessel that you can use.
Commercial heating and air contractors sometimes have ducting tear outs from remodels and upgrades, since the initial installs are mostly custom fabricated parts, that can't easily be retrofitted into other systems, they are glad to have you haul it away, rather than filling up their dumpster.
Shane McKenna wrote:You have obviously spent a lot more time thinking about your needs, so your plan of running down the length of the trailer probably meets those needs better than my ideas.
I had a brain flash, and shared how I can see a system working in the space, but I was thinking your whole trailer was being used as an office, and that the thermal mass would take up work space. I was also mainly considering how the channeled floor lends itself to moving heat down the whole length of the trailer with a forced air system. Also, I have seen these trailers with a simple tarped ducting system to move cold air from the front to the back along the ceiling. That same system could be used to move warm air from the front to the back. However, since you are going to be dividing the space, that changes my conception of the project, and how best to distribute the heat.
Overall, the insulation, sealed envelope, existing air moving components, weight capacity, and thermally conductive floor of your trailer makes for an excellent project, and a wonderful repurposing of a refrigerated trailer. In several projects I have used them as working modules for mobile systems, and at least one of them became a permanent installation with very little conversion. Considering these trailers are designed to move 50K+ worth of cooled or frozen goods over varied road conditions, they are likely over-designed in frame, and weather proofing than any building you could purchase at the same price.
One thing to factor into your design, is that a trailer is designed to carry the weight over the whole length of the trailer. That weight is spanned between the rear axles and the king pin. The floor has a slight crown over this span. If you evenly distribute the design capacity weight the crown flattens out. In the case of our install with the water tank, boiler, and pumps, we loaded everything in dry, and watched the crown flatten out as we filled the system. once it was flat, we braced up the center of the trailer. With the bracing in place, the trailer could then carry well over the design capacity. We could have braced it without letting it flatten out first, but we wanted a relatively flat grade to keep our tank water level flat.
John Eee wrote:
The walls of my container are made of this white glossy wallboard, like what you would find in a commercial washroom or walk in cooler wall. Its textured but really smooth, and where it has been broken it looks like its at least partly made of fibreglass. I will probably have to at least redo the silicone around the combustion chamber, as I dont know if it is hi-temp rated.

Need more info?
Ernie and Erica
Wood burning stoves, Rocket Mass Heaters, DIY,
Stove plans, Boat plans, General permiculture information, Arts and crafts, Fire science, Find it at www.ernieanderica.info
Shane McKenna wrote:
John Eee wrote:
The walls of my container are made of this white glossy wallboard, like what you would find in a commercial washroom or walk in cooler wall. Its textured but really smooth, and where it has been broken it looks like its at least partly made of fibreglass. I will probably have to at least redo the silicone around the combustion chamber, as I dont know if it is hi-temp rated.
That is FRP (fiberglass reinforced panel). They are made with fiberglass and plastic, not high temp friendly enough to have a stove up close. I would be less worried about melting, and more worried about off gassing. I am not familiar with the temp rating, and I am sure it varies depending on the manufacturer. If it were me, I would cover with insulation and sheet metal until you are a distance far enough away to have temps below 130° at the surface. That is not a scientific number, just my seat of the pants talking, for what ever that is worth.
Ernie Wisner wrote:isolate the RMH core from the floor. we are not talking about a few hundred degrees here we are talking incandescent bricks and that means very hot. aluminum cannot take the heat nor can the foam but its not a big task to lift the burn unit and insulate under it.
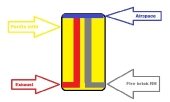
the T channels would make a really good hydronic floor and the RMH can heat an open tank on top then you can use a small pump to circulate the hot water all over the container.
umm why is the container still refrigerated? is it a blast freezer and you are using the blast unit for air conditioning? bad idea for continued health if you are.
Need more info?
Ernie and Erica
Wood burning stoves, Rocket Mass Heaters, DIY,
Stove plans, Boat plans, General permiculture information, Arts and crafts, Fire science, Find it at www.ernieanderica.info
Need more info?
Ernie and Erica
Wood burning stoves, Rocket Mass Heaters, DIY,
Stove plans, Boat plans, General permiculture information, Arts and crafts, Fire science, Find it at www.ernieanderica.info
Need more info?
Ernie and Erica
Wood burning stoves, Rocket Mass Heaters, DIY,
Stove plans, Boat plans, General permiculture information, Arts and crafts, Fire science, Find it at www.ernieanderica.info

|
But why do you have six abraham lincolns? Is this tiny ad a clone too?
it's easier and more soul building than any workee-job
https://wheaton-labs.com/bootcamp
|