 2
2


 1
1


 1
1


 Cob mixed with a large amount of perlite would be a good long-term insulating stiffener.


Glenn Herbert wrote:Hi Freyda! I am just east of Binghamton.
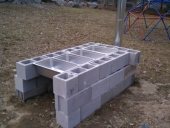
The two evaporators I have built have used the shells of a kitchen stove and freezers to house the firebox and support pans and chimney connections. If you have access to a derelict appliance and a sawzall, angle grinder, or tinsnips, that will make it easier to build a durable small evaporator. You will get much better performance with a rocket fired unit if you add a chimney, probably 6 to 10 feet of 6" galvanized duct for your size. I would advise an L-tube design, with a horizontal feed/burn tunnel around 7" wide x 8" high x at least 24" long, and a riser of similar dimensions and at least 24" high from the floor. If you have a really large number of bricks and don't wish to make a permanent or moveable setup, you could just stack bricks for the whole thing (plus metal chimney).
I would make your feed and riser as described, then at the top of the riser, make a trough shape leading from the riser top with around 4" clearance to the bottoms of the pans and heading toward the chimney collection/mounting point. A flat floor with brick walls wide enough to hold the rims of your pans, transitioning to wide enough to hold your canning pot, would be what you want. You will really want some sort of closure around the 12" canning pot so that you can keep draft through the fire to the chimney. Big tin cans cut and flattened and bent as required would do okay in your small setup. Use one or more of these at the end to connect the chimney stovepipe. I am not at a location where I can easily make sketches to post right now.
If your clay is anything like mine, between the clay and gravel there is quite a bit of silt and sand, and you may not need to add anything to make good cob. For mass cob, I don't even bother to remove anything smaller than around marble to golf ball size, depending on the intended use. Only for finish layers or thin bedding layers do you need to screen the clay. Adding chopped straw will give good wet and dry strength.


Glenn Herbert wrote:A good way to make the feed/burn tunnel with brick is to make walls of bricks on end, flat faces facing the fire, and spaced so that they can support bricks laid across the tops of the walls. You will need to stabilize this by containing the wall bricks. Anything functional is fine, from more bricks as mass backup, to metal sheets or bands, to a thick layer of cob. You will want to insulate the top and sides of the tunnel and riser as much as you can. Scraps of fiberglass will work for a few years. Obviously you need noncombustible insulation
Cob mixed with a large amount of perlite would be a good long-term insulating stiffener.


Glenn Herbert wrote:The riser would not add anything to the horizontal dimensions. The cooking surface would overlap about a foot over the firebox, and I would orient the pans crosswise to the flow for more compactness. So you could fit the whole thing in less than 6'. One of the evaporators I built has the firebox at right angles to the pan. The fire doesn't care about that.
I did mean to sink the pans down into the trough supported on their rims, both for better sealing and better heat transfer.
I think the wood ash combined with a bit of clay would work fine for sealing, stabilizing and insulating the firebox and riser. If there is any charcoal or unburned material in it, that would be consumed as you heat the firebox leaving some voids.

|
Anderson gave himself the promotion. So I gave myself this tiny ad:
Rocket mass heaters in greenhouses can be tricky - these plans make them easy:
Wet Tolerant Rocket Mass Heater in a Greenhouse Plans
|


