Hey...
Wow thanks for all the help already!
Jason Learned, sorry to hear about your Thai brew setup being stolen! However your plans for the next one sound pretty epic, and quite technical - I like the immersion heater idea to keep at temps, I am guessing it doesnt use much power to keep temp rather than raise it. And good thoughts on the scorching and valve. Better book that trip to California
 Alan
Alan Loy - Thanks man really useful, good to hear from an Ozzie on the subject of beer! ok I get you, I am familiar with the j-tube but will do some research on the batch burner...do you mean batch box? I just found some very interesting stuff on that - where you can load lots of wood at one...oh and just discovered the P-Channel - time to crank it up a gear and get back to the drawing board

Mat Smith - So yes the plan is to have a 3 tier gravity system - no pumps - no HERMs just Hot Liquor Tank (HLT) - Mash Tun and Boil Kettle.
The plan was to use rocket stove heater 1 as the HLT, so I can have a load of hot water on tap as and when I need it, however it could also be for household use when not brewing?? (not sure yet.)
The 200L is split - 100L for the initial Mash, then another 100L an hour later for the sparge
(so for non brewers that is basically 100L poured on the grain then you let it sit for an hour - Mash, then another 100L poured over the top to rinse the grain - Sparge)
So I could heat 100L then start again and heat another 100L as long as it took less/= an hour, so I had the next 100L ready for the sparge...
What I like about the coil system, if it can reach 78C (170F) is that it is scaleable - so if I decide to make a bigger brewery it still works, as long as i have enough wood!
And if I can increase the boil kettle size too with a batch burner/box it could all start coming together....with lots more research. Including how much wood do I need to heat X amount of water! Any ideas? Are there any rough calcs out there, or are there too many variables? I am thinking of growing Willow coppiced and kiln dried...
On a side note: Its funny i went to an old 19th century house today for a visit and in the back courtyard you can see how, back in the day, they made cheese, laundry, bread, salted meat etc AND there was a brewery! There were 2 massive (1000L approx) vats with fires underneath, the fires weren't huge and very simple. Apparently the beer would leave the vats, travel along a long pipe to the cellar (to cool) then get tapped and ferment - but guess what the vats were made of.....LEAD! lovely lead lined brewing pots...yummy! Also lead boxes were used to salt the meat in!
Thanks again guys, beers coming your way if this thing works!


 2
2


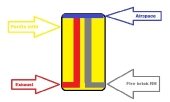
![[Thumbnail for diagram-01.jpg]](/t/59443/a/45368/diagram-01.jpg "Filename: diagram-01.jpg
Description: My Rocket Design")