gift
Garden Mastery Academy - Module 1: Dare to Dream
will be released to subscribers in: soon!
  • Post Reply Bookmark Topic Watch Topic
  • New Topic
permaculture forums growies critters building homesteading energy monies kitchen purity ungarbage community wilderness fiber arts art permaculture artisans regional education skip experiences global resources cider press projects digital market permies.com pie forums private forums all forums
this forum made possible by our volunteer staff, including ...
master stewards:
  • r ranson
  • Nancy Reading
  • Carla Burke
  • John F Dean
  • Jay Angler
  • paul wheaton
stewards:
  • Nicole Alderman
  • Pearl Sutton
  • Anne Miller
master gardeners:
  • Christopher Weeks
  • Timothy Norton
gardeners:
  • Nina Surya
  • Matt McSpadden
  • thomas rubino

First fires in 8" RMH

 
Posts: 36
15
  • Likes 17
  • Mark post as helpful
  • send pies
    Number of slices to send:
    Optional 'thank-you' note:
  • Quote
  • Report post to moderator
It's finally done, and I was a bit underwhelmed. This is an 8" RMH venting into about 30 feet of 6" masonry/SS flue. Initial proof of concept fires with a couple sheets of crumpled up newspaper placed in the heat riser showed promise of good draft and were encouraging. The first actual heat producing fire was lit a few days later with a cold, 20°F outside temp. Since the initial fires were so encouraging I just lit the fire without pre-warming the flue (with paper in the riser) and things got a little smokey, even with the doors closed. A heat gun blowing in the intake (through the floor channel) seemed to fix that little glitch and in a few minutes enough heat had been added to create a nice natural draft. After that the doors could be opened with no smoke creeping out.

The heater seemed to burn really well, though the "rockety" bit was underwhelming. I sort of expected a bit of a roar, but no. It did look like combustion was continuing in the riser at a significant rate with temps in the floor channel running about 800°F. A probe resting on the floor of the riser showed a bit more than 1300°F which may be representative for that area. There was a bit of smoke exiting the flue at start-up and when wood was added to the fire, but that quickly subsided to what appeared to be steam vapor that would evaporate 6-8 feet from the flue — no smoke when actively burning. Highest temps I saw in the upper portion of the barrel run about 600°F and flue temp runs about 185-200°F at the exit.

Burning continuously for about 3 hours raised the room temp (25,000 cu/ft -- 700cu/m) by about 12 degrees from 60 to 72°F. It looks like a successful build. All the math seemed to work. Stick to it.

One of the images I'm including here was my idea of a modified 5 minute riser — 1/2" ceramic wool wrapped around a concrete form with 1/2" hardware cloth stitched to the blanket with SS wire, and another layer of on top of that to protect the steel. The inner surface of the blanket had also been coated with zirconium paint. It looked like a good idea, and would probably work just fine, but I had started the riser using full size firebrick and couldn't figure out how to securely attach the fabricated riser to the square brick foundation. So, I just continued the firebrick build to the top of the riser and coated the inside of the riser and firebox with the zirconium paint.
20231112_133814.jpg
riser wrapped in 1" ceramic blanket
20231129_163855.jpg
first real fire
first real fire
20231129_163939.jpg
[Thumbnail for 20231129_163939.jpg]
20231129_163953.jpg
[Thumbnail for 20231129_163953.jpg]
20231129_164059.jpg
temperature with sensor resting on the floor of the heat riser
20231130_223021.jpg
[Thumbnail for 20231130_223021.jpg]
20231130_223048.jpg
[Thumbnail for 20231130_223048.jpg]
 
rocket scientist
Posts: 6525
Location: latitude 47 N.W. montana zone 6A
3395
cat pig rocket stoves
  • Likes 7
  • Mark post as helpful
  • send pies
    Number of slices to send:
    Optional 'thank-you' note:
  • Quote
  • Report post to moderator
Hi Leslie;
Nice looking first build!
About the throaty rocket roar, it is only J-Tubes that do that.
Batchboxes burn hot with not much noise at all.

Pushing an 8" batch into a 6" chimney is certainly not recommended, but if it is working to your satisfaction then awesome.

Your riser description has me confused.
I see a 5-minute riser sitting to the side in one photo, 1/2" wrapped with hardware cloth.
I like your construction method but I would recommend using 1" superwool to wrap.
To easily install a 5-minute riser, you build a square firebrick riser taller than the port.
Stand your 5-minute riser over the square hole and use fireclay/cob mortar to seal and support the riser.
That's it, nothing but an earthquake will cause that riser to move once the barrel is protecting it.


Using firebricks and wrapping them with insulation works fine.
It will be slower to get up to operating temperatures but will hold that heat for a long time.


Leslie Walper
Posts: 36
15
  • Likes 7
  • Mark post as helpful
  • send pies
    Number of slices to send:
    Optional 'thank-you' note:
  • Quote
  • Report post to moderator
The 5 minute riser was actually two layers of the 1/2" blanket, so it would have been 1" total. The picture actually only shows the first layer wrapped in the hardware cloth. The second layer was then securely tied with several wraps of SS wire. I'm sure it would have worked well, but just couldn't see how that was going to stay in place in perpetuity. I had lots of the hard kiln firebrick so using that was just as easy and gave me more peace of mind.

Here's a shot of the floor channel — 2x4 steel with a 2 inch SS bracket and 6 inches of SS exhaust pipe for the stub. With this setup the stub can be considered to be sacrificial and easily replaced as needed. And, no welding skills required!

With the flue exiting from near the bottom of the bell the brick mass heated well with what seems to be just the right combination of heat to mass.
20231201_141939.jpg
[Thumbnail for 20231201_141939.jpg]
 
Leslie Walper
Posts: 36
15
  • Likes 8
  • Mark post as helpful
  • send pies
    Number of slices to send:
    Optional 'thank-you' note:
  • Quote
  • Report post to moderator
After using this heater for a bit, I can honestly say this is the best heater I've ever burned. The fires are very consistent regardless of the type of wood being burned—hardwood, softwood, cedar, oak, ash, pine, maple, osage orange—even boxelder that has been sitting in an unsplit and uncovered pile for 3 years and has begun to get a little bit punky. Once the heater warms up it seems to be able to burn just about anything. With a better thermocouple placement there's about a 250F degree temperature increase from the firebox to the riser so I suppose there is significant combustion going on there with riser temps of about 1750F and firebox about 1500F. With that there's no outside smoke visible even when a new batch of wood is added.

The only thing that continues to bother me is initial lighting and retrograde smoke out the front of the heater. I've added a TEE in the flue and light a small (2-3 sheets of newspaper) in the flue which really improves the draft. Starting with a small fire in the firebox low and directly in front of the port also helps establish the draft through the contraflow barrel, So, light the flue fire, cap the tee, then light the firebox and monitor for the need for more wood when that initial small fire stops smoking. Once the whole heater comes up to temperature adding wood to a full bed of coals is no problem. With temperatures in the low to mid 30s I've been heating about 1,400 cu/m.
 
gardener
Posts: 1068
Location: +52° 1' 47.40", +4° 22' 57.80"
455
woodworking rocket stoves wood heat
  • Likes 7
  • Mark post as helpful
  • send pies
    Number of slices to send:
    Optional 'thank-you' note:
  • Quote
  • Report post to moderator

Leslie Walper wrote:After using this heater for a bit, I can honestly say this is the best heater I've ever burned. The fires are very consistent regardless of the type of wood being burned—hardwood, softwood, cedar, oak, ash, pine, maple, osage orange—even boxelder that has been sitting in an unsplit and uncovered pile for 3 years and has begun to get a little bit punky. Once the heater warms up it seems to be able to burn just about anything.


Thanks for the compliment, it means a lot to me. It feels I did something right in this life by making this design open source. And yes, once hot, this thingy can burn anything that will fit inside the firebox without too much trouble.

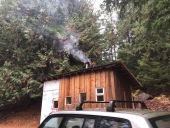
Leslie Walper wrote:With a better thermocouple placement there's about a 250F degree temperature increase from the firebox to the riser so I suppose there is significant combustion going on there with riser temps of about 1750F and firebox about 1500F. With that there's no outside smoke visible even when a new batch of wood is added.


Let's see... highest measured temperature in the firebox in my 6" development model has been 1700 ºF and in the riser 2140 ºF, very close to the theoretically maximum. That last one, measured at the back of the riser, halfway height of the port and about one inch from the wall. The thermocouple was inserted from the back of the riser. While that riser temperature was measured just once, 2010 ºF is an easily achievable goal.

Leslie Walper wrote:The only thing that continues to bother me is initial lighting and retrograde smoke out the front of the heater. I've added a TEE in the flue and light a small (2-3 sheets of newspaper) in the flue which really improves the draft. Starting with a small fire in the firebox low and directly in front of the port also helps establish the draft through the contraflow barrel, So, light the flue fire, cap the tee, then light the firebox and monitor for the need for more wood when that initial small fire stops smoking. Once the whole heater comes up to temperature adding wood to a full bed of coals is no problem. With temperatures in the low to mid 30s I've been heating about 1,400 cu/m.


I understand the heater is just that block of bricks and 1plus barrel. Utilizing an 8" chimney this heater could drive two barrels more without a problem. Provided the heater would be still at least lukewarm in this situation, there won't be any smoke from the firebox while starting up. The larger chimney diameter would transform the thingy completely, turning it into a roaring monster. With a riser built out of firebricks, it would produce more noise as well, especially in that barrel. But then, as long there's no smoke from the chimney and it heats the house better than any previous stove you are entitled to be content with the results so far.
 
Leslie Walper
Posts: 36
15
  • Likes 5
  • Mark post as helpful
  • send pies
    Number of slices to send:
    Optional 'thank-you' note:
  • Quote
  • Report post to moderator
Thanks Peter, for supplying the knowledge and math and making it available to all. Since I used full sized firebrick everywhere it takes a couple of batches to actually get hot, but then it just sings. For those who might be curious, I'm including here a photo of the TEE setup in the flue. The cap is not attached with screws, but fits snugly enough to stay in place. It's a little hard to see, but there's about 12" between the wall and cap, so plenty of room to stuff in paper and lighted match. The only problem I have with this process is that there is so much draft that my match is hard to keep lit when I come around to light the firebox. Exhaust temps as the flue goes through the wall run in the 200F range so I'm sort of reluctant to add any more barrels or bell for heat extraction. In the construction process I had thought of adding more bell space, but for my chosen location I was having trouble working out the flue position, so ... it is what it is—and I'm happy, so I guess that's what counts.
Flue-tee.jpg
[Thumbnail for Flue-tee.jpg]
 
pioneer
Posts: 876
Location: Inter Michigan-Superior Woodland Forest
139
5
transportation gear foraging trees food preservation bike building solar writing woodworking wood heat
  • Likes 1
  • Mark post as helpful
  • send pies
    Number of slices to send:
    Optional 'thank-you' note:
  • Quote
  • Report post to moderator

thomas rubino wrote:Pushing an 8" batch into a 6" chimney is certainly not recommended, but if it is working to your satisfaction then awesome.

Stand your 5-minute riser over the square hole and use fireclay/cob mortar to seal and support the riser.
That's it, nothing but an earthquake will cause that riser to move once the barrel is protecting it.

Using firebricks and wrapping them with insulation works fine.
It will be slower to get up to operating temperatures but will hold that heat for a long time.


Uncle Mud's recommendation to assemble a 5-minute riser is simply to leave a half inch or more of the superwool extending past the bottom of the duct/hardware cloth and set it on that. It's been working the charm for me so far, no mortar in that area.

The 6" chimney and firebrick riser would seem to be contributing to the need for a good deal of priming here.

Questions for my own curiosity: Does a riser of full size firebrick and insulation come close to the limit of the CSA around the inside of the barrel?

Also, would eliminating the gap between the firebox and the mass help heat up the firebox to any benefit?
 
Rocket Scientist
Posts: 4575
Location: Upstate NY, zone 5
599
5
  • Likes 3
  • Mark post as helpful
  • send pies
    Number of slices to send:
    Optional 'thank-you' note:
  • Quote
  • Report post to moderator
The wall the stovepipe goes into is just the chimney, not a mass. Of course it will hold some heat radiated from the main mass, but not that much. I probably would have moved or enlarged the mass to touch the chimney and incorporate that into the mass, and also made the exit stovepipe a plunger tube rising from near the floor straight out of the bell top so the masonry could be 8-10" longer without actually occupying significantly more floor space.


I would have made a bypass from near the top of the barrel to the exit stovepipe, so there would be a simple path for heat when starting the fire. That might have eliminated the need for the tee and paper to warm the chimney, or at least just have the paper in the back of the firebox along with kindling.
 
Leslie Walper
Posts: 36
15
  • Likes 6
  • Mark post as helpful
  • send pies
    Number of slices to send:
    Optional 'thank-you' note:
  • Quote
  • Report post to moderator
It's 9°F outside this morning and we are quite cozy with this RMH. Since getting heat upstairs was not very efficient with just radiated heat through the intact floor, I opted to cut a few holes in the floor above the RMH (installed about 250 sq/in of floor registers) allowing that nice warm 100°F air to rise and then fall back down the stairway to the basement. Heating about 2900 cu/m of space burning about 10 lb/hr of a variety  of wood species. That's a lot of wood, but also heating about 5,800 sq/ft of living space from cold to toasty. In this house I've got 7 tons (84k BTU) of HVAC installed so, with this amount of wood consumption I estimate 100k BTU/h being generated by this RMH. Pretty impressive!

I made a couple of mods to the floor channel, changing the straight-up stub to one with a turn-down exhaust tip facing the riser to prevent ashes falling into the stub. I also added an ash catcher at the front of the floor channel, again to control ashes from falling out the front and plugging the duct. These changes did affect the burn characteristics so I shortened the stub by 1/2" which seems to have restored the pre-mod performance.
 
Leslie Walper
Posts: 36
15
  • Likes 3
  • Mark post as helpful
  • send pies
    Number of slices to send:
    Optional 'thank-you' note:
  • Quote
  • Report post to moderator

Glenn Herbert wrote:I would have made a bypass from near the top of the barrel to the exit stovepipe, so there would be a simple path for heat when starting the fire. That might have eliminated the need for the tee and paper to warm the chimney, or at least just have the paper in the back of the firebox along with kindling.


I may ultimately plumb the TEE directly into the side of the barrel with a damper for a startup bypass. The small fire with match-dry finger size sticks at the back of the firebox does also help with the smoky start-up. Actually, the last start a few days ago now, was virtually smoke free.
 
Why is your dog always so ... moist? Check this tiny ad for some sort of cure:
Binge on 17 Seasons of Permaculture Design Monkeys!
http://permaculture-design-course.com
reply
    Bookmark Topic Watch Topic
  • New Topic