• Post Reply Bookmark Topic Watch Topic
  • New Topic
permaculture forums growies critters building homesteading energy monies kitchen purity ungarbage community wilderness fiber arts art permaculture artisans regional education skip experiences global resources cider press projects digital market permies.com pie forums private forums all forums
this forum made possible by our volunteer staff, including ...
master stewards:
  • John F Dean
  • Carla Burke
  • Nancy Reading
  • r ranson
  • Pearl Sutton
  • Jay Angler
stewards:
  • Liv Smith
  • paul wheaton
  • Nicole Alderman
master gardeners:
  • Christopher Weeks
  • Timothy Norton
gardeners:
  • thomas rubino
  • Matt McSpadden
  • Eric Hanson

Basement RMH

 
Posts: 4
  • Mark post as helpful
  • send pies
    Number of slices to send:
    Optional 'thank-you' note:
  • Quote
  • Report post to moderator
Hey fellow permies!

I'm working on an ambitious RMH design for a basement of my Victorian home, and am currently having draft issues. I'm not getting a Rockety burn, just a room full of smoke, and am not sure where my problem is.

Here's a FB album with pics and notes on the project. https://www.facebook.com/media/set/?set=a.10202401067609300.1073741830.1271531391&type=1&l=0f8c4492c8

I have an inline duct-fan installed in the exhaust pipe just before it leaves the basement, I thought it would be useful to get a draft started but... I was hoping I wouldn't have to rely on it.

My main questions are:
1. Should I increase the ascent or angle of the exhaust flue as it leaves the barrel?
2. Does the flue HAVE to grow larger as it leaves the barrel? It's an 8 inch pipe through out the mass, then reduces to 6 inch before going vertical leaving the basement (see pic #9).
3. How much space is needed between the top of the riser and the barrel? It's currently 3 inches. Seems like it might be too tight... but what would be optimal?

NOTE: I have approx. 45 feet of 8 inch pipe to be encased in cob mass. Which is more than most RMH designs I've seen. So I was intending on increasing the riser and barrel length, by adding a 2/3's barrel on top. I'd read that the greater the length of barrel and riser, the more heat generated/fuel consumed. Is this true & recommended given the length and u-shape of my bench?

If you would please look over my project and give me your learned opinions, that would save me a lot of trouble.
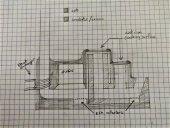
RMHlayout.jpg
[Thumbnail for RMHlayout.jpg]
The basic layout
20131208_224258.jpg
[Thumbnail for 20131208_224258.jpg]
Pic #9 - an 8-6 inch reducer before the inline duct-fan
 
steward
Posts: 7926
Location: Currently in Lake Stevens, WA. Home in Spokane
350
  • Likes 2
  • Mark post as helpful
  • send pies
    Number of slices to send:
    Optional 'thank-you' note:
  • Quote
  • Report post to moderator
Allen Lumley posted a reply while this post was being split.
Here is his reply:


Trane DePriest : Welcome to Permies.com, our Sister Site richsoil.com, and a Big Welcome to the Rocket and Wood Stoves Forum/Threads !
You should be able to come here nearly 24 / 7 and talk to someone who wants to talk about what you want to talk about ! You definitely think outside the
box, we need a lot more people like you who think this way, thats what makes us grow !

The most hopeful thing I see about your build is the amount of care and attention to detail went into the areas you thought were important ! After your
final vertical chimney leaves the basement it enters another ?Brick? chimney, this chimney should have been checked by a Chimney Sweep or other
qualified person, the total vertical distance of your basement stove pipe and the exterior chimney should work for you For natural draft! For any fan the
reverse is true, and an unlined vertical chimney will oftenBe laid up by a mason that puts his very best work into making sure the chimney is pleasing to
the eye, level and plumb, have consistent mortar lines where the excess was struck off, and be ruff as cob and nasty on the inside where no one would
be likely to pass judgement on that quality of work for years and years !

I have reputation as an old crab, in this case I am going to ask you to verify about every step on the building process!

You need to disassemble the Vertical Stove Pipe in your basement, and get into a position where you can hold a mirror inside the bottom of the ?Brick?
Chimney during a brite sunny day you should be able to clearly see much of the upper third of your chimney and inspect for intact tile if any, and the
light outlining the top of the chimney as seen in your mirror should be sharply outlined with nothing blocking the light, It should extend 5'-6' over the
peak of the roof ! and get rid of or move the piece of wood hiding behind your vertical Stove pipe, It looks too much like amateur hour !

It is possible that you have an outside clean out at the very bottom of your Exterior Vertical Chimney and can check your chimney from there, Warning
The old clean out may be cemented into place with a furnace cement and be in very poor condition ! After your inspection this must be sealed up again
tight !

You mentioned that you had read about increasing the height of the Barrel and the Heat Riser, this will indeed increase the Draft created by the Heat
Riser, In an ordinary system you would then worry that the draft was too strong, sucking the hot exhaust gases out of the Combustion zone (my word choice)
before all the hydrocarbons were 'burned '. this is not your problem, a 1/3 of a barrel at a time is a lot, with a barrel and 2/3rds disassembling the barrel
for cleaning will be a two person job ! While I don't think that you will even hit the ceiling with that barrel, it is possible to knock the fire bricks of the
Heat Riser loose and never know it until you take it apart and check it for level and plumb ! again a 1/3 of a barrel at a time is fine a 3'' gap on a taller
barrel is good enough !

Lets talk bricks The only place I can see any bonding material is in your shot straight down inside your barrel where there appears to be some Mastic of
some kind, In your pictures i see no sign that the bricks are sealed up with any thing, a simple leak of exhaust gasses certainty if the bricks were just
stacked up into a running bond without any effort to seal the spaces between individual bricks, thats a minimum of 3 sides out of 6 for each brick more
with pieces!

Not to be missed you need to verify the type of brick you have, you will need to measure them and report their sizes and then weigh 10 of them on a
bathroom scale or drop by the Post office (or Ups, Federal Express, or a similar clone,) and ask them to weigh a brick ! This will calm some of my darker
fears !

Two last things, please goto> rocketstoves.com to Download your PDF Copy $15 U.S. of 'The Book' "Rocket Mass Heaters'',this will allow you
have a source that explains the ratios between heat riser height, and Feed tube and Burn Tunnel Length and how to actually determine the Constant Cross
Sectional Areas, and the need to keep them constant !

I also want you to google stack effect in houses so that we can talk about it later !

We have a lot of work to do, But if you are committed to having a Rocket Mass Heater RMH, In Your House, your fellow members here at permits will help
you make it happen ! for the good of the craft ! BIG AL !


Posts: 69
Location: Susquehanna, PA
1
  • Mark post as helpful
  • send pies
    Number of slices to send:
    Optional 'thank-you' note:
  • Quote
  • Report post to moderator
Hi Trane,
Congrats on the ambitious basement build! I can attest to Allen's rep as an old crab but also to his excellent advise. Every detail counts. The post of my build may be a help. https://permies.com/t/17748/rocket-stoves/st-RMH-build
~Marty
 
pollinator
Posts: 4154
Location: Northern New York Zone4-5 the OUTER 'RONDACs percip 36''
67
hugelkultur fungi books wofati solar woodworking
  • Mark post as helpful
  • send pies
    Number of slices to send:
    Optional 'thank-you' note:
  • Quote
  • Report post to moderator
Trane DePriest : Come Back ? Big AL !
 
Trane DePriest
Posts: 4
  • Likes 2
  • Mark post as helpful
  • send pies
    Number of slices to send:
    Optional 'thank-you' note:
  • Quote
  • Report post to moderator
OK, so this weekend's efforts towards the RMH were stifled by a lingering drywall project... but I did manage to burn the paint off of the barrel as suggested by many fellow permies.

Later this week; I'll submit a more comprehensive update on my progress including pics and numeric specs! Stay Tuned!
 
Posts: 126
Location: Springfield, mo
2
  • Mark post as helpful
  • send pies
    Number of slices to send:
    Optional 'thank-you' note:
  • Quote
  • Report post to moderator
I suppose it might be that you had no choice given an existing flue and such but I think you'll have a problem with using the 6" exhaust pipe at the end of the 8". I suspect it will only work if the fan is used all the time.
1 The exhaust pipe out of the barrel can be perfectly flat horizontally until the final vertical turn.
2 The transition area "manifold" at the bottom of the barrel before it exits into pipe needs to be larger than pipe (2-3x riser/duct CSA) unless you just exit out of the side of the barrel.
3 With an 8" riser a 3" top gap is likely enough. Making it larger might help with draw, but you'll decrease the radiant heat off the barrel top.
 
Trane DePriest
Posts: 4
  • Mark post as helpful
  • send pies
    Number of slices to send:
    Optional 'thank-you' note:
  • Quote
  • Report post to moderator
UPDATE:
1.) I reconfigured flue plan (see pic below), following suggestions from so many helpful souls.
2.) I removed the 8" to 6" reduction, removed the exhaust fan, and am now working with 8" from barrel, through bench, out of basement and up to sky.

NOTE:
a.) I am not using the house's chimney stack what-so-ever. The pics make it look like I'm tapping my exhaust into the brick chimney. It's simply exiting the basement and traveling up the exterior wall approx. 15 feet.
b.) I have an 8" starter collar attached to the bottom of the barrel, and then a T to allow for clean-out, then the bench.

QUESTIONS:
1.) I am shopping for CLAY as the soil in my own yard isn't yielding enough slip to work with.... There's this catalog from Columbus Clay... but I'm not exactly sure what I'm looking for. Can anyone point me in the right direction for the clay I need for my cob bench?
http://www.columbusclay.com/Slip.htm

2.) I burned paint off of barrel, but it got wet in the rain and subsequently rusty... what do you recommend for removing the rust before I treat it with mineral spirits?
RMH-layout-2.jpg
[Thumbnail for RMH-layout-2.jpg]
 
allen lumley
pollinator
Posts: 4154
Location: Northern New York Zone4-5 the OUTER 'RONDACs percip 36''
67
hugelkultur fungi books wofati solar woodworking
  • Mark post as helpful
  • send pies
    Number of slices to send:
    Optional 'thank-you' note:
  • Quote
  • Report post to moderator
Trane DePriest : I certainly can understand how confusing it is to try and get information from the''Columbus clay '' People, they are strictly Potters and Ceramists,
speak a different language, and traditionally use Fire kiln bricks exactly 180Degrees differently than we do !

I am sending you to > traditionaloven.com/articles/101/ to learn what fire clay IS, the most important thing you need to know is Clay with a high Alumino-Silicate
percentage is what you want and why that is important, you can also pick up some information on types of brick, but remember this is forPizza ovens and Ceramic
Kilns, not RMHs there is a major difference in the way we use them ! For the Good of the Crafts Big AL !

Late note on barrels : One mans treasure is an others trash, I Think you can use steel wool to lightly burnish to outside and then oil the barrel Ala Ernie Wisner
you end up with a drum that looks like an old cast iron pan and looks nice to MY EYE. A.L.
 
Trane DePriest
Posts: 4
  • Mark post as helpful
  • send pies
    Number of slices to send:
    Optional 'thank-you' note:
  • Quote
  • Report post to moderator
Big Al; thanks for the link... but I think you misunderstood. It sounds like you're suggesting fireclay for the burntunnel and riser... but I'm already using firebricks (76 of them) to form my J-tube. And I'm mortaring them together with Castable fire cement.

The Clay slip I'm unsure about is for the cob bench. I have read that I should use big rocks and pieces of cement to fill the void around the 8" pipe. But I was wondering what precautions should I take to ensure that the pipe isn't crushed under the weight of the bench top and subsequent sitter?
 
allen lumley
pollinator
Posts: 4154
Location: Northern New York Zone4-5 the OUTER 'RONDACs percip 36''
67
hugelkultur fungi books wofati solar woodworking
  • Mark post as helpful
  • send pies
    Number of slices to send:
    Optional 'thank-you' note:
  • Quote
  • Report post to moderator
Trane DePriest : Yes, I guess I did not read the whole thing clearly enough, we are all filtering the information we take in thru our Biases and preconceived
judgments. sorry, I'll try to do better !

First you want 100% coverage in Cob of your Horizontal ducting to provide the strength you want to achieve in your Thermal Mass Bench, it also gives you the
most surface area for the Heat Energy to transfer into the Thermal Mass. You want more than an inch and 2'' of Cob is plenty, by completely encapsulating the
pipe in cob we are recreating that perfect shape that transfers stress evenly, after that use as much Urbanite as possible.

If you are living in an Area Truly well scoured by Glaciers, you may have to hunt for clay but it is everywhere, If you go to the Top Right of this page and find
the Permies Toolbox you can 'clickon>' Search, which will allow you to enter a topic into the search field like Finding Clay locally- then do a
'Permies only' search for this information, Membership has its privileges, you can go there 24 / 7 and find 100s of Forum Threads/Thread Extensions on finding
local clay, even getting it delivered for free ! With the length of the Bench that you have, doing a 1/4 0f the depth to all of the bench, and then starting over and
doing the next 1/4, and then the next - should be all that is needed to build a thermal bench that will stand up to everything !
To make sure that you have good bonding through all your layers I would use a paint brush to paint the clay slip onto the pipe and every additional layer, do
not try to smooth finish everything but the final Couple of layers after the Structural cob Layer ! Rough layers will bond together and crack less than smooth !

For the Craft, Think like Fire, Flow like Gas, Don't be A Marshmallow! As always, your comments and questions are solicited and Welcome PYROLogically Big AL !
 
allen lumley
pollinator
Posts: 4154
Location: Northern New York Zone4-5 the OUTER 'RONDACs percip 36''
67
hugelkultur fungi books wofati solar woodworking
  • Mark post as helpful
  • send pies
    Number of slices to send:
    Optional 'thank-you' note:
  • Quote
  • Report post to moderator
Trane DePriest : I had to go check my facts before i posted any more about types of fire/kiln brick ! You say you are mortaring the Fire bricks together, I say
you are cementing the Fire brick together. A clay sand mortar mix for brick is more forgiving ! You Should be able to use a refractory furnace cement to build
your Combustion core Feed Tube, Burn tunnel and Heat Riser without problems as long as you are using the Heavy weight Fire/kilnbrick weighing more than 7+
pounds a brick, 9'' x 4.5'' x 2.5'' Splits at 9'' x 4.5'' x1.25 1/2 that!

If your fire/kiln brick are sub Two pound, there is a potential problem, Because of the hardness that the refractory furnace cement types dry to and their different
rates of Expansion and Contraction there can be problems with chipping/spalling and fractures with the lighter brick, especially to bricks that bridge across the top
of the burn tunnel !

If you will find my Forum Thread of Dec 14th, Fake fire brick in the Rocket Stoves Forums, and then scroll down to Erica Wisners response/thread extension
of Dec20th, you will see where she extensively covers the topic ! (As long as you have the heavier fire/kiln brick you should be fine !) Big AL !
 
It's a beautiful day in the tiny ad neighborhood
permaculture and gardener gifts (stocking stuffers?)
https://permies.com/wiki/permaculture-gifts-stocking-stuffers
reply
    Bookmark Topic Watch Topic
  • New Topic