|

|
|
|
|

|

|

|

|

|
 15
15


 6
6
![[Thumbnail for PXL_20251023_220934145.jpg]](/t/362330/a/277397/PXL_20251023_220934145.jpg "Filename: PXL_20251023_220934145.jpg
Description:") 9
9
![[Thumbnail for PXL_20251101_144739449.jpg]](/t/362330/a/277411/PXL_20251101_144739449.jpg "Filename: PXL_20251101_144739449.jpg
Description:") 3
3
![[Thumbnail for PXL_20251101_150455930.jpg]](/t/362330/a/277412/PXL_20251101_150455930.jpg "Filename: PXL_20251101_150455930.jpg
Description:") 3
3
Celtic/fantasy/folk/shanty singing at Renaissance faires, fantasy festivals, and other events in OR and WA, USA.
RionaTheSinger on youtube.
Pop-up garden/vintage+ yard stand owner.
4
It really improve the hard clay soil after a few years. Burning a load of wood in the pit was a big turning point.Riona Abhainn wrote:Looks like a good method.
4
 3
3
 4
4
Invasive plants are Earth's way of insisting we notice her medicines. Stephen Herrod Buhner
Everyone learns what works by learning what doesn't work. Stephen Herrod Buhner
3
Anne Miller wrote:Grub worms turn into little eating machines possibly eating the roots of all your plants.
then these larva turn into June Bugs which then eat the leaves and flowers of plants.
Soap or insecticidal vinegar might kill them both.
https://permies.com/t/55244/grubs-decomposers-root-eaters
6
Zone 6, 45 inches precipitation, hard clay soil

Skill verified by gir bot") 3
3
May Lotito wrote:The grubs could be the larvae of bess beetles if they live inside rotting wood. They speed up the decomposition process, earthworms will move in to eat their frass. Similar looking grubs that are found in soil or root mass are likely pest beetles. bess beetle


 8
8
Some places need to be wild
4
Eric Hanson wrote:Hi Thom,
I live in Illinois as well, but a good six hours south. From looking at your pictures, you seem to have more loam than I expected from the text in your post. Your picture looks a lot like what I tried many years ago—I dug a trench, threw in the leaves and branches and then covered it up. What I unintentionally did was to just about perfectly preserve my leaves and branches! My clay is solid brown and very sticky when wet. I made some near-perfect anaerobic conditions. Years later I could still find almost perfect preserved leaves and the branches never changed.
While I love the idea that you have (incorporating free organic matter into the soil to loosen it up), my thoughts are to start with it on top instead of burial. If you start on top, the process will be aerobic—just what you want. Also, the organic matter will help insulate the soil and encourage soil goodies to work their way up into the OM. And their waste will work back into soil—GREAT!! If you dig into the OM after it sits for a while, worms will make their way in—PERFECT!! If you really go crazy, try inoculating with Wine Cap mushrooms, but that’s not necessary yet (but WOW, does it ever work!).
One way you could do this is to lay the OM on top and maybe sprinkle some soil on top of the OM. This is to inoculate and to hold the OM in place over winter. In spring, maybe take whatever is left and make a compost pile but put that pile in a place that you want to grow veggies in the future. By making the compost pile on top of the future bed, all the composting goodness that washes down with rain (don’t forget about all the microbes in a compost pile that will wash down into the soil!).
I envy all those organic goodies that you can get into your garden! On a side note, I envy your latitude as well. I grew up near Bloomington, definitely south of you, but we still got some real winters. I love my home, but I miss a good blizzard!
Eric
2
 2
3
2
3
Some places need to be wild
2

 3
3
![[Thumbnail for PXL_20251122_213239546.jpg]](/t/362330/a/278754/PXL_20251122_213239546.jpg "Filename: PXL_20251122_213239546.jpg
Description:") 3
3
![[Thumbnail for PXL_20251122_213300780.jpg]](/t/362330/a/278755/PXL_20251122_213300780.jpg "Filename: PXL_20251122_213300780.jpg
Description:") 4
4
Some places need to be wild
4
Eric Hanson wrote:Thom,
Granted, you are not using food waste, but I see no reason why the same principle would not work using leaves instead of food scraps.
Eric
5
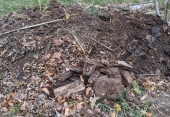
Thom Bri wrote:A close-up of a chunk of ash and charcoal from the area above. Interesting is all the roots completely filling the ash, far more than in the surrounding clay soil. Some plant, probably a peach tree, really loves the ash layer.
Zone 6, 45 inches precipitation, hard clay soil
2
May Lotito wrote:
Thom Bri wrote:A close-up of a chunk of ash and charcoal from the area above. Interesting is all the roots completely filling the ash, far more than in the surrounding clay soil. Some plant, probably a peach tree, really loves the ash layer.
The root mass is impressive! Can you tell if the roots are mycorrhizae inoculated or not?
I plan on preparing a large planting hole with biochar and minerals for a peach pit next year. Maybe that will get the roots to grow deeper and healthier.

|
Live large! ... but not you tiny ad:
grow your own garden and build your own home, in Montana, for free-ish
https://wheaton-labs.com/bootcamp
|