• Post Reply Bookmark Topic Watch Topic
  • New Topic
permaculture forums growies critters building homesteading energy monies kitchen purity ungarbage community wilderness fiber arts art permaculture artisans regional education skip experiences global resources cider press projects digital market permies.com pie forums private forums all forums
this forum made possible by our volunteer staff, including ...
master stewards:
  • Nancy Reading
  • Carla Burke
  • John F Dean
  • Timothy Norton
  • r ransom
  • Jay Angler
  • Pearl Sutton
stewards:
  • Devaka Cooray
  • Leigh Tate
  • paul wheaton
master gardeners:
  • Christopher Weeks
gardeners:
  • M Ljin
  • thomas rubino
  • Megan Palmer

Is a Sunken Floor Pebble Rocket Mass Heater Viable?

 
Posts: 21
Location: Japan,Toyama (Zone 9a)
6
forest garden foraging rocket stoves
  • Likes 7
  • Mark post as helpful
  • send pies
    Number of slices to send:
    Optional 'thank-you' note:
  • Quote
  • Report post to moderator
Hello Everyone! I'm in the early planning stages for my RMH and had a few questions before I invest too much time considering potentially unviable builds.

To give you some context for the question, my house is about 1 meter off the ground with a very large crawl space. I live in earthquake country, so building the heater directly on the ground is much safer than trying to reinforce the existing floorboards from below. I've been playing around with different ideas and came up with a Pebble design similar to a Japanese Irōri (essentially a sand pit in the middle of the room that people keep hot coals in to keep their living spaces warm. Have attached a picture to this post).

I currently have a vision of having the pebbles, chamber and feed hole at around the same height as the current floor level and sinking the rest of the unit below the floor (built up from the ground). My main worry is whether this is a fire hazard, or whether I'm going to be losing too much heat out the side of the unit into my foundations... At least it would keep them nice and dry!

My initial thoughts are that heat rising dictates that the majority of it will be radiating up and out from the upper pebble surface anyhow, but that I wanted to consult the Permies board of rocket scientists and see what you all thought about the idea! If it's totally unviable I am open to any suggestions you might have.

Thank you for your time!
IMG_20260128_225206.jpg
Japanese Irōri
Japanese Irōri
 
Rocket Scientist
Posts: 881
Location: Guernsey a small island near France.
377
  • Likes 5
  • Mark post as helpful
  • send pies
    Number of slices to send:
    Optional 'thank-you' note:
  • Quote
  • Report post to moderator
Well a standard 6” J tube will required feeding  with fuel every 20-30 minutes so do you have a plan for that aspect?
 
pollinator
Posts: 4229
Location: Tennessee 7b
349
  • Likes 7
  • Mark post as helpful
  • send pies
    Number of slices to send:
    Optional 'thank-you' note:
  • Quote
  • Report post to moderator
You could easily insulate the bottom and sides to direct the heat up. Mineral wool or vermiculite would be my choice.
 
pollinator
Posts: 477
59
  • Likes 3
  • Mark post as helpful
  • send pies
    Number of slices to send:
    Optional 'thank-you' note:
  • Quote
  • Report post to moderator
Many of us love Japanese art, design, architecture.  This heater could be aesthetically pleasing .
 I am with Fox, if your riser ends up at floor level, it seems your feed will be 2- 4 feet below floor level.  How to feed the fire?  Sorry if i am confusing your intentions. Conversely, if the fuel is fed at floor level, your riser and bell will be much taller than your floor. Diagram or sketch of this idea you  might offer plesse?
 
pioneer
Posts: 1039
Location: Inter Michigan-Superior Woodland Forest
192
6
transportation gear foraging trees food preservation bike building solar writing woodworking wood heat
  • Likes 3
  • Mark post as helpful
  • send pies
    Number of slices to send:
    Optional 'thank-you' note:
  • Quote
  • Report post to moderator
The opening post states that the feed would be at floor level, and there's no reason not to have the top of the strat chamber at the same level. There would just be a radiant chamber sticking up into the room. Working with a japanese style, I think feeding this would not be inordinately awkward.

Is this for a mild climate? Otherwise I'd be thinking 8".
 
Posts: 386
Location: North East Iowa, USA
117
  • Likes 2
  • Mark post as helpful
  • send pies
    Number of slices to send:
    Optional 'thank-you' note:
  • Quote
  • Report post to moderator
No one has mentioned, but I just can't see a exit flue in the photo?  is there one in this photo?

Where does the term " pebbles" come from for this design?  

Just pondering!
 
rocket scientist
Posts: 485
Location: in the Middle Earth of France (18), zone 8a-8b
280
2
hugelkultur dog tiny house chicken composting toilet cooking building sheep rocket stoves homestead composting
  • Likes 3
  • Mark post as helpful
  • send pies
    Number of slices to send:
    Optional 'thank-you' note:
  • Quote
  • Report post to moderator
Hi Scott, I believe the photo is an example of a traditional Japanese heating system called Irōri.

Alex, as R Scott has said, if you insulate base and sides of the rocket mass heater under the floor, it should be an option.

I think I can imagine how you want the design to look like, but could you perhaps provide us with a drawing?

The riser and the bell would be higher that the floor level.

You would have your ash clean outs under the floor... or maybe you could make little hidden lids that you can open in the floor, and an ash clean-out access from above?

I'm just musing here, based on an imaginary image of your project...but if you can dream it, you can do it!
 
Scott Weinberg
Posts: 386
Location: North East Iowa, USA
117
  • Likes 2
  • Mark post as helpful
  • send pies
    Number of slices to send:
    Optional 'thank-you' note:
  • Quote
  • Report post to moderator

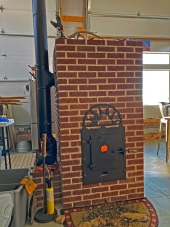
Nina Surya wrote:Hi Scott, I believe the photo is an example of a traditional Japanese heating system called Irōri.

Alex, as R Scott has said, if you insulate base and sides of the rocket mass heater under the floor, it should be an option.

I think I can imagine how you want the design to look like, but could you perhaps provide us with a drawing?

The riser and the bell would be higher that the floor level.

You would have your ash clean outs under the floor... or maybe you could make little hidden lids that you can open in the floor, and an ash clean-out access from above?

I'm just musing here, based on an imaginary image of your project...but if you can dream it, you can do it!


Actually I was just wondering if this Irori thing had a flue that I was not seeing?
And I also wondered what the term "pebbles" pertains to,  but perhaps you were meaning R Scott?  The rest of your musings I did not comment on, so maybe this was directed to some other Scott      Not sure.

take care all.

Scott Weinberg
 
Rico Loma
pollinator
Posts: 477
59
  • Likes 4
  • Mark post as helpful
  • send pies
    Number of slices to send:
    Optional 'thank-you' note:
  • Quote
  • Report post to moderator
Sorry folks when I see "chamber" in the description,  I envision radiant heat from the steel barrel surrounding the riser. I am not certain. As stated here, IN the room not below floor level.  

OP has a fantastic idea, this design reminds me of a recent post from T Rubino about a subterranean RMH from Montana circa  1800s ,  he sent that......three days ago?  

A solitary widow (Scandinavian family,) made it with clay and granite after cutting out her wood floor....... about 4 tons of mass under her small cabin. That stove saved a few lives, honestly. She had the idea from Northern Europe as a child and could re-create the masonry stove.  Thanks Thomas.

Best of luck sir, I am sure you will succeed.  
 
Alex Howell
Posts: 21
Location: Japan,Toyama (Zone 9a)
6
forest garden foraging rocket stoves
  • Likes 5
  • Mark post as helpful
  • send pies
    Number of slices to send:
    Optional 'thank-you' note:
  • Quote
  • Report post to moderator
Wow, thank you everyone for your interest in the project and all your replies! I'm happy to hear that if I insulate the sides below the floor I could viably re-direct heat up and into the rooms... I assume I would need to make sure whatever foundations I built on were also well insulated for similar reasons.

I'll do my best to go through any questions you've all had below, and will create a sketch that's less visually confusing than my initial madman scribble drafts for everyone to consult in the near future.

Climate: The coldest we get are temperatures around 0⁰C to -5⁰C, lots of snow so I need to be careful about where I'm placing the chimney. I am planning on a 8" J tube.

Design: The bell would be coming up into the room to act as a radiant heater. The feed tube would be at floor level, this might sound awkward to tend, but I spend 80% of the time on the floor (tatami mats) and most Japanese furniture is built low to the ground to accommodate for this style of house

I played around with the idea of having the bell below floor height, but felt that it would only really make sense if I was making some kind of conversation-pit style design where the whole room was sunken down like Peter Sedgwick's RMH Hokkaido build. If possible I would like to avoid interrupting the flow of movement between rooms as much as possible, which is why I started playing around with this idea.

What did I mean by pebbles?: Pebbles were referring to the pebble RMH build that's shown in the free heat movie as I thought the look was quite Japanese and would work well in my interior. That being said, the same effect could be achieved by having a solid cob/rock base and a small sandpit facade on the top, so I'm not ruling out any options yet. Ultimately I would want the most efficient thermal mass possible, so if pebbles fall short here then I may steer away from that design.

Video of the Pebble RMH below for reference:
 
Rico Loma
pollinator
Posts: 477
59
  • Likes 5
  • Mark post as helpful
  • send pies
    Number of slices to send:
    Optional 'thank-you' note:
  • Quote
  • Report post to moderator
Alex, I like your idea about using cob and/or other materials for stratification bell or bench. Pebbles are not the first choice according to the pro builders, but will allow the advantage of portability.
The unmatched Matt Walker recently had this to say when advising a client (he sells stove plans, shippable cores, et al) :

" "I have a few customers who have built portable units and are quite pleased with them. Gravel has a lot of airspace and doesn't make the best thermal mass, but it is easy and clean and better than nothing so may be a good choice for you. For portable units water is ideal since you can easily empty to move and fill when located, but of course that complicates things"

This comment is from an active thread on Permies entitled
Walker Stoves Superhot J 8 Inch build experience

 
Alex Howell
Posts: 21
Location: Japan,Toyama (Zone 9a)
6
forest garden foraging rocket stoves
  • Likes 2
  • Mark post as helpful
  • send pies
    Number of slices to send:
    Optional 'thank-you' note:
  • Quote
  • Report post to moderator
Hey Everyone, thanks again for your interest and your comments.

I decided to veer away from pebble mass entirely for the reasons you mentioned above + I ran some seismic simulations and pebble mass fared much worse due to all the individual pebbles having their own inertia, which resulted in a lot of stress on the frame/anything it was attached to... In general it seems to be a bad idea in an earthquake prone country (unless you're bringing it around as an outdoor promotional item at fairs, etc.)

Since my last post I have decided that sinking it into the crawl space is  a bit of a recipe for disaster (Soil moisture migration and restricting crawlspace airflow are just a couple of concerns here), so my next steps really are deciding what work needs to be done to make everything earthquake/fire safe for the standard above floor setup.

I'm estimating that is would weigh about 3.5–5 metric tonnes over about 4-6 meters squared, so I'm thinking that it would be best to seismically isolate the heater from the house.New piers or short strip footings, build a new platform concrete rebar slab on top, with an isolation gap between the slab and the house frame (Maybe 10–15 mm filled with rock wool). Other than that, keeping the bench low and spreading the surface area as wide as possible is logical.

The seismic logistics are turning into a bit of a mammoth task, so I'm currently thinking I may build a test unit in my barn as there are solid concrete floors there and I could pipe the flue directly out of the wall. Would give me a much more holistic idea of what I'm dealing with and work out any potential kinks during this initial testing stage, then if necessary calling in someone to help with the foundation work if it feels out of my depth.

Will continue to update this thread as things progress.
 
Fox James
Rocket Scientist
Posts: 881
Location: Guernsey a small island near France.
377
  • Likes 4
  • Mark post as helpful
  • send pies
    Number of slices to send:
    Optional 'thank-you' note:
  • Quote
  • Report post to moderator
Building a prototype in your barn is a great idea, it will really help you understand how everything works and the performance that can be achieved.
Rocket stoves are not always as impressive as people expect, you have to be realistic when sizing and building to find a compromise with the overall size, the amount of work and expense involved.
Building a mock up, possibly using dry laid fire bricks will help you no end.
Also there are other options that might help you build a lightweight stove with less mass, maybe not exactly what you planed but still a super efficient stove that can be placed in you home without massive foundation work.
 
Alex Howell
Posts: 21
Location: Japan,Toyama (Zone 9a)
6
forest garden foraging rocket stoves
  • Likes 2
  • Mark post as helpful
  • send pies
    Number of slices to send:
    Optional 'thank-you' note:
  • Quote
  • Report post to moderator
Hi James, Pleasantly surprised to hear from another channel islander! (I was born & raised in Jersey)

Fox James wrote:
Also there are other options that might help you build a lightweight stove with less mass, maybe not exactly what you planed but still a super efficient stove that can be placed in you home without massive foundation work.


Did you have any potential recommendations here? I'm making sure to consider all my options before I make any costly mistakes.
 
Fox James
Rocket Scientist
Posts: 881
Location: Guernsey a small island near France.
377
  • Likes 6
  • Mark post as helpful
  • send pies
    Number of slices to send:
    Optional 'thank-you' note:
  • Quote
  • Report post to moderator
Well it is a small world, I bet you are glad you left that horrible place…should have moved to Guernsey   ha ha!

We have rocket mass heaters and there are rocket stoves without the mass.
Therefore we could have a compromise between the two.

A six inch J tube can be built from lighter materials like vermiculite board or insulating fire brick but it is the mass that can cause the structural issues.
If you want long overnight heating from a pre heated dense mass then there are not many compromises but if you want fast radiant heat then you just need the rocket engine.

I have my own version J tube with a small amount of mass that works perfectly for my circumstances, it has glass viewing windows a short burn tunnel and a spinning vortex riser.
I also use an extremely efficient vortex stove with no mass at all but it looks amazing and throws out heat like you would never believe but has zero mass!
Peters latest Shorty core is relatively easy to build and is much more forgiving about re loading to produce radiants heat all day long.
A lot depends on how well your house is insulated and how much wood you have to burn?
 
Rico Loma
pollinator
Posts: 477
59
  • Likes 2
  • Mark post as helpful
  • send pies
    Number of slices to send:
    Optional 'thank-you' note:
  • Quote
  • Report post to moderator
You can rest assured, a  solution for your traditional house is forthcoming. Your practice build will be a superb idea. I certainly agree with Fox, perhaps focus on the best ROCKET for your situation.  And in the back of your mind , ruminations will begin for the mass aspect of your heater, be it middleweight or nonexistent. Fox, can we all find your rocket videos on UTube?

One idea I want to toss out is maybe the smallest heater. Benjamin documented his  work here,
Cottage rocket, first time build

It is compact yet has a slight mass, please look.  If bolted to a wall it could handle an earthquake better than an all masonry build, I presume?
 
Fox James
Rocket Scientist
Posts: 881
Location: Guernsey a small island near France.
377
  • Likes 1
  • Mark post as helpful
  • send pies
    Number of slices to send:
    Optional 'thank-you' note:
  • Quote
  • Report post to moderator
Rico, yes I have lots of YouTube videos and my designs are also documented on this forum, I don’t like to keep re posting the videos but you can find them on my channel https://youtu.be/LbZTkuiMBRU
 
Coydon Wallham
pioneer
Posts: 1039
Location: Inter Michigan-Superior Woodland Forest
192
6
transportation gear foraging trees food preservation bike building solar writing woodworking wood heat
  • Likes 1
  • Mark post as helpful
  • send pies
    Number of slices to send:
    Optional 'thank-you' note:
  • Quote
  • Report post to moderator

Alex Howell wrote:I decided to veer away from pebble mass entirely for the reasons you mentioned above + I ran some seismic simulations and pebble mass fared much worse due to all the individual pebbles having their own inertia, which resulted in a lot of stress on the frame/anything it was attached to... In general it seems to be a bad idea in an earthquake prone country (unless you're bringing it around as an outdoor promotional item at fairs, etc.)

Since my last post I have decided that sinking it into the crawl space is  a bit of a recipe for disaster (Soil moisture migration and restricting crawlspace airflow are just a couple of concerns here), so my next steps really are deciding what work needs to be done to make everything earthquake/fire safe for the standard above floor setup.

I'm estimating that is would weigh about 3.5–5 metric tonnes over about 4-6 meters squared, so I'm thinking that it would be best to seismically isolate the heater from the house.New piers or short strip footings, build a new platform concrete rebar slab on top, with an isolation gap between the slab and the house frame (Maybe 10–15 mm filled with rock wool). Other than that, keeping the bench low and spreading the surface area as wide as possible is logical.

The seismic logistics are turning into a bit of a mammoth task, so I'm currently thinking I may build a test unit in my barn as there are solid concrete floors there and I could pipe the flue directly out of the wall. Would give me a much more holistic idea of what I'm dealing with and work out any potential kinks during this initial testing stage, then if necessary calling in someone to help with the foundation work if it feels out of my depth.


I wonder if the obstacles leading you to abandon a sunken design here are insurmountable? If you are going to have a massive object, surely having it constructed roughly two feet shorter (half height?) would make it far less subject to damage from seismic activity?

As for the mass construction, when considering aesthetic finish, a pebble surface would be preferable to sand. Sand is more insulative, the pebbles would allow heat to filter up more freely while still presenting themselves as objects of heat retention. In this application I'd think a cob-rock sleeve or base around a ducted run in the floor would provide the most functional extraction model, with an inch or two of pebbles on the surface for presentation.

If considering maximum efficiency, a granite/stone slab over a stratification chamber would work better while maintaining a hopefully appropriate aesthetic. But the granite will get extremely hot during operation, requiring some sort of insulation on top if being used for walking/sitting. Perhaps a thin layer of pebbles would work for this also, but I don't have a grasp of the seismic forces that need to be accounted for.

As for your mention of using rock wool for insulation/fill to seal edges between mass and floor, Morgan Superwool would be beneficial there if you have access to it or something similar- regular rock wool has hazardous properties in normal handling which Superwool does not, as long as it is kept below furnace temperatures.
 
Alex Howell
Posts: 21
Location: Japan,Toyama (Zone 9a)
6
forest garden foraging rocket stoves
  • Likes 1
  • Mark post as helpful
  • send pies
    Number of slices to send:
    Optional 'thank-you' note:
  • Quote
  • Report post to moderator

Fox James wrote:Well it is a small world, I bet you are glad you left that horrible place…should have moved to Guernsey   ha ha!


Guernsey wasn't quite far enough from Jersey for me, so I decided to move to Japan instead, hahaha

Fox James wrote:Peters latest Shorty core is relatively easy to build and is much more forgiving about re loading to produce radiants heat all day long. A lot depends on how well your house is insulated and how much wood you have to burn?


Firewood is expensive here, so not a lot. And the house is currently very drafty (working on that part of it), which is why I was hoping to get a good amount of mass... That being said, I would also like to feel warm sometime in the near future, so a small setup for the coldest rooms might be the way to go for the immediate future (as long as I can figure out where to route a flue...)

Rico Loma wrote: One idea I want to toss out is maybe the smallest heater. Benjamin documented his  work here, Cottage rocket, first time build.  It is compact yet has a slight mass, please look.  If bolted to a wall it could handle an earthquake better than an all masonry build, I presume?


Will definitely take a look into this! Regarding bolting things onto walls, the main issue with earthquakes isn't the stove falling over, it's the stove acting as an anchor and preventing free movement/flexing during the shaking (these old timber houses are supposed to move with the quakes, not resist them). It's not really something you think about unless you live in earthquake prone countries, so it's been a big learning curve for me!

Coydon Wallham wrote: I wonder if the obstacles leading you to abandon a sunken design here are insurmountable? If you are going to have a massive object, surely having it constructed roughly two feet shorter (half height?) would make it far less subject to damage from seismic activity? As for your mention of using rock wool for insulation/fill to seal edges between mass and floor, Morgan Superwool would be beneficial there if you have access to it or something similar- regular rock wool has hazardous properties in normal handling which Superwool does not, as long as it is kept below furnace temperatures.


There are a few issues with the sunken idea (albeit aesthetically preferable) which are currently turning me off the idea. It really depends on how sunken we are talking about, but in a 1-2 foot step-down scenario the biggest risk is the trapped heat zones becoming a pyrolysis risk to the surrounding bearer posts/joists, and that the close the slab is to ground level, the more we have to start accounting for condensation... Building it directly on the ground might seem like it would be seismically safer, but there's a real risk of soil liquefaction during quakes, if the heater moves and the house doesn't, or visa versa, then you're suddenly ramming a large mass into the foundations of the building... It's all a bit messy.

Will definitely take a look at superwool, thanks!


reply
    Bookmark Topic Watch Topic
  • New Topic