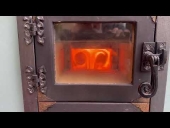
We have many chimneys... On the roof, the one on the left is for the RMH. It is maybe 1 meter of stone and then 3 meter of black pipe.
On the roof, the one on the right is for our kitchen stove, it is only stone. Draft is a lot worse with that one, the kitchen stove needs careful lighting..
Then the one closest to the RMH is the chimney from the downstairs (future) workshop. Also part stone and pipe
And the stainless steel one is fromnour diesel central heating.
Maybe one day i will make another one at the back of the house so we can geat with wood there too. Never can have enough chimneys
EDIT: adding day 3 pictures. Now we have the chimney leftover to do. I do not know why, but it is 10mm thick steel.....it will cost me a lot of angle grinder discs to cut it into pieces and get it out. We might keep a part of the super thick steel chimney, might look cool when it is nicely painted. The RHM output chimney can always be put in it.
Day 4/5 update: Grinding away on the chimney. It goes OK, but I have ran out of cutting discs and because my grinder is very old, all the stores here do not carry 18cm discs anymore. So ordered some from amazon. So this work is halted for now, Really do not understand why you would make a chimney like this out of 10mm(!!!) thick steel. The bottom plate would make sense, and the baffle as well. But everything is 10mm thick. No way is that needed, especially with the low temps you get in a fireplace like this....ah well, build to last i guess.
I still have some other prep work to do: Cleaning up barrels, digging more clay, figuring out how to seel the manifold and the top barrel, etc.
EDIT: Day 6: Found some more grinding discs so managed to get another piece out. Also started welding in new supports for the big steel chimney. I will take a big part of the bottom of the chimney off, to have more space to fit the exhaust of the RHM.
EDIT: Day 7: We continue
EDIT: Day 8: The chimney is gone and I have welded all the supports onto the remaining piece of pipe. Now just to remove a part of the pipe at the bottom and then remove some more cement and stones to make the floor a bit more level. And then cleaning up...
EDIT: Day 9: I guess the first phase of the project has come to an end!
WhatsApp-Image-2026-06-16-at-20.22.02.jpeg
day 4
WhatsApp-Image-2026-06-20-at-14.32.35.jpeg
Day 5/6
WhatsApp-Image-2026-06-20-at-20.43.12.jpeg
Day 6: welding supports for the big steel chimney. These are welded on the Steel frames that support the house.
WhatsApp-Image-2026-06-22-at-18.01.44.jpeg
Day7
WhatsApp-Image-2026-06-22-at-20.29.52.jpeg
Day 7: the extra space becomes noticable
WhatsApp-Image-2026-06-23-at-13.56.51.jpeg
Day 8
WhatsApp-Image-2026-06-24-at-14.04.41.jpeg
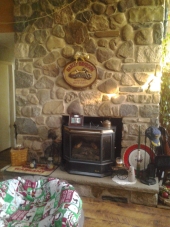
Day 9: More space in the living room! Ready to start building :-)


 4
4


![[Thumbnail for WhatsApp-Image-2026-06-13-at-21.02.24.jpeg]](/t/367670/a/291239/WhatsApp-Image-2026-06-13-at-21.02.24.jpeg "Filename: WhatsApp-Image-2026-06-13-at-21.02.24.jpeg
Description: Day 1")

.jpeg "Filename: WhatsApp-Image-2026-06-14-at-18.31.14-(1).jpeg
Description: Day 2")


")