|

|
|
|
|

|

|

|

|

|
 10
10


 9
9


 8
8
For all your Montana Masonry Heater parts (also known as) Rocket Mass heater parts.
Visit me at
dragontechrmh.com Once you go brick you will never go back!
9
For all your Montana Masonry Heater parts (also known as) Rocket Mass heater parts.
Visit me at
dragontechrmh.com Once you go brick you will never go back!


 10
10
Proudly presenting RocketMassHeaters.com
A good starting point to all RMH research
How Permies.com works
6
It's great to have another Rocket enthusiast in the neighborhood! We live in the Valle de Lecrín, maybe 45 min from you.
I'm happy to drop by on Saturday (if the roads are clear) and bring the Wiesner book, I'll be in Cenes de la Vega. Or you could pick it up there and we can chat over a coffee.
 ) . I was planning on contacting you somewhere along the line the have a chat. Tomorrow (sorry for the late reply, this week has been nuts with the weather as you might know), might be tricky. On my altitude they are expecting quite some snow starting tonight and through the whole weekend. I will send you a private message to talk.
Will you replace the 250mm exhaust or try to fit the 200 mm (8") exhaust in there?
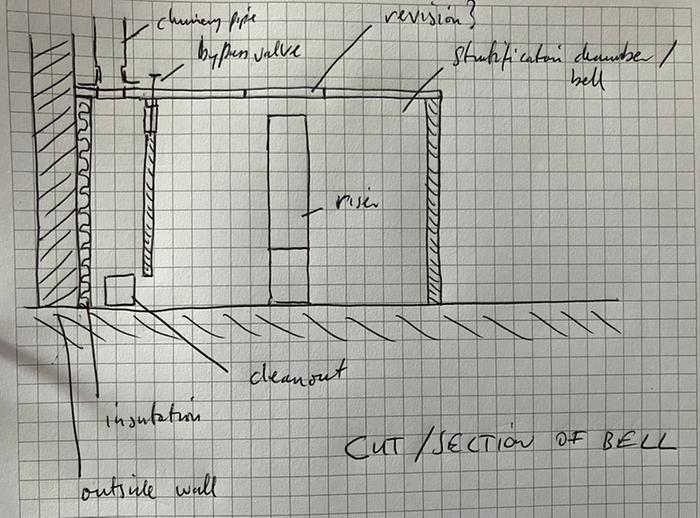
-Definitely insulate the bell against the outer wall. Maybe even build a double wall filled with insultaion. I like to use Arlita (expanded clay), but you might need 15-20 cm as it's not very insulative. That would probably bring your ISA down already.
-Core design: You could have another row (course) of flat laying fire brick as the first course to raise the height of the burn tunnel. Which size firebrick are you using/planning with? Do you have a height restriction with your bell?
Welcome to the wonderful world of rocket science.
I found the width of your burn tunnel. This is not going to work properly at all. It must be the correct area; it cannot be smaller, or your feed tube will become a chimney.
Adding a cleanout door is always a good idea, but be aware that all of mine will leak condensation when the system is cold. (Black drips)
The exhaust chimney, if located inside the bell, must be insulated.
The exhaust chimney should be 8" inside the bell, with a funnel-shaped bottom.
8
For all your Montana Masonry Heater parts (also known as) Rocket Mass heater parts.
Visit me at
dragontechrmh.com Once you go brick you will never go back!
7
Proudly presenting RocketMassHeaters.com
A good starting point to all RMH research
How Permies.com works
6


 8
8
Mark Roelofs wrote:
Or the chimney could be along the entire depth of the bell
![[Thumbnail for Bypass.jpg]](/t/367670/a/283401/Bypass.jpg "Filename: Bypass.jpg
Description:")
Proudly presenting RocketMassHeaters.com
A good starting point to all RMH research
How Permies.com works
5


 6
8
5
8
7
8
6
6
8
5
8
7
8
6
Cristobal Cristo wrote: Have you considered to open the dividing wall...
Fox James wrote:what a great project and it sounds like you are having fun already?
 7
8
7
7
10
7
8
7
7
10
Proudly presenting RocketMassHeaters.com
A good starting point to all RMH research
How Permies.com works
6

 7
7
Proudly presenting RocketMassHeaters.com
A good starting point to all RMH research
How Permies.com works
4
6
![[Thumbnail for 5e9e7567-7d87-4277-b130-d04cc56f95ca.jpg]](/t/367670/a/288260/5e9e7567-7d87-4277-b130-d04cc56f95ca.jpg "Filename: 5e9e7567-7d87-4277-b130-d04cc56f95ca.jpg
Description:") 6
4
4
6
6
6
4
4
6
6
![[Thumbnail for IMG_20260527_205751.jpg]](/t/367670/a/290124/IMG_20260527_205751.jpg "Filename: IMG_20260527_205751.jpg
Description:")
![[Thumbnail for IMG_20260527_205808.jpg]](/t/367670/a/290125/IMG_20260527_205808.jpg "Filename: IMG_20260527_205808.jpg
Description:") 3
4
3
4
![[Thumbnail for Schermafbeelding-2026-05-30-135910.png]](/t/367670/a/290237/Schermafbeelding-2026-05-30-135910.png "Filename: Schermafbeelding-2026-05-30-135910.png
Description:") 5
5
Proudly presenting RocketMassHeaters.com
A good starting point to all RMH research
How Permies.com works
5
4
Proudly presenting RocketMassHeaters.com
A good starting point to all RMH research
How Permies.com works
6
For all your Montana Masonry Heater parts (also known as) Rocket Mass heater parts.
Visit me at
dragontechrmh.com Once you go brick you will never go back!
7
![[Thumbnail for WhatsApp-Image-2026-06-04-at-19.30.52-(1).jpeg]](/t/367670/a/290576/WhatsApp-Image-2026-06-04-at-19.30.52-(1).jpeg "Filename: WhatsApp-Image-2026-06-04-at-19.30.52-(1).jpeg
Description:")
![[Thumbnail for WhatsApp-Image-2026-06-04-at-19.30.52-(2).jpeg]](/t/367670/a/290577/WhatsApp-Image-2026-06-04-at-19.30.52-(2).jpeg "Filename: WhatsApp-Image-2026-06-04-at-19.30.52-(2).jpeg
Description:")
![[Thumbnail for WhatsApp-Image-2026-06-04-at-19.30.52-(3).jpeg]](/t/367670/a/290578/WhatsApp-Image-2026-06-04-at-19.30.52-(3).jpeg "Filename: WhatsApp-Image-2026-06-04-at-19.30.52-(3).jpeg
Description:")
![[Thumbnail for WhatsApp-Image-2026-06-04-at-19.30.52.jpeg]](/t/367670/a/290579/WhatsApp-Image-2026-06-04-at-19.30.52.jpeg "Filename: WhatsApp-Image-2026-06-04-at-19.30.52.jpeg
Description:") 3
3
Proudly presenting RocketMassHeaters.com
A good starting point to all RMH research
How Permies.com works

| I agree. Here's the link: http://stoves2.com |