|

|
|
|
|

|

|

|

|

|


 I already test a pellet stove but wasn't satisfied. I plan to build a rocket stove mass heater.

God of procrastination https://www.youtube.com/watch?v=q1EoT9sedqY
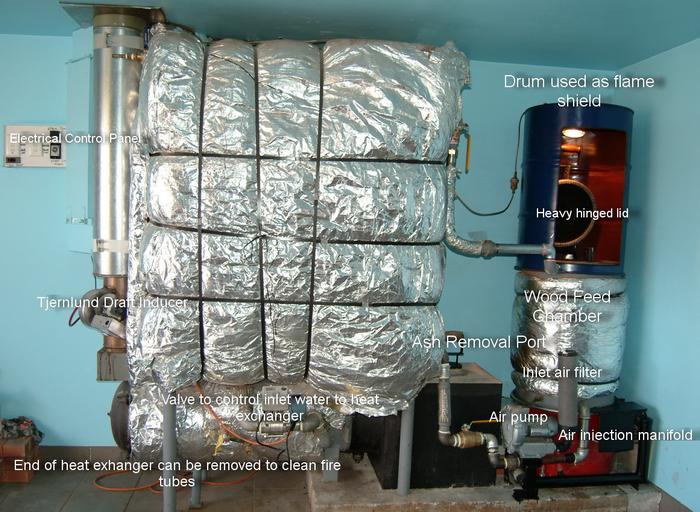
![[Thumbnail for barrel.jpg]](/t/45381/a/26885/barrel.jpg "Filename: barrel.jpg
Description:")


 1
1
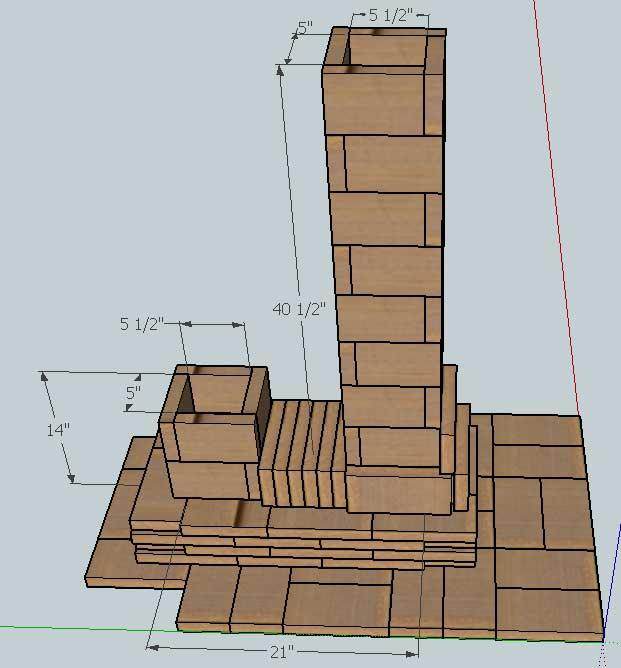
![[Thumbnail for RMH-rebuild_190.JPG]](/t/45381/a/26894/RMH-rebuild_190.JPG "Filename: RMH-rebuild_190.JPG
Description:")
![[Thumbnail for RMH-rebuild_192.JPG]](/t/45381/a/26895/RMH-rebuild_192.JPG "Filename: RMH-rebuild_192.JPG
Description:")
For all your Montana Masonry Heater parts (also known as) Rocket Mass heater parts.
Visit me at
dragontechrmh.com Once you go brick you will never go back!
![[Thumbnail for exaust_pipe.jpg]](/t/45381/a/26967/exaust_pipe.jpg "Filename: exaust_pipe.jpg
Description:")
![[Thumbnail for heater_8in.jpg]](/t/45381/a/26968/heater_8in.jpg "Filename: heater_8in.jpg
Description:")
![[Thumbnail for Photo327.jpg]](/t/45381/a/26984/Photo327.jpg "Filename: Photo327.jpg
Description:")
![[Thumbnail for Photo328.jpg]](/t/45381/a/26985/Photo328.jpg "Filename: Photo328.jpg
Description:")
![[Thumbnail for wind.jpg]](/t/45381/a/26987/wind.jpg "Filename: wind.jpg
Description:")
 You can see how the floor is, build in 2x6 bolted and doubled with adjacent piece.
Yurt picture
I sleep in it for like 3 week and get catch by a nasty winder storm for 2 day long with 160+ km/hours wind with ligthning etc. It was a bit before Christmas, the canvas on the roof was gone, I return to get the manufacturer warranties etc. I solved the problem, but at the moment, nothing else except a pellet stove is in the Yurt. Ill go back to live in it in like 2 week.
but 2-3 person can easy live in a 1000 feet square space
You can see how the floor is, build in 2x6 bolted and doubled with adjacent piece.
Yurt picture
I sleep in it for like 3 week and get catch by a nasty winder storm for 2 day long with 160+ km/hours wind with ligthning etc. It was a bit before Christmas, the canvas on the roof was gone, I return to get the manufacturer warranties etc. I solved the problem, but at the moment, nothing else except a pellet stove is in the Yurt. Ill go back to live in it in like 2 week.
but 2-3 person can easy live in a 1000 feet square space 
|
A mime should never say "Look! I'm in a box!" Now watch this tiny ad:
Experience months or even years of natural building and growing your own food
https://wheaton-labs.com/bootcamp
|