• Post Reply Bookmark Topic Watch Topic
  • New Topic
permaculture forums growies critters building homesteading energy monies kitchen purity ungarbage community wilderness fiber arts art permaculture artisans regional education skip experiences global resources cider press projects digital market permies.com pie forums private forums all forums
this forum made possible by our volunteer staff, including ...
master stewards:
  • r ranson
  • Nancy Reading
  • Carla Burke
  • John F Dean
  • Jay Angler
  • paul wheaton
stewards:
  • Nicole Alderman
  • Pearl Sutton
  • Anne Miller
master gardeners:
  • Christopher Weeks
  • Timothy Norton
gardeners:
  • Nina Surya
  • Matt McSpadden
  • thomas rubino

In line float valve?

 
gardener
Posts: 5258
Location: Cincinnati, Ohio,Price Hill 45205
1042
forest garden trees urban
  • Mark post as helpful
  • send pies
    Number of slices to send:
    Optional 'thank-you' note:
  • Quote
  • Report post to moderator
 I need a float valve that is inside a pipe.
Something like this:

     |  |
    /   \
   | ○ |
   \  • /
     |  |

Water flows downward freely until the water level rises in the pipe, at which point the ball(○) floats up and prevents any more water from flowing.
When the water level drops,the ball drops, but  the "pin" (•) keeps the ball from blocking the lower hole.
I can't find the name for such a thing.
I know I could use a Hudson valve but I don't want to open up my lower tanks.
They will be ibc totes and stacked
I may end up making one, but there should be such a thing, right?
 
pollinator
Posts: 276
Location: New Zealand
78
hugelkultur purity forest garden books cooking woodworking
  • Mark post as helpful
  • send pies
    Number of slices to send:
    Optional 'thank-you' note:
  • Quote
  • Report post to moderator
I has a quick google but didn’t find anything useful.
You’re after a jiggler type fuel siphoning valve but with a floating ball.
Won’t the head pressure of the water just push the ball down anyway?
What’s the application?
 
William Bronson
gardener
Posts: 5258
Location: Cincinnati, Ohio,Price Hill 45205
1042
forest garden trees urban
  • Mark post as helpful
  • send pies
    Number of slices to send:
    Optional 'thank-you' note:
  • Quote
  • Report post to moderator
I hope it wouldn't press or down anyway.
The principle seems to work in first flush systems,but those are too big for my needs.
It works in Hudson valves, but I would need to cut into one of the lower totes, which im yryi g to avoid.

I want to stack two tiers of ibc totes, with three totes in each tier. Then I want to join the totes in  each tier together so that water levels remain constant across all three.
Lastly I want to tie the upper tier of totes to the lower tier.
Simply tying the two together probably would result in leaks in the lower tier, as all the pressure of 750 gallons of water pushed up against the lids of the bottom tier, lids I couldn't get to to fix, at least until all 750 gallons had leaked away.
A valve that allowed water to enter the lower totes,but shut off the flow when the water level reached an inch from the tanks top, would be easy to service, if necessary.
Think of a toilet. The float valve cuts the flow of water before the tank overflows.
I want the float valve, inside a pipe, so I don't have to open a hole in the side of my tote, losing structural integrity and tank capacity.
 
pollinator
Posts: 814
Location: Central Virginia USA
78
  • Mark post as helpful
  • send pies
    Number of slices to send:
    Optional 'thank-you' note:
  • Quote
  • Report post to moderator
First, don't think of pressure as pounds of water, think of it as height of water .

You're actually only dealing with 6 or so pounds of pressure (per sq inch) so the amount of water doesn't enter into the equation. (unless a tote falls on you)

That may help with your planning since you seemed concerned with increased pressure creating leaks


William Bronson
gardener
Posts: 5258
Location: Cincinnati, Ohio,Price Hill 45205
1042
forest garden trees urban
  • Mark post as helpful
  • send pies
    Number of slices to send:
    Optional 'thank-you' note:
  • Quote
  • Report post to moderator
I have a Hudson valve already,so I might just put a Hudson valve inside  a 3-4" pipe and use a reducer to connect it to my bottom tank...
I'm liking that,even though building my own is tempting.
 
pollinator
Posts: 596
Location: Southern Arizona. Zone 8b
79
fish bike bee solar woodworking greening the desert
  • Likes 1
  • Mark post as helpful
  • send pies
    Number of slices to send:
    Optional 'thank-you' note:
  • Quote
  • Report post to moderator
A field hockey ball is about 2.8" in diameter, will cost you about $3-$4, and will fit inside 3" PVC with about 1/4" to spare, use a 2 or 2.5" reducer on top.

Probably also work with a 4" pipe and a 2.5" reducer.

If you look around (Walmart, sport store, etc.) you might be able to find a bigger ball.
 
Drew Moffatt
pollinator
Posts: 276
Location: New Zealand
78
hugelkultur purity forest garden books cooking woodworking
  • Likes 1
  • Mark post as helpful
  • send pies
    Number of slices to send:
    Optional 'thank-you' note:
  • Quote
  • Report post to moderator
A ballcock valve in the bottom tier would do it.
 
William Bronson
gardener
Posts: 5258
Location: Cincinnati, Ohio,Price Hill 45205
1042
forest garden trees urban
  • Mark post as helpful
  • send pies
    Number of slices to send:
    Optional 'thank-you' note:
  • Quote
  • Report post to moderator
Thanks everyone. Peter, you're seeing what I'm saying, I'll be shopping for balls with a section of three inch pipe in hand.
 
Peter VanDerWal
pollinator
Posts: 596
Location: Southern Arizona. Zone 8b
79
fish bike bee solar woodworking greening the desert
  • Mark post as helpful
  • send pies
    Number of slices to send:
    Optional 'thank-you' note:
  • Quote
  • Report post to moderator
I didn't read the entire thread before posting.  I thought you were looking for a first flush diverter.  Unfortunately the ball in tube idea won't work to stop pressurized water, even with low pressure.

However, I think what you are trying to do can be done without any valves.

Connect all of the lower tanks with some 1.5" to 2" PVC or ABS pipe, at one end of the pipe put an elbow and a vertical pipe that extends up to just below the top of the upper tanks.  At the top of this pipe put a Tee.
Connect all of the upper tanks the same way and add a vertical riser that goes up next to the one from the lower tank and stops at the same point.  Add an ellbow to this riser and connect it to the Tee ^.
Fill the upper tanks first, when they are nearly full the excess will flow up the pipe, through the elbow and down into the lower tanks.

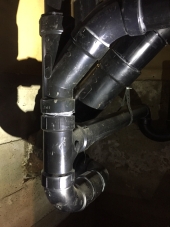
Now all you have to do is handle overflow from the lower tanks, that is simple too.  Cut the riser from the lower tanks just before the top of the lower tanks and add a "sanitary tee"  (see below), this will allow the water comming down to flow into the lower tanks until they are full and then the overflow will go out the tee.  Using a sanitary tee will keep water that is running down the side of the pipe from going out the tee until the tank is full.


There you go, automatic filling, overflow control, no moving parts and no maintenance required.
 
Posts: 92
Location: Columbia Missouri
15
forest garden urban bike
  • Mark post as helpful
  • send pies
    Number of slices to send:
    Optional 'thank-you' note:
  • Quote
  • Report post to moderator
I have seen something similar to your sketch used in floor drains to prevent flooding.  I googled "floordrain backflow valve" and found something called a floodguard valve.  I hope this helps.
 
Posts: 52
2
  • Mark post as helpful
  • send pies
    Number of slices to send:
    Optional 'thank-you' note:
  • Quote
  • Report post to moderator
I think Peter VdW nailed it!

fill the top, overflow to bottom, overflow to the ditch....

sounds perfect.
gift
 
PIP Magazine - Issue 19: Ideas and Inspiration for a Positive Future
will be released to subscribers in: soon!
reply
    Bookmark Topic Watch Topic
  • New Topic