|

|

|

|

|

|
|
|
|
|
|
|
|

|

|

|

|

|


Chris
 1
1


 1
1
"Never doubt that a small group of thoughtful, committed citizens can change the world; indeed, it's the only thing that ever has."-Margaret Mead "The only thing worse than being blind, is having sight but no vision."-Helen Keller
1
Chris


 2
2
Mow as close to ground as possible
Throw down a ridiculous amount of gypsum (essentially a thin layer covering the entire surface)
Add 3" or so of woodchips or compost (whatever I have on hand at that point)
Broadfork, trying to break up the deep clay as much as possible.
Add another ridiculous amount of gypsum, also lime, potassium sulphate, and bone meal
Surface cultivate 6" or so as finely as possible
Layer on more woodchips or compost
List of Bryant RedHawk's Epic Soil Series Threads We love visitors, that's why we live in a secluded cabin deep in the woods. "Buzzard's Roost (Asnikiye Heca) Farm." Promoting permaculture to save our planet.


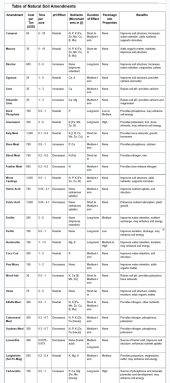
![[Thumbnail for soiltest.png]](/t/88823/a/62593/soiltest.png "Filename: soiltest.png
Description: soil test")
Chris
With grass that tall a scythe would be not only less fuel but also faster cutting. One option would be to use a tractor and disk, this turns the whole plant under in one pass, if you had your amendments already spread, it would be a one time affair.My thought on mowing before broadforking was mostly for access. Most of the area I'm looking at has around 3' of grass/brush growth, which, while encouraging to see, makes it difficult to put down soil amendments. I've been thinking about picking up a scythe for the last few months for chop and drop purposes, perhaps this would be a good time to do so and save on fuel as well.
Mushroom slurries are easy and not expensive to use and they can be applied at anytime. Mycorrhizae are best applied at time of planting (seed coating or tree root at planting). Mushroom compost is usually sterile because of Federal regulations that require heating it to 160 f temp. for 30 minutes.When you say use the fuel money to add some fungi to the soil, I'm not sure what you're referring to. Mushroom compost? Quick research on that does seem like it would be beneficial on my soil, being high in humus, chalk, and also more on the alkaline side, though it sounds like the real benefit is the residual fungi present.
Unless you plan on planting a commercial crop now, these nutrients are already in that soil, they just aren't in the water soluble state, building your microorganism biosphere will be what does this for you, so if you made those additions then got the microbiome going, you just overdid those particular nutrients.Why would it be best to skip the lime and potassium at this point? My soil test (hopefully attached this time), indicates a deficiency in potassium and a high acidity (~5.0 pH). I'm assuming that the soil building steps I'm taking will have the more or less same positive effect, rendering these amendments unnecessary?
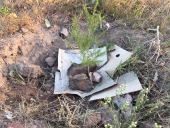
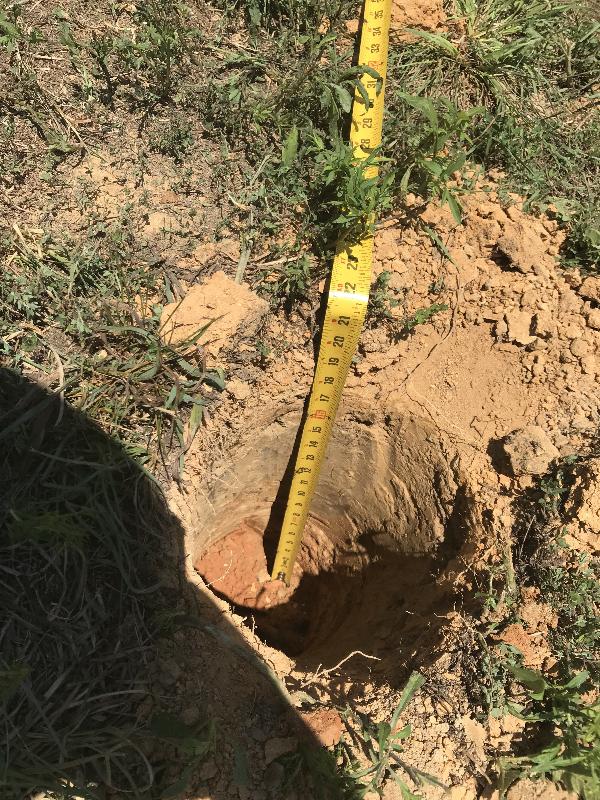
If you run a disk setup, and are turning in all your amendments in a single pass, add to the microbiome with compost teas, you will see clods begin to break down in under 30 days from application.Regarding the tilling, point well taken, I certainly don't want to kill the microbes I have there already. My main concern was the large clods of clay that came up while broadforking. The picture below isn't the best, but you can see that large chunks of clay were coming up 6" or so from the surface. My thought was that the soil would build more quickly/evenly if the compost and/or chips were mixed in. I suppose if I put down the wood chips/compost before broadforking, the surface could have been more even. The area pictured here I scattered the cover crop mix on that I mentioned before, but nothing ended up growing. I didn't use any amendments here outside gypsum, so I think compost to start a layer of topsoil will be necessary for the project.
List of Bryant RedHawk's Epic Soil Series Threads We love visitors, that's why we live in a secluded cabin deep in the woods. "Buzzard's Roost (Asnikiye Heca) Farm." Promoting permaculture to save our planet.
2
Standing on the shoulders of giants. Giants with dirt under their nails
2
![[Thumbnail for 2019-07-28-13.45.56.jpg]](/t/88823/a/90651/2019-07-28-13.45.56.jpg "Filename: 2019-07-28-13.45.56.jpg
Description:")
![[Thumbnail for 2019-07-28-13.46.29.jpg]](/t/88823/a/90652/2019-07-28-13.46.29.jpg "Filename: 2019-07-28-13.46.29.jpg
Description:")
Chris

|
this tiny ad is temporarily not soil
grow your own garden and build your own home in the gardening gardeners program
https://wheaton-labs.com/bootcamp
|