• Post Reply Bookmark Topic Watch Topic
  • New Topic
permaculture forums growies critters building homesteading energy monies kitchen purity ungarbage community wilderness fiber arts art permaculture artisans regional education skip experiences global resources cider press projects digital market permies.com pie forums private forums all forums
this forum made possible by our volunteer staff, including ...
master stewards:
  • Carla Burke
  • Nancy Reading
  • John F Dean
  • r ranson
  • Jay Angler
  • paul wheaton
stewards:
  • Pearl Sutton
  • Leigh Tate
  • Devaka Cooray
master gardeners:
  • Christopher Weeks
  • Timothy Norton
gardeners:
  • thomas rubino
  • Matt McSpadden
  • Jeremy VanGelder

Alternative wood floor install?

 
steward
Posts: 1898
Location: Coastal Salish Sea area, British Columbia
1058
2
books chicken food preservation pig bike solar wood heat rocket stoves homestead ungarbage
  • Mark post as helpful
  • send pies
    Number of slices to send:
    Optional 'thank-you' note:
  • Quote
  • Report post to moderator
Hello folks

I am working on my floor at the moment and i am finding i am wanting to figure out an alternative to putting tons of screws into the floor.
I am wondering if anyone has alternatives to doing that?

One idea i have is to put a thin 1x4 board which has been rounded/beveled every 4 feet or so and screw that down through the floor into the floor joists. A picture might make it easier to understand. I will try and get a photo if that is needed.

I am looking for ways which require the smallest amount of work. I am even open to drilling holes and putting wooden pegs in.


What do you got?

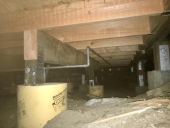
IMG_1213.JPG
picture of the floor joists
IMG_1215.JPG
a bunch of the floor boards
IMG_1216.JPG
it was sunny but gives an idea of what i am working with
 
gardener
Posts: 3261
Location: Cascades of Oregon
817
  • Likes 1
  • Mark post as helpful
  • send pies
    Number of slices to send:
    Optional 'thank-you' note:
  • Quote
  • Report post to moderator
Could you recess the 1/4 in board? More work, but even that 1/4 inch bump could be a pain in the butt.
 
steward
Posts: 4837
Location: West Tennessee
2438
cattle cat purity fungi trees books chicken food preservation cooking building homestead
  • Likes 5
  • Mark post as helpful
  • send pies
    Number of slices to send:
    Optional 'thank-you' note:
  • Quote
  • Report post to moderator
A nod to you for putting down a vapor barrier.

I think that what you have shown in the pictures will work. The room in the picture appears to be not of a terribly large size and a tub of screws, and a screw gun can have that done in a day. So I'm a floor guy I used to be a floor guy but now I farm and homestead. Generally, floors are 1.5 inches thick. There is a 3/4" subfloor over the joists, usually plywood or OSB, then the finished floor is fastened to the subfloor. What you propose to do isn't wrong and I believe will work fine. Having said that, there may be a slight amount of sag or "give" when stepping on those boards right in between the joists. I think two screws per each board per joist will suffice or 14 screws for an 8 foot board sitting on 7 joists. The less screws used, the more likely the floor is to squeak when traipsing about, and also the more prone the boards may be to bowing or lifting from seasonal temperature and indoor humidity changes.
 
steward and tree herder
Posts: 8507
Location: Isle of Skye, Scotland. Nearly 70 inches rain a year
4023
4
transportation dog forest garden foraging trees books food preservation woodworking wood heat rocket stoves ungarbage
  • Likes 3
  • Mark post as helpful
  • send pies
    Number of slices to send:
    Optional 'thank-you' note:
  • Quote
  • Report post to moderator
I’m wondering if you can construct some sort of floating floor arrangement like they do for engineered laminate floors. You’d need to interlock the boards in some way, either with routed tongue and groove (the one’s I’m thinking were more of a hook which might be tricky) or use dowels or wafers and glue. The whole floor then becomes a sheet that just sits on the joists....not sure if that would work. The laminate floors are continually supported by a sub floor, but your’s will be stiffer section to start with.
 
pollinator
Posts: 5367
Location: Bendigo , Australia
485
plumbing earthworks bee building homestead greening the desert
  • Likes 1
  • Mark post as helpful
  • send pies
    Number of slices to send:
    Optional 'thank-you' note:
  • Quote
  • Report post to moderator
James, I am surprised the floor boards are normally 11/2 inch thick.
Ian Australia we have tounge and grooved floorboards 20mm or 3/4 inch thick over joists 18 inches apart.
 
James Freyr
steward
Posts: 4837
Location: West Tennessee
2438
cattle cat purity fungi trees books chicken food preservation cooking building homestead
  • Likes 2
  • Mark post as helpful
  • send pies
    Number of slices to send:
    Optional 'thank-you' note:
  • Quote
  • Report post to moderator

John C Daley wrote:James, I am surprised the floor boards are normally 11/2 inch thick.
Ian Australia we have tounge and grooved floorboards 20mm or 3/4 inch thick over joists 18 inches apart.


The boards aren't 1.5 inches thick, they are 3/4 inch thick which is the industry standard. A floor ends up being 1.5 inches with a 3/4" subfloor plus a 3/4" finished floor, whether it's hardwood or a tile floor, which has a cement board underlayment + mortar + tile which generally equates to 3/4". Here in the States joists are 16 inches on center, or they were for a long time, but I am not sure if that has changed. I've heard rumors of joists and studs being moved out wider to cut costs and stories of people jumping up and down in the center of one room in a house and rattling dishes in the kitchen cabinets, but I have never seen it with my own eyes in any remodel I've done.
 
jordan barton
steward
Posts: 1898
Location: Coastal Salish Sea area, British Columbia
1058
2
books chicken food preservation pig bike solar wood heat rocket stoves homestead ungarbage
  • Likes 3
  • Mark post as helpful
  • send pies
    Number of slices to send:
    Optional 'thank-you' note:
  • Quote
  • Report post to moderator
thanks for all the input people!

So the floor boards are 1 1/2" thick douglas fir boards. They have been planed on one face and the edges. I cut the boards at my mill in about april/may. They have been covered and stickered for a few months now. Right now with no screws/nails in them the board move when i walk on them.

I have been reading about floors and it appears most people use staples/cleats/pnematic nailers. I honestly do not want to buy any more tools in order to put this little floor in which is about 19' x 9' or 171sqft.

I was looking at the history of flooring on a few websites and many of them did not mention how they fastened the boards.


I have an inclination to do what i am suggesting with the board being screwed down with the thin 1x4 board. Than once the floor acclimates to the environment i will decide how to go forward.

I noticed in my searching that places in japan actually designed floors to be squeaky in case of intruders.


One thing which looks cool would be to use old square nails.


I am also tempted to take the boards out one by one and shiplap them with the router.
 
Posts: 1510
110
  • Likes 3
  • Mark post as helpful
  • send pies
    Number of slices to send:
    Optional 'thank-you' note:
  • Quote
  • Report post to moderator
when I first moved here where on the property is many many stacks of lumber I looked at possible ways to use it for flooring , I didn't only because it is all red cedar and way too soft a wood for flooring/so ive been told anyway. but what I came upon with is router bits on a table router or a wood shaper with a power feed unit to make it all into tounge and groove and use a traditional floor nailer that toe nails the flooring to sub floor. its a lot of work but eliminated the screw and plug from the top of board that you mention.
 
James Freyr
steward
Posts: 4837
Location: West Tennessee
2438
cattle cat purity fungi trees books chicken food preservation cooking building homestead
  • Likes 7
  • Mark post as helpful
  • send pies
    Number of slices to send:
    Optional 'thank-you' note:
  • Quote
  • Report post to moderator

jordan barton wrote:

So the floor boards are 1 1/2" thick douglas fir boards. ... I cut the boards at my mill in about april/may. They have been covered and stickered for a few months now.

I have been reading about floors and it appears most people use staples/cleats/pnematic nailers. I honestly do not want to buy any more tools in order to put this little floor in which is about 19' x 9' or 171sqft.


If those boards aren't completely dry, they will contract over the course of a year or two and gaps will form. I personally believe three months to be inadequate to air cure/dry freshly milled lumber for building/flooring/furniture use.

Those nailers are commonly available to rent from tool rental places. I have a pneumatic floor stapler, and it drives on the leading edge of a board back and down at a 45 degree angle. If this were used on your 1.5 inch thick boards, the staples, or cleats if using a cleat nailer, are not long enough to make it through that much material and have any grab to anchor each board. These types of nailers are designed to secure 3/4 inch tongue and groove floor to a 3/4 inch substrate. I believe they are also insufficient for anchoring non-tongue & groove boards as only one side of each board will be secured. They will be floppy and move when walking across them similar to they way you mentioned they do now being unsecured. Face nailing or screwing is, I believe, the best method to secure non-tongue & groove boards for a floor application, just like building an outdoor deck.

One thing which looks cool would be to use old square nails.


square nails are cool, but the thing with nails, even ring shanks in my experience, can back out over time due to seasonal expansion and contraction. I have a few ring shank nails on my outdoor decks backing out not hardly 3 years after installation. Nails can back out, screws don't.

I am also tempted to take the boards out one by one and shiplap them with the router.


Shiplap is excellent for vertical surfaces and shedding rain on exterior walls. Shiplap isn't great for floor applications, but can be used if the boards are face nailed/screwed.

Hope this helps!
 
gardener
Posts: 2114
Location: Gulgong, NSW, Australia (Cold Zone 9B, Hot Zone 6) UTC +10
1005
6
hugelkultur fungi chicken earthworks wofati food preservation cooking bee building solar rocket stoves
  • Likes 3
  • Mark post as helpful
  • send pies
    Number of slices to send:
    Optional 'thank-you' note:
  • Quote
  • Report post to moderator

jordan barton wrote:Hello folks

I am working on my floor at the moment and i am finding i am wanting to figure out an alternative to putting tons of screws into the floor.
I am wondering if anyone has alternatives to doing that?
One idea i have is to put a thin 1x4 board which has been rounded/beveled every 4 feet or so and screw that down through the floor into the floor joists. A picture might make it easier to understand. I will try and get a photo if that is needed.
I am looking for ways which require the smallest amount of work. I am even open to drilling holes and putting wooden pegs in.


If you use some type of glue such as a sub-floor adhesive.  This is an Australian site but as an example: https://soudal.com.au/adhesives/soudabond-subfloor/.  It has fast grip  and allows for movement in the wood.  I like the idea of a thinner board as a pattern but if you want to screw it use a secret screw at 45 Deg into the side and then into the joist.  You will need to cramp up so you don't get gaps between the boards.  If you do not have a flooring cramp then you can screw a block into the joist and then knock a wedge between the block and the boards.  Use the flat of the wedges so the back is at 90 Deg and can be tapped in easily.  Once it is tight then secret screw it so you have a tight finish.
You can use a floor cramp as shown in this You Tube Video.  It also shows secret nailing,  glue most and screw about every 5th board to hold it while you set up the next 5 or so.  
 Beautiful job so far.
 
pioneer
Posts: 233
Location: Nikko, Japan Zone 7a-b 740 m or 2,400 ft
57
2
cat home care cooking food preservation medical herbs writing
  • Likes 1
  • Mark post as helpful
  • send pies
    Number of slices to send:
    Optional 'thank-you' note:
  • Quote
  • Report post to moderator

jordan barton wrote:thanks for all the input people! I noticed in my searching that places in japan actually designed floors to be squeaky in case of intruders.
*****
Uguisubari or nightingale floors were a thing in 17th century Japan.  Pricey and difficult to install, they were found in homes of the wealthy and royalty only.  

Also, my extremely cursory glance at the differences between shiplap and tongue and groove indicates that both are nailed in place, sometimes glued and nailed, but always nailed. Shiplap is mostly used as caldding -- I didn't see it used as flooring at all. But, your house, your rules. Good luck with your project! I couldn't do that.

 
pollinator
Posts: 2339
Location: Denmark 57N
598
fungi foraging trees cooking food preservation
  • Likes 3
  • Mark post as helpful
  • send pies
    Number of slices to send:
    Optional 'thank-you' note:
  • Quote
  • Report post to moderator
The floors in this house are nailed down but none of the nails show. they are all put through the tongue on the tongue and groove. they are a real pain to get out as they are long and in at an angle but it certainly works. the floors are over 100 years old and as solid as when they went in. They can't back out as the next board sits right on top of them.
 
steward
Posts: 15517
Location: Northern WI (zone 4)
4852
7
hunting trees books food preservation solar woodworking
  • Likes 2
  • Mark post as helpful
  • send pies
    Number of slices to send:
    Optional 'thank-you' note:
  • Quote
  • Report post to moderator
Just to clarify, you are thinking of laying down the semi-dry 1.5" floor boards and then run 1x4 cleats over the top of them and screw those cleats down to capture the floor boards.  Then once the floor is dry you'd remove the cleats, skootch them together and then screw/nail them down to the joists?

I guess that would work.  I would expect them to shrink a fair bit so I'd have a couple extra boards in the house that are drying along with them to fit in at the end of the run next year.

As for attachment methods, I'd probably tongue and groove them (or make splines) and toenail or toescrew them down.  Shiplap would be a challenge since the upper ship would be on the leading edge so it would be hard to toenail under it.  If you don't mind the fasteners exposed, face nailing would be somewhat traditional.  The issue with face nails is that as the wood expands and contracts with building humidity, they can pull the nails out a bit, or they get loose on the nail and slide up and down, giving you squeaks.  Clearance drilled holes with screws shouldn't squeak.

 
Thank you my well lotioned goddess! Here, have my favorite tiny ad!
Learn Permaculture through a little hard work
https://wheaton-labs.com/bootcamp
reply
    Bookmark Topic Watch Topic
  • New Topic