• Post Reply Bookmark Topic Watch Topic
  • New Topic
permaculture forums growies critters building homesteading energy monies kitchen purity ungarbage community wilderness fiber arts art permaculture artisans regional education skip experiences global resources cider press projects digital market permies.com pie forums private forums all forums
this forum made possible by our volunteer staff, including ...
master stewards:
  • Nancy Reading
  • Carla Burke
  • r ranson
  • John F Dean
  • paul wheaton
  • Pearl Sutton
stewards:
  • Jay Angler
  • Liv Smith
  • Leigh Tate
master gardeners:
  • Christopher Weeks
  • Timothy Norton
gardeners:
  • thomas rubino
  • Jeremy VanGelder
  • Maieshe Ljin

Unusual Hugelkultur Fix?

 
gardener
Posts: 1744
Location: N. California
811
2
hugelkultur kids cat dog fungi trees books chicken cooking medical herbs ungarbage
  • Likes 4
  • Mark post as helpful
  • send pies
    Number of slices to send:
    Optional 'thank-you' note:
  • Quote
  • Report post to moderator
I built a hugelkultur maybe 3 years ago.  It's been one struggle after another, mostly caused by my chickens, who love to remove all the soil down to the wood layer.  I finally solved this problem by fencing it. Last winter I forgot the gate open, and the chickens again reeked havoc.  I didn't e do anything with it last year at all.
I want to get it back in working order. I started by removing the weeds.  It's probably less than half the height it started out.
My son cut back our walnut tree a lot. I have a lot of dead and  green walnut. I was thinking about piling wood all around the hugel, then do layers of soil, compost, wood chips,straw, basically want ever I have to fill all the spaces. Once I get it to the point you can't see the wood I will dump a bunch of soil, and compost on top.
I will plant it like I did the first year. I will make a hole, fill the hole with compost, and plant.
I know the wood is supposed to be on the inside, but I just don't have time to pull it apart and start over.  What do you think? Will it work???   Looking forward to hearing your comments and feedback. Thanks
IMG_20220115_165404494.jpg
[Thumbnail for IMG_20220115_165404494.jpg]
IMG_20220115_161246816_HDR.jpg
[Thumbnail for IMG_20220115_161246816_HDR.jpg]
 
steward
Posts: 16058
Location: USDA Zone 8a
4272
dog hunting food preservation cooking bee greening the desert
  • Likes 3
  • Mark post as helpful
  • send pies
    Number of slices to send:
    Optional 'thank-you' note:
  • Quote
  • Report post to moderator
I am sure you have seen this thread though it might be a good refresher or help other members, especially this quote:

In the last podcast I heard Paul (finally) mentions the technique of putting dirt down as the logs are being placed. (That is, put down a few logs, then some dirt, and repeat.) That helps with preventing big voids in the logs, and might help with keeping it taller without needing to be so wide. I also recall hearing about Sepp having to tell excavator operators to just keep piling it up repeatedly in the same spot until it just works. I wish we had known these things before we built our hugels.


Tricks to Keep the Dirt from Sliding off Hugel

The first post has a great picture that explains.

Also, I feel that a good cover crip will make a big difference.
 
Jen Fulkerson
gardener
Posts: 1744
Location: N. California
811
2
hugelkultur kids cat dog fungi trees books chicken cooking medical herbs ungarbage
  • Likes 3
  • Mark post as helpful
  • send pies
    Number of slices to send:
    Optional 'thank-you' note:
  • Quote
  • Report post to moderator
Thanks Anne.
When I originally built my hugel I was carful to try to fill all the spaces with soil. When I built my hugel beets in my garden I sprayed the soil with water to move it down into the cracks, and find the voids, but that didn't work as well on the hugelkultur once I got above ground level, it didn't work as well.
I put soil, between every layer.  It was my only expense building it. I ended up not having enough soil, and bought organic soil, and organic compost.
Thanks
 
steward
Posts: 12418
Location: Pacific Wet Coast
6990
duck books chicken cooking food preservation ungarbage
  • Likes 6
  • Mark post as helpful
  • send pies
    Number of slices to send:
    Optional 'thank-you' note:
  • Quote
  • Report post to moderator
Branches on the outside aren't going to rot as quickly, or hold moisture for you, but there's probably still wood on the inside from the initial build anyway. However, the branches on the outside might not only help the soil stay in place better, but stop the chickens from being able to knock it all apart!

I have ongoing issues with keeping soil on hugels. I can remember Sepp saying at one point that most of the diagrams show too much wood and not enough dirt. Where I am, wood is cheap and relatively light. Dirt is heavy, filled with rocks, mostly mineral soil, and digging it is extremely time consuming as I'm usually using it where I don't have heavy machinery.

My current hugel is a "compost hugel". Hubby dug a pit with the back hoe. I filled it with rotten wood, dead chickens, veggie scraps, brooder bedding, duck-shit-contaminated woodchips and I tried, I really tried, to take dirt from the pile Hubby had made and get the rocks out and add it to the hugel/compost in layers with everything else. It turned to concrete, I couldn't get the shovel through, sieving turned it to powder - then the fall rains came early and heavy and it was a slimy mess. February was fairly dry, so I finally managed to add the last of the wood to the bed, surrounded it with big rocks, and filled it in with half the dirt pile by layering dirt and duck bedding. I used some shitty coffee sacks as the second last layer to try to stop wild birds from knocking all the dirt off, and so far that is helping a lot - they're just digging under the lower edge of the tarps and dug up all the onions I planted there - twice - sigh... I'm trying to figure out how to use branches from my bamboo to make a intertwined "cover" for the bed?

Jen, would you like me to post a series of pictures, or shall I start a separate thread for them?
 
Jen Fulkerson
gardener
Posts: 1744
Location: N. California
811
2
hugelkultur kids cat dog fungi trees books chicken cooking medical herbs ungarbage
  • Likes 2
  • Mark post as helpful
  • send pies
    Number of slices to send:
    Optional 'thank-you' note:
  • Quote
  • Report post to moderator
Thanks Jay, feel free to post pictures, I always enjoy seeing what others are doing.
 
gardener & hugelmaster
Posts: 3694
Location: Gulf of Mexico cajun zone 8
1970
cattle hugelkultur cat dog trees hunting chicken bee woodworking homestead ungarbage
  • Likes 6
  • Mark post as helpful
  • send pies
    Number of slices to send:
    Optional 'thank-you' note:
  • Quote
  • Report post to moderator
It will probably do OK Jen. After all, plants grow in the forest with broken branches on the ground. What you describe might not be a perfect textbook hugel but it will grow food. I think use what you have available & do the best you can with it. Sooner or later that external wood will break down & it will be even better, right?
 
Jay Angler
steward
Posts: 12418
Location: Pacific Wet Coast
6990
duck books chicken cooking food preservation ungarbage
  • Likes 3
  • Mark post as helpful
  • send pies
    Number of slices to send:
    Optional 'thank-you' note:
  • Quote
  • Report post to moderator
I have built two hugelcomposts this past 8 months or so. The first one, I used vertical branches on one side to help me get it "taller rather than wider".

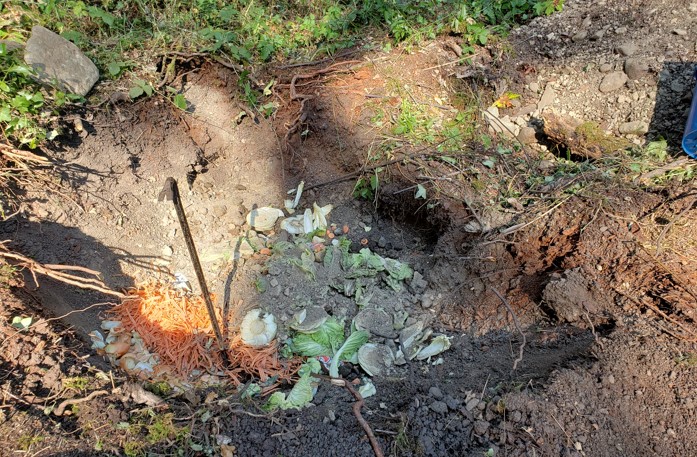
Here's the hole in the ground:


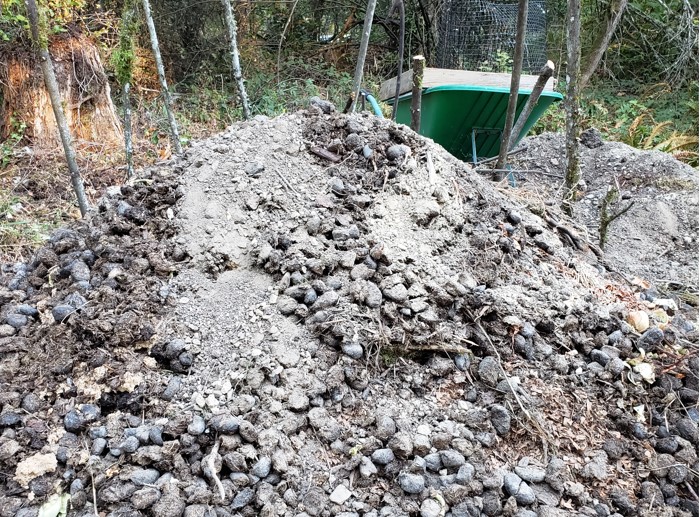
After much organic matter, log chunks and a couple of loads of horse shit, we get this nearly done pile


I covered this with some poopy coffee sacks, put a thin layer of dirt/compost over the sacks and then threw a bunch of kale and parsley seeds on it, but critters seem to like the kale better, so few of them have survived. There are some onions and strawberries planted at the base.


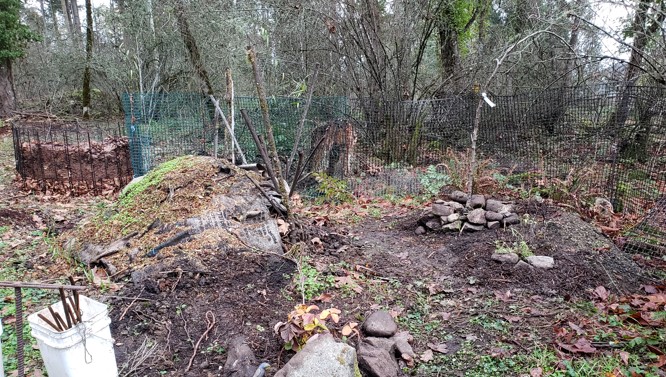
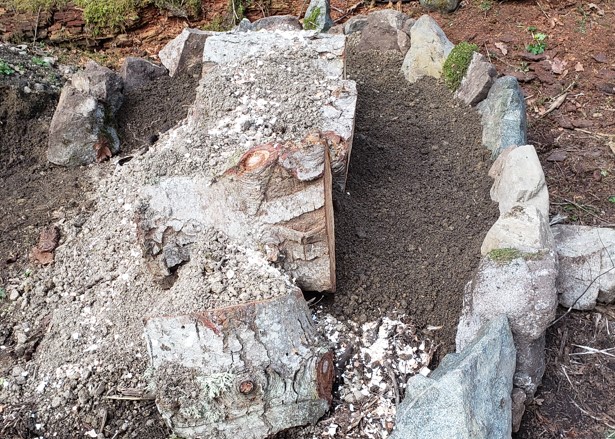
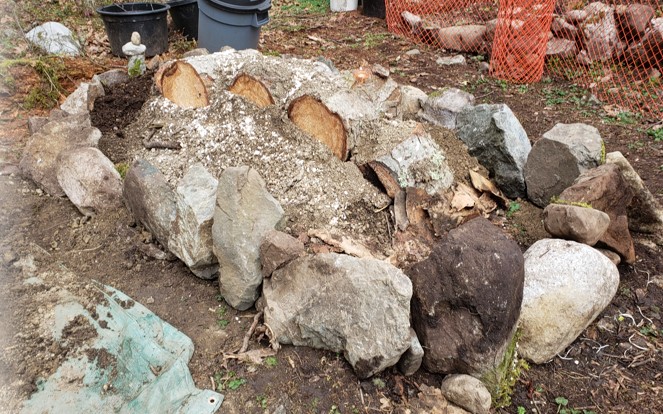
Hubby then dug an even bigger hole, further up the slope. It also got layers of wood, veggie scraps, dead birds, coffee sacks, and duck bedding, but unfortunately, my horse-shit producers moved to the Interior - their shit will be sorely missed unless I can find another reliable source! However, the dirt he dug out turned to concrete, which then got poured on in our wetter than average fall. I need to get the dirt pile dealt with, but I didn't want to try the vertical branch approach as it looks pretty messy and wasn't all that effective. So here's the rock version:


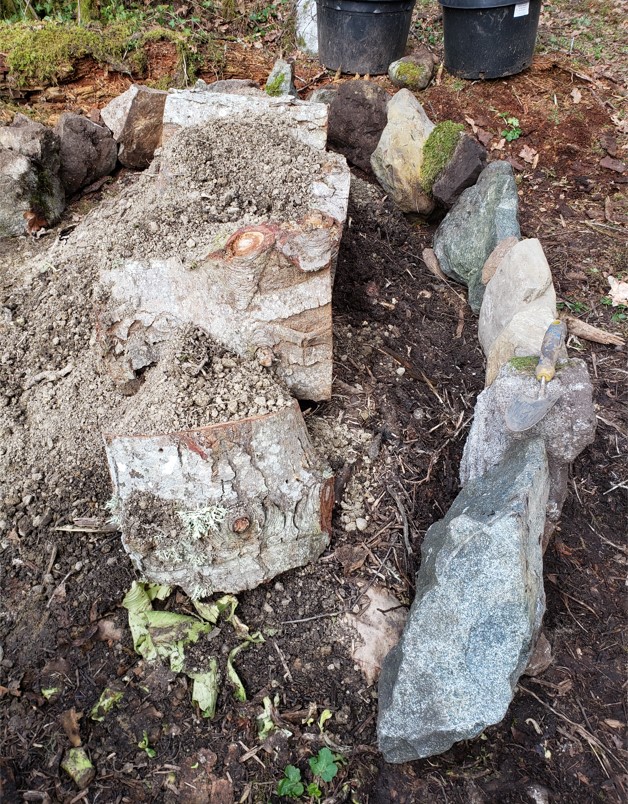
I *really* should have resisted putting those big rounds on top, but a storm had topped the tree, and Hubby had left them in my way where they'd kill the grass... bad move, Hubby!  I decided to start filling the bed before I put all the rocks in place as it gave me more space to work.


At this point, I was mostly layering the clay dirt and the duck-shit inoculated wood chips to build up enough to cover the logs.

The last of the big rocks, and some smaller rocks to add height in areas that needed it are now in place. I couldn't resist a statue in honor of the Compost Gods.


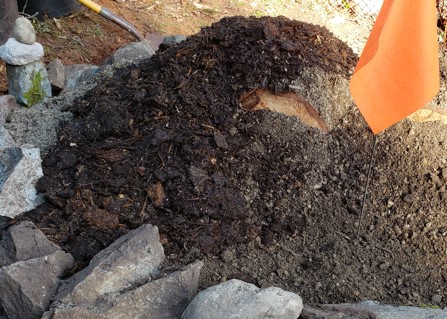
In this last picture for the moment, you can see that I'm still barely covering the large rounds of wood. If I'd thought of it in time, I should have drilled some holes in the top of those rounds to help the dirt stick a little, but it's hard to drill a hole large enough to be useful with a battery drill and this bed is a long way from any power source. On top of what is pictured, went coffee sacks and top-dressing similar to the picture of my first hugelcompost.  The flag marks the spot where I later planted a Seaberry plant, and the second one is at the very front edge of the bed. I tried planting some onion starts, but the birds dug them up twice, so I need some sort of protection before adding small plants or seeds.

I'm really pleased with this second attempt. It looks much neater than the first mound, although I know that if I plant a few squash on that first one once the weather warms up, it will be fine for the summer, and by next fall it will have shrunk down enough that I can remove the vertical branches. It will be interesting to see how much the second one shrinks. I wouldn't be all that surprised if the round logs sink into the composting material under them until they're more the same level as the top of the rocks. That should make it easier for me to keep dirt on top of them. If worst comes to worst, I'll pull them out. Theoretically, the combination of the bed in the ground and above ground will not be enough that this will work with no water added in our climate, but there's simply no way I can build a 7 foot high hugel with my height and shoulder strength. My general goal has been to get plants growing that only need water once every 2 to 4 weeks in the driest months, and it will be interesting to see how this bed does.
 
Jen Fulkerson
gardener
Posts: 1744
Location: N. California
811
2
hugelkultur kids cat dog fungi trees books chicken cooking medical herbs ungarbage
  • Likes 3
  • Mark post as helpful
  • send pies
    Number of slices to send:
    Optional 'thank-you' note:
  • Quote
  • Report post to moderator
Almost a month has gone by, and I'm finally getting back to the hugel. The hugel itself didn't look to bad, but it looked like I never weeded it.  My daughter said I should just throw cardboard down, and forget it.  The weeds actually came out very easy, so I weeded it again. Besides I want to be able to use the soil around the hugel it's what used to be on the hugel before chicken demolition.
My original hugel was two built as two with a space in-between. I didn't want that anymore, so I filled the space with old fire wood, then soil, and that brought it to about the same level.
I put a layer of shredded cardboard, and a layer of my chop and drop from the veggies garden.  Next is soil.  After only a few minutes I knew I needed to remove a section of fence so my son can dump the soil on top with the bobcat so much faster and easier.  I hope to finish it this week, but it will depend on how I feel after work, and how late my son gets home from work. Anyway it's progress.
IMG_20220402_185826253.jpg
[Thumbnail for IMG_20220402_185826253.jpg]
IMG_20220402_194545350.jpg
[Thumbnail for IMG_20220402_194545350.jpg]
 
Jen Fulkerson
gardener
Posts: 1744
Location: N. California
811
2
hugelkultur kids cat dog fungi trees books chicken cooking medical herbs ungarbage
  • Likes 1
  • Mark post as helpful
  • send pies
    Number of slices to send:
    Optional 'thank-you' note:
  • Quote
  • Report post to moderator
Next step soil. Then I added a bunch of branches, part to get them out of the yard, and part to put into the hugel to help catch the soil.  Soil, and wood chips.  It was getting dark, when my son's company left, but he got the bobcat and dumped the rest of the soil, and a huge pile of wood chips.  The soil was a pile of wood chips left for about 3 years the only downside is there's a bunch of weeds in it. It was moved a couple weeks ago in hope of exposing and killing the weeds.  I hope it got most of them, time with tell.  The wood chips are about 18 months old.  My plan was to use half of the soil on the branches, then do a load of wood chips, then the rest of the soil, then amend the soil with some compost. My son changed the plan.  Now I have to decide what to do.  I don't have any more soil.  Can't afford to buy enough to cover the hole hugel.  Maybe I will flatten the top and put some compost on the top, and any place on the side I will pull the wood chips back, make a little well of compost and plant in that.  Seems doable, and I should be able to finish it soon.
IMG_20220403_195549947.jpg
[Thumbnail for IMG_20220403_195549947.jpg]
IMG_20220403_200755878.jpg
[Thumbnail for IMG_20220403_200755878.jpg]
IMG_20220403_201713578.jpg
[Thumbnail for IMG_20220403_201713578.jpg]
 
Jen Fulkerson
gardener
Posts: 1744
Location: N. California
811
2
hugelkultur kids cat dog fungi trees books chicken cooking medical herbs ungarbage
  • Likes 2
  • Mark post as helpful
  • send pies
    Number of slices to send:
    Optional 'thank-you' note:
  • Quote
  • Report post to moderator
I've been adding seedlings and seeds to the hugel. It's starting to look alive.  It's coming along a little slower than normal, with our strange weather, but it's getting hot, and growth is picking up.  I've planted a few kinds of squash, Two tomatoes, a Japanese eggplant, cantaloupe, cucumber kale, and a few peppers. And a loofah. I threw on some marigolds, zinnias and borage seeds.  I plan to add a few pumpkin, and sall it good.  The biggest plants are  gourds I planted the first year that always come back.
IMG_20220608_195615669.jpg
[Thumbnail for IMG_20220608_195615669.jpg]
IMG_20220608_195450128.jpg
[Thumbnail for IMG_20220608_195450128.jpg]
 
gardener
Posts: 5169
Location: Cincinnati, Ohio,Price Hill 45205
1010
forest garden trees urban
  • Likes 1
  • Mark post as helpful
  • send pies
    Number of slices to send:
    Optional 'thank-you' note:
  • Quote
  • Report post to moderator
I have found "soil" to be over rated in any bed.
I usually use raised beds, as my land tends to be full of rocks, but even where I do plant in ground, I want the soil around the plant to be compost like.


I say all this because I think the mound form is over rated.
Rather than struggling to keep soil on the surface of a mound, we can put the same ingredients into a raised bed, or in the ground.
A raised bed does mean some extra materials are needed, but nothing fancy.
You can even use the stony clay soil to make the sides of a raised bed.
Once the contents of the bed compost into rich soil, we can remove the sides and a steep sided  mound will remain, held together with plant roots and mycelium.

There may be a benefit to building sloping soil mounds that I'm not seeing.
As it stands I'm totally jealous of all the good composting material yall have, and I would be content with beds filled with this and little else.

 
Jen Fulkerson
gardener
Posts: 1744
Location: N. California
811
2
hugelkultur kids cat dog fungi trees books chicken cooking medical herbs ungarbage
  • Likes 2
  • Mark post as helpful
  • send pies
    Number of slices to send:
    Optional 'thank-you' note:
  • Quote
  • Report post to moderator
I actually have both. My raised beds are what I call hugel beets.  I dug into the ground 2' lined the bottom with old firewood then a layer of native soil, small branches, soil, as much compostable material I could find. Wood chips, soil, the last 12" I used organic compost and organic soil.  I placed cement blocks 2 high around the hole. So it's about 16" above ground.  Unfortunately I had to remove that 16" of material and place hardwire cloth, then replace all the cement blocks and put the layers back because gophers where eating everything.  But it's an amazing raised bed, and totally worth even the double work.
IMG_20210122_143800124.jpg
[Thumbnail for IMG_20210122_143800124.jpg]
IMG_20210123_150200588_HDR.jpg
[Thumbnail for IMG_20210123_150200588_HDR.jpg]
IMG_20210623_185124572_HDR.jpg
[Thumbnail for IMG_20210623_185124572_HDR.jpg]
gift
 
The Humble Soapnut - A Guide to the Laundry Detergent that Grows on Trees ebook by Kathryn Ossing
will be released to subscribers in: soon!
reply
    Bookmark Topic Watch Topic
  • New Topic