Ryan Kal ; You have been paying attention,took notes, and read ''The Book " all signs of a future Rocketeer !
Verbose as I am, I will be short to make this easier to refer to !
1) I would add cross braces between individual floor joists, Plywood nailed to the underside of the joists will stiffen up things nicely. Fat cross sections
or slices off of large log ends will spread the foot print of your support pillars as they take the Rocket Mass Heaters RMHs weight, IF the Ground under
your Yurt platform is dry ! (The area around the perimeter should be landscaped to drain standing water away !)
2) 1st part,O.K., 2nd part, why so small ? Will you ever want company? Look at the empty unused space between your thermal mass and the wall !
Near the lefthand top of this page find :::-->
permies >> forums >> energy >> Rocket stoves Clickon :::-->
rocket stoves
This will take you to the listing of all rocket stove /rocket mass heater RMH Original threads, near the top find forum thread :::-->
video: great rocket mass heaters in upstate N.Y. and Quebec Watch the 1st video! this is the primary heater for this house (an 8'' system )
she often naps on the Day bed / Thermal Mass, this is snuggle sized for two, yours could be bigger or added onto later, (the hard way !)
3,4) Your plan is a near copy of a DVD video of E & Es upscale build and professionally filmed found at village video, goto :::-->
Villagevideo.org
find and clickon the
U-Tube Icon on the next page find the top set of short video clips labeled
Rocket Mass Heater Scenes, and
hover you mouses Icon directly over its near righthand side, this will make a [ > PLAY ] bottom appear to click on !
This will play ~3/8ths of the DVD made with this build is professionally done as is the build, careful it is full of builders eye candy and you will want this
DVD !
The 1st 4 ft of the horizontal pipe in your thermal mass needs the same insulation to protect your floor !
5 ) O. K.
6 a)O. K.
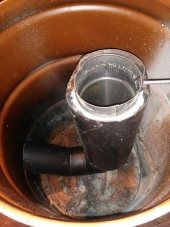
b) The very top of your Heat Riser should end with a ring of Cob with a rounded cone or Gumdrop shape to keep Fly Ash from settling out onto the Heat
Risers rim !
c) The 1.5'' was a suggested minimum, go for 2''

Where you have seen barrels notched out to make a transitional area between the outside bottom of
the Heat Riser and the horizontal chimney of the Thermal Mass you are seeing a 1/2 barrel that gets mated to a full barrel. This works well if you can
find two identical barrels built to ship dry powder in that have completely Removable Tops. This are held on with a clamping ring! A good location to hunt
these is for cleaning supplies like a car wash ! OR - Go with the Firebricks and Cob to make the manifold, this one should be easier to insulate and seal !
d )With all the firm statements about remembering the Constant Cross Sectional Areas C.C.S.A.s, and keeping them Whole-y

Here we want a large
round or oval opening, 2Xs or 3Xs the regular C.C.S.A.s! This is an important change, It reduces unwanted turbulence, Allows for the friction loses due
to Laminar Flow and you will find Fly Ash collecting in this location !
e) Just the Floor !
7) I can not see the placement of your 1st clean out, ideally this is close to the transitional area to let you inspect and clean this area !

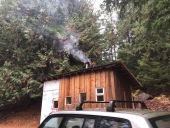
Remember that your final goal is to have an exhaust temperature ~ 150dF~ at your final vertical chimney! You can find a sew in kit to add a thimble
to the side of your tent, west of the Mississippi it may be called a jack, You get this from horse trekking, and/or hunting tent outfitters ! or you can go
out through a sky light in some Yurt models !
There will be a part two to follow ! For the good of the Crafts ! Big AL

 1
1


 Where you have seen barrels notched out to make a transitional area between the outside bottom of
 Here we want a large
 Remember that your final goal is to have an exhaust temperature ~ 150dF~ at your final vertical chimney! You can find a sew in kit to add a thimble


 1
1


 For the Good of the Craft ! Big AL


