posted 1 year ago
With your hole cut under sized, we know the glass cannot fall out towards the fire, we simply have to make a frame to keep it from falling out the front, I use the very common 1/2 x 1/2 x .125" angle iron.
Lay this out so you have a 1/8" gap from the side of the glass to the inside face of the frame. ( simple math) But you can make this flat side down and measure as you go along. MAKE IT true and squared. (not square shape, but equal corner to corner square)
With the frame done and corners ground nice, you can add your 6 bushings for the screws. These can be as thin as washers as there is NO real load on them, what ever your comfortable with.
When happy with these locations you can place on your door, and mark the 6 hole locations. Before drilling, these 6 holes should all be the same distance from your glass hole in the door. I use .250" because that is what I have, but smaller is fine, there is NO strength requirement.
With the inside of your door facing down, lay on your glass, and then the frame, and install screws and nuts.
Carefully you can lift your door and observe, Your glass will be loose ( it has to be if you did this correctly) and these turn over door glass down.
I have painted all the parts prior to final assembly with oven paint ( bbq paint) (hi-temp paint) Before assembly
Then with your FREE oven door seal cord, you can stuff in the gap all the way around the inside edge, with any dull tool (not a pointy screw driver)
One oven door strip will be in far excess of what you need, Cut to length, after you get it mostly stuffed into place. (tin snip works well)
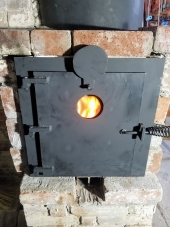
And there you have it, a rocket stove door that is sealed, and things can expand/contract without worry of breaking glass. And relatively in expensive. Oven glass cleaner works well if it gets smoked over. (do not clean when hot)
stove-door-assembly-with-screws.JPG
![Filename: stove-door-assembly-with-screws.JPG
Description: [Thumbnail for stove-door-assembly-with-screws.JPG]](/t/241976/a/239502/stove-door-assembly-with-screws.JPG)
stove-door-assembly-window-gap.JPG
![Filename: stove-door-assembly-window-gap.JPG
Description: [Thumbnail for stove-door-assembly-window-gap.JPG]](/t/241976/a/239503/stove-door-assembly-window-gap.JPG)
window-frame-6.75H-x-5.75H-sketch-with-bolt-bushings.JPG
![Filename: window-frame-6.75H-x-5.75H-sketch-with-bolt-bushings.JPG
Description: [Thumbnail for window-frame-6.75H-x-5.75H-sketch-with-bolt-bushings.JPG]](/t/241976/a/239504/window-frame-6.75H-x-5.75H-sketch-with-bolt-bushings.JPG)

 2
2


 2
2


![Filename: IMG951362.jpg
Description: [Thumbnail for IMG951362.jpg]](/t/241976/a/234829/IMG951362.jpg)
![Filename: IMG951360-(1).jpg
Description: [Thumbnail for IMG951360-(1).jpg]](/t/241976/a/234830/IMG951360-(1).jpg)
 4
4


 2
2


 8
8


 2
2


