Here's a guide to pulling nails from recycled wood.
I've recycled about 15,000 tons of building materials and therefore consider myself an expert on removing nails from old wood. I've developed many techniques to expedite this process and I've also copied from others who do this.
Good gloves, goggles, earplugs and nail proof footwear are advisable. I've seen more puncture wounds from sloppy de-nailing sites than from any other process in demolition. More than one person wearing shorts and sandals has gotten their feet tangled up on a sloppy site and fallen flat out onto the naily boards they were working on. Darwinism in action

Whenever you're de-nailing wood it's a good idea to set up a comfortable work station. I like good solid sawhorses set at about crotch height. If I'm doing tongue and groove flooring or other material containing small nails I'll set the horses higher than this. The lower setting is great for heavy framing lumber containing big nails. After the nails are hammered back and the wood is flipped you'll want to use a 3 foot prybar to withdraw big spikes. If the horses are set too high you are likely to whack your self in the head with the bar. A quick snapping action with the bar uses less energy than a slow pulling type of withdrawal.
The hammer--- It is inadvisable to use a heavy framing hammer for most de-nailing purposes. You simply don't need all that power and you'll tire yourself out for nothing. The most useful hammer I've used is one that was designed for drywall installation. It is very light but with a really large diameter head. The broad head means that even quite inaccurate swings are likely to hit the nail. A fast strike with a light hammer is more effective than a slow strike with a heavy hammer. What you're trying to accomplish is to shock the rust and static friction to get the nail started. The heavier hammer traveling slowly will have much of its energy absorbed as the wood bounces. Always straighten bent nails with the claws of your hammer before hammering them.
Withdrawing spikes---- Once you've hammered big spikes to expose 1/4 inch of the head and shaft of all the spikes on one side of a plank it's time to flip it over and yank those big nails with a 3 foot prybar. I often see people hammer on the spikes until the point of the nail is flush with the plank. 10 strikes or more are not uncommon with amateurs.
Most of this effort is wasted since a good bar will rip the nail from the wood in one solid yank if you just expose 1/4 inch of the nail head and shaft. Hammers are useless for this process but I frequently watch people work this way. They give many repeated jerks until they either tire their forearms or break the hammer handle. A person working with a hammer and bar will be much more productive, less likely to induce tendinitis or other injuries and will not break tools.
De-nailing plywood---- The Drop Method--- Whenever I need to remove large quantities of small nails from plywood I work with a helper and we carefully drop the sheets onto concrete or asphalt so that all of the points of the nails strike the concrete at once. Usually only one drop is necessary to get enough head exposed so that we can strip the nails. Hammers or small prybars are best for withdrawing these nails since they have little holding power after they have been shocked loose. Sometimes after the initial drop we work our way around the sheet tapping lightly with a sledgehammer in tamper fashion and many of the nails pop out on their own. For this process to work it's important that the nails be relatively straight before the drop. If the wood is recently removed from a structure most of the nails will be straight enough. Use the claws of your hammer to straighten the others. When ever you transport plywood and lumber with the nails in you're likely to bend many of them over and this will make de-nailing more difficult. Better to process the materials as they are produced. This also lets you get a bigger and safer load on your truck.
The drop method also works on 1 inch boards and sometimes planks but you'll need to be quite accurate so as not to bend the nails upon impact. Don't try this on a nice concrete patio or new driveway! You'll leave 1 million little holes which won't be appreciated later. It's better to find an area of concrete or asphalt that is going to be torn up at the demolition site.
De-nailing tongue and groove materials--- Generally tongue and groove materials are more bouncy and floppy than other wood you will encounter so it's very important to set up a proper workstation. The nails will generally be driven in on about a 45° angle so it sometimes helps to tilt the wood with one hand while striking the nail. This makes for less bounce. Once you hammer all the nail points it's time to pull the nails. For this you need a curved claw hammer and the pressure point for leverage should be the tounge and not the finished face of the flooring or wainscoting. Straight claw hammers are useless for this purpose since they invariably slip around and damage the finished surface. Using a grinder---- sometimes when nails are withdrawn they cause splitting or take out a chunk of the finished surface rendering the finished product worthless. An angle grinder with a very thin cutoff blade can be used to cut these nails off just below the bottom surface of your flooring. Use the lightest grinder you can find and protect your ears and eyes. Once you get on to grinding nails it will be much faster than other methods. Snapping nails----It is possible to snap many of the old square nails which are encountered in houses built before 1930. These nails often have just enough rust to make them cling to the wood and take out a chunk of finished surface if removed with a hammer. If you've got a strong forearm and thick leather gloves you can often snap these thin nails with the hand. I've also used pliers with a quick twisting motion to accomplish this.
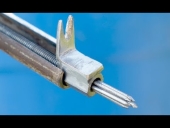
De-nailing trim---- quite often trim in old houses has many layers of paint or varnish. When nails are hammered out they take out big chunks of wood and completely spoil the surface. Since trim nails have very small heads they can often be pulled out from the back side of the material using vise grips or a nail biting device sometimes called a side cutter. Basically you grab the nail tight against the wood and leverage the tool against the wood. Wear good gloves for this since there is a good chance that with a slip you will smack your hand into other nail points. I always start at one end of the board and work my way towards the other with all of my prying action going towards the area I have already stripped.
The grinder method can also be used for trim.


 3
3


![[Thumbnail for image52.jpg]](/t/10249/a/2708/image52.jpg "Filename: image52.jpg
Description:")

![[Thumbnail for image28.jpg]](/t/10249/a/2710/image28.jpg "Filename: image28.jpg
Description:")