• Post Reply Bookmark Topic Watch Topic
  • New Topic
permaculture forums growies critters building homesteading energy monies kitchen purity ungarbage community wilderness fiber arts art permaculture artisans regional education skip experiences global resources cider press projects digital market permies.com pie forums private forums all forums
this forum made possible by our volunteer staff, including ...
master stewards:
  • Nancy Reading
  • Carla Burke
  • r ranson
  • John F Dean
  • paul wheaton
  • Pearl Sutton
stewards:
  • Jay Angler
  • Liv Smith
  • Leigh Tate
master gardeners:
  • Christopher Weeks
  • Timothy Norton
gardeners:
  • thomas rubino
  • Jeremy VanGelder
  • Maieshe Ljin

RMH for woodshop. Have questions

 
Posts: 5
1
  • Likes 2
  • Mark post as helpful
  • send pies
    Number of slices to send:
    Optional 'thank-you' note:
  • Quote
  • Report post to moderator
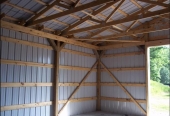
Ok I have a pole barn about 900 sq ft 12 foot ceilings and 2 full size garage doors. Walls and ceilings are insulated. The garage doors are not yet insulated but will be by next winter. I currently heat my shop with a 220v electric heater and supplement that when needed with a propane torpedo heater. Obviously my main reason for considering a RMH is the current cost I am spending on heating my shop. I use my shop 6-7 days a week for 8-12 hours a day. I live in NEPA so we do get some cold days/nights. I have and am still considering a few heating options them being coal/pellet stove and a ceiling  mounted gas heater but the RMHs intrigue me and would be an awesome way recycle all of my scrap wood cutoffs. The biggest thing I can’t figure out is the style I want to go with. I am going to upload a few pictures of my shop and the room I have to build the heater. This corner seems like it would work well especially for the walker style heater as it is more vertical then horizontal.  I am also going to include the 2 styles I am considering. Right now I am really leaning towards the walker stoves build but am also considering the barrel build but I worry about the longevity of the barrels.

I also would like to know if these builds would heat the shop sufficiently? I don’t need it to be 70 but a constant 55+ would be ideal. I’d really appreciate any thoughts or input.
66AF6EF9-E4A3-42E9-9CF7-0ADA459A03A5.jpeg
[Thumbnail for 66AF6EF9-E4A3-42E9-9CF7-0ADA459A03A5.jpeg]
C64CA21A-F336-4CE3-9CAD-B76FFFE31DD0.jpeg
[Thumbnail for C64CA21A-F336-4CE3-9CAD-B76FFFE31DD0.jpeg]
8A6188EF-6A59-41B7-9AA2-44A7C73C82F0.jpeg
[Thumbnail for 8A6188EF-6A59-41B7-9AA2-44A7C73C82F0.jpeg]
7F5B5C9E-F926-4EF9-B7E5-B3217A150F09.jpeg
[Thumbnail for 7F5B5C9E-F926-4EF9-B7E5-B3217A150F09.jpeg]
 
gardener
Posts: 500
Location: Victor, Montana; Zone 5b
228
hugelkultur forest garden composting toilet building rocket stoves
  • Likes 2
  • Mark post as helpful
  • send pies
    Number of slices to send:
    Optional 'thank-you' note:
  • Quote
  • Report post to moderator
Matt's stove is awesome, but I don't know about how much space it will heat. I thought it was designed for a smaller space than 900sf, but I could be wrong. If we are lucky Matt will see this post and comment.

I built a batch stove of Peter's design--heats 800-900sf between 62-72 for 24 hours on a single load of scrap 1x4 pine I have for free. Since it is a workshop I suggest the batch load stove since you want to actually get work done and not tend a J style rocket. It is so easy to load of the batch and have heat lasting all day and into the morning.

Barrel is long lasting. I think Ianto has a rocket he built that is 20+ years old and still in use.

As for looking to the vertical instead of a horizontal bench, just consider doing a larger vertical masonry bell--could be cob or brick or something else, just build up instead of out.

Check out the applications section of Peter's website here http://batchrocket.eu/en/applications. He has a pretty vertical heater in his shop that might do the trick.
 
Jay Welliver
Posts: 5
1
  • Mark post as helpful
  • send pies
    Number of slices to send:
    Optional 'thank-you' note:
  • Quote
  • Report post to moderator
Daniel,
Thanks for the reply. Your setup sounds like exactly what I am looking for. I agree batch box seems like the way to go for me and your temps are exactly what I am looking for. I would also be burning a lot of line 1x material as I have a lot of scraps of it.
Do you have pics of your build or a link to a how to of your build?
 
Jay Welliver
Posts: 5
1
  • Mark post as helpful
  • send pies
    Number of slices to send:
    Optional 'thank-you' note:
  • Quote
  • Report post to moderator
Any other input? Where is the best resource for step by step plans and material list?
 
rocket scientist
Posts: 6320
Location: latitude 47 N.W. montana zone 6A
3192
cat pig rocket stoves
  • Mark post as helpful
  • send pies
    Number of slices to send:
    Optional 'thank-you' note:
  • Quote
  • Report post to moderator
Hi Jay;   Matt sells his plans and a material list at his website       walkerstoves.com
Peters plans are free, here is his website http://batchrocket.eu/en/applications  I do not know if a material list is included.

The barrel style (barrels last many years) will throw more heat faster , but would cool off sooner than a brick construction.

Depending on your skill level and confidence , Matts stoves plans are sold with detailed instructions.  

Peters plans are freely given(THANK YOU PETER !)  but do require more studying and technical savvy.  

Matt can be contacted thru his website OR he can be Purple Moosaged thru Permies.

Here is another site  http://donkey32.proboards.com/ this is a rocket stove forum with very serious builders. Matt and Peter are both Moderators at this site.


I believe Daniel Rays build is here on Permies as well.  Tap his name and his profile will pop up, it has a list of all his posts.

EDIT)   Your 12 ' tall ceiling's is going to need a fan if it doesn't already have one.
 
Jay Welliver
Posts: 5
1
  • Mark post as helpful
  • send pies
    Number of slices to send:
    Optional 'thank-you' note:
  • Quote
  • Report post to moderator
Thomas,
Thanks for the info. I do have one ceiling fan and plan to add another to create air flow and to better distribute the heat. I’ve spoke with matt and while he thinks his beater would work in my stituation it’s quite a bit more expensive to build compared to a barrel style setup. Just with the 3 pieces of fiberboard alone I’m already at 350+  so I was considering alternatives but I very much like to work from direct plans. I have too many things going on to completely invest in another hobby which is why I’m more then happy to lay for plans I unfortunately it doesn’t seem that there are many plans out there that don’t consist of a giant cob bench.
 
thomas rubino
rocket scientist
Posts: 6320
Location: latitude 47 N.W. montana zone 6A
3192
cat pig rocket stoves
  • Likes 1
  • Mark post as helpful
  • send pies
    Number of slices to send:
    Optional 'thank-you' note:
  • Quote
  • Report post to moderator
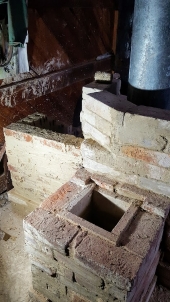
Well Jay; Most who want to go vertical rather than horizontal , just go ahead and start laying brick.  The core unit whether a J tube or batch box is the only critical dimension's.  The overall size and shape of your brick bell is only limited by the ISA internal surface area.


I just built a rather non conventional brick bell stove.   To start I used a J tube design for simplicity and speed.   I then incorporated a barrel, that is half exposed to my shop for instant radiating heat the other side of my barrel is exposed to the inside of the brick bell to warm it sooner.

This gives me the best of both worlds.  (My auto shop is not insulated)  I feel warmth  5 minutes into my burn and over several hours the brick work warms up to 160 F external temps.
Barrel temps regularly runs 600-800F on top and 400 or so on the exposed side.

As far as the costs.  Matt is using ceramic boards and ceramic blanket.  Both are the very best to use in a RMH , both are not cheap.   I used them on my shop stove and I can tell you they are outstanding in performance!  Nothing will work as good as them …   A few years ago nobody even knew about C.F. products we all used heavy and or insulated fire bricks to build. That is always a lower cost option.
DSCN0118.JPG
[Thumbnail for DSCN0118.JPG]
Shop RMh
 
Jay Welliver
Posts: 5
1
  • Likes 1
  • Mark post as helpful
  • send pies
    Number of slices to send:
    Optional 'thank-you' note:
  • Quote
  • Report post to moderator
I really appreciate the info. Obviously I have a lot to consider. As far as your setup it looks great, exactly what I am looking for. Something somewhat compact but gives instant heat as well as radiant heat after the burn. That’s a great setup. I assume you just kinda pieced it together rather than build from plans. Matt’s plans were at the top of my list and you make a good point about the fiber. I’m sure I could source the rest of the materials rather inexpensively to help keep the cost down. As with most of us I don’t want to loose valuable ship space but the low running cost of this style heater is worth the trade off.
 
thomas rubino
rocket scientist
Posts: 6320
Location: latitude 47 N.W. montana zone 6A
3192
cat pig rocket stoves
  • Likes 1
  • Mark post as helpful
  • send pies
    Number of slices to send:
    Optional 'thank-you' note:
  • Quote
  • Report post to moderator
Yup, I completely winged it, other than the core unit and the riser.
My barrel is sealed off to the masonry with ceramic blanket.  This was a big risk... several strongly suggested I not proceed with this and create a fourth brick wall , leaving the barrel 100% exposed to the room.  If this stove was in a living area I would have built it that way.
Nobody had ever tried building like I did, most considered it a folly and thought I would be rebuilding, I thought they were wrong and built it anyway ....  IT WORKS PERFECT ! Not one leak at the barrel!  
My temporary roof , 1/2" hardy board has cracked once and I replaced it,  it has now cracked again (but is not leaking exhaust ) The plan all along has been to replace the cement board with a domed brick top...  see how good my masonry skills are...

Here is a link to that build permies.com/t/94980/Brick-Bell-Shop-Heater    Several other posts as well , Baby dragon roars , working with Morgan super wool,   all worth checking out.
 
Rocket Scientist
Posts: 1809
Location: Kaslo, BC
525
building solar woodworking rocket stoves wood heat greening the desert
  • Likes 1
  • Mark post as helpful
  • send pies
    Number of slices to send:
    Optional 'thank-you' note:
  • Quote
  • Report post to moderator
Thomas going all rogue on us with his deviations from the norm (yet still providing sound advice and encouragement to many) makes him a great moderator and keeps the innovations coming that helps us all out. Yeah Thomas!
 
gardener
Posts: 3471
Location: Southern alps, on the French side of the french /italian border 5000ft elevation
194
  • Mark post as helpful
  • send pies
    Number of slices to send:
    Optional 'thank-you' note:
  • Quote
  • Report post to moderator
Jay, my answer to the same problem as yours,

https://permies.com/t/44806/Cobbling-workshop-heater


I wouldn't do it this way exactly now, as i cook often at the same time as i work. So the "makeshift" oven, would be a proper one now.

Except to this,  i wouldn't change much. It works as needed. Only prob i get, is in spring, when it's colder inside than outside, and it's been off for a few days. It smokes back.

For wood scraps, top load is better.  So my big cooking plate would be hinged.  
 
Rocket Scientist
Posts: 4526
Location: Upstate NY, zone 5
574
5
  • Likes 1
  • Mark post as helpful
  • send pies
    Number of slices to send:
    Optional 'thank-you' note:
  • Quote
  • Report post to moderator
For a brick bell roof, an easier alternative to a dome might be a corbeled roof. You lay each course flat, a bit farther in each time, until you close off the top. If planned right, they can be self-supporting at every step, and make no outward thrust like a dome or arch will.

Thomas, with your three-sided brick bell, this might be safer than a dome as the open side of your brick bell would have little resistance to the sideways thrust.
IMG_1044.JPG
[Thumbnail for IMG_1044.JPG]
beginning of corbeled roof
IMG_1113.JPG
[Thumbnail for IMG_1113.JPG]
corbeling closed in
 
thomas rubino
rocket scientist
Posts: 6320
Location: latitude 47 N.W. montana zone 6A
3192
cat pig rocket stoves
  • Mark post as helpful
  • send pies
    Number of slices to send:
    Optional 'thank-you' note:
  • Quote
  • Report post to moderator
Hi Glenn;
Thank you, I have considered the side thrust on a dome and wondered about how strong a push it would put on the wall. I also have an issue with the walls not being perfectly level. The arch dome was going to be a summer experiment to see how or if it worked out.I think I really just wanted to practice with brick building... Due to my work there is a good chance I will not even be home this summer to play with arches. I may find myself next fall with the same flat roof...
To do a dome or a corbel  I will need to fab a length of modified angle iron, to reach across from one side to the other, as support for an end wall.
I guess while I have a welding hood on I could make half a dozen of them. To be prepaired if nessisary for a full season of burning with a flat roof. That hardy board seems to need lots of support.


gift
 
The Humble Soapnut - A Guide to the Laundry Detergent that Grows on Trees ebook by Kathryn Ossing
will be released to subscribers in: soon!
reply
    Bookmark Topic Watch Topic
  • New Topic