Our brick house, built approximately fifty years ago, has original-equipment frost proof sillcocks. That's the fancy name for the exterior garden hose faucet that cannot freeze, because the actual valve and all the water is inside the wall in heated space. They work like this:

Starting about a year ago, ours began to dribble water. Out the spigot or attached garden hose, by preference; but if you closed that exit with a closed valve or a cap, it would spurt out around the stem of the valve knob/handle. So this suggested a dual failure: first of the seal where the bibb washer meats the faucet seat, allowing water to pass when the valve is closed, and second, of the stem packing under the packing nut.
The leak slowly grew worse. We could see it in our water bill, since our water is metered. It kept growing.
Now, normally, the fix would be to unship the packing nut, pull out the whole outer stem assembly and stem, replace the bibb washer, replace the packing material under the packing nut, and put the whole thing back together. They sell kits for this.
One small problem. It's not clear that our frost proof sillcock has a removable packing nut. There's a hex surface cast into the brass in about the right spot, but if that represents a nut, the nut doesn't turn. My brother in law and I got big pipe wrenches, and applied as much force as we dared. No disassembly eventuated.
Another small problem: the sillcock connects to interior plumbing inside a studded wall, behind drywall. No easy access.
So we responded to this problem by, essentially, ignoring it. We've had bad luck with professional plumbers; in our area, they just won't come out for small jobs. And if you do get one, they'll turn the smallest job into a thousand-dollar nightmare.
And then my wife had some surgeries and things got hectic and this just wasn't a priority. The water bill kept creeping up, but we couldn't spare the mental bandwidth to figure out how to attack a problem that didn't seem to have an attack surface.
Well, matters came to a head today. The latest water bill was about $120 more than it should be (normal is about $40). My wife is better now. A month ago we had an urgent conversation when we got the last bill, but she was in pain and the weather was terrible, and, and, and, nothing got done. Now she's feeling good and it's sunny out and this four dollar a day water leak has got to stop!
No argument from me. The very definition of unsustainable.
So we determined that, since tearing apart the sillcock to repair it had already defeated us, the next step was replacement. For that, we needed to know how it connected to the house plumbing. Nothing to be done but cut a hole in the drywall and look! So we did.
Even today, most of these sillcocks (if they aren't designed to connect directly to modern plastic plumbing) come with a sweat fitting (for soldering them directly to the old-style copper pipes) and an extra sweat-to-threaded-iron fitting for connecting them to iron pipe plumbing systems (not usually found in houses, I don't think, but pretty common in outbuildings and industrial settings back in the day.)
What we were not expecting to find is that the back end of our sillcock was sweated (soldered) into its sweat fitting-to-iron conversion fitting, which somebody had then brazed or welded to a brass elbow that also had iron-pipe threads on it. The threads were not involved; the two pieces were just jammed together and brazed. The brass elbow terminated at its other end in another sweat fitting, soldered directly to the house copper.
Conclusion: there is no way to replace the sillcock without also replacing a chunk of the house plumbing, consisting of that brazed abortion of elbow fittings.
Complication: I'm not skilled with a blowtorch, and waving one around inside a sheetrocked wall trying to unsweat old copper sweat fittings cleanly is not my idea of fun. More to the point, my wife won't have it.
Further complication: because of the elbow, there's no way to remove the old sillcock and replace it, short of cutting through the body of the sillcock itself. That's going to take a saw that can cut metal, and some care about sparks. A problem for another day.
Somewhere in here we made the executive decision that if we could simply cut free the 1/2" house copper and cap it off, we were willing to give up the use of that sillcock (not vital to our yard projects) in trade for losing the $4-a-day leak
right now goddammit!
Hello, Google: Is there some way to cap copper plumbing without soldering it?
It turns out there is -- an expensive push-to-connect system called Sharkbite. I needed me
a 1/2 Sharkbite cap, and I could still get to Lowes before it closed if I hustled! So, I hustled.
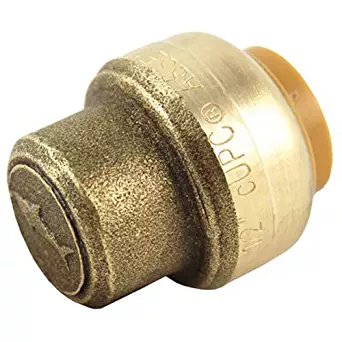
You might well wonder if the fancy stainless steel teeth and the "chloramine resistant EPDM rubber o-ring" inside the SharkBite product are genuinely trustworthy, the sort of thing you want to trust under house pressure for the next however-many-decades until it blows apart. We certainly do wonder. But it seems a less-bad alternative than setting the house on fire with a torch. Here's a YouTube video, of a skeptical plumber wondering the same thing, and basically concluding that we dunno, since the product has only been on the market about fifteen years:
But we watched the video, and the lady of the house, who actually owns the place, made the call that she liked her chances with the SharkBite better than going with the aforementioned "amateur blowtorch self-education hour" approach.
By the time I got back from Lowes with the SharkBite, it was full dark outside. Guess whose household water valve is in a housing that's half full of water due to recent rains? I really enjoy reaching into a cave in the ground half full of muddy water and groping around in the light of a flashlight for the watervalve. If there was ever a place to find a surly snake...
But I did not die. Got the water turned off. Got the half inch copper tubing leading to the defunct sillcock cut cleanly. I even sanded the outside of the tubing with sandpaper -- just to make sure the SharkBite gasket would have a nice clean surface to mate with. And then I just ... pressed it on. It settled into place with a pleasing tactile snap, too.
It was so easy, it was anticlimactic. Back outside, hand back in the snake water cave hole, house water turned back on. Did not die again. Made my wife monitor the SharkBite for the least sign of weeping or leakage or seeps, but she reported it was holding, dryer (my phrase not hers) than a popcorn fart.
So we are down a sillcock, and have stanched an annoying financial bleed that was pointless and unsustainable.
Now I need to figure out what is the best method of cutting all the brazed-on cruft off the back of the old sillcock so I can extract it out through the hole in the brick. New replacements come with a wide variety of interior fittings; I'll have to connect to the house plumbing with SharkBite fittings again, but it all should be doable. But that's a problem for another day, and probably not my highest priority home improvement project, if we're being honest.
Writing this up for Permies for two reasons:
1) because plumbing leaks, even ones that are deeply embedded in the infrastructure and hard to reach, are fundamentally unsustainable. And because:
2) I haven't messed with real copper plumbing in decades. (Just modern plastic systems.) I felt like there had to be some sort of kludgy system available for capping a copper line without soldering a proper cap on, but I was pleasantly surprised at how functional and easy to use the press-on connectors I found were.


 1
1


Skill verified by Nikki Roche")

Skill verified by L. Johnson")

Skill verified by Opalyn Rose")

Skill verified by Opalyn Rose")

Skill verified by L. Johnson")

Skill verified by Nikki Roche")

Skill verified by Jeremy VanGelder")

Skill verified by Christopher Weeks")

Skill verified by paul wheaton")

Skill verified by Nicole Alderman")

Skill verified by Nicole Alderman")

Skill verified by Mike Barkley")

Skill verified by Mike Barkley")

Skill verified by Mike Barkley")

Skill verified by Mike Barkley")

Skill verified by Ash Jackson")

Skill verified by Nicole Alderman")

Skill verified by Opalyn Rose")

Skill verified by Ash Jackson")

Skill verified by Opalyn Rose")

Skill verified by Opalyn Rose")

Skill verified by Opalyn Rose")

Skill verified by Ash Jackson")