• Post Reply Bookmark Topic Watch Topic
  • New Topic
permaculture forums growies critters building homesteading energy monies kitchen purity ungarbage community wilderness fiber arts art permaculture artisans regional education skip experiences global resources cider press projects digital market permies.com pie forums private forums all forums
this forum made possible by our volunteer staff, including ...
master stewards:
  • Nancy Reading
  • Carla Burke
  • r ranson
  • John F Dean
  • paul wheaton
  • Pearl Sutton
stewards:
  • Jay Angler
  • Liv Smith
  • Leigh Tate
master gardeners:
  • Christopher Weeks
  • Timothy Norton
gardeners:
  • thomas rubino
  • Jeremy VanGelder
  • Maieshe Ljin

Old barn to cozy cabin (Woodchips and slip method?)

 
Posts: 26
Location: North eastern Kansas / tall grass prairie meets oak-hickory for
16
kids foraging tiny house
  • Likes 13
  • Mark post as helpful
  • send pies
    Number of slices to send:
    Optional 'thank-you' note:
  • Quote
  • Report post to moderator
Hello fellow builders, dreamers and enthusiasts!
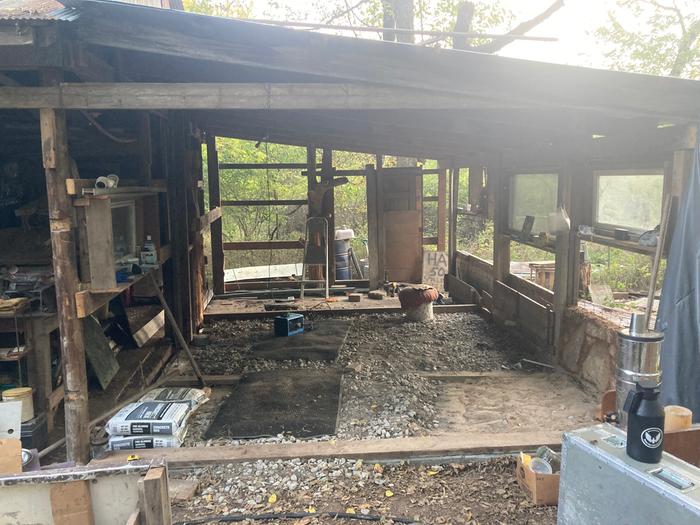
I’ve recently become a caregiver to a piece of land that I’ve had some special attachments to for awhile. The land owners and I are close friends and have agreed to let me build a small structure. Due to limiting building codes and finances I’ve settled on an abandoned pole barn to build out on the interior. The stick bug is one of my creature companions so I plan to leave the exterior as is, old rusty siding while the inside im sure I can carve out a cozy cave for myself.

This past winter I cleared it out of all the junk and pack rat nests, the rats moved next door… and now I’ve started to envision what the inside may look like. I’ve read a few posts here about the chip’n’slip method of mixing Woodchips with clay slip and this is the method im almost certain I will use as both are available to me at no cost. Im thinking the exterior metal will serve as on form and I’ll use scrap wood as the forms inside moving them up as I work.  

Im hoping to document my progress for others who hope to use a similar idea and to open myself up to scrutiny, skepticism, and sass as im ever naive and optimistic and need some practical perspective from time to time. Encouragement and enthusiasm are welcomed as well.

So far I’ve made a smal cardboard model home of the same dimensions I hope to play along with as I move through the process. And three experimental block of different mixes  of chips and slip.

I’ll attach some pictures and come back with more updates as they come along.
IMG_1005.jpeg
Front of the space covered with a tarp
IMG_1006.jpeg
Chip pile next to side of barn
IMG_1004.jpeg
Inside walls
Inside walls
IMG_1007.jpeg
Model home and two blocks 1:1 and 2:1 chips:clay
 
Ando McFin
Posts: 26
Location: North eastern Kansas / tall grass prairie meets oak-hickory for
16
kids foraging tiny house
  • Likes 2
  • Mark post as helpful
  • send pies
    Number of slices to send:
    Optional 'thank-you' note:
  • Quote
  • Report post to moderator
One note on the mix ratio… I just read someone say 3:1 chips:clay was the ideal ratio for them which is the one I have yet to try out. I tried a 4:1 and it was was too loose and crumbly.
 
Ando McFin
Posts: 26
Location: North eastern Kansas / tall grass prairie meets oak-hickory for
16
kids foraging tiny house
  • Likes 3
  • Mark post as helpful
  • send pies
    Number of slices to send:
    Optional 'thank-you' note:
  • Quote
  • Report post to moderator
Questions so far…

Will the metal exterior inhibit the walls ability to breathe and potentially be a damp/mold issue? ( I have some ideas to help with this)

How thick to make the walls? My minimum is 6 inches…

The east wall has the metal siding sticking out over bare earth as seen in the last picture so I’ll need to make some sort of footing on this side I believe to prevent water wicking up. How deep to go? Back fill with gravel and start with a layer of rocks as the base?

Ceilings? Vapor bariers? Insulation options?
 
pollinator
Posts: 5347
Location: Bendigo , Australia
477
plumbing earthworks bee building homestead greening the desert
  • Likes 6
  • Mark post as helpful
  • send pies
    Number of slices to send:
    Optional 'thank-you' note:
  • Quote
  • Report post to moderator
The metal wall will cause problems, if you can have a reflective layer vapour barrier and an air space that can allow moisture to move out, that will help.
I would lay them flat so the wall is more stable and key it to the frame.
A vapour barrier will be needed under the earth blocks
Any footing I would do with a 12 inch thick footing, rising above any water flow line with a drain under or infront of it.
 
Ando McFin
Posts: 26
Location: North eastern Kansas / tall grass prairie meets oak-hickory for
16
kids foraging tiny house
  • Likes 4
  • Mark post as helpful
  • send pies
    Number of slices to send:
    Optional 'thank-you' note:
  • Quote
  • Report post to moderator
Thank you for the feedback.
The bricks were just mix tests, I’m planning on putting the mix into forms that then are removed.  
Reflective vapor barrier on the exterior is your recommendation? One of my ideas was to use the metal as form material and remove it once the wall was filled/built then it would have a slight corrugated pattern on the exterior surface that I could then lime plaster and add Earth pigments to to get a similar looking exterior as the rusty metal, which is for camouflage purposes;)
 
John C Daley
pollinator
Posts: 5347
Location: Bendigo , Australia
477
plumbing earthworks bee building homestead greening the desert
  • Likes 2
  • Mark post as helpful
  • send pies
    Number of slices to send:
    Optional 'thank-you' note:
  • Quote
  • Report post to moderator
Yes that may work.
Also, on the wall with no foundation you could build with that gap and use it as an experiment about moisture etc
 
Ando McFin
Posts: 26
Location: North eastern Kansas / tall grass prairie meets oak-hickory for
16
kids foraging tiny house
  • Likes 8
  • Mark post as helpful
  • send pies
    Number of slices to send:
    Optional 'thank-you' note:
  • Quote
  • Report post to moderator
A few updates:)

I worked some more on the model house to set down some of the ideas I’ve had like window placement and loft bed and wood stove .

I’ve removed some of the metal siding on the inside where I need the studs to show.

I made a third mix experiment block that is 3:1 chips to slip. And the other two that are totally dried (1:1) and (2:1)I applied a sand and clay (2:1) plaster on with scoring on half to prepare for a top coat experiment.

And finally I started digging the trench on the wall that will need some sort of footing added.
IMG_1039.jpeg
model house for natural building trial
IMG_1038.jpeg
removed some metal siding
IMG_1040.jpeg
third mix experiment block that is 3:1 chips to slip
IMG_1041.jpeg
I started digging the trench on the wall
 
John C Daley
pollinator
Posts: 5347
Location: Bendigo , Australia
477
plumbing earthworks bee building homestead greening the desert
  • Likes 3
  • Mark post as helpful
  • send pies
    Number of slices to send:
    Optional 'thank-you' note:
  • Quote
  • Report post to moderator
Do you think any water will come inside from the ground flooding?
 
Ando McFin
Posts: 26
Location: North eastern Kansas / tall grass prairie meets oak-hickory for
16
kids foraging tiny house
  • Likes 2
  • Mark post as helpful
  • send pies
    Number of slices to send:
    Optional 'thank-you' note:
  • Quote
  • Report post to moderator
I think you may be asking about the last picture with the trench?

If so my thought is to add some gravel for drainage where the trench is which would happen after the foundation was extended about 6-8 inches and maybe had a stem wall on top to protect from water damage and seepage.

After the walls and ceiling is done then I can focus on the floor which I’m hoping to do a simple earthen floor. It has a concrete slab that slopes towards the back so I’ll need to do some research on uneven earthen floors and earthen floors on top of cement slabs…
 
John C Daley
pollinator
Posts: 5347
Location: Bendigo , Australia
477
plumbing earthworks bee building homestead greening the desert
  • Likes 3
  • Mark post as helpful
  • send pies
    Number of slices to send:
    Optional 'thank-you' note:
  • Quote
  • Report post to moderator
Stem wall may help.
Is there anywhere for water to drain?
Have you thought of painting the concrete and keeping it as the floor?
It would be easier and with a rub or so may work. I am guessing there is no waterproof membrane under the concrete slab.
 
Ando McFin
Posts: 26
Location: North eastern Kansas / tall grass prairie meets oak-hickory for
16
kids foraging tiny house
  • Likes 5
  • Mark post as helpful
  • send pies
    Number of slices to send:
    Optional 'thank-you' note:
  • Quote
  • Report post to moderator
Water drainage and redirection are on the list of to do’s. The cement floor sunk at one point on one end so it slopes towards the back otherwise I would keep it as is (it’s also got a really rough surface so it’d need some sort of covering either way)
Leveling with driveway fill type rock seems to be an option based on other posts I’ve read and then putting a layer of earthen floor on that. I’ve got access to clay and sand so materials are not an issue.
 
Ando McFin
Posts: 26
Location: North eastern Kansas / tall grass prairie meets oak-hickory for
16
kids foraging tiny house
  • Likes 12
  • Mark post as helpful
  • send pies
    Number of slices to send:
    Optional 'thank-you' note:
  • Quote
  • Report post to moderator
It’s been a little while since I’ve updated my progress mostly because it’s been slow and steady progress prepping the space for the exciting work of wall building!
I have drilled holes in the existing slab to insert rebar to help tie the cement stem wall to the existing floor. I’ve poured almost all of those stem walls by now most of which will be at final floor level so they will be mostly hidden in the interior.
It was decided that the floor was probably poured sloping towards the back and did not sink like I originally thought. The reason may be because it was an animal barn originally so for easier cleaning/spraying out they probably poured it at an angle.
IMG_1182.jpeg
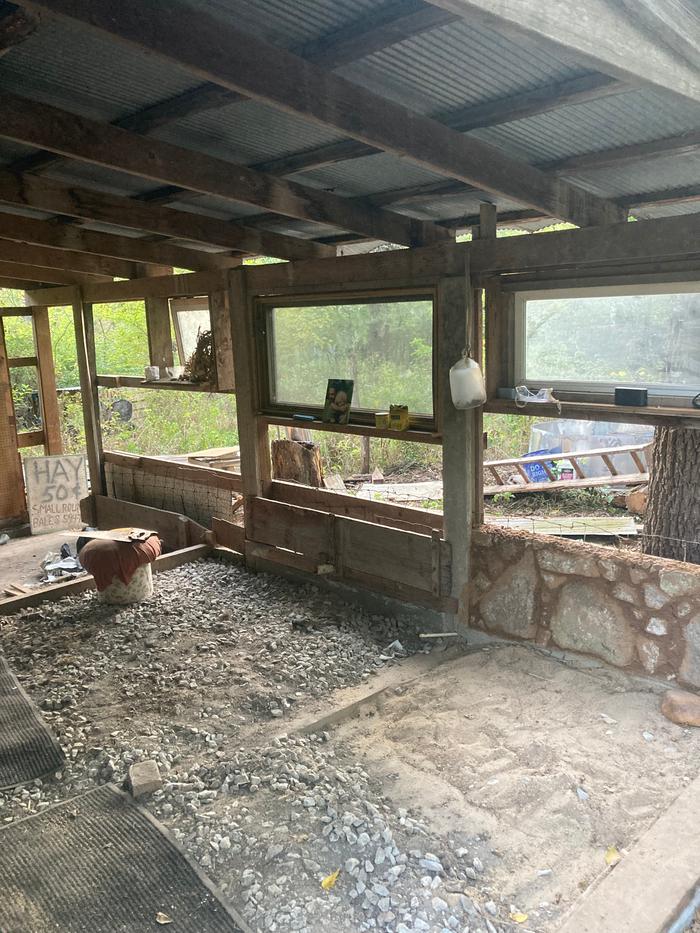
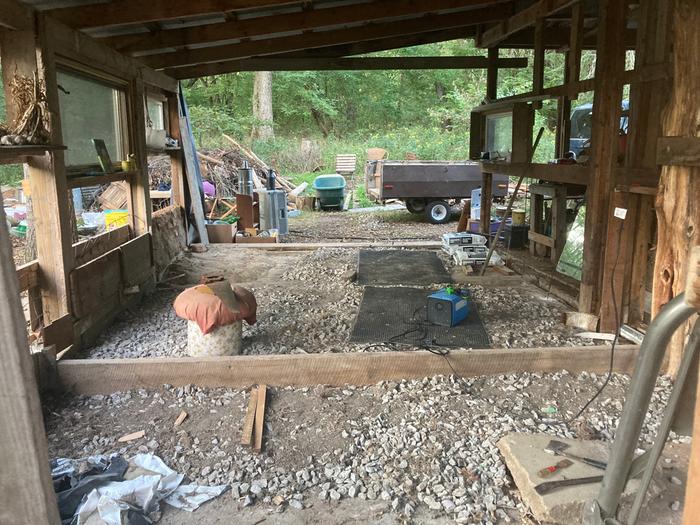
All of the metal siding has been removed. I realized it would be easier to have movable forms on either side. Wi does have been installed!!! And gravel has started to level out the floor:)
IMG_1184.jpeg
I made a little urbanite and clay/sand mortar wall for mass in the front south side to soak up those rays.
IMG_1185.jpeg
At the back looking out the front/south side. The board along the floor is serving as a retaining wall that will step down making the amount of fill material I need to level the floor less.
IMG_1189.jpeg
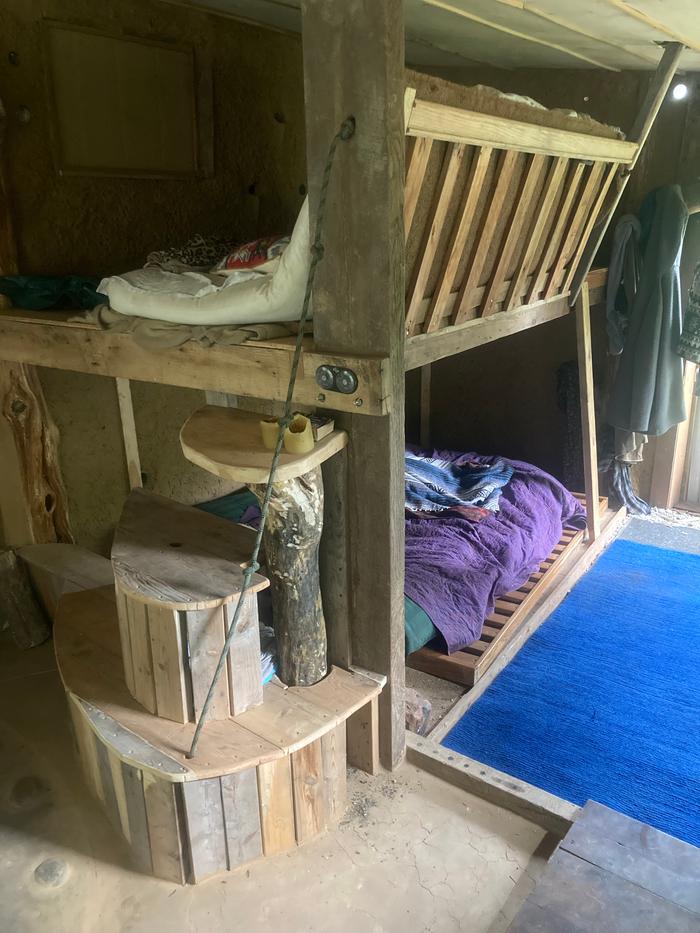
Cedar tree post for one of the bunk bed posts. The gutter down spout will be buried in the wall and serve as a cooling tube in the summer and an air intake flextime to the wood stove in the winter.
Cedar tree post for one of the bunk bed posts. The gutter down spout will be buried in the wall and serve as a cooling tube in the summer and an air intake next to the wood stove in the winter.
IMG_1190.jpeg
Another cedar tree bed post with branch ladder and another gutter cooling tube …
 
John C Daley
pollinator
Posts: 5347
Location: Bendigo , Australia
477
plumbing earthworks bee building homestead greening the desert
  • Likes 4
  • Mark post as helpful
  • send pies
    Number of slices to send:
    Optional 'thank-you' note:
  • Quote
  • Report post to moderator
I am not convinced a gutter tube through the wall is a good idea;
- they block
- rust away
- limited cooling value
- great potential to damage the wall material
 
Ando McFin
Posts: 26
Location: North eastern Kansas / tall grass prairie meets oak-hickory for
16
kids foraging tiny house
  • Likes 4
  • Mark post as helpful
  • send pies
    Number of slices to send:
    Optional 'thank-you' note:
  • Quote
  • Report post to moderator
All good things to consider however they have been outside for years without rusting so I’m not concerned about that and even if they did rust away one will be encased in cement and the other buried under the floor so the air way would remain. I’m not sure what you mean by block but they will get wire mesh on each end to prevent critter clutter. And damaging wall material? I’m unclear how galvanized metal will affect clay and sand…
And limited cooling value is better than no cooling… and from my experience with wood stoves having an air access nearby greatly reduces cold air from entering through cracks and gaps around the house. The cooling factor is definitely experimental but it was scrap materials laying around and it’s not going to add much labor to the project so I thought I’d try it out. Worst case scenario I have to block them off and not use them.
 
John C Daley
pollinator
Posts: 5347
Location: Bendigo , Australia
477
plumbing earthworks bee building homestead greening the desert
  • Likes 2
  • Mark post as helpful
  • send pies
    Number of slices to send:
    Optional 'thank-you' note:
  • Quote
  • Report post to moderator
Leaf litter can block down pipes
water builds up
constant source of water rusts galvanised pipe
holes in galvanised pipe, allow water to penetrate any wall material
wall material degrades

I’m unclear how galvanised metal will affect clay and sand…

 
pollinator
Posts: 177
55
  • Likes 2
  • Mark post as helpful
  • send pies
    Number of slices to send:
    Optional 'thank-you' note:
  • Quote
  • Report post to moderator
I may have missed it, but are you going to install a rain gutter with a downspout that directs water away from  the building?
 
master pollinator
Posts: 1745
Location: Ashhurst New Zealand (Cfb - oceanic temperate)
533
duck trees chicken cooking wood heat woodworking homestead
  • Likes 2
  • Mark post as helpful
  • send pies
    Number of slices to send:
    Optional 'thank-you' note:
  • Quote
  • Report post to moderator
John, you may have missed the part about the galvanised gutter pipes being used for air, not water. It sounds like an appropriate application of the material for this case.
 
John C Daley
pollinator
Posts: 5347
Location: Bendigo , Australia
477
plumbing earthworks bee building homestead greening the desert
  • Likes 1
  • Mark post as helpful
  • send pies
    Number of slices to send:
    Optional 'thank-you' note:
  • Quote
  • Report post to moderator
OK Phil
 
Ando McFin
Posts: 26
Location: North eastern Kansas / tall grass prairie meets oak-hickory for
16
kids foraging tiny house
  • Likes 3
  • Mark post as helpful
  • send pies
    Number of slices to send:
    Optional 'thank-you' note:
  • Quote
  • Report post to moderator
Yes thank you for the clarification. It’s not a down pipe it’s a cross pipe, or horizontal pipe with a section of screen covering the exit that only extends a few inches past the exterior wall so no leaves will get in and any water condensation will quickly drizzle out since it’s sloped down towards the exit. Similar to cooling tubes in the earth ships. It won’t be connected to any water drainage guttering.

And yes I will be installing a gutter on the barn that extends to the east as well as extending. The roof on the west to make outdoor kitchen patio space with a gutter on it as well. I could also do some small burm in the up hill side to help direct ground runoff towards the kitchen garden.

The walls are almost all filled in and I’m really pleased with how sturdy they are feeling. I experimented with multiple form techniques which I will update on soon. I also had a lot of fun with the stone hearth behind where the wood stove is going:)
 
pollinator
Posts: 3756
Location: 4b
1358
dog forest garden trees bee building
  • Likes 3
  • Mark post as helpful
  • send pies
    Number of slices to send:
    Optional 'thank-you' note:
  • Quote
  • Report post to moderator

Ando McFin wrote:It’s been a little while since I’ve updated my progress mostly because it’s been slow and steady progress prepping the space for the exciting work of wall building!
I have drilled holes in the existing slab to insert rebar to help tie the cement stem wall to the existing floor. I’ve poured almost all of those stem walls by now most of which will be at final floor level so they will be mostly hidden in the interior.
It was decided that the floor was probably poured sloping towards the back and did not sink like I originally thought. The reason may be because it was an animal barn originally so for easier cleaning/spraying out they probably poured it at an angle.


Do you have pictures, or more details about the way you created this?  It's beautiful.  It looks like it may just be urbanite and mortar that you built using slipforms?
Wall.JPG
[Thumbnail for Wall.JPG]
 
Ando McFin
Posts: 26
Location: North eastern Kansas / tall grass prairie meets oak-hickory for
16
kids foraging tiny house
  • Likes 3
  • Mark post as helpful
  • send pies
    Number of slices to send:
    Optional 'thank-you' note:
  • Quote
  • Report post to moderator
Thank you for appreciating that Little Rock wall section. It was done in haste and excitement at finally being at the building wall phase! Yes it is mostly urbanite with a sand:clay 2:1 mortar. I just placed the big ones and filled in around them. Just wait until you see what I did with the hearth…

As for updates we got our first snow of about four inches. No roof cave ins! And just in time for my wood stove to be put in. I also had helps from my parents putting in half my ceiling insulation (5.5 inch thick rock wool r23) held up with plastic deer fencing that will get tongue and groove boards put over for the final ceiling. The ceiling boards are picked out and getting some coats of linseed oil and maybe some white to help lighten up the space. I’ve also put down a few floor sections. Under the bed area, and the wood stove, and an indoor floor “cooler” space. All the floors are a 3:1 sand:clay mix.

IMG_1408.jpeg
Skidding glass door entry way. DIY slider on a piece of angle iron and framed in.
Sliding glass door entry way. DIY slider on a piece of angle iron and framed in.
 
Ando McFin
Posts: 26
Location: North eastern Kansas / tall grass prairie meets oak-hickory for
16
kids foraging tiny house
  • Likes 3
  • Mark post as helpful
  • send pies
    Number of slices to send:
    Optional 'thank-you' note:
  • Quote
  • Report post to moderator
I have some big bags of fine wood shavings I’m going to use for the floor topcoats. Initial experiments have proven successful… results to come soon!
IMG_1410.jpeg
All the interior plaster is up now for the top coat which will be cattail fluff and clay.
IMG_1411.jpeg
Best early Christmas present form my parents!
IMG_1327.jpeg
Coon coons!
Coon coons!
IMG_1326.jpeg
Bottom bunk floor with cracks… I’m going to do a top coat
IMG_1325.jpeg
Aaaand the HEARTh… complete with little caves and a pathway with stairs.
 
Ando McFin
Posts: 26
Location: North eastern Kansas / tall grass prairie meets oak-hickory for
16
kids foraging tiny house
  • Likes 4
  • Mark post as helpful
  • send pies
    Number of slices to send:
    Optional 'thank-you' note:
  • Quote
  • Report post to moderator
I can also report on my attempts at trying different methods for wall building with forms. At first I was planning on using the existing metal siding on the exterior as a form but I realized it would be harder to pull it off after the wall was built and leaving it on would mean less breathability for the walls and house. So it came off and was replaced with metal garden fence (picture below) then on the interior I planned on using wooden boards as forms to fill and move upwards as I worked. This worked well but I wanted to try to improve the method. I also wasn’t sure if the wall would need a lattice/support on the inside. I had no idea what its final strength and cohesion would be. So I used the same garden fencing on one wall. I rolled it up and attached it to the bottom of the wall and unrolled it upwards as I worked and filled it in. The bending of the metal left it warped and it was not a fun material to work with. The next wall I used plastic deer fencing. Same idea as the metal fence but slightly easier to work with but also flimsier and saggier. I ended up realizing the walls were drying very solid and probably did not need the additional suppprt so I switched back to the form boards and am most pleased with the flat walls and simple process.
IMG_1405.jpeg
Metal fencing on exterior filled with chips n slip and getting a base coat of earthen plaster.
 
Ando McFin
Posts: 26
Location: North eastern Kansas / tall grass prairie meets oak-hickory for
16
kids foraging tiny house
  • Likes 7
  • Mark post as helpful
  • send pies
    Number of slices to send:
    Optional 'thank-you' note:
  • Quote
  • Report post to moderator
I’ve now almost completed the ceiling and insulation. I was going to use repurposed sidingBoards but it was taking too long and I was losing patience. So I got some nice plywood to put up and make it go quicker. I’m ready to get this thing done so I can start having fun with the details. Wood stove has been cleaned up and polished and a couple rest burns in its spot have done. Now to finalize the chimney and set it in place.
 
Posts: 37
5
  • Likes 2
  • Mark post as helpful
  • send pies
    Number of slices to send:
    Optional 'thank-you' note:
  • Quote
  • Report post to moderator
I am so excited to continue following this thread. Keep up the good work!
 
Ando McFin
Posts: 26
Location: North eastern Kansas / tall grass prairie meets oak-hickory for
16
kids foraging tiny house
  • Likes 9
  • Mark post as helpful
  • send pies
    Number of slices to send:
    Optional 'thank-you' note:
  • Quote
  • Report post to moderator
Thank you for your positive feedback about following along:)

Here are some pictures of the walls totally up! The wood stove is in as well and it’s holding heat! Now I can work on the interior even in these cold months.
IMG_1468.jpeg
A nice light fixture used similar to a glass bottle in the wall.
 
Ando McFin
Posts: 26
Location: North eastern Kansas / tall grass prairie meets oak-hickory for
16
kids foraging tiny house
  • Likes 7
  • Mark post as helpful
  • send pies
    Number of slices to send:
    Optional 'thank-you' note:
  • Quote
  • Report post to moderator
Still very much a construction zone but it’s getting close to getting I to the finishing work like base plaster and top coat, kitchen and floors and I’ve got a fun idea for a seating area at the front by the entry way.
IMG_1469.jpeg
[Thumbnail for IMG_1469.jpeg]
IMG_1470.jpeg
[Thumbnail for IMG_1470.jpeg]
IMG_1471.jpeg
[Thumbnail for IMG_1471.jpeg]
IMG_1473.jpeg
[Thumbnail for IMG_1473.jpeg]
IMG_1474.jpeg
[Thumbnail for IMG_1474.jpeg]
 
Steve Mendez
pollinator
Posts: 177
55
  • Likes 1
  • Mark post as helpful
  • send pies
    Number of slices to send:
    Optional 'thank-you' note:
  • Quote
  • Report post to moderator
Nice work.  What an improvement from your first photos. It looks like you've spent a night or two there.
 
Ando McFin
Posts: 26
Location: North eastern Kansas / tall grass prairie meets oak-hickory for
16
kids foraging tiny house
  • Likes 9
  • Mark post as helpful
  • send pies
    Number of slices to send:
    Optional 'thank-you' note:
  • Quote
  • Report post to moderator
I spent the weekend in my place during one of these cold spells. It got in the negative temperature range and one night it apparently felt like -23. It was a nice chance to see how all this work held up to such conditions and also find all the leaky spots!
It held up great! Obviously waking up in the morning to cold as I had to restoke the fire was inevitable. Some of the areas of base coat plaster that had leaks from outside air developed frost around them making identification very easy! I’ve spent my time putting finishing touches to the first layer of plaster inside and am now gearing up for the top coat. I’ll be doing three different versions in different spaces. A sifted sand, fine wood shavings and cattail fluff. All mixed with the same clay I have been using. I’ve done test batches of all three and I’ve been happy with how they have turned out. I also now have my kitchen area set up inside the with the sink draining to the outside. I’m also very pleased with the cooking abilities this stove has. I don’t even have to remove the circular pieces to get a good boil going or fry some veggies.
 
pollinator
Posts: 133
Location: Southern Gulf islands, BC, Canada
54
  • Likes 3
  • Mark post as helpful
  • send pies
    Number of slices to send:
    Optional 'thank-you' note:
  • Quote
  • Report post to moderator
This looks awesome.  Great  job. I'm  just designing a chip slip cabin, nice to see what others are doing.
 
Ando McFin
Posts: 26
Location: North eastern Kansas / tall grass prairie meets oak-hickory for
16
kids foraging tiny house
  • Likes 4
  • Mark post as helpful
  • send pies
    Number of slices to send:
    Optional 'thank-you' note:
  • Quote
  • Report post to moderator
Ooh Great! I’d be really interested to follow along! Do you have any info on these forums about your plans/progress? I wasn’t able to find much info when I was starting out but it would be great to continue to refine this method as im planning on doing more work with it.
 
C Murphy
pollinator
Posts: 133
Location: Southern Gulf islands, BC, Canada
54
  • Likes 2
  • Mark post as helpful
  • send pies
    Number of slices to send:
    Optional 'thank-you' note:
  • Quote
  • Report post to moderator

Ando McFin wrote:Ooh Great! I’d be really interested to follow along! Do you have any info on these forums about your plans/progress? I wasn’t able to find much info when I was starting out but it would be great to continue to refine this method as im planning on doing more work with it.


Not yet - still in designing  phase, I think  once we've got a more concrete plan I will  post here for input though   been researching  loads, and helped on a chip slip house last summer.
 
Ando McFin
Posts: 26
Location: North eastern Kansas / tall grass prairie meets oak-hickory for
16
kids foraging tiny house
  • Mark post as helpful
  • send pies
    Number of slices to send:
    Optional 'thank-you' note:
  • Quote
  • Report post to moderator
Well I would love to connect to others trying this out so reach out at any time.
 
Ando McFin
Posts: 26
Location: North eastern Kansas / tall grass prairie meets oak-hickory for
16
kids foraging tiny house
  • Likes 8
  • Mark post as helpful
  • send pies
    Number of slices to send:
    Optional 'thank-you' note:
  • Quote
  • Report post to moderator
I just added a little partial wall made out of some stone blocks next to the stove. It’ll catch some warmth and radiate it especially since I left a gap between the blocks allowing air to move across them. It’ll also serve as the back of a bench on the other side for the entry way . Maybe some wet boot storage underneath so they can dry by the warmth of the fire:)
IMG_1742.jpeg
a half wall made from blocks
IMG_1741.jpeg
a half wall made from blocks in a cob and woodchip cabin
 
Ando McFin
Posts: 26
Location: North eastern Kansas / tall grass prairie meets oak-hickory for
16
kids foraging tiny house
  • Likes 12
  • Mark post as helpful
  • send pies
    Number of slices to send:
    Optional 'thank-you' note:
  • Quote
  • Report post to moderator
It’s been awhile since an update… I’ve been busily plugging away on little details to get ready for finishing the interior plaster and floors. I’ve built three different benches and gotten the top coat plaster about half way done inside. Top coat plaster so far is a fine sand (bought at local hardware store) + the same clay I’ve been using , mixed at about 3sand:1 clay.


IMG_2183.jpeg
Entry bench
Entry bench
IMG_2185.jpeg
Entry bench
Entry bench
IMG_2184.jpeg
Storage bench( lid lifts up)
IMG_2189.jpeg
3 in 1 bench, also steps and storage on backside. Top bunk railing allows the bed to be a couch futon style
IMG_2180.jpeg
The rope from the rope railing goes through the post and holds up the back of the mattress.
IMG_2191.jpeg
Backside of bench steps reveals the shelves
 
Trace Oswald
pollinator
Posts: 3756
Location: 4b
1358
dog forest garden trees bee building
  • Likes 3
  • Mark post as helpful
  • send pies
    Number of slices to send:
    Optional 'thank-you' note:
  • Quote
  • Report post to moderator
I love this project.  Bravo.
 
Posts: 50
5
  • Likes 2
  • Mark post as helpful
  • send pies
    Number of slices to send:
    Optional 'thank-you' note:
  • Quote
  • Report post to moderator
What an inspiring transformation! Great work!
 
Posts: 25
  • Likes 1
  • Mark post as helpful
  • send pies
    Number of slices to send:
    Optional 'thank-you' note:
  • Quote
  • Report post to moderator
It looks really good, I like to watch the construction process
 
Ando McFin
Posts: 26
Location: North eastern Kansas / tall grass prairie meets oak-hickory for
16
kids foraging tiny house
  • Likes 5
  • Mark post as helpful
  • send pies
    Number of slices to send:
    Optional 'thank-you' note:
  • Quote
  • Report post to moderator
It’s time for another update! Things are starting to get polished and cozy! I’ve finished the top coat plaster on the inside and covered the back  half of the walls with a couple coats of a lime wash to make the space lighter and brighter and also prevent mold and mildew.

Top coats- I used some fine sand I bought from the local hardware store and clay and did a few walls with cattail fluff and clay. The fluff was kind of tedious separating it all and making sure it mixed well.

IMG_2340.jpeg
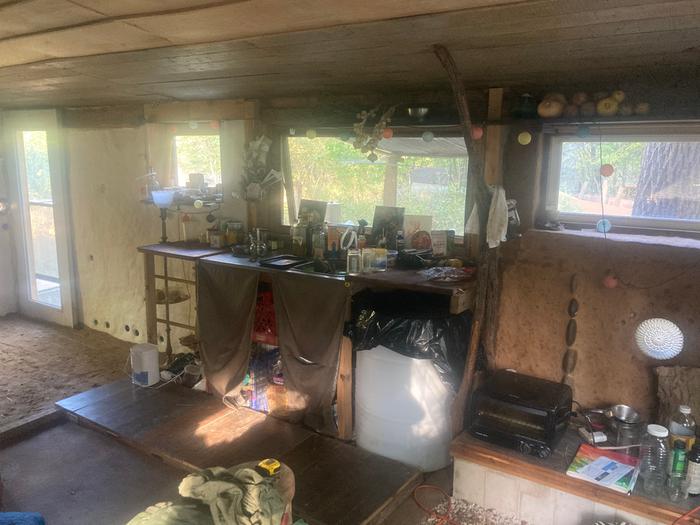
Kitchen is starting to take shape and order. I have finally gotten the pump hooked up to the barrel. A small foot pump pumps about 2 oz of water with each pump from the barrel through plastic tubing
IMG_2336.jpeg
White walls. I put down a base coat for the floor with bamboo imbedded for extra strength.
IMG_2339.jpeg
Big o gourds!
Big o gourds!
IMG_2381.jpeg
Kid approved tree ladder!
 
Ando McFin
Posts: 26
Location: North eastern Kansas / tall grass prairie meets oak-hickory for
16
kids foraging tiny house
  • Likes 4
  • Mark post as helpful
  • send pies
    Number of slices to send:
    Optional 'thank-you' note:
  • Quote
  • Report post to moderator
Oh ya and I had fun with this dining are table:)
IMG_2444.jpeg
Polished cedar
Polished cedar
 
Royal Flush Bitches! Pay up tiny ad:
Unlock Free Wood Plans! Download free projects and create unique pieces now!
https:/the-art-of-regenerative-wood-working/
reply
    Bookmark Topic Watch Topic
  • New Topic