• Post Reply Bookmark Topic Watch Topic
  • New Topic
permaculture forums growies critters building homesteading energy monies kitchen purity ungarbage community wilderness fiber arts art permaculture artisans regional education skip experiences global resources cider press projects digital market permies.com pie forums private forums all forums
this forum made possible by our volunteer staff, including ...
master stewards:
  • r ranson
  • Carla Burke
  • Nancy Reading
  • John F Dean
  • Jay Angler
  • paul wheaton
stewards:
  • Pearl Sutton
  • Burra Maluca
  • Joseph Lofthouse
master gardeners:
  • Timothy Norton
  • Christopher Weeks
gardeners:
  • Jeremy VanGelder
  • Maieshe Ljin
  • Nina Surya

Double bell rocket mass heater to heat a yurt

 
Posts: 20
3
  • Likes 6
  • Mark post as helpful
  • send pies
    Number of slices to send:
    Optional 'thank-you' note:
  • Quote
  • Report post to moderator
Hi all!

Looks like we will be moving into a yurt for at least a year (that would be me, my wife and our baby boy). We will be installing an off-grid solar system but don't intend to rely on it in the winter. So we turned rocket mass heaters for heat. (As a side note, we intend to heat our later straw bale home as well, so this will also be a prototype for us.)

The yurt is about 64 square meters (or 690 square feet), and it has about 5 cm (2") insulation. It will also be insulated from the ground double that. If possible, we would like to include an oven in the first bell (much like in this J-tube RMH: https://permies.com/t/60784/Rocket-mass-heater-tube-bell) and heat up to 2 beds on the second bell (almost) right to the external wall of the yurt.

So far I've collected from Peter's site (https://batchrocket.eu/en/building#size) that we would need about 6,65 kW power to heat such a place, and that this would more or less mean a 9" batch rocket, which in turn could heat bells of up to 11 sq meters - which than could include the 2 bells we're aiming for. At first I thought about an 8" J-tube RMH, but that would appear to be insufficient.

The concept is as follows (drawings will come tomorrow):
The 1st bell would stand on the heat riser, with the riser off to the side of the bell facing the burn chamber. This bell would be about 1,8 m (6') high and 0,9 m (3') wide and long, topped in a dome (all inner dimensions, so circa 6 sq meters ISA - more precise numbers later). I intend to make it a double skinned masonry bell. An oven would be incorporated on the left side (as seen from the burn chamber), slightly off from atop the heat riser. The outflow would be down and to the right, where it would lead into the 2nd, horizontal bell. This bell would be a 3,6 m long, 0,6 m wide and 0,25 m high on the inside (circa 3,2 sq meters ISA), and masonry-cob hybrid. This would end in an insulated pipe connection through the external yurt wall to a chimney. We intend to install a complete insulated ceramic chimney just a bit off from the outside wall of the yurt.

Does this all add up?
I will add drawings tomorrow (it's past 6 p.m. here in Hungary).

Edit| I have one apparent problem: I could only find chimneys with a 200 mm inner diameter or less. And as I understand I should not go under the heat riser CSA with the chimney.

God bless!
 
rocket scientist
Posts: 6578
Location: latitude 47 N.W. montana zone 6A
3463
cat pig rocket stoves
  • Likes 7
  • Mark post as helpful
  • send pies
    Number of slices to send:
    Optional 'thank-you' note:
  • Quote
  • Report post to moderator
Hi Gabor;

In my opinion you do not need a 9" Batch, they are a monster.
You can use sheet metal and make your own 9" stove pipe if needed.

I vote that you drop down to an eight-inch batch (also a monster) and use the 200mm pipe.
You may need to burn it longer to keep it nice and cozy inside.

You are correct,  you're chimney must be the same or larger than your riser dia.
I have not checked your ISA numbers, but your plan sounds good.
 
Gábor Kertész
Posts: 20
3
  • Likes 5
  • Mark post as helpful
  • send pies
    Number of slices to send:
    Optional 'thank-you' note:
  • Quote
  • Report post to moderator
The smaller it can be the better.

After some calculation I also found that my 1st bell would be too short for the 9" batch, maybe even the 8" one. And the oven would be impractical even above the line of the 8"-ers 58" riser as it would be already at about shoulder height.

Also is that right that a full load for the 8" batch would be around 0,6 cubic meter (or 2,3 cubic feet)? That would add up over 3 months of full and another 3 of half runs to about 15 cubic meters (560 cubic feet), which still sounds a lot. (I got 30 cubic meters for the 9" batch.) Did I miscalc something? Is heating a slightly insulated structure just such an undertaking, no ways around it?
 
Gábor Kertész
Posts: 20
3
  • Likes 4
  • Mark post as helpful
  • send pies
    Number of slices to send:
    Optional 'thank-you' note:
  • Quote
  • Report post to moderator
I also just looked it up: the yurt that we bought was (is) until now heated with a 3,5 kW output split air conditioner. That would indeed be in the range of an 8" batch with 2 fires per day.
Can 2 fires follow each other if the mass is sufficient, or do they have to be apart in time? (I have since found the term "double fire" on Peter's site, which I presume is exactly this.)

Edit| For the wood load above: there was a decimal error, I calculated about 0,054 cubic meters. Stills comes out to just above 4 cords per winter (averaging 20 °C delta T). It seems a tad too much, but that could be my lack of experience speaking.
My father in law however heated an uninsulated (though porous, but not porotherm) brick house about twice as large with 5,7 cords of wood. Did I miscalculate something again or is the yurt the reason?
 
gardener
Posts: 1068
Location: +52° 1' 47.40", +4° 22' 57.80"
455
woodworking rocket stoves wood heat
  • Likes 8
  • Mark post as helpful
  • send pies
    Number of slices to send:
    Optional 'thank-you' note:
  • Quote
  • Report post to moderator

Gábor Kertész wrote:Also is that right that a full load for the 8" batch would be around 0,6 cubic meter (or 2,3 cubic feet)?


No, that's not correct. I calculated the volume of an 8" batchrocket for you, that's 0.0726 m³, or 2.6 cu. ft. Only half of that volume can be filled with fuel, due to the air between the logs and the 3" of air space above it. So, one full load would be 0.0363 m³ or 1.3 cu. ft. It's a bit more than half of what you calculated, meaning you could heat an entire winter with 8 m³ or 300 cu. ft. of fuel.

Given the harsh winters in Hungary, that'll sound about right to me.
 
Peter van den Berg
gardener
Posts: 1068
Location: +52° 1' 47.40", +4° 22' 57.80"
455
woodworking rocket stoves wood heat
  • Likes 8
  • Mark post as helpful
  • send pies
    Number of slices to send:
    Optional 'thank-you' note:
  • Quote
  • Report post to moderator

Gábor Kertész wrote:I also just looked it up: the yurt that we bought was (is) until now heated with a 3,5 kW output split air conditioner. That would indeed be in the range of an 8" batch with 2 fires per day.
Can 2 fires follow each other if the mass is sufficient, or do they have to be apart in time? (I have since found the term "double fire" on Peter's site, which I presume is exactly this.)


Better to have two fires apart in time, like one in the morning and one at night. Of course you can do two loads back-to back but the chimney temperature and thereby the losses will go up quite a bit.

Gábor Kertész wrote:Edit| For the wood load above: there was a decimal error, I calculated about 0,054 cubic meters. Stills comes out to just above 4 cords per winter (averaging 20 °C delta T). It seems a tad too much, but that could be my lack of experience speaking.


One full cord is about 3.5 m³, so according to my calculation, that would be two cords and some more.

All this is assuming the minisplit of 3.5 kW, being the number which all is calculated against, is running day and night, all winter long. We both know that won't be the case, this minisplit was chosen so it would be sufficient for the extreme depth of winter. I'm inclined to think that you won't get up to two cords or 7 m³, but the proof of the pudding is in the eating.
 
Gábor Kertész
Posts: 20
3
  • Likes 4
  • Mark post as helpful
  • send pies
    Number of slices to send:
    Optional 'thank-you' note:
  • Quote
  • Report post to moderator
Thank you both for the answers - the encouragements and the corrections.

I also completed the first drafts (that I am mostly satisfied with). Dimensions are all in cm. The protrusion above the burn chamber is where I would include a white oven if feasible. The chamber in the bench is 10 cm-s lower than the burn chamber to bring it's CSA above 5,2 times that of the riser.
The drawings are (top-down, left-right):
- the 2 rows of firebricks of the burn chamber (1:10)
- firebrick of the burn chamber from the side (1:20)
- layout of the core (1:20)
- cross section of the first bell perpendicular to the core; the bench connects at the opening down on the right (1:20)
- cross section of the bench, perpendicular to the outline before (1:20)
- cross section of the first bell, parallel to the core (1:20)

I'm planning an inner firebrick and outer red brick double skin for the first bell, and a double red brick skin for the bench with cob between and above the skins. The bench should double as heated bed space.

Unfortunately the total ISA at 9,7 m2 seems to be over what an 8" batch is supposed to work with and I have no option for a bypass however. I'm wondering whether I should go with a larger core after all, even if the yurt itself wouldn't warrant it. I would rather keep the oven if I can - because electric stoves are even greater of a consumer of power and winter solar won't be too great.
Could I raise the bench chamber to the level of the first bell? That would drop the total ISA by about 0,7 m2 and right in the range of the core - but it would also shrink the bench chamber CSA to about 4,6 times that of the riser.

What else do I not see yet?
rmh-1.jpg
Plan for a classic-looking brick batch box rocket mass heater
 
Peter van den Berg
gardener
Posts: 1068
Location: +52° 1' 47.40", +4° 22' 57.80"
455
woodworking rocket stoves wood heat
  • Likes 8
  • Mark post as helpful
  • send pies
    Number of slices to send:
    Optional 'thank-you' note:
  • Quote
  • Report post to moderator
In my opinion, there are a couple of things, three in fact that you might have missed.

The white oven will function much better when placed directly on top of the firebox, much easier to install as well. The top of the firebox will get awfully hot, you'll need a raised pizza stone or something like that. Moreover: the firebox itself can be used as a black oven when the fuel is all to coals. And with a steel grid on legs placed over it to hold the casserole or römertopf or whatever.

The 1:5 rule of thumb for a stratification chamber shouldn't be applied in horizontal direction. In order to let it function properly, the connection to the main bell should be as wide as the whole of the bench' inside. By building it like that, the bench is acting as an integral part of the bell construction. In order to better understand how the bell is filled with heat, turn your drawing upside down an imagine that it's filled with water. The places where the water comes first will be the hottest, where it comes last the coolest. It's easy to see that the seat of the bench will be (much) warmer than the sides.

According to the above example, the top of the main bell will be the hottest. But... in your drawing that is the part that isn't double skinned. Buiulding it like that, the whole of the bell's top will crack very badly, I fully expect it will do that within the first month of being in use. The steel T-profile and superwool solution in the Mallorca build is much more succesful. By the way: this construction is used many, many times now with commendable results, I might add.
 
Gábor Kertész
Posts: 20
3
  • Likes 4
  • Mark post as helpful
  • send pies
    Number of slices to send:
    Optional 'thank-you' note:
  • Quote
  • Report post to moderator
Thank you.

Should the 1:5 rule be adhered to in general however? If I lower the bench with about 10 cm from the level of the first bell I get that ratio, but I also exceed the recommended total ISA with at least 0,5 m2.

I intended to build the top of the first bell with a double skin, I just left that out of the drawings because it was not essential to what I knew not to have understood and was in a bit of a hurry to finish them. I will study the build you suggested.
 
Peter van den Berg
gardener
Posts: 1068
Location: +52° 1' 47.40", +4° 22' 57.80"
455
woodworking rocket stoves wood heat
  • Likes 6
  • Mark post as helpful
  • send pies
    Number of slices to send:
    Optional 'thank-you' note:
  • Quote
  • Report post to moderator

Gábor Kertész wrote:Should the 1:5 rule be adhered to in general however? If I lower the bench with about 10 cm from the level of the first bell I get that ratio, but I also exceed the recommended total ISA with at least 0,5 m2.


Not sure I got the right picture here, so the following might be beside the point.
In order to get a correct stream pattern, please keep the floor of the bench at the same level as the floor of the main bell. And in case the exhaust opening is  somewhere on the perimeter of the main bell, in the bench there will be a stream of warm gases entering the top part of the bench and another one that is coming out of it along the floor level. Any level difference would disrupt the free flow of gases.

The 1 to 5 rule is one that is meant to help by designing a single bell, just to provide for enough space around the heater's core. The recommended ISA is what it is: a recommendation. Adhering to that ISA means the heater will work, almost guaranteed. With an ideal chimney of sufficient height one would have some tolerance in the ISA numbers, though. Both rules are tools to make building a well-behaving heater possible for DIY people.
 
Gábor Kertész
Posts: 20
3
  • Likes 4
  • Mark post as helpful
  • send pies
    Number of slices to send:
    Optional 'thank-you' note:
  • Quote
  • Report post to moderator
That actually was my main question. I will keep the two chamber on the same floor then.
If I have to make a call however between an undersized chimney, an oversized ISA and a somewhat undersized CSA in the bench, would I still be best to go with the tighter bench? Or should I keep looking for another solution?

I'd also like to understand the physics of placing the oven. Would it be too cold further away from the firebox? Would it's top be too hot, being closer to the top of the bell, while it's floor not enough? I understand that for one the firebox itself is very hot, and two that in the bell the hotter gases are higher up.

Also: are 4 cm thick firebricks sufficient for the firebox, and can I cast a clay bonded perlite riser for it? I'm a bit more hesitant to try my hand at cutting firebricks than at casting. I would also use as little rock wool (or alternative, as with the 5-minute riser) as possible.
 
Peter van den Berg
gardener
Posts: 1068
Location: +52° 1' 47.40", +4° 22' 57.80"
455
woodworking rocket stoves wood heat
  • Likes 5
  • Mark post as helpful
  • send pies
    Number of slices to send:
    Optional 'thank-you' note:
  • Quote
  • Report post to moderator

Gábor Kertész wrote:That actually was my main question. I will keep the two chamber on the same floor then.
If I have to make a call however between an undersized chimney, an oversized ISA and a somewhat undersized CSA in the bench, would I still be best to go with the tighter bench? Or should I keep looking for another solution?


I would look for another solution. Why would you incorporate compromises in building such a heater, while the published design parameters are known to work? Almost guaranteed, I dare to add.

Gábor Kertész wrote:I'd also like to understand the physics of placing the oven. Would it be too cold further away from the firebox? Would it's top be too hot, being closer to the top of the bell, while it's floor not enough? I understand that for one the firebox itself is very hot, and two that in the bell the hotter gases are higher up.


On top of the firebox would be the best location, in my opinion. The top of the oven could be insulated and the hot floor could be damped somewhat to place an oven plate on spacers. By the way, the firebox is a very capable oven in itself, provided the fuel is all down to coals.

Gábor Kertész wrote:Also: are 4 cm thick firebricks sufficient for the firebox, and can I cast a clay bonded perlite riser for it? I'm a bit more hesitant to try my hand at cutting firebricks than at casting. I would also use as little rock wool (or alternative, as with the 5-minute riser) as possible.


Please use sturdier bricks for the firebox, able to withstand manual abuse. The riser however, could be built using 3  or 4 cm firebricks. When cast, preferably bought material, no home DIY recipes. And no rock wool in those quarters, this isn't up to the job in a mass heater.
 
Gábor Kertész
Posts: 20
3
  • Likes 2
  • Mark post as helpful
  • send pies
    Number of slices to send:
    Optional 'thank-you' note:
  • Quote
  • Report post to moderator

Peter van den Berg wrote:
I would look for another solution. Why would you incorporate compromises in building such a heater, while the published design parameters are known to work? Almost guaranteed, I dare to add.


Because (only if possible) I would include a double long bed and an oven in the build. If we had only one bed and more than one child who would get the heated bed? A double wide bed wouldn't really fit because of the size of the yurt. (And it is unlikely that we will stay in the yurt long enough for 3 beds to be needed.) The oven would be needed (as I already mentioned) because we will have limited solar power in winter. We could go with a separate wood oven but that would complicate things. That would be a third solution though.
However, placing the oven on top of the firebox I managed to get the ISA down to the recommended parameter (while keeping with the CSA as well).

Peter van den Berg wrote:On top of the firebox would be the best location, in my opinion. The top of the oven could be insulated and the hot floor could be damped somewhat to place an oven plate on spacers. By the way, the firebox is a very capable oven in itself, provided the fuel is all down to coals.


I would still like to understand it more. This is just curiosity, but again: Would it be too cold further away from the firebox? Would it's top be too hot, being closer to the top of the bell, while it's floor not enough?

Peter van den Berg wrote:Please use sturdier bricks for the firebox, able to withstand manual abuse. The riser however, could be built using 3  or 4 cm firebricks. When cast, preferably bought material, no home DIY recipes. And no rock wool in those quarters, this isn't up to the job in a mass heater.


I will redesign accordingly.

Thank you for the corrections already. I will upload an updated drawing soon and would like to ask for advice still then.
I have also decided to go with the Mallorca style close on top of the first bell and am also considering the 5-minute riser instead of casting. Should these work with the sturdier firebox, the lowered oven and now correct CSA and ISA?
 
Gábor Kertész
Posts: 20
3
  • Likes 4
  • Mark post as helpful
  • send pies
    Number of slices to send:
    Optional 'thank-you' note:
  • Quote
  • Report post to moderator
Or I will just follow the Mallorca build with the riser as well. I do have enough firebricks.

On another  note: I have a concrete foundation for the RMH. Is it enough if I place firebricks only under the core? Should I cover the entire foundation with some sort of bricks, or can the bell floor be the concrete? Remembering Peter's earlier advice about the floor levels I've got the feeling that this could distract gas flow between the first bell (floor mostly filled by the core base) and the bench bell.

And yet another: I need to bridge the bell above the oven. I can by a 1000x250x60 (mm) brick bridge element rated to 700 °C. It would sit about 60 cm-s below the top of the riser and 2 cm-s above the oven. Would that suffice?
 
Peter van den Berg
gardener
Posts: 1068
Location: +52° 1' 47.40", +4° 22' 57.80"
455
woodworking rocket stoves wood heat
  • Likes 4
  • Mark post as helpful
  • send pies
    Number of slices to send:
    Optional 'thank-you' note:
  • Quote
  • Report post to moderator

Gábor Kertész wrote:On another  note: I have a concrete foundation for the RMH. Is it enough if I place firebricks only under the core? Should I cover the entire foundation with some sort of bricks, or can the bell floor be the concrete?


The floor of the bell could be concrete, tiles or any other non-combustible material. Temperature will stay fairly low, especially when the entire core is elevated above the floor. That can be done by using a steel pedestal or simple frame that is supported by the walls of the bell itself.

Gábor Kertész wrote:Remembering Peter's earlier advice about the floor levels I've got the feeling that this could distract gas flow between the first bell (floor mostly filled by the core base) and the bench bell.


Yes, you are right, the above mentioned steel frame would solve that problem quite elegantly. The space under the core would be completely empty this way.

Gábor Kertész wrote:And yet another: I need to bridge the bell above the oven. I can by a 1000x250x60 (mm) brick bridge element rated to 700 °C. It would sit about 60 cm-s below the top of the riser and 2 cm-s above the oven. Would that suffice?


I would call that lintel overkill, in the Mallorca build we used two steel rods of 10x10 mm to support the bell wall. In fact, all three openings (firebox, bell to bench and exhaust box) were bridged this way. Of course, those steel bars were all done with superwool all around in order to provide for expansion.
 
Gábor Kertész
Posts: 20
3
  • Likes 4
  • Mark post as helpful
  • send pies
    Number of slices to send:
    Optional 'thank-you' note:
  • Quote
  • Report post to moderator
Thank you for the answers again. I'm working on a redesign to include the steel plate and otherwise simplify the build (and much time goes into the yurt itself).

How much space would be enough under the steel frame? Would between 5 and 6 cm be enough? And how thick steel should I use?
 
rocket scientist
Posts: 178
Location: Sangre de Cristo Mountains, CO - Lat 38°14' - Zone 5b
136
hunting earthworks solar wood heat rocket stoves homestead
  • Likes 6
  • Mark post as helpful
  • send pies
    Number of slices to send:
    Optional 'thank-you' note:
  • Quote
  • Report post to moderator
Hello Gabor. I can first say that it is great that you are taking your time to discuss your build plans with the folks on the forum. Peter and Thomas Rubino have been incredibly helpful to me on my build that is a few weeks away from being complete.

Here are 2 details from my build that relate to your recent questions.

First is anywhere that I had to bridge (across my exhaust connection box, over my firebox and clean-out port), per Peter's recommendation I used 3/8" (approximately 10mm) square stock. Below is a picture showing that I was originally going to use angle stock but changed to the square stock with Superwool gasket for expansion.

Second is a picture of the steel stand that I built for my core to rest on. For my built it provides about 12" (300mm) of open space below the core for air flow and places the firebox at a more comfortable height for loading. My steel is 1.5" (~38mm) angle stock x 3/16" (~5mm). I welded the center rail that supports brick on both sides. I then laid full size firebricks into the frame as a base layer, then a layer of Superwool gasket and finally the core floor sat on top, no mortar used between the base layer and firebox layer.

You can view where I am at with my build at https://permies.com/t/238503/Batch-Rocket-Build. I hope this is helpful for your planning.

IMG_20240120_122751.jpg
[Thumbnail for IMG_20240120_122751.jpg]
IMG_20240122_160304.jpg
[Thumbnail for IMG_20240122_160304.jpg]
IMG_20240123_140812.jpg
[Thumbnail for IMG_20240123_140812.jpg]
IMG_20240125_134426.jpg
[Thumbnail for IMG_20240125_134426.jpg]
 
Gábor Kertész
Posts: 20
3
  • Likes 4
  • Mark post as helpful
  • send pies
    Number of slices to send:
    Optional 'thank-you' note:
  • Quote
  • Report post to moderator
It is useful, thank you. I actually did check your thread earlier, saved it even, but then forgot to draw from it during the design yet.

So now having considered your example, Peter's earlier advice and some feedback from designing the yurt itself, here is the next iteration of the design.
('db' and 'darab' is for pieces in hungarian; other numbers are in cm, sq dm and sq m)

My only problem is that with about 30 cm under the core (and still confirming to constraints such as the design parameters, the beds, the oven and the sourceable chimney) I would exceed the maximum recommended ISA by about 1 sq meter.
My idea to rectify this issue is to seal off the 6 cm gap between the two sides of the firebox and the outer wall of the bell - as well as the 30 cm under the firebox. This way gases could only flow under the heat riser and the back wall of the firebox and I'm not sure whether this wouldn't defeat the entire purpose of elevating the core in the first place.
rmh-3.jpg
[Thumbnail for rmh-3.jpg]
 
Peter van den Berg
gardener
Posts: 1068
Location: +52° 1' 47.40", +4° 22' 57.80"
455
woodworking rocket stoves wood heat
  • Likes 6
  • Mark post as helpful
  • send pies
    Number of slices to send:
    Optional 'thank-you' note:
  • Quote
  • Report post to moderator

Gábor Kertész wrote:My only problem is that with about 30 cm under the core (and still confirming to constraints such as the design parameters, the beds, the oven and the sourceable chimney) I would exceed the maximum recommended ISA by about 1 sq meter.
My idea to rectify this issue is to seal off the 6 cm gap between the two sides of the firebox and the outer wall of the bell - as well as the 30 cm under the firebox. This way gases could only flow under the heat riser and the back wall of the firebox and I'm not sure whether this wouldn't defeat the entire purpose of elevating the core in the first place.


There's a much more elegant solution: shorting the riser to 8B instead of 10B, and the bell accordingly.
The longer story: you've drawn a 20 cm system, height of the riser according to the recommended dimensions 144.68 cm. The riser could be 8/10th of that, being 115.74 cm. Above the riser there should be at least a headroom equal to the chimney diameter. So your bell could be about 30 cm lower now, possibly enough to adhere to the recommended ISA?
 
Glenn Littman
rocket scientist
Posts: 178
Location: Sangre de Cristo Mountains, CO - Lat 38°14' - Zone 5b
136
hunting earthworks solar wood heat rocket stoves homestead
  • Likes 4
  • Mark post as helpful
  • send pies
    Number of slices to send:
    Optional 'thank-you' note:
  • Quote
  • Report post to moderator

Peter van den Berg wrote:There's a much more elegant solution: shorting the riser to 8B instead of 10B, and the bell accordingly.


Gabor, after consulting with Peter, this is precisely what I did. My riser is just a bit taller than 8x the base number, allowing me to achieve the required ISA.
 
Gábor Kertész
Posts: 20
3
  • Likes 3
  • Mark post as helpful
  • send pies
    Number of slices to send:
    Optional 'thank-you' note:
  • Quote
  • Report post to moderator

Peter van den Berg wrote:The longer story: you've drawn a 20 cm system, height of the riser according to the recommended dimensions 144.68 cm. The riser could be 8/10th of that, being 115.74 cm. Above the riser there should be at least a headroom equal to the chimney diameter. So your bell could be about 30 cm lower now, possibly enough to adhere to the recommended ISA?


I have 25 x 12 x 6 cm and 25 x 12 x 4 cm firebricks. If I take out 2 rows from the riser would be 126 cm high and the ISA would still be about 0,3 sq m in excess of the recommendation. I would need to remove another 9 to 10 cm from the riser. How difficult is it to cut 4 cm thick firebricks to 2 or 3 cm wide bars?
Or is 30 cm needed under the core? If I could lower it to 18 cm that would get the ISA in the correct range.
 
Gábor Kertész
Posts: 20
3
  • Likes 4
  • Mark post as helpful
  • send pies
    Number of slices to send:
    Optional 'thank-you' note:
  • Quote
  • Report post to moderator
We made progress building the yurt in the meantime and it turned out to be somewhat smaller than expected - so the heater's bed bell is going to be somewhat shorter as well. Slightly more than enough to do away with the excess ISA. Is the riser height a minimum recommendation, or are the 8x and 10x base important proportions?
 
Peter van den Berg
gardener
Posts: 1068
Location: +52° 1' 47.40", +4° 22' 57.80"
455
woodworking rocket stoves wood heat
  • Likes 6
  • Mark post as helpful
  • send pies
    Number of slices to send:
    Optional 'thank-you' note:
  • Quote
  • Report post to moderator

Gábor Kertész wrote:ISA. Is the riser height a minimum recommendation, or are the 8x and 10x base important proportions?


The 10x base recommendation is there to be sure of a well working heater. But... if everything else is up to specs, one could get away with an 8x base riser. Anything lower and the core won't function as well. For example, an even shorter riser would have flames out of the top more frequently. When that happens, combustion isn't complete anymore.
 
Gábor Kertész
Posts: 20
3
  • Likes 4
  • Mark post as helpful
  • send pies
    Number of slices to send:
    Optional 'thank-you' note:
  • Quote
  • Report post to moderator
Ok then. Keeping the riser height above 8x base won't be too difficult.

I also just realized that I didn't directly address (and the drawings aren't completely clear) another question: for now I designed the bell to snugly encompass the oven. How problematic would it be if the gases could only flow down behind the oven and not around it's sides? That CSA is still above 5x the riser CSA and then the gases would have space to flow around the firebox under the sides of the oven.

Would this work? Or would it obstruct the flow too much?
 
Peter van den Berg
gardener
Posts: 1068
Location: +52° 1' 47.40", +4° 22' 57.80"
455
woodworking rocket stoves wood heat
  • Likes 5
  • Mark post as helpful
  • send pies
    Number of slices to send:
    Optional 'thank-you' note:
  • Quote
  • Report post to moderator

Gábor Kertész wrote:I also just realized that I didn't directly address (and the drawings aren't completely clear) another question: for now I designed the bell to snugly encompass the oven. How problematic would it be if the gases could only flow down behind the oven and not around it's sides? That CSA is still above 5x the riser CSA and then the gases would have space to flow around the firebox under the sides of the oven.

Would this work? Or would it obstruct the flow too much?


As far as I can see, this should be no problem since above and under the oven there's much more space. Although the transition between upper and under space might be just enough, it should work.
 
Gábor Kertész
Posts: 20
3
  • Likes 4
  • Mark post as helpful
  • send pies
    Number of slices to send:
    Optional 'thank-you' note:
  • Quote
  • Report post to moderator
This is then the next iteration of the design. Might it be the final before the build?
(I didn't indicate the steel support structures, but I intend to place insulated T-bars under every horizontal structure and a steel plate under the bridge to the bench.)
rmh-4.jpg
[Thumbnail for rmh-4.jpg]
 
Gábor Kertész
Posts: 20
3
  • Likes 1
  • Mark post as helpful
  • send pies
    Number of slices to send:
    Optional 'thank-you' note:
  • Quote
  • Report post to moderator
Forgot to add: the bench ISA is just under 3,7 sq meters, so the total would be just under 9 sq meters.
 
Gábor Kertész
Posts: 20
3
  • Likes 4
  • Mark post as helpful
  • send pies
    Number of slices to send:
    Optional 'thank-you' note:
  • Quote
  • Report post to moderator
Hi again!

I finally got to building a few weeks ago.
IMG_20240502_142003.jpg
The lintel is a 4 mm thick steel plate that is also supported in the middle by an upright brick cut a bit to form less of an obstruction.
IMG_20240506_134431.jpg
[Thumbnail for IMG_20240506_134431.jpg]
IMG_20240510_124802.jpg
The welded structure to support the core. The above mentioned brick can also be seen.
 
Gábor Kertész
Posts: 20
3
  • Likes 4
  • Mark post as helpful
  • send pies
    Number of slices to send:
    Optional 'thank-you' note:
  • Quote
  • Report post to moderator
Next pics and my first new question: the vertical piece of the floor channel is a bit off. Should I reweld it to make it straight? I think it ended up being far too short as well... I tried to base it off of the Mallorca core - but I realized only now that that core is 6"-es while mine is 8"-es large. How high should the vertical piece be?

And my second new question: I put a half inch kaowool sheet under the riser to make the base under it level. Will that cause cracks later on between the riser and the firebox? I have no desire to dismantle and rebuild the core but even less of a desire to finish a faulty heater...
IMG_20240510_131543.jpg
[Thumbnail for IMG_20240510_131543.jpg]
IMG_20240510_131556.jpg
[Thumbnail for IMG_20240510_131556.jpg]
IMG_20240510_142448.jpg
I had to dismantle a few bricks because I realized a bit late that I would rather place a cleanout opening right under the main bell as well.
IMG_20240517_152336.jpg
Batch box rocket under construction in a yurt
IMG_20240517_152400.jpg
walls of batch box and riser going up
IMG_20240517_152407.jpg
secondary air supply for a batch rocket installed in the floor
IMG_20240517_152349.jpg
My questionable floor channel.
IMG_20240518_174227.jpg
[Thumbnail for IMG_20240518_174227.jpg]
IMG_20240518_174251.jpg
The sides of the firebox could be ready.
IMG_20240518_174259.jpg
But this here is the subject of my second question.
IMG_20240518_174321.jpg
[Thumbnail for IMG_20240518_174321.jpg]
IMG_20240518_174325.jpg
A 6 to 7 cm gap is between the core and the bell on both sides.
IMG_20240518_174358.jpg
And here are the pieces to chauffer (is that the right word?) the lower section of the riser.
 
Peter van den Berg
gardener
Posts: 1068
Location: +52° 1' 47.40", +4° 22' 57.80"
455
woodworking rocket stoves wood heat
  • Likes 5
  • Mark post as helpful
  • send pies
    Number of slices to send:
    Optional 'thank-you' note:
  • Quote
  • Report post to moderator

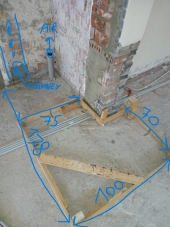
Gábor Kertész wrote:Next pics and my first new question: the vertical piece of the floor channel is a bit off. Should I reweld it to make it straight? I think it ended up being far too short as well... I tried to base it off of the Mallorca core - but I realized only now that that core is 6"-es while mine is 8"-es large. How high should the vertical piece be?


Hi Gábor, the floor channel is quite a bit off indeed, on more than one point. To begin with: to my eye, the horizontal piece is a 60x40 steel duct. That's alright for a 150 mm system but for a 200 mm system it should also be scaled up, in line with all the other dimensions. So the horizontal channel (called feed) would be something like 80x50 mm, being every linear dimension + 33%. The cross section area of a 200 mm chimney is 314 cm², the feed should *internally* be 10% or a bit more than that. The vertical piece (called stub) is half of that, being 5% of chimney csa. So, probably both dimensions are far too small.

The height of the stub should be so that the air is delivered in the top half of the port. So the closed end of the stub is reaching right up to half height of the port, the opening where the air is delivered  just in the top half. In your case: the port should be around 380 mm, so the opening in the stub should reach above 160 mm.

And last but not least: it appears the stub is *in* the port itself, which is a definitive no-no. It should be placed in front of the port, with half of the port width left and right, between the steel and brick.

Gábor Kertész wrote:And my second new question: I put a half inch kaowool sheet under the riser to make the base under it level. Will that cause cracks later on between the riser and the firebox? I have no desire to dismantle and rebuild the core but even less of a desire to finish a faulty heater...


You placed superwool under the riser to make it level with what? Not with the floor of the firebox, totally unnecessary. You might run the risk of the superwool shrinking due to the high heat and the riser tearing apart from the firebox. To solve this without breaking down the core: cut some half inch pieces of firebrick and shove these under the corners of the riser to prevent it to sag down.

Some random remarks.
The slanted sides of the firebox are called chamfers.
The support structure of the firebox looks like a bit overdone, it would do fine with half of the supporting studs.
The gap left, right and rear of the firebox might or might not be spaciously enough. To be sure, calculate their total cross section area and divide it by the cross section area of the chimney. In case the resulting figure is 5 or more, it should be OK but only just. In case it's less, you are guraranteed to run into trouble.
What I am missing is the threshold on the inlet side of the feed. It was missing in the Mallorca build, I know that, but on its drawing it's there.
I think this is it, better to ask first and build then?
 
Gábor Kertész
Posts: 20
3
  • Likes 4
  • Mark post as helpful
  • send pies
    Number of slices to send:
    Optional 'thank-you' note:
  • Quote
  • Report post to moderator

Peter van den Berg wrote:
I think this is it, better to ask first and build then?


Indeed it would be... Still far better to remake something then not to ask at all.

I calculated the size of the floor channel based on the 8,25% number from the Designs page on batchrocket.eu. A 60x60 steel duct would have a 9,98% internal cross section area of the riser. Would that cut it? (If not I will redesign accordingly of course.)
The stud being in the port is a great oversight on my part. At least it is easy to fix, but I remake the entire floor channel anyway. (Also by the Designs page the port of a 200 mm batch box should be 317 mm. Is that correct?)
I somehow missed the treshold. I will add one on the remade floor channel.

I built the riser into the rear of the firebox hence I wanted to make them level. I don't know why I didn't place at least fireclay mortar under there.

The total cross section area at the height of the gap is about 5,1 times the cross section area of the chimney.
 
Peter van den Berg
gardener
Posts: 1068
Location: +52° 1' 47.40", +4° 22' 57.80"
455
woodworking rocket stoves wood heat
  • Likes 4
  • Mark post as helpful
  • send pies
    Number of slices to send:
    Optional 'thank-you' note:
  • Quote
  • Report post to moderator

Gábor Kertész wrote:I calculated the size of the floor channel based on the 8,25% number from the Designs page on batchrocket.eu. A 60x60 steel duct would have a 9,98% internal cross section area of the riser. Would that cut it? (If not I will redesign accordingly of course.)


On the same Designs page, there's an update from 01/05/2019 on the dimensions of the floor channel. The feed twice as large as the stub according to this. So, the feed at 10% or thereabouts, the 60x60x2 mm duct would do it nicely. The stub at 5% would come down to 45 mm square duct.

Gábor Kertész wrote:The stud being in the port is a great oversight on my part. At least it is easy to fix, but I remake the entire floor channel anyway. (Also by the Designs page the port of a 200 mm batch box should be 317 mm. Is that correct?)


According to my calculator, it's 318.296 mm, but 317 is close enough. Measured from the top of the floor channel as being the floor of the firebox.

Gábor Kertész wrote:The total cross section area at the height of the gap is about 5,1 times the cross section area of the chimney.


That is awfully close, when there aren't other pinched points it would work anyway. How about the exit to the chimney? That is another potential friction area.
 
Gábor Kertész
Posts: 20
3
  • Likes 5
  • Mark post as helpful
  • send pies
    Number of slices to send:
    Optional 'thank-you' note:
  • Quote
  • Report post to moderator
Thank you for the answers. I didn't realize the actual size difference between the designs because I noticed no ratios. (All of this wasn't meant to be a "but you told so", it was only meant to clear up my current or some potential later confusion.)

The real riser-to-minimum-bell CSA ratio is actually somewhat more than 5,1 as I designed with a 6 cm gap on both sides but ended up with 7,5 cm. I estimated during construction that it would still be within limits of the maximum total surface area. I will recheck more punctually but I can always make the bench a bit shorter if needed.
The bench CSA is also somewhat above 5x that of the riser.

Peter van den Berg wrote: How about the exit to the chimney? That is another potential friction area.


I have no detailed design yet but I intend to slowly narrow down to the 200 mm chimney flues I could get. The connection on the chimney is about 80 cm above the planned exit of the bench and about 50 cm away from it's end. I didn't yet decide whether to use two 90° turns on both the exit and the connection to the chimney or to make the entire length of the flue slanted and have 60° turns on both ends.
 
Gábor Kertész
Posts: 20
3
  • Likes 2
  • Mark post as helpful
  • send pies
    Number of slices to send:
    Optional 'thank-you' note:
  • Quote
  • Report post to moderator
Hi everyone! I finally made progress again with the heater - I will post images as well soon. A question in the meantime: I understand that the top of the heater is partly held by T-profil steel pieces. Should I place kaowool under them as well for protection in the high heat above the riser? If so, how can I make the kaowool stay in place?
 
We cannot change unless we survive, but we will not survive unless we change. Evolving tiny ad:
Learn Permaculture through a little hard work
https://wheaton-labs.com/bootcamp
reply
    Bookmark Topic Watch Topic
  • New Topic