|

|
|
|
|

|

|

|

|

|
 8
8


 5
5
Air and opportunity are all that stand between you and realizing your dreams!
3
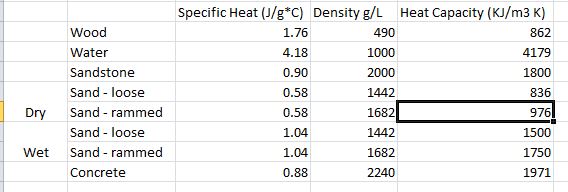
larry kidd wrote:Lots of people playing with thermal storage now a days including me. lol Isn't it funny how such similar materials can have such different properties. You might want to try granite dust and or crush and run as a filler that conducts heat as well as mass for holding heat. Also cleaning those rocks of moss, mold or any foreign material as that is a barrier to good conductivity.
3
Jim Griff wrote:
larry kidd wrote:Lots of people playing with thermal storage now a days including me. lol Isn't it funny how such similar materials can have such different properties. You might want to try granite dust and or crush and run as a filler that conducts heat as well as mass for holding heat. Also cleaning those rocks of moss, mold or any foreign material as that is a barrier to good conductivity.
Yes good point on cleaning the rocks! 👍 It was late after work when I gathered and placed them in the hole but most likely I’ll be pulling them out to place the stainless steel on the bottom.
I have thought about stone dust but couldn’t find any thermal info on it as well have read that it absorbs and holds a lot of moisture.
I might try a bench test on some. 🤔
1
Air and opportunity are all that stand between you and realizing your dreams!
3
larry kidd wrote:Do you realize that stainless steel is one of the worst metal thermal conductors there is?


 4
4
Christ is Risen!

Skill verified by gir bot")

Skill verified by Nikki Roche")

Skill verified by Alexandra Malecki") 2
2
2
2
Mark Miner wrote:Hi Jim,
Sounds like a neat project!
I'll venture a comment on your stainless sheets - they will be useful to spread heat across themselves, and although stainless is a poor conductor compared to copper (~390W/m/K) or aluminum (~160W/m/K), it will be dramatically better than the sand grains. Thermal conduction in a continuous solid, like the sheet or a rock, is worlds better than conduction through a granular media. The contact from grain-to-grain impedes heat flow much more substantially than the conductivity within a grain. Solid sheets will perform better than equivalent-mass chips of the same material. If you're looking at values for "silica" that will likely be a bulk number, whereas "conduction through sand" is going to be much less.
It sounds like you're applying heat to the plates, presumably electrically? It's a good idea to smear those watts over the large area, or you will get hotspots, The sheets would also be a very good place to monitor the temperature of your bed for the sake of controlling the heaters - locate the sense point on the metal, but fairly far from a heater element to avoid dithering on-off too rapidly. The price sounds pretty good for stainless anyway, so even if you don't use them for this project, it might be a deal.
Last thought on shop swarf chips - those will almost all have gone through a machine spraying them with a chlorinated coolant. I'd think twice about putting them (uncleaned) in my greenhouse, though you'd want to do your own due-diligence. Personally, I hate aluminum swarf - the edges are nasty, your magnet can't grab it, and it hurts worse than steel to get a sliver (but not so bad as copper & brass). But maybe you're burying it for good and that's no issue.
Have fun!
Mark
2
David Baillie wrote:So... why stainless steel sheets? do you already have them? Aluminum would be a far better choice. A scrap dealer would probably give you an even swap for them with maybe a little money thrown in. You could also pour just the heating wire in a thin layer of concrete to act as a heat transfer medium rocks and sand for the balance.
2


 2
2
Mike Philips wrote:Are you trying to make a 3 or 4 season greenhouse?
What are you growing? Some plants like spinach and arugula can freeze solid and thaw without dying.
In my opinion the most economical passive solar greenhouse is a “Chinese” greenhouse. Insulated, opaque north wall with thermal mass, and insulating nighttime blankets over all the glazing.
As far as thermal mass, often the bottle-neck in heat transfer is convection. Typical passive convection (solid to air heat transfer) is only about 20 watts per square meter per degree C temperature difference. For this reason, open gaps in loose gravel might allow air to naturally convect easier over more surface area, even if the total mass is a bit less.
If you want to get a feeling for how far heat will conduct through a solid in a given amount of time, look up heat “diffusivity”. By the way, with diffusion, time is proportional to distance squared. So, in a dynamic sense (diurnal temperature change) for heat to transfer twice as far takes 4 times as long. In other words, heat transfers much faster over short distances than over long distances.
Mike Philips wrote:Conductivity is a useful parameter if the temperature is not changing.
However, in dealing with thermal mass, the whole point is that the temperature *is* changing over time. Here’s the reason why this matters. Before heat can be conducted it over some longer distance, it first has to raise the temperature of the material in-between. That material in-between has a heat capacity. Heat is required to raise its temperature. Heat cannot be conducted further along down the line until the temperature of the in-between material is first raised. That’s why (in the case of dynamic temperature changes) the time it takes to transfer heat depends on the distance squared.


 4
4
Country oriented nerd with primary interests in alternate energy in particular solar. Dabble in gardening, trees, cob, soil building and a host of others.
C. Letellier wrote:Definitely insulate the north wall. If the roof ridgeline runs east west also probably insulate the north half of the roof as your sun in winter should reach around it. On the insulated north wall add a bunch of mass. Since your building is small guessing you don't want water barrels which would be the common answer so the other 2 common one are shelves with partially water filled 2 liter bottles painted black or the tire tubes cut in long hanging arches filled with water tied off at both ends.
Beyond that most of the stuff suggests you get roughly 1 zone for each layer of plastic. As best I can tell it is actually closer to 1 1/2 layers per zone and of course a law of diminishing returns applies. Now you might be able to add cold frames inside all of this for another layer. And I would set up for the chinese greenhouse inside sort of so you can add an insulating blanket over this too. So if you put your greenhouse under a greenhouse then added and inner greenhouse and a cold frame that would give you 4 layers so probably 2 zones worth.
Swedish skirt insulation around the building on the ground outside would probably help too.
If you look up the Mike Oehler greenhouse book another one of his tricks was a raised bed to the cold had room to fall off around the plant giving another tiny buffer.
greenhouse book
Beyond that one in my dreaming is to add an active foam insulation system. My mid size greenhouse dream would have one side as glass and inside that I want to build a giant plastic bag of greenhouse plastic set in an insulated trough with a heat tape under it so it can't freeze. Run a fish tank stone into that liquid. The liquid will be weed sprayer marker foam(sodium laurel sulfate) and water Turn the air pump on when the sun goes down and hopefully fill the bag full of what amounts to dish foam. It is supposed to be good for a R per inch roughly so a foot of foam would give me an R-12 window at night. When the sun comes up turn it off. The foam will die down and let the light in during the day. Now there is a bunch of thinking that goes into keeping ice from damaging the bag that if you want just ask and I will share.
some links.
soap bubbles
foam 2
soap bubbles canada
There are a number of others. Best one is out of the UK from about a decade ago but I can't find it at the minute.

![[Thumbnail for IMG_5531.jpeg]](/t/249553/a/238590/IMG_5531.jpeg "Filename: IMG_5531.jpeg
Description:")
![[Thumbnail for IMG_5539.jpeg]](/t/249553/a/238591/IMG_5539.jpeg "Filename: IMG_5539.jpeg
Description:")
![[Thumbnail for IMG_5571.jpeg]](/t/249553/a/238592/IMG_5571.jpeg "Filename: IMG_5571.jpeg
Description:")
![[Thumbnail for IMG_5575.jpeg]](/t/249553/a/238593/IMG_5575.jpeg "Filename: IMG_5575.jpeg
Description:")
![[Thumbnail for IMG_5576.jpeg]](/t/249553/a/238594/IMG_5576.jpeg "Filename: IMG_5576.jpeg
Description:") 1
1
![[Thumbnail for IMG_6317.jpeg]](/t/249553/a/248353/IMG_6317.jpeg "Filename: IMG_6317.jpeg
Description:")

|
There's a way to do it better - find it. -Edison. A better tiny ad:
Quit your workee-job and live, year round, for free-ish in Montana
https://wheaton-labs.com/bootcamp
|