• Post Reply Bookmark Topic Watch Topic
  • New Topic
permaculture forums growies critters building homesteading energy monies kitchen purity ungarbage community wilderness fiber arts art permaculture artisans regional education skip experiences global resources cider press projects digital market permies.com pie forums private forums all forums
this forum made possible by our volunteer staff, including ...
master stewards:
  • r ranson
  • Nancy Reading
  • Carla Burke
  • John F Dean
  • Jay Angler
  • paul wheaton
stewards:
  • Nicole Alderman
  • Pearl Sutton
  • Anne Miller
master gardeners:
  • Christopher Weeks
  • Timothy Norton
gardeners:
  • Nina Surya
  • Matt McSpadden
  • thomas rubino

Combining Pebble RMH combustion unit with a bell bench - we have questions

 
Apprentice Rocket Scientist
Posts: 138
Location: Portugal
31
monies tiny house books composting toilet rocket stoves homestead
  • Likes 4
  • Mark post as helpful
  • send pies
    Number of slices to send:
    Optional 'thank-you' note:
  • Quote
  • Report post to moderator

We are rebuilding a rocket mass heater but would like to change from the 8"flue/duct run to be replaced by a bell bench (hollow sealed bench).

I have a few questions though

The manifold?
Should this feed into the bell bench in the upper 25% of the bench?
Should there be a bit of a duct run into the bench?
To prevent cold air and hot air mixing too soon

The Exhaust
Should it ideally still 'kiss the drum' to help create the draft on firing up?
Should the exhaust outlet be lower part of the bench, say the bottom 25%?
Should the exhaust (6") still be tall?
Could the exhaust escape out of anywhere out the bench so long as it is low?

The bench
Is the sizing of the bench doable for the size of RMH combustion unit?

Many thanks for your kind consideration. I'm looking forward to reading your replies.

HEATER SUMMARY

Design Intentions-
Variation of ‘Pebble Style Rocket Mass Heater
Heat Exchange mass: brick bench (bell /stratification chamber)  capped with pavers
Duct size: 8” with 6” exhaust (as designed by Permies People)
Bench area: 70" long (1.8 meters) by 31.5" wide (80 cm) by 23.5" (60cm) high

Combustion unit:
Heat riser height:_48” / 122 cm
Fuel feed height:_16” / 40.5 cm
Burn tunnel length: 32” / 81 cm

Gap above heat riser: 1.5” / 4 cm

Location
Central Portugal / Northern hemisphere
Mediterranean climate, with hot, dry summers and cool, wet winters.

Winter(December to February):
average temperature ranges from 5°C (41°F) to 14°C(57°F)

Average humidity 90°

Goal

RMH to bring house temp up from 10°c to 18 - 20 °C
3 months of the year.

RMH to help lower internal humidity.

Space: 1 large area of 6 meters by 6 meters with 4 meter dome roof.
2 adults

Dwelling - concrete clinker block built on lightweight expanded clay aggregate pad built on bed of rock.

RMH  will be against the external wall, south-facing wall (northern hemisphere)
 
rocket scientist
Posts: 6528
Location: latitude 47 N.W. montana zone 6A
3398
cat pig rocket stoves
  • Likes 6
  • Mark post as helpful
  • send pies
    Number of slices to send:
    Optional 'thank-you' note:
  • Quote
  • Report post to moderator
Hi Jenny;
I'll try to answer your questions.

The Manifold) The hot air should enter low not at the top.
Each build is different, some run the 8" pipe to the far end so that that end of the bench heats up.
Others go halfway and some just let the air stratify on its own.
The heat will equally stratify wherever it enters.

The Exhaust) If you need to kiss the barrel to help cold start you can, but I believe in a bypass for that.
Yes if not kissing the barrel then your chimney can be anywhere in the bell.
Your 6" chimney should have a handmade funnel shape at the bottom.
This encourages the exhaust to flow, making it 8-10" wide (203 mm-254 mm), and it should be apx. 2" (50 mm-60 mm) from the floor.

You want to increase your riser to barrel gap to 3" minimum.  1.5" is proven not helpful.
Your barrel top temps will be lower but more heat will travel into your bell.
 
Jenny Ives
Apprentice Rocket Scientist
Posts: 138
Location: Portugal
31
monies tiny house books composting toilet rocket stoves homestead
  • Likes 4
  • Mark post as helpful
  • send pies
    Number of slices to send:
    Optional 'thank-you' note:
  • Quote
  • Report post to moderator
Thank you for your reply @thomas.

We are going stir crazy trying to be precise with our measurements.

For the 8" system we have managed to get an 18 cm square feed tube.

Our burn tunnel internal measurement is 32" long but the height is 16".  We haven’t mortored our bricks yet.  

Is a height of 32" on the burn tunnel acceptable?  
It's 18 cm wide (7 1/8th inch).  

20241203_115750.jpg
[Thumbnail for 20241203_115750.jpg]
 
thomas rubino
rocket scientist
Posts: 6528
Location: latitude 47 N.W. montana zone 6A
3398
cat pig rocket stoves
  • Likes 6
  • Mark post as helpful
  • send pies
    Number of slices to send:
    Optional 'thank-you' note:
  • Quote
  • Report post to moderator
Hi Jenny;
Do not stress about being perfect in your measurements, J-Tubes are forgiving.
All is good as long as no measurement is larger than the riser diameter. The riser must be the largest or you will have draft issues.
Also, remember that when you mortar your bricks, all measurements change.
Hopefully, you are using a clay mortar.

Here are the approximate—metric measurements you'll want for an 8" J-Tube. (jumping from imperial to metric is confusing.)
Ideally, your feed tube is 19cm square and it is 40 cm deep
Your burn tunnel should be the same size 19cm square.
Burn tunnel length when measured from the feed tube wall to the back wall of the riser should be apx. 64cm and no more than 68cm.
I prefer to measure just the "roof" of the burn tunnel and to not measure the entire tunnel.
The roof should measure 25cm and no more than 30cm  (It is very important, not to have too of a long burn tunnel)
Your riser if round should be 20cm or if brick it should be 19cm square.
The riser should be from 100cm - 120cm tall

You can modify those measurements if you keep the same area.  ie) A 19cm x 19 cm burn tunnel could be built as an 18cm wide  and  20cm tall keeping the same area as before.
 
thomas rubino
rocket scientist
Posts: 6528
Location: latitude 47 N.W. montana zone 6A
3398
cat pig rocket stoves
  • Likes 7
  • Mark post as helpful
  • send pies
    Number of slices to send:
    Optional 'thank-you' note:
  • Quote
  • Report post to moderator
I looked at your original post again.
You are going to need an 8" chimney leaving your bell, you can then reduce it to 6"  where it goes through the roof.
Hopefully, you do not have a tall external chimney beyond the house.
It must be easy for the gasses to escape the bell or you will have draft problems.
 
Jenny Ives
Apprentice Rocket Scientist
Posts: 138
Location: Portugal
31
monies tiny house books composting toilet rocket stoves homestead
  • Likes 6
  • Mark post as helpful
  • send pies
    Number of slices to send:
    Optional 'thank-you' note:
  • Quote
  • Report post to moderator
I've attached a photo of what is effectively what I measure when I measure 'the burn tunnel'.

It measures 32" (81 cm).  The bamboo in the pic is 32".  Is my burn tunnel too long?

Based on your answer for ideal length of burn tunnel of " aprx 64 cm - 68 cm" it seems mine is too long at 32" / 81cm .

But I am confused.  Maybe the 64 - 68 cm doesn't include the feed tunnel measurement?

Also if I follow 1:2:3  proportions then
40 cm feed high feed tunnel =  80 cm long burn tunnel = 120 cm riser core.

My feed tunnel is 18 cm x 18cm square.  Last year the feedback was our 18.5 cm x 18.5 cm feed tunnel was too big.  Something about pie but I can't eat it.

Sorry about metric and imperial.  Our tape measure is in centimeters here in Europe and I'm converting measurements to imperial on my phone.  

We are using fire bricks throughout.  And refractory cement.
No round tunnels due to rectangular brick shape.

Nothing is mortored up yet.  

Noted about the 8" chimney out of the bell. Thanks.

Appreciate your help x
Screenshot_20241203_151431.jpg
[Thumbnail for Screenshot_20241203_151431.jpg]
 
thomas rubino
rocket scientist
Posts: 6528
Location: latitude 47 N.W. montana zone 6A
3398
cat pig rocket stoves
  • Likes 7
  • Mark post as helpful
  • send pies
    Number of slices to send:
    Optional 'thank-you' note:
  • Quote
  • Report post to moderator
Yes, your tunnel is way too long.
It will work but produce way too much ash.
As you are converting to a bell that is not a big deal... for now.
Consider using a clay sand mortar, refractory is permanent but will ultimately crack out and need replacement.
Removing refractory from bricks is a bitch, I do not recommend it.
Clay mortar pops off in a bucket, add water, and is usable again, your firebricks are reusable as well.

18 x18 cm is fine but I would build 19x 19 cm just for that little extra room.
If you add a Peter channel you will lose some room, although you gain a cold air channel directly where you want it.
 
Jenny Ives
Apprentice Rocket Scientist
Posts: 138
Location: Portugal
31
monies tiny house books composting toilet rocket stoves homestead
  • Likes 7
  • Mark post as helpful
  • send pies
    Number of slices to send:
    Optional 'thank-you' note:
  • Quote
  • Report post to moderator
Yup yesterday we spent the day scraping off refractory cement.  The job was finished this morning with an angle grinder.  And the plus side we now know the refractory cement works even though not a lot is used, well certainly not the same amount as the usual mortor.  

For context, it can feel like we on the edge of civilisation where we live and obtaining the right material is tricky.

We don't trust the bit of  'clay' we have.  A Portuguese neighbour took us down a road and we dug into a bank.  It seems a bit hit & miss to my master builder so refractory cement it is.  

When I measure my burn tunnel  ... is the bamboo stick in the previous photo the length I am measuring?  

And if yes, does this length need to be shorter and between 64 cm x 68 cm?
 
thomas rubino
rocket scientist
Posts: 6528
Location: latitude 47 N.W. montana zone 6A
3398
cat pig rocket stoves
  • Likes 7
  • Mark post as helpful
  • send pies
    Number of slices to send:
    Optional 'thank-you' note:
  • Quote
  • Report post to moderator
Correct,  64-68cm at that measurement.
Shorten that and give the riser more room from the barrel top and your dragon will roar.

Yup, I get it about availability.  Sometimes you must use what is available.
The refractory mortar will crack out but it takes time.

Good luck with your build!  
 
Jenny Ives
Apprentice Rocket Scientist
Posts: 138
Location: Portugal
31
monies tiny house books composting toilet rocket stoves homestead
  • Likes 7
  • Mark post as helpful
  • send pies
    Number of slices to send:
    Optional 'thank-you' note:
  • Quote
  • Report post to moderator
Ooh I'm so excited.  Bricks are being wheeled out and we are going to dry stack our build with your input on measurements and light a fire hopefully tonight.  

While the donkey work is being done I'm researching on the forum what a Peter channel is and where I'm going to place it😜
 
thomas rubino
rocket scientist
Posts: 6528
Location: latitude 47 N.W. montana zone 6A
3398
cat pig rocket stoves
  • Likes 6
  • Mark post as helpful
  • send pies
    Number of slices to send:
    Optional 'thank-you' note:
  • Quote
  • Report post to moderator
Jenny, go to my website and look at one.
They are easy to build.

dragontechrmh.com

https://permies.com/t/100852/Peter-channel-dragon
 
Jenny Ives
Apprentice Rocket Scientist
Posts: 138
Location: Portugal
31
monies tiny house books composting toilet rocket stoves homestead
  • Likes 7
  • Mark post as helpful
  • send pies
    Number of slices to send:
    Optional 'thank-you' note:
  • Quote
  • Report post to moderator
At the expense of dinner we trialed the dry build outside tonight.

The heat riser in the photo needs to go up two courses and the drum needs to be extended.  Jobs for tomorrow.

The rocket heater outside worked well and in an unexpected way.  By the time we came inside the 13 °c inside felt a lot warmer then the 8°c outside 😆
20241203_175403.jpg
[Thumbnail for 20241203_175403.jpg]
 
Apprentice Rocket Scientist
Posts: 155
Location: Portugal
102
2
transportation gear earthworks solar rocket stoves
  • Likes 6
  • Mark post as helpful
  • send pies
    Number of slices to send:
    Optional 'thank-you' note:
  • Quote
  • Report post to moderator
For what it's worth, I used refractory mortar on the lower part of the Matt Walker stove* that I built, which I don't anticipate ever needing to take apart.  The top layers are clay-sand mortar in case I need to get it apart for some unspecified maintenance purpose later.

One thing I keep noticing though is the clay mortar has very limited adhesion to the bricks when dried out.  It's easy to knock bricks loose.  I dunno if my clay is inferior or the sand the wrong sort or whether that's normal for clay mortar but it's something that might put me off if I'd paid someone to build a stove for me.  

For now we don't have a bench on ours, but it's in the pipeline once the space it needs to go into can be cleared.  Not a priority until the kitchen gets moved downstairs where the stove is and the focus of our life moves downstairs with it  
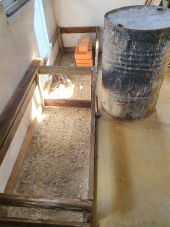
The stove itself has a fair bit of mass, and is now working quite well after a few tweaks and experiments.

* documented here if you haven't already seen it.
 
Jenny Ives
Apprentice Rocket Scientist
Posts: 138
Location: Portugal
31
monies tiny house books composting toilet rocket stoves homestead
  • Likes 6
  • Mark post as helpful
  • send pies
    Number of slices to send:
    Optional 'thank-you' note:
  • Quote
  • Report post to moderator
...when the Rocket Heater hasn't been connected to the exhaust you make another plan 😆

2nd photo We put a candle in and there's a draw.


Edit - added photo of barrel
20241207_085908.jpg
[Thumbnail for 20241207_085908.jpg]
20241208_025617.jpg
[Thumbnail for 20241208_025617.jpg]
20241208_025617.jpg
[Thumbnail for 20241208_025617.jpg]
 
Rocket Scientist
Posts: 4586
Location: Upstate NY, zone 5
600
5
  • Likes 4
  • Mark post as helpful
  • send pies
    Number of slices to send:
    Optional 'thank-you' note:
  • Quote
  • Report post to moderator
Clay mortar is not glue. It will stick to other clay if used properly, but on bricks it is purely a leveling and sealing agent. It will add friction when used between rough bricks. You need to make the brick structure stable and back it up with other material, cob, perlite-clay, bricks, etc.

The proportions in the original RMHs were 1:2:3; more recent advice has been 1:2:4. I have found that 1:1.5:3 works well, and on an 8" system can be 16" feed height, 24" burn tunnel floor length, and 48" riser height from floor, giving an 8" burn tunnel ceiling. My system in a tall bell with good natural draft actually has a 45" riser, and flames seldom reach the top of the riser, meaning combustion is complete by then. (I have a nail-sized peephole in the access panel above the J-tube so I can see across the top of the riser.)
 
Jenny Ives
Apprentice Rocket Scientist
Posts: 138
Location: Portugal
31
monies tiny house books composting toilet rocket stoves homestead
  • Likes 3
  • Mark post as helpful
  • send pies
    Number of slices to send:
    Optional 'thank-you' note:
  • Quote
  • Report post to moderator

Austin Shackles wrote:For what it's worth, I used refractory mortar on the lower part of the Matt Walker stove*

One thing I keep noticing though is the clay mortar has very limited adhesion to the bricks when dried out.  It's easy to knock bricks loose.  

* documented here if you haven't already seen it.


When we first used refractory cement it was quite nerve wracking.  It didn't have body or substance of usual mortar and left us wondering if it would 'do anything'.  So in a weird way we were quite pleased when we took RMH #1 apart how very well the refractory cement worked.

Plus in Portugal you can wallace into a hardware store and buy it in containers of .500 gram right up to tens of kg sacks.
20241206_114127.jpg
[Thumbnail for 20241206_114127.jpg]
 
Jenny Ives
Apprentice Rocket Scientist
Posts: 138
Location: Portugal
31
monies tiny house books composting toilet rocket stoves homestead
  • Likes 4
  • Mark post as helpful
  • send pies
    Number of slices to send:
    Optional 'thank-you' note:
  • Quote
  • Report post to moderator

Glenn Herbert wrote:.

The proportions in the original RMHs were 1:2:3; more recent advice has been 1:2:4. I have found that 1:1.5:3 works well, and on an 8" system can be 16" feed height, 24" burn tunnel floor length, and 48" riser height from floor, giving an 8" burn tunnel ceiling. My system in a tall bell with good natural draft actually has a 45" riser, and flames seldom reach the top of the riser, meaning combustion is complete by then. (I have a nail-sized peephole in the access panel above the J-tube so I can see across the top of the riser.)


With Thomas Rubino help we luckily shortened the burn tunnel and heightened the Riser.

In the end our numbers washout as follows

38 cm / 65 cm / 122 cm  
(15 cm gap between riser and top of the drum)

 
Jenny Ives
Apprentice Rocket Scientist
Posts: 138
Location: Portugal
31
monies tiny house books composting toilet rocket stoves homestead
  • Likes 4
  • Mark post as helpful
  • send pies
    Number of slices to send:
    Optional 'thank-you' note:
  • Quote
  • Report post to moderator
Busted!!! The sheep came inside and discovered what keeps us humans on the inside for so long in the mornings 🤭
20241224_093240.jpg
[Thumbnail for 20241224_093240.jpg]
 
Embrace the glorious mess that you are. - Elizabeth Gilbert / tiny ad
Learn Permaculture through a little hard work
https://wheaton-labs.com/bootcamp
reply
    Bookmark Topic Watch Topic
  • New Topic