
 14
14


For all your Montana Masonry Heater parts (also known as) Rocket Mass heater parts.
Visit me at
dragontechrmh.com Once you go brick you will never go back!


 14
14


![Filename: 20250404_114443.jpg
Description: [Thumbnail for 20250404_114443.jpg]](/t/279929/a/264884/20250404_114443.jpg)
![Filename: 20250404_120543.jpg
Description: [Thumbnail for 20250404_120543.jpg]](/t/279929/a/264885/20250404_120543.jpg)
![Filename: 20250404_120552.jpg
Description: [Thumbnail for 20250404_120552.jpg]](/t/279929/a/264886/20250404_120552.jpg)
![Filename: 20250404_123630.jpg
Description: [Thumbnail for 20250404_123630.jpg]](/t/279929/a/264887/20250404_123630.jpg)
![Filename: 20250404_124028.jpg
Description: [Thumbnail for 20250404_124028.jpg]](/t/279929/a/264888/20250404_124028.jpg)

![Filename: 20250404_124641.jpg
Description: [Thumbnail for 20250404_124641.jpg]](/t/279929/a/264890/20250404_124641.jpg)
![Filename: 20250404_130357.jpg
Description: [Thumbnail for 20250404_130357.jpg]](/t/279929/a/264892/20250404_130357.jpg)


For all your Montana Masonry Heater parts (also known as) Rocket Mass heater parts.
Visit me at
dragontechrmh.com Once you go brick you will never go back!


 11
11


![Filename: 20250404_154950.jpg
Description: [Thumbnail for 20250404_154950.jpg]](/t/279929/a/264895/20250404_154950.jpg)
![Filename: 20250405_131153.jpg
Description: [Thumbnail for 20250405_131153.jpg]](/t/279929/a/264896/20250405_131153.jpg)
![Filename: 20250406_140846.jpg
Description: [Thumbnail for 20250406_140846.jpg]](/t/279929/a/264897/20250406_140846.jpg)
![Filename: 20250406_140942.jpg
Description: [Thumbnail for 20250406_140942.jpg]](/t/279929/a/264898/20250406_140942.jpg)
![Filename: 20250409_114056.jpg
Description: [Thumbnail for 20250409_114056.jpg]](/t/279929/a/264899/20250409_114056.jpg)
![Filename: 20250409_115258.jpg
Description: [Thumbnail for 20250409_115258.jpg]](/t/279929/a/264900/20250409_115258.jpg)
![Filename: 20250409_115632.jpg
Description: [Thumbnail for 20250409_115632.jpg]](/t/279929/a/264901/20250409_115632.jpg)
![Filename: 20250409_115859.jpg
Description: [Thumbnail for 20250409_115859.jpg]](/t/279929/a/264902/20250409_115859.jpg)
![Filename: 20250409_120211.jpg
Description: [Thumbnail for 20250409_120211.jpg]](/t/279929/a/264903/20250409_120211.jpg)
![Filename: 20250409_122545.jpg
Description: [Thumbnail for 20250409_122545.jpg]](/t/279929/a/264904/20250409_122545.jpg)
![Filename: 20250409_123324.jpg
Description: [Thumbnail for 20250409_123324.jpg]](/t/279929/a/264905/20250409_123324.jpg)
![Filename: 20250409_202938.jpg
Description: [Thumbnail for 20250409_202938.jpg]](/t/279929/a/264906/20250409_202938.jpg)
For all your Montana Masonry Heater parts (also known as) Rocket Mass heater parts.
Visit me at
dragontechrmh.com Once you go brick you will never go back!


 14
14


![Filename: 20250410_153952.jpg
Description: [Thumbnail for 20250410_153952.jpg]](/t/279929/a/264907/20250410_153952.jpg)
![Filename: 20250411_120452.jpg
Description: [Thumbnail for 20250411_120452.jpg]](/t/279929/a/264909/20250411_120452.jpg)
![Filename: 20250411_120552.jpg
Description: [Thumbnail for 20250411_120552.jpg]](/t/279929/a/264910/20250411_120552.jpg)
![Filename: 20250411_120522.jpg
Description: [Thumbnail for 20250411_120522.jpg]](/t/279929/a/264911/20250411_120522.jpg)
![Filename: 20250411_124037.jpg
Description: [Thumbnail for 20250411_124037.jpg]](/t/279929/a/264912/20250411_124037.jpg)
![Filename: 20250411_124028.jpg
Description: [Thumbnail for 20250411_124028.jpg]](/t/279929/a/264913/20250411_124028.jpg)
![Filename: 20250411_133055.jpg
Description: [Thumbnail for 20250411_133055.jpg]](/t/279929/a/264914/20250411_133055.jpg)
![Filename: 20250411_133128.jpg
Description: [Thumbnail for 20250411_133128.jpg]](/t/279929/a/264915/20250411_133128.jpg)
For all your Montana Masonry Heater parts (also known as) Rocket Mass heater parts.
Visit me at
dragontechrmh.com Once you go brick you will never go back!
 3
3


John Daley Bendigo, Australia The Enemy of progress is the hope of a perfect plan
Benefits of rainfall collection https://permies.com/t/88043/benefits-rainfall-collection
GOOD DEBT/ BAD DEBT https://permies.com/t/179218/mortgages-good-debt-bad-debt


 11
11


For all your Montana Masonry Heater parts (also known as) Rocket Mass heater parts.
Visit me at
dragontechrmh.com Once you go brick you will never go back!


 13
13


![Filename: 20250429_114939.jpg
Description: [Thumbnail for 20250429_114939.jpg]](/t/279929/a/264967/20250429_114939.jpg)

For all your Montana Masonry Heater parts (also known as) Rocket Mass heater parts.
Visit me at
dragontechrmh.com Once you go brick you will never go back!


 12
12


![Filename: 20250429_151836.jpg
Description: [Thumbnail for 20250429_151836.jpg]](/t/279929/a/265046/20250429_151836.jpg)
![Filename: 20250429_151831.jpg
Description: [Thumbnail for 20250429_151831.jpg]](/t/279929/a/265047/20250429_151831.jpg)
![Filename: 20250430_125126.jpg
Description: [Thumbnail for 20250430_125126.jpg]](/t/279929/a/265048/20250430_125126.jpg)
![Filename: 20250501_112955.jpg
Description: [Thumbnail for 20250501_112955.jpg]](/t/279929/a/265049/20250501_112955.jpg)
![Filename: 20250501_115654.jpg
Description: [Thumbnail for 20250501_115654.jpg]](/t/279929/a/265050/20250501_115654.jpg)
![Filename: 20250501_122910.jpg
Description: [Thumbnail for 20250501_122910.jpg]](/t/279929/a/265051/20250501_122910.jpg)
![Filename: 20250501_130837.jpg
Description: [Thumbnail for 20250501_130837.jpg]](/t/279929/a/265054/20250501_130837.jpg)
For all your Montana Masonry Heater parts (also known as) Rocket Mass heater parts.
Visit me at
dragontechrmh.com Once you go brick you will never go back!


 11
11


![Filename: 20250504_112618.jpg
Description: [Thumbnail for 20250504_112618.jpg]](/t/279929/a/265068/20250504_112618.jpg)
![Filename: 20250504_112506.jpg
Description: [Thumbnail for 20250504_112506.jpg]](/t/279929/a/265071/20250504_112506.jpg)
![Filename: 20250504_112427.jpg
Description: [Thumbnail for 20250504_112427.jpg]](/t/279929/a/265072/20250504_112427.jpg)
For all your Montana Masonry Heater parts (also known as) Rocket Mass heater parts.
Visit me at
dragontechrmh.com Once you go brick you will never go back!
 8
8


 6
6


“Trees know when we are close by. The chemistry of their roots and the perfumes of their leaves pump out change when we're near...when you feel good after a walk in the woods, it may be that certain species are bribing you”
― Richard Powers, The Overstory


 8
8


For all your Montana Masonry Heater parts (also known as) Rocket Mass heater parts.
Visit me at
dragontechrmh.com Once you go brick you will never go back!
 7
7


Jeff Pollari wrote:Hello Thomas and thanks for this awesome update.
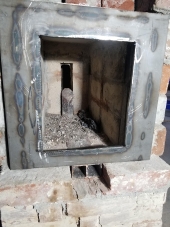
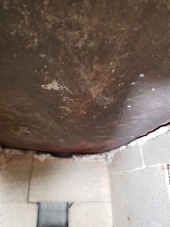
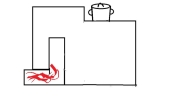
Did you use durock for the roof of the secondary bell as well?


 7
7


For all your Montana Masonry Heater parts (also known as) Rocket Mass heater parts.
Visit me at
dragontechrmh.com Once you go brick you will never go back!
 4
4


thomas rubino wrote:Hi Scott,
My bell top is Durock with no extra insulation..
With the double barrels, the temps are low enough to handle it.
My Walker Black and White also has a Durock roof, but it has 1" of superwool suspended below it.
Durock is also used as a floor plate for building on wooden floors.


 6
6


For all your Montana Masonry Heater parts (also known as) Rocket Mass heater parts.
Visit me at
dragontechrmh.com Once you go brick you will never go back!
 3
3


 5
5


Fox James wrote:I have used cement board in virtually every stove I have built, where I live standard cement board is called Magply but we get a few different ones.
Some use polypropylene fibres and some use fiberglass fibres, polypropylene melts at 160c fibreglass around 350c - 400c.
The one I use most nowadays is the HTFB made with fire cement and some sort of high temp fibres, that is good for 1000c
I have shown it in many of my videos, i just love the stuff but of course the disadvantage is the cost, HTFB cost around £360 a sheet 8’x4’

|
Alas, poor Yorick, he knew this tiny ad:
Permaculture Design Magazine
https://permies.com/wiki/237407/permaculture/Permaculture-Design-Magazine
|


