• Post Reply Bookmark Topic Watch Topic
  • New Topic
permaculture forums growies critters building homesteading energy monies kitchen purity ungarbage community wilderness fiber arts art permaculture artisans regional education skip experiences global resources cider press projects digital market permies.com pie forums private forums all forums
this forum made possible by our volunteer staff, including ...
master stewards:
  • Nancy Reading
  • Carla Burke
  • r ranson
  • John F Dean
  • paul wheaton
  • Pearl Sutton
stewards:
  • Jay Angler
  • Liv Smith
  • Leigh Tate
master gardeners:
  • Christopher Weeks
  • Timothy Norton
gardeners:
  • thomas rubino
  • Jeremy VanGelder
  • Maieshe Ljin

Not staying lit...

 
Posts: 7
  • Mark post as helpful
  • send pies
    Number of slices to send:
    Optional 'thank-you' note:
  • Quote
  • Report post to moderator
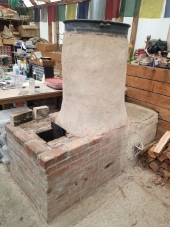
Brand new rocket stove... used what I had to use... that's the idea right? I downloaded Rocket Mass Heaters and read up a good bit. Had 4" pipe to work with in good quantities as well as stainless flexi flu. Built her nicely... fired along the way, never a real hot or lasting fire, but decent enough to be darned excited and keep moving. Now well cobbed up and just can't keep a fire lit.

I seem to get decent enough draw, but it just burns out. The wood isn't the driest, though it is fairly dry, just damp from the dampish air we have here in Ireland. It's wood that in a standard fire would burn like mad.

Pics:

Brick layout before cementing

Flu layout on first layer of cob

Refractory battery

Junction at tank to flu

Tank in place

burning with a few smalls sticks (normally many more in there... this was a first light)

The 4" pipe up the middle of a chimney liner with vermiculite insulation between.

Video showing it burning and some other details... (sorry it's the wrong angle!)
https://dl.dropboxusercontent.com/u/5102319/Yurt/Stove/IMG_0071.MOV

Any thoughts?

Many thanks for looking.
 
Randy Repass
Posts: 7
  • Likes 2
  • Mark post as helpful
  • send pies
    Number of slices to send:
    Optional 'thank-you' note:
  • Quote
  • Report post to moderator
I have built two rocket stoves, this is the second. The first is very simple, and is similar to something I saw a guy do on Youtube to heat water, my need on that one, to heat a hot tub. I am learning from all of this, and certainly would love for someone to help me understand where a 4" pipe, if that is the real issue (I'll be quite keen to know why), will not work when proportions to the 5 or 6" style do? In other words, I build the chamber and all of the stove to the proportions laid out in the larger systems, and it does heat, it just doesn't stay lit.

If I can fix this, I will, if I have to tear it down... I will, reluctantly & sadly. But I am looking for insights here please, not newbie bashers.
 
Posts: 39
Location: NH
2
  • Mark post as helpful
  • send pies
    Number of slices to send:
    Optional 'thank-you' note:
  • Quote
  • Report post to moderator
I've been playing with proportions lately, too, using my woodstove as my burn-chamber, and not getting enough draw.

Off the bat, if you're using a 4" d pipe, then your area is 13.6", which means that all other areas of the heater should be no bigger than 13.6" in diameter, if I'm understanding correctly. Your feed port looks like it's a kiln brick wide (4.5") by some length even greater (6"?), which makes me wonder if your burn chamber is too large in diameter, as it also seems mighty long for a 4" system.

I'm finding that when the feed tube and burn chamber are too large, the system draws very weakly, like the difference between sucking wind through a large opening versus a small opening. The same volume of air coming in through a large opening will move slowly, while it will pick up speed instead when the opening is constricted, as you know.

I wonder if you could shorten your burn chamber and constrict the feed tube without too much aggravation. I reconstructed mine about four times yesterday, before I ultimately took it off completely in order to try some new concepts today. I figure as long as we stay in the guidelines, our designs can be limitless. Good luck.

Edit: So, I went back to look at the pics, and I was obviously mistaken (the last pic loaded first, so that's the one I went by, and my perspective was inaccurate). Your feed tube opening appears to be what, 2.5" x 4.5"? Something within the 13.6", yes? If so, then I only wonder about the length of the burn chamber now. That still looks really long to me.

As with my own system, I have to wonder about the area around the inside of the "barrel," too. I wonder, with it being so wide, whether it acts as a back-pressure area against the push of the 4" exhaust. My barrel is also much larger than my riser diameter, so I am thinking that it's creating too much back pressure, giving me a weak burn. Part of me says that the interior dimension of the barrel relative to the insulated riser shouldn't matter, because the stove should work whether there's a barrel or just space; the barrel is "space" but a little more confined. Still, I'm conflicted and confused for now on how it may affect the system.
 
gardener
Posts: 1057
Location: +52° 1' 47.40", +4° 22' 57.80"
448
woodworking rocket stoves wood heat
  • Mark post as helpful
  • send pies
    Number of slices to send:
    Optional 'thank-you' note:
  • Quote
  • Report post to moderator
Randy, welcome to the boards.
In my view, there are some errors in your stove. Some are simple, others are rather complicated let's start with the simple ones.

#1 The flexible duct you are using for the horizontal flue is far from smooth inside so this will slow the stove down because of friction in the smoke path.

#2 You've scaled down the system size, yes, but not the thickness of the bricks. In your stove core there's far too much mass, this is contraproductive.

#3 In the pictures I don't see any insulation around the core. The riser is insulated, yes, but where's the rest?

#4 This is one of the more complicated items. The riser is round, the rest of the stove is a rectangle. The conversion from one form to the other is problematic because there's a restriction at that point. Take a piece of paper and draw both those geometric shapes on top of each other. Where those overlaps are, gases can't pass there and moreover, a round vertical duct is better in transporting gases than a square or rectangle one despite of their cross sectionlal area being the same. As a rule of thumb, the sides of a square duct should be measured the same as the diameter of the circular one in order to make those comparable aerodynamically speaking. When the round duct fits inside the square then it's the right size.

#5 The barrel seems overly large for such a small system and so is the length of the tunnel. The bricks spanning the tunnel looks to be enough for a much larger system.

#6 What is the gap size above the riser?

#7 Maybe you have to dig out the clay around the barrel/horizontal run manifold a bit more. That spot is a bottleneck, usually.

#7 And last but not least: you don't mention a vertical chimney at the end of the horizontal duct. Is there a stack and does it reach above the eaves? Is it insulated and in the house's envelop?

It's possible that due to all these material and layout choices the heat produced by the stove will be absorbed by the stove itself. To such an extent, that the fire cools off and goes out without much fuss.
 
pollinator
Posts: 4024
Location: Kansas Zone 6a
284
  • Mark post as helpful
  • send pies
    Number of slices to send:
    Optional 'thank-you' note:
  • Quote
  • Report post to moderator
Allen was trying to be nice.

You are trying several things that the great and powerful Ernie and Erica can't/won't do. You are using 4", so you are at the lower limit of what will draw, period. You are using flexi flue, which has like 10 times the drag of smooth pipe. I am not sure you can draw well in a 6" system with that much flexi.


Pipe the riser directly out the window w/o the barrel and see if you can get it to draw. Then try the barrel without the bench.


Randy Repass
Posts: 7
  • Mark post as helpful
  • send pies
    Number of slices to send:
    Optional 'thank-you' note:
  • Quote
  • Report post to moderator
Thank you Jeff, Peter & R Scott. I take all of your thoughts to heart and appreciate your thoughts on this.

I built glass furnaces, as well as taught furnace building here in Ireland for about 6 yrs, so I do come with some "unlearning" to do, no doubt, but also some knowledge of "playing with fire". I went through a series of designs, the best of which came at the end of that tenure for me. I gave it up as it was so expensive and in my eyes impractical for our environment. This is the first time I am considering melting glass again, using one of these cool stoves.

That aside:
Since all these posts, and after "Big Al's" I persisted and got her burning fairly well. Kept it burning, but had backdraft that kept putting it out. After blowing on it, it started up again... lots of hot coals though. Partially I found placement of my sticks was helpful and towards the end of my testing when the coals were building up, covering the hole with a bit of brick increased the flow so it burned well, and resisted the backdraft. I had to leave before it completed, so I don't know yet how much burned up, or if there is a good deal of ash or charcoal left from the burn.

Thoughts on comments:
  • rough lines improved burn in a glass furnace, but I can see now how it can really mess up my system.


  • testing minus the barrel, then minus the flu is a great suggestion


  • Peter; there is insulation around the flu out of the burn chamber, where else would I need any? I don't see any description or sketches showing other insulated spaces-or did I totally miss something?


  • Can you clarify why you feel changing the brick thickness would matter Peter? my understanding is that we are dealing with internal spaces, not external?


  • I guess, Peter, you are suggesting a larger riser from the burn tube, so that the transition from square to round is better? I tend to think is flows well enough there, that that might be minor in consideration of other issues, or am I wrong about that? Seems the test with just that riser will help a lot to see how it does.


  • length of system, Peter: the guide says 30' for 8", 20-25' for 5", I went for about 15-20 for 4". But will test it with 10-12', as the last 8' is not built yet, just attached on for testing.


  • vertical chimney was very short initially, and had problems. I increased it with that last test burn and that made a big difference. I'll work on getting that properly setup.


  • barrel size: should I shorten it? Or is it too big around all together? Is it a problem with too much space between insulated riser and the OD of the barrel?


  • I went with 4" as that is what I had, as I said, but also, I want a smaller system. I have a very well insulated 23' yurt this is in, I'd like it to be warm but not overly hot. Thus a smaller system (in my practical mind) makes some sense. I know from furnace building and the origins of rocket stoves, small is very possible... so why can't we size down the mass heater? I am hard pressed to see argument saying it can't happen, but do agree R Scott that it is likely on the small side of draw, especially if I am too long. Filling with ash and reducing it hadn't come to mind (another important point I overlooked on some level). So, I need to introduce another access hole for sure at my 180 degree bend to deal with that I think.

    I am feeling that I will need to pull the rough flu... sadly. Thought that was so perfect! It's used as replacement chimney liner all over this part of the world, and jus't didn't occur to me, even though the mention of a clean straight pipe in the guide is there.

    Lastly, R Scott, I don't think, reading now, that "Big Al" was being cruel... but as a first response it was not a good one. I taught furnace building for years... I'd certainly congratulate efforts before pointing out problems... where ingenuity is in place. Mistakes are the pillar...

    Thank you all hugely for your input. I've been pushed by Al to prove him wrong (not a bad thing! we can all learn, eh?) and now have a lot to consider going forward and best of all, R Scott, practical testes to perform at this point.
     
    Posts: 245
    Location: near Houston, TX; zone 8b
    3
    • Mark post as helpful
    • send pies
      Number of slices to send:
      Optional 'thank-you' note:
    • Quote
    • Report post to moderator
    With regard to a 4" sized rocket... Peter Berg has designed one and Dragon Heaters produces a cast refractory model. It has the requisite thin walls and the internal shape induces turbulence in the combustion chamber. It can have a 4" or 6" stove pipe/chimney pipe exhaust. It works just fine. As a disclaimer, I am a partner in Dragon Heaters. www.dragonheaters.com
     
    Peter van den Berg
    gardener
    Posts: 1057
    Location: +52° 1' 47.40", +4° 22' 57.80"
    448
    woodworking rocket stoves wood heat
    • Mark post as helpful
    • send pies
      Number of slices to send:
      Optional 'thank-you' note:
    • Quote
    • Report post to moderator

    Randy Repass wrote:

  • Peter; there is insulation around the flu out of the burn chamber, where else would I need any? I don't see any description or sketches showing other insulated spaces-or did I totally miss something?

  • The insulation should be around the feed tube and burn tunnel as well. That is the place where the fire is the hottest and the hotter it get the better the combustion. Lots of heavy firebrick around those places will absorb lots of heat. Eventually all this will heat up but is will cost a lot of time and fuel. So the walls of the feed and tunnel should be as thin as practically possible and heavely insulated. It's in the book, I'm sure of that.

    Randy Repass wrote:

  • Can you clarify why you feel changing the brick thickness would matter Peter? my understanding is that we are dealing with internal spaces, not external?

  • Same reason as above. Theoretically speaking, the combustion space should contain virtually no mass at all and the walls should be super insulated. A small stove built from heavy bricks is asking for trouble. The smaller the stove, the thinner the bricks should be. How would you call that... proportion, I think that's the right word.

    Randy Repass wrote:

  • I guess, Peter, you are suggesting a larger riser from the burn tube, so that the transition from square to round is better? I tend to think is flows well enough there, that that might be minor in consideration of other issues, or am I wrong about that? Seems the test with just that riser will help a lot to see how it does.

  • I think what you mean is a wider riser so the round steel pipe would fit in there. Yes, that's exactly my point. I simply summed up the bottlenecks, some are worse than others, yes. It's up to you to decide whether you do something about it.

    Randy Repass wrote:

  • length of system, Peter: the guide says 30' for 8", 20-25' for 5", I went for about 15-20 for 4". But will test it with 10-12', as the last 8' is not built yet, just attached on for testing.

  • The stream of gases has to flow smoothly though the pipes. What length your stove can drive is depending on a lot of parameters, every stove is different in this respect.

    Cindy is right, the 4" cores that are marketed by Dragon Heaters will work very well. Those cores' wall thickness is 3 cm (1.18"), there should be at least 2" of vermiculite around it and the riser is made of vermiculite board. Insulating and as little mass as possible, that'll do the trick. Of course, there are more tricks in the core itself but those won't do any good when the first requirements aren't there.
     
    Randy Repass
    Posts: 7
    • Mark post as helpful
    • send pies
      Number of slices to send:
      Optional 'thank-you' note:
    • Quote
    • Report post to moderator
    So, based on your thoughts (Peter) and my own meditation on the project I'm rebuilding the stove before the battery.

    My first iteration of the project had the chamber built entirely of cast pipe from a large cook stove, still 4" but hardy stuff. I had this setup as a burner to heat my hot tub, another side journey I've been on. I'm redoing that job into a Rocket?snorkel stove which I'll talk about another time.

    I've just cast an insulated base out of vermiculite and cement, about 4" thick. I used to make such casting for the top outer insulation of my glass furnaces; it's easy to cast very well insulating near hot temperatures.

    I'll next set my 'J' pipe on that and cast over and around the entire bottom and feed tube while creating a base for the tank above. That is a much smaller chamber than before, an old propane tank I've cut the bottom off. I'm considering running a copper coil I've built inside it for my hot water. The inner dimensions of the tank are 13", my heat riser is 4 ½ od, about 1" insulation inside a 6" pipe. This leaves about 2 ½ inches of gap between the heat riser insulation retaining pipe and the outer tank.

    Should I use more insulation in the heat riser?

    I am glad to be moving forward! I've been living off a wood stove that just feels like a mass fuel burner!

    Thanks
     
    This ad is so tiny, it is contemplating augmentation:
    turnkey permaculture paradise for zero monies
    https://permies.com/t/267198/turnkey-permaculture-paradise-monies
    reply
      Bookmark Topic Watch Topic
    • New Topic