• Post Reply Bookmark Topic Watch Topic
  • New Topic
permaculture forums growies critters building homesteading energy monies kitchen purity ungarbage community wilderness fiber arts art permaculture artisans regional education skip experiences global resources cider press projects digital market permies.com pie forums private forums all forums
this forum made possible by our volunteer staff, including ...
master stewards:
  • Carla Burke
  • Nancy Reading
  • r ransom
  • John F Dean
  • paul wheaton
  • Jay Angler
stewards:
  • Timothy Norton
  • Pearl Sutton
  • Tereza Okava
master gardeners:
  • Christopher Weeks
  • M Ljin
gardeners:
  • Jeremy VanGelder
  • Matt McSpadden
  • thomas rubino

Marbling cloth with natural pigments & shaving cream??

 
steward
Posts: 22474
Location: Pacific Northwest
13161
13
homeschooling hugelkultur kids art duck forest garden foraging fiber arts sheep wood heat homestead
  • Likes 14
  • Mark post as helpful
  • send pies
    Number of slices to send:
    Optional 'thank-you' note:
  • Quote
  • Report post to moderator
So, I'm teaching my kids about 18 century bookbinding, and thought it would be cool to make marbled paper to use in the books we'll be binding. In the past, we've done marbled paper with oil paints on water, but, trying to do that with 24 kids at my homeschool co-op seems like a bit much.

I was thinking about doing marbled paper with shaving cream (like shown here), but using my historical watercolors made with natural pigments and gum arabic (instead of food dye or conventionally purchased liquid watercolors). I'm thinking this should work easily on paper, since my water colors are a lot like liquid watercolors.

BUT! Then I thought it would be cool to make marbled cloth to cover the book (I'm planning on having the kids use Coptic stitch binding to bind their books and then using cloth over it). If I use cut-up old sheets and marble them with shaving cream, will that work? Or will it bleed terribly on the cloth, or make the cloth thick and weird?

I plan on picking up shaving cream tomorrow, and trying it out, but I was wondering if anyone else had any ideas or imput?
 
Nicole Alderman
steward
Posts: 22474
Location: Pacific Northwest
13161
13
homeschooling hugelkultur kids art duck forest garden foraging fiber arts sheep wood heat homestead
  • Likes 5
  • Mark post as helpful
  • send pies
    Number of slices to send:
    Optional 'thank-you' note:
  • Quote
  • Report post to moderator
I'm thinking that this has a high chance of working decently. Since the fabric won't get washed (it's the book cover), we don't have to worry about the paint coming off.

I'm thinking that, as long as the watercolors aren't too watered down, they probably won't bleed much. Last year, I had my class painting kites made out of either butcher paper or cotton cloth. The paint didn't really bleed a lot.

my students kites in the background


Since the paint is embedded in shaving cream, rather than water, that should also help with the paint not bleeding. Watercolor likes to bleed when it's very wet, but doesn't bleed when it's more concentrated.

The fabric that we've painted in the past only got a little stiff. That really shouldn't bee too much a a problem with this project, since it's on a book.

By marbling the cloth, that also solves the issue of having a limited selection of fabric for them to choose from. Now they get to create their own fabric in colors they like.

Marbled book covers are pretty common and lovely. I'm not sure if book covers were being made during the 1700s. But, I'm going to go find out!

marbled book covers are so pretty! Ours probably won't have a different material on the binding.


I'm pretty sure that marbled book covers are usually made with marbled paper with leather or cloth on the binding. But, I'm pretty sure it's okay to do with the whole cover being marbled...
 
Nicole Alderman
steward
Posts: 22474
Location: Pacific Northwest
13161
13
homeschooling hugelkultur kids art duck forest garden foraging fiber arts sheep wood heat homestead
  • Likes 4
  • Mark post as helpful
  • send pies
    Number of slices to send:
    Optional 'thank-you' note:
  • Quote
  • Report post to moderator
Ooooh, while researching 18th century books, I found this site: Judging a Book by its Cover: 18th-century hand-decorated papers in the Linnean Society's Collections

It mentions, "Combed paste paper"

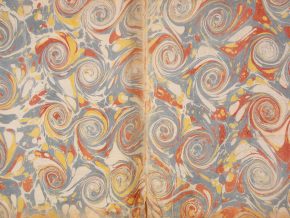
Combed paste paper designs were achieved by dragging a comb, brush, or finger across the still-wet coloured paste on the surface


Combed paste paper


This kind of seems a bit like the shaving cream. We're using various mediums to make cool swirly designs!

The article also mentions, "Hand decorated paper was very popular for use in bindings, end papers and wrappings until the early 19th century, when papermaking and printing began to be mechanised, and colours could be produced synthetically. By the end of the 19th century, hand decorating as a commercial industry had faded."
 
Nicole Alderman
steward
Posts: 22474
Location: Pacific Northwest
13161
13
homeschooling hugelkultur kids art duck forest garden foraging fiber arts sheep wood heat homestead
  • Likes 3
  • Mark post as helpful
  • send pies
    Number of slices to send:
    Optional 'thank-you' note:
  • Quote
  • Report post to moderator
Just for fun, here's some more combed paste papers:

1791, This pattern would have been created by first covering a sheet of paper with the desired colors of paste.  Then, some sort of implement would be used to comb through the paste, causing its final design.
 
1761
 
1701. This volume has colorful daubed endpapers, with finger-made swirls
 [url=https://pastispresent.org/2017/fun-in-the-archive/pasted-pandemonium/
1804. The boards of this small volume are covered with combed paste paper.
[/url]  
1793. The printed paste paper on this pamphlet has a floral design.


From the blog of the American Antiquarian Society:

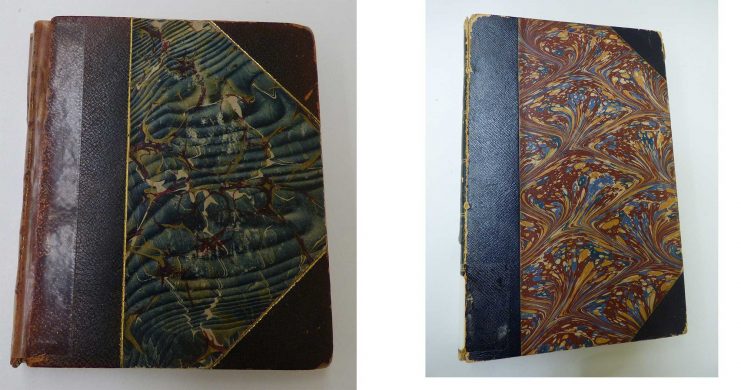
Paste papers are one of the early styles of decorative paper used in bookbinding, becoming a popular feature in books toward the end of the sixteenth century. They remained popular into the early nineteenth century, but were gradually replaced by marbled papers as industrial processes made marbling easier.

 
gardener
Posts: 534
Location: WV
177
kids cat foraging food preservation medical herbs seed
  • Likes 4
  • Mark post as helpful
  • send pies
    Number of slices to send:
    Optional 'thank-you' note:
  • Quote
  • Report post to moderator
No tips or advice whatsoever but I'd love to see the results.

 
Nicole Alderman
steward
Posts: 22474
Location: Pacific Northwest
13161
13
homeschooling hugelkultur kids art duck forest garden foraging fiber arts sheep wood heat homestead
  • Likes 4
  • Mark post as helpful
  • send pies
    Number of slices to send:
    Optional 'thank-you' note:
  • Quote
  • Report post to moderator
Just for more documentation (I'm probably not going to try paste papers, but I find this fascinating):


There's more info relating to the video here: https://www.herringbonebindery.com/blog/2020/09/07/tutorial-paste-papers/

I also found more info found here: Kenneth Spencer Research Library:

Paste paper is a style of decorative paper made by coating the surface of paper with a thick pigmented starch adhesive (usually wheat paste or methylcellulose) and then manipulating the wet paste mixture to create patterns. Combs, stamps, brushes, wadded paper or textiles, rollers, fingers and more could be used to create designs. Paste papers were an economical alternative to marbled papers, which required a high degree of skill and costly materials to produce. No special training or supplies were needed to make paste papers; bookbinders could create them right in their workshops with materials already at hand.

Paste papers were most often used for book covers and endpapers and were popular from the late 16th through the 18th century. Paste papers are often seen on books from Germany and Northern Europe, although there are many lovely examples of block-printed paste papers from Italy. There was renewed interest in paste papers during the Arts & Crafts movement of the late 19th and early 20th century. Today, paste papers are still created by book artists and hobbyists, and can be seen on some fine-press editions. The examples on view represent just a fraction of the many beautiful paste papers found in Spencer’s collections and available to view in the Reading Room.

 
Nicole Alderman
steward
Posts: 22474
Location: Pacific Northwest
13161
13
homeschooling hugelkultur kids art duck forest garden foraging fiber arts sheep wood heat homestead
  • Likes 6
  • Mark post as helpful
  • send pies
    Number of slices to send:
    Optional 'thank-you' note:
  • Quote
  • Report post to moderator
More research, this time back to marbled paper:

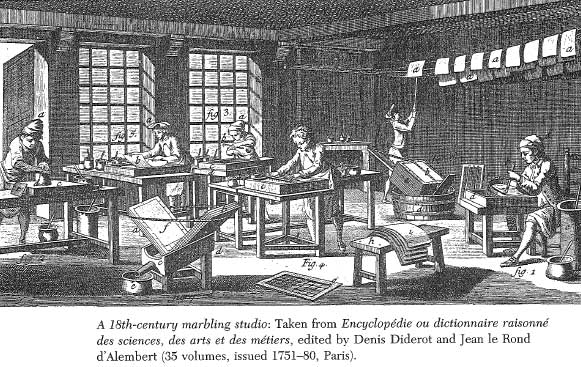
The craft of marbling, which flourished in Turkey and elsewhere in the Middle East, first became known to Europeans only in the 16th and 17th centuries, and commercial production in England did not begin until the 1770s. One reason this took so long is that making marbled paper is complicated: liquid pigments are suspended on a liquid medium, creating the colorful swirls, and then transferred to paper laid upon them. In the case of Tristram Shandy's first edition, this was done by hand and repeated on both the front and back of a single page with the margins folded in—a process so involved that later versions of the book usually resorted to mechanized reproductions


=https://libnews.umn.edu/2017/12/hidden-beauty-ordinary-books-part-1/

I love this quote from University of Minnesota

Marbled paper was used for books, but also for other decorative purposes; linings for trunks, cabinets, instrument cases, and tea chests, to cover small decorative objects, and even as decoration for harpsichords. In the 17th century, production centered in France, Germany, and Holland. English bookbinders who wanted to use marbled paper for endsheets had an ingenious trick for avoiding the hefty customs duties levied on imported paper — toys and other small objects were wrapped in marbled paper for import. Once imported, the toys were unwrapped and the (untaxed) marbled wrapping paper was carefully smoothed out and sold to bookbinders.


I wish there were dates on these books from the above article:


But, they do talk about this book from around 1616-1632 in Turkey


And this one from 1764:
A ‘snail’ pattern forming the endpapers of a book from Paris, 1764. © Victoria and Albert Museum
 
Nicole Alderman
steward
Posts: 22474
Location: Pacific Northwest
13161
13
homeschooling hugelkultur kids art duck forest garden foraging fiber arts sheep wood heat homestead
  • Likes 6
  • Mark post as helpful
  • send pies
    Number of slices to send:
    Optional 'thank-you' note:
  • Quote
  • Report post to moderator
This video goes into all the ingredients needed to do traditional marbling. I was fascinated to find out that you actually use watercolors and not oil paints to marble paper. That explains why my previous attempts at marbling did not quite work out!


Another thing to note is that the paper is mordanted with alum....which makes me wonder if I should mordant the cloth we use, or not worry about it. I think trying or mordant all my cloth might be tricky. But, maybe if I mordant the sheet first, it'll work better. He shows brushing the alum on top of the paper, but I think with cloth I could just soak it in a mordant bath?


Another thing I'm reminded of is that paper during the 18th century was made from cloth--not trees like it largely is now. So, using cloth is almost more traditional than using current-day paper in some ways...

 
rocket scientist
Posts: 503
Location: in the Middle Earth of France (18), zone 8a-8b
300
2
hugelkultur dog tiny house chicken composting toilet cooking building sheep rocket stoves homestead composting
  • Likes 9
  • Mark post as helpful
  • send pies
    Number of slices to send:
    Optional 'thank-you' note:
  • Quote
  • Report post to moderator
As a handbookbinder by trade, I've made both, paste marbled and 'proper' marbled paper. The 'proper' version only in the study setting, because it's a bit more complicated as tools and materials are concerned, but paste paper is relatively easy and a lot of fun to do.
I cut 'combs' out of cardboard.

For paste marbling, use a tough, smooth paper. I used to cook my own paste out of wheat flour, and use leather dyes as colouring agent.
Try to make the paste quite thin (but not runny). We want a thin layer of pattern-paste on the resulting paper.

I haven't watched the YT video, but I'm sure it explains the process.

One of my favourite patterns with paste marbling was achieved by
- pasting the paper with just one colour paste (usually it's more about the patterns than colours, or the paper colour acts as 2nd col.)
- gently folding the paper on itself
- tapping the folded paper with fingertips a couple of times
- slowly drawing the paper open

The resulting pattern is that of "mountaintops", I really liked it.

After drying the papers well, I'd iron them with the paste side up, some kind of protective sheet between the paper and the iron - I used baking paper.
This makes the paste pattern more flat, otherwise it has a slight bevel to it.

I closed my atelier 15 years ago, so I'm afraid I don't have any samples anymore to share.
 
steward
Posts: 18591
Location: USDA Zone 8a
4709
dog hunting food preservation cooking bee greening the desert
  • Likes 2
  • Mark post as helpful
  • send pies
    Number of slices to send:
    Optional 'thank-you' note:
  • Quote
  • Report post to moderator

Nicole Alderman wrote:This kind of seems a bit like the shaving cream. We're using various mediums to make cool swirly designs!


Those look really cool.  I like your suggestion for using various mediums rather than shaving cream.

What did you try that worked?
 
pollinator
Posts: 489
Location: Oz; Centre South
140
trees books cooking fiber arts writing
  • Likes 8
  • Mark post as helpful
  • send pies
    Number of slices to send:
    Optional 'thank-you' note:
  • Quote
  • Report post to moderator
This post got my cogs turning over again!  I read a lot (understatement) and I remember from ages ago that the pigments for marbling were applied to a thickened water - using a moss called carrageen (may have spelled that wrongly) so, basically a jelly - maybe unflavoured gelatine would work. Set enough to float the pigments.
My Dad liked DIY and made patterns on painted surfaces, usually wood, using combs with different widths and spaced teeth (all on the same implement) dragged through the wet paint - presto! pretend woodgrain. finishes.
 
Nicole Alderman
steward
Posts: 22474
Location: Pacific Northwest
13161
13
homeschooling hugelkultur kids art duck forest garden foraging fiber arts sheep wood heat homestead
  • Likes 7
  • Mark post as helpful
  • send pies
    Number of slices to send:
    Optional 'thank-you' note:
  • Quote
  • Report post to moderator
I did some quick experimenting at school today between classes. Sadly, I didn't have my camera, so I didn't get any pictures. I used foaming, sensitive shaving cream and sprayed it about an inch thick onto a tray.

These are the tests I did:

(1) First, I tried my own watercolors, just adding water to my existing dry watercolors (instead of mixing fresh, liquid watercolors). I tapped my paint brushes to sprinkle paint onto the shaving cream, swirled with a stick, and then laid a piece of un-mordanted cotton sheet I had left over from a previous project. I pressed the dry cloth down, smoothing it over the shaving cream, and then lifted it off. Then I used a big popsicle stick to scrape off the shaving cream. I learned:
  • A small paint brush does ver small dots of paint! Larger paint brushes should be used
  • The natural, re-watered watercolors did not spread well through the shaving cream, and were faint when applied to both cloth and paper.
  • The paints smeared on the cloth when I used a popsicle stick to scrape the shaving cream off (they didn't smear as much on the paper)
  • I tried rinsing the cloth....and most of the watercolor came right out. This was good to know, because some kids might be sad that their design didn't turn out, and this would allow them to rinse and retry.

(2) Second, I tried paper. I added more paint onto the shaving cream, swirled more, and applied the paper. I learned:
  • The design on the paper was a bit more vibrant than the designs on the cloth, but it was still very faint.
  • When I scraped the shaving cream, it didn't smear nearly as much as when I used cloth

(3) Third, disappointed with how faint the re-animated water colors were, I tried mixing just pigment with water. I learned:
  • This didn't seem to work much better. I think the pigment is just too heavy?

(4) Fourth, my coworker had food coloring. So, I gave that a try. I found:
  • The colors were much brighter!
  • The colors spread father when swirled, giving a much nicer effect.

(5)I also tried marbling some paper and the cloth without scraping the shaving cream off. We'll see how this works!

I got home and decided to try mordanting the cloth I have at home. My jar of alum actually has instructions for fabric marbling (2 tsps of alum for 1 gallon of warm water. Submerge in the alum bath, wring out--don't rinse--, air dry, and iron if needed). I currently have the cloth drying by a heater and a fan. Fingers crossed that it'll be dry soon so I can cut it up for their book covers!
 
Nina Surya
rocket scientist
Posts: 503
Location: in the Middle Earth of France (18), zone 8a-8b
300
2
hugelkultur dog tiny house chicken composting toilet cooking building sheep rocket stoves homestead composting
  • Likes 7
  • Mark post as helpful
  • send pies
    Number of slices to send:
    Optional 'thank-you' note:
  • Quote
  • Report post to moderator
Hi Nicole,

I only now read your initial post in the thread as well - sorry, too hasty action from me to jump in half way in a thread and start yapping.

The Coptic binding looks really nice when it's done with wooden covers (but you need strong enough thread, and there's some drilling and lots of sanding involved).
It's also lovely when done with (board covers covered with) handmade paper.

You don't want to use anything bulky to be able to fold around the corners - even with handmade paper I'd stay between the thin and medium weight range.

I'm not sure how the sheet cloth will work.
Make a mock-up if you can; just a scrap piece of board in the thickness you think you'll be using (I'd go for 3mm, = 0.12 inches according to converter), and do a corner with the cloth, pretending you're covering the board with the cloth and turning the edges over. Use the actual materials you think you'd be using for the project, including glue.
There's an extra dimension coming into play with gluing textile to board; glue bleeding through the cloth. Remedied by lining the cloth first with japanese paper/strong tissue paper, using paste as glue. By; laying a piece of japanese paper/tissue paper on a slab of marble (or similar smooth, rigid stuff), brushing it evenly in all directions with paste, smoothing out the paste to a thin layer as you go, deliberately also pasting the marble as you brush away from the center of the paper. Then carefully laying the piece of cloth (which is bigger than the paper) on the pasted paper, starting from one corner or edge, and smoothing it over the pasted paper with the side of your hand as you go, pressing out any bubbles or wrinkles. The cloth will adhere not only to the paper, but around its edges to the slab of marble (or glass etc) as well. You leave it in place to dry = dries out smooth and flat. & hey presto, you've got your lined cloth ready to be used for covering book covers!

Marbling textile with shaving cream (and food colouring, good find!) sounds good fun as well! But maybe that could be another project, for tote bags or t-shirts for instance?

These are just my gentle suggestions. I hope I'm not ruining any fun, just whispering from the sidelines. As always; follow curiosity, do what you love


Nicole Alderman
steward
Posts: 22474
Location: Pacific Northwest
13161
13
homeschooling hugelkultur kids art duck forest garden foraging fiber arts sheep wood heat homestead
  • Likes 5
  • Mark post as helpful
  • send pies
    Number of slices to send:
    Optional 'thank-you' note:
  • Quote
  • Report post to moderator
For the covers, I'm using "top tab file folders." The paper on them is more ridged than cardstock....and it's a resource that I found in the school workroom :D

These things are called 'top tab file folders'. The paper is strong and ridged...and affordable!


We're making the books pretty small--the covers measure 6 inches by 4 inches....that way they look good when made up, even if the kids only sew a few signatures onto them.

I prepped all the covers last night, too, so the kids can marble their choice of: cloth, cover, and papers. Some might just marble the cover, others might marble the cloth.

Thank you for reminding me about the glue! I'd forgotten how (when I bound with leather), if I wasn't careful, the glue bled through and made the cover dark or wrinkled. What I might do is have the kids use glue sticks to attach it to the cover itself, and then use bottled glue for where it folds to the inside.

I wasn't able to make a complete mock-up before the activity, but I did bind the book and test the size of cloth it'll need before cutting all the cloth.

I'm doing the marbling this afternoon, so wish me luck!


Nicole Alderman
steward
Posts: 22474
Location: Pacific Northwest
13161
13
homeschooling hugelkultur kids art duck forest garden foraging fiber arts sheep wood heat homestead
  • Likes 2
  • Mark post as helpful
  • send pies
    Number of slices to send:
    Optional 'thank-you' note:
  • Quote
  • Report post to moderator
I wonder, what if we covered it with the cloth, and then glued paper on the front and back cover?

I have some book covers that look like this:

The ones I have at home don't have the corner area--just cloth on the binding and paper on the covers.


But, with cloth on the binding and paper on the cover. Inspecting them, the cloth seems to be laid down first, and then the paper is applied over. I don't have paper measure to that size at the moment, but I can quickly cut it up at school.

That would put cloth on the binding, but cover up any mistakes on the cover due to gluing?

I might just give the kids lots of options and let them choose!
 
Nicole Alderman
steward
Posts: 22474
Location: Pacific Northwest
13161
13
homeschooling hugelkultur kids art duck forest garden foraging fiber arts sheep wood heat homestead
  • Likes 4
  • Mark post as helpful
  • send pies
    Number of slices to send:
    Optional 'thank-you' note:
  • Quote
  • Report post to moderator
Today I determined that, if I ever do this again, I'm just going to buy carrageenan and ox gall and do it the traditional way!

It's not that the shaving cream didn't work...it's that it was a gigantic mess! I mixed up watercolors for the kids to use, as well as food dyes. Generally, they'd add a TON of food dye and swirl it up. Then, they'd tap the paint brushes to sprinkle drops of color. Then we put on the paper or cloth, and then scrape off the foam.

The scraping was SO MESSY. We used big popsicle sticks. We should have used pieces of cardboard that were at least 4 inches tall and wider than the paper. But...we didn't. The food-dyed shaving cream that was scraped off the paper was so thick and always spilled over the popsicle stick. We had to use SO MANY popsicle sticks! And, we used so many paper towels trying to clean the area after each scraping.

There wasn't enough table space, either. I thought I could have the students finishing up their last project and I'd pull them over one at a time. But, everything took so long that I brought over 2 or 3 to the table. But, that meant there wasn't room for scraping the papers or storing anything.

The paint did stick better to the alum-mordanted cloth, so that was good. The papers turned out nice, too. My daughter realized she could sprinkle paint on her cloth after she'd did the marbling, and that looked really cool.

Did I manage any pictures? Nope! It was far too chaotic. I think I brought home the ones I'd made the day before. I'll try to get pictures of those tomorrow. For now, I'm all burnt out!
 
She's brilliant. She can see what can be and is not limited to what is. And she knows this tiny ad:
montana community seeking 20 people who are gardeners or want to be gardeners
https://permies.com/t/359868/montana-community-seeking-people-gardeners
reply
    Bookmark Topic Watch Topic
  • New Topic