• Post Reply Bookmark Topic Watch Topic
  • New Topic
permaculture forums growies critters building homesteading energy monies kitchen purity ungarbage community wilderness fiber arts art permaculture artisans regional education skip experiences global resources cider press projects digital market permies.com pie forums private forums all forums
this forum made possible by our volunteer staff, including ...
master stewards:
  • Carla Burke
  • John F Dean
  • Nancy Reading
  • r ransom
  • Jay Angler
  • Timothy Norton
stewards:
  • paul wheaton
  • Pearl Sutton
  • Anne Miller
master gardeners:
  • Christopher Weeks
  • M Ljin
gardeners:
  • Jim Garlits
  • thomas rubino
  • William Bronson

Strawberry Obelisk - Design Feedback

 
Posts: 16
3
  • Likes 7
  • Mark post as helpful
  • send pies
    Number of slices to send:
    Optional 'thank-you' note:
  • Quote
  • Report post to moderator
I made a design for a vertical structure to grow strawberries. It's an obelisk, so I shall name it... the Strawbelisk! Anyway, I wanted to run the design past you and get feedback. Particularly around watering.

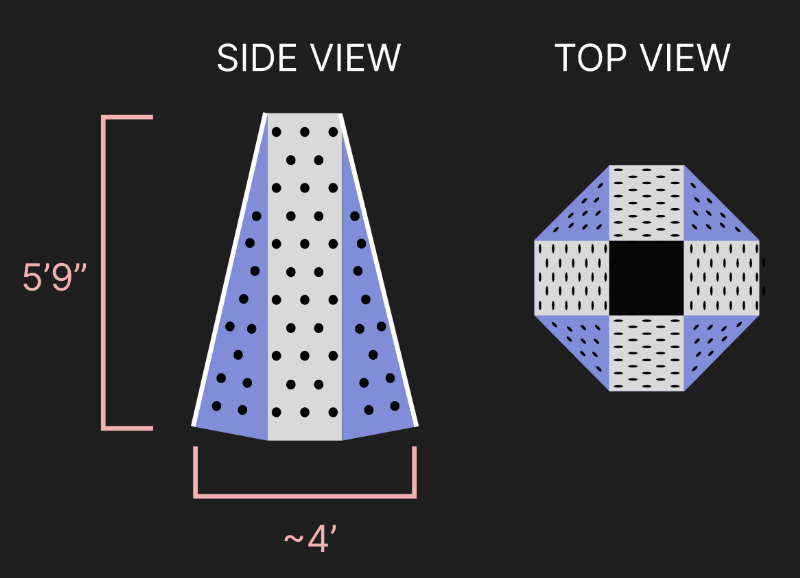
Here's the gist of the design:


All sides taper inward at 13 degrees. There are 4 main sides and between them are triangle shaped "filler" sides (shown in blue above). The colors in the image are just to illustrate the different sides. In reality it'll all be made of white oak, sealed with tung oil. So brown.
I'll be able to fit a lot of strawberries in this thing. It's gonna be awesome.

But a few questions present themselves. One thing I'm wondering about is watering. Assuming I fill the whole thing with soil, if I water from the top in that 6"x6" opening... will it adequately spread throughout the soil and get to the strawberries on the outside? Particularly around the bottom area, which is furthest from the opening and most spread out away from the center.

I've never watered a body of soil in this shape before, so I don't know. Have any of you?

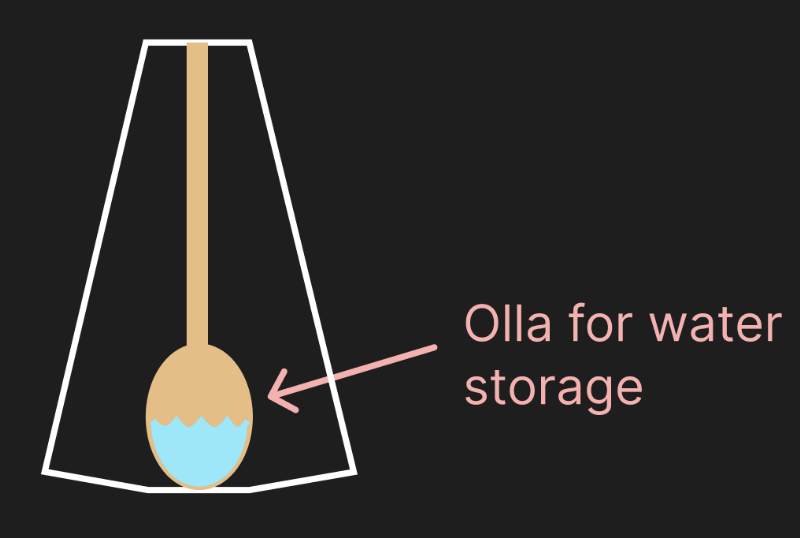
I'd love it if that was the case, because it would make things easy. But if not, there is another idea I had. A large olla.


Here, the bottom part could passively draw water from a reservoir in the terra cotta olla. I think this is a cool idea, because it also helps the overall structure not dry out as easily. More stable with hydration. But it's expensive to do this. So I'd prefer to not do it if I don't have to.

What do you think?
 
pollinator
Posts: 96
Location: Haarlem, The Netherlands
70
forest garden fungi trees urban writing ungarbage
  • Likes 7
  • Mark post as helpful
  • send pies
    Number of slices to send:
    Optional 'thank-you' note:
  • Quote
  • Report post to moderator
Good morning Peter,

Nice design. I think you need the olla or something like it. As an alternative, you could water into some of the holes in the side. Spiraling a drip irrigation hose inside the strawbelisk will certainly help. I think, the amount of soil in the strawbelisk, as well as the amount of plants, need a lot of water. It requires a lot of patience watering that all into the top of the strawbelisk, especially when the top is dry.

A cheap alternative for an olla, could perhaps be a bunch of sticks in the ground, sticking up almost to the top of the strawbelisk, wicking water from the ground (assuming there is water in the ground). I want to try this wicking myself this season, but I have no actual experience yet. The height of the structure might be an issue for wicking, so you still need to water from the top.

Good luck! Let us know what you did, and how well it worked. I would love to see a picture when it is ready.

 
steward
Posts: 19148
Location: USDA Zone 8a
4830
dog hunting food preservation cooking bee greening the desert
  • Likes 6
  • Mark post as helpful
  • send pies
    Number of slices to send:
    Optional 'thank-you' note:
  • Quote
  • Report post to moderator
I feel the water effect would be the same as if you were watering a 4 foot pot except the water would dry out faster due to the holes on the side.

I like this idea:

Nynke said, " Spiraling a drip irrigation hose inside

 
pollinator
Posts: 271
75
kids urban seed
  • Likes 4
  • Mark post as helpful
  • send pies
    Number of slices to send:
    Optional 'thank-you' note:
  • Quote
  • Report post to moderator
The olla idea makes sense here. The soil volume is relatively small and spread across a tall structure so it'll dry out faster than a regular pot. A buried reservoir in the centre would help a lot more than top watering. The drip line spiralled inside is probably the most practical option if you don't want to make an olla.
 
Peter Alewine
Posts: 16
3
  • Likes 5
  • Mark post as helpful
  • send pies
    Number of slices to send:
    Optional 'thank-you' note:
  • Quote
  • Report post to moderator

Nynke Muller wrote:
A cheap alternative for an olla, could perhaps be a bunch of sticks in the ground, sticking up almost to the top of the strawbelisk, wicking water from the ground (assuming there is water in the ground). I want to try this wicking myself this season, but I have no actual experience yet. The height of the structure might be an issue for wicking, so you still need to water from the top.


This idea struck me. Sticks! Trees wick water upward all the time, quite high. So I did a little test, putting various objects into a bucket of water, to observe how high they wicked water. I did two wooden dowels, two types of string, a chopstick, bamboo, an old stick I found in the yard, and a paper towel. Oh, and a glass straw for good measure, just to see if it would do anything.

Image attached.

The wood dowels took water up a couple inches, nothing impressive, and certainly not good enough for this application (which would involve lifting water 5-6 feet), but at least you could see it working. Everything else was even less impressive. Except for the paper towel. That thing got all the way to the top! I wonder how high it could get eventually. Too bad it would rot relatively quickly inside soil, making it unsuitable for my application.

Anyway, this tells me that simply using the wood from a tree, to wick water upward, is not able to fully recreate what goes on inside trees to move water. There must be more to it. I would love to be able to passively recreate that phenomenon though.

Do we even have a full understanding of how it works? I did a little searching but didn't come up with a fully satisfying answer...

IMG_3101.jpeg
[Thumbnail for IMG_3101.jpeg]
 
master pollinator
Posts: 5417
Location: Due to winter mortality, I stubbornly state, zone 7a Tennessee
2377
7
forest garden foraging books food preservation cooking fiber arts bee medical herbs
  • Likes 2
  • Mark post as helpful
  • send pies
    Number of slices to send:
    Optional 'thank-you' note:
  • Quote
  • Report post to moderator
I do not have personal experience with using rope for wicking. However I found Mart's use of wicking for seed starting, here very interesting. Perhaps a length of rope, adding a nest shape at the base of your plants would keep the lower soil from absorbing all the water near the bottom?
 
Peter Alewine
Posts: 16
3
  • Likes 2
  • Mark post as helpful
  • send pies
    Number of slices to send:
    Optional 'thank-you' note:
  • Quote
  • Report post to moderator
UPDATE:

I put together the shell of v1 (the initial drawing) and put it out in the yard to see how I liked it... but it didn't look good in the space I wanted to put it. So I went back to the drawing board.

I'm now thinking of doing 3 skinnier towers. Based on feedback about  watering and soil compaction, I'm thinking about putting in "shelves" for each plant. This would slow the water down as it flows through the tower, hopefully allowing the soil to hold onto more. If I make the shelves sturdy enough (like screwed in on 3 sides), it would also help with soil compaction because each section of dirt would be supported by its shelf.

Here's an image of Strawbelisk v.2 (below)

As before, I appreciate feedback! Always better to hear about things that can go wrong before I actually make the thing and stick a bunch of plants in it
strawberry-tower-2.jpg
[Thumbnail for strawberry-tower-2.jpg]
 
gardener & hugelmaster
Posts: 3953
Location: Texas
2262
cattle hugelkultur cat dog trees hunting chicken bee woodworking homestead ungarbage
  • Likes 4
  • Mark post as helpful
  • send pies
    Number of slices to send:
    Optional 'thank-you' note:
  • Quote
  • Report post to moderator
I like the V2.0 concept. It would probably help to use some sort of wicking or drip irrigation.

Before I moved away from Humphrey D Hugelhump I completely planted it in strawberries. I never saw it again but heard it produced many berries. Food for thought.
 
gardener
Posts: 5719
Location: Cincinnati, Ohio,Price Hill 45205
1320
forest garden trees urban
  • Likes 4
  • Mark post as helpful
  • send pies
    Number of slices to send:
    Optional 'thank-you' note:
  • Quote
  • Report post to moderator
I think you could use stacked terracotta pots and saucers to water the inside of a tower.
Each saucer would serve as a shelf to hold the growing medium, the pots would hold the water.

The more I think about it, the less appealing it is.
Water at the base would need to wick a long way up through the separate pieces of terracotta in order to keep the top of the tower moist.
Maybe a terracotta sewer pipe or a sewer pipe cast from mortar mix would work as a single  seamless tower olla.
 
pollinator
Posts: 3948
Location: Kent, UK - Zone 8
752
books composting toilet bee rocket stoves wood heat homestead
  • Likes 7
  • Mark post as helpful
  • send pies
    Number of slices to send:
    Optional 'thank-you' note:
  • Quote
  • Report post to moderator
I've built a couple of these and they work well. They do need regular watering through the summer, and good soil. I initially didn't use good enough soil and the plants struggled. This year I'm getting a few good strawberries each day from 2 barrels.

I want to move them to a better spot for more sun and easier care, but am limited by garden layout.

They are made by cutting a horizontal slice in the the barrel (I used a circular saw) and then heating the plastic with a hot air gun to soften it, before ramming a wine bottle in to make the opening.

For next time; I would keep the top 12 inches of plastic free from openings and fill with soil to leave 6" of space at the top. Then I can water by quickly tipping a whole watering can on each one. With the openings near the top, water runs down the side and washes out through the planting holes.

 
Nynke Muller
pollinator
Posts: 96
Location: Haarlem, The Netherlands
70
forest garden fungi trees urban writing ungarbage
  • Likes 2
  • Mark post as helpful
  • send pies
    Number of slices to send:
    Optional 'thank-you' note:
  • Quote
  • Report post to moderator

Peter Alewine wrote:
...
The wood dowels took water up a couple inches, nothing impressive, and certainly not good enough for this application (which would involve lifting water 5-6 feet), but at least you could see it working. Everything else was even less impressive...


Hi Peter,

I like that you run the experiment. Experiments don't lie.

However, the dowels are wood without bark. I think you need the bark, because the part between the bark and the wood, is where the water is transported. As I understood it, from some post here on permies, the transporting structure keeps on working, even after the wood is completely rotten.  The stick you used is very thin. It looks dead to me. I imagined the system with a larger piece of fresh wood. And last but not least, covering the wood in soil is part of the functionallity.

I have build my experiment as well,. Because it has been rainy, I can't tell whether it works or not,. My mount is only 2 or 3 feet high. I can imagine that the height is limited with this system.
 
Peter Alewine
Posts: 16
3
  • Likes 3
  • Mark post as helpful
  • send pies
    Number of slices to send:
    Optional 'thank-you' note:
  • Quote
  • Report post to moderator

Nynke Muller wrote:
However, the dowels are wood without bark. I think you need the bark, because the part between the bark and the wood, is where the water is transported.


That's a great point, one I had not considered. I just always assumed the entire body of the wood would be transporting water and nutrients. But upon further research, it looks like there's an outer band that is lighter in color and called the "sapwood" and this does the transporting. The inner ring, which is darker, does not, and is called "heartwood". So I may need to find a piece of wood that has sapwood intact and try again!

For the record, the bark itself does not seem to actually be important in transporting. It only serves as an outer protective layer. Sapwood is a region beneath the bark - this link has a good illustration of it. https://www.britannica.com/science/sapwood

Can you tell me about your own experiment?
 
Peter Alewine
Posts: 16
3
  • Mark post as helpful
  • send pies
    Number of slices to send:
    Optional 'thank-you' note:
  • Quote
  • Report post to moderator

Michael Cox wrote:I've built a couple of these and they work well. They do need regular watering through the summer, and good soil. I initially didn't use good enough soil and the plants struggled. This year I'm getting a few good strawberries each day from 2 barrels.


That's an interesting approach. I like how he puts the Olla in there. I may do that too if I have room in my newly-skinnified design.

For my own stuff, I'm trying to stay away from plastic as much as I can. It's a challenge! Currently for the body I'm using White Oak with Tung oil coating. Researching to decide what to use, and then obtaining the wood, cutting it, staining it... has all been a lot of work. But I've learned a lot in the process, so that's good. Still, it would be so much easier to just use plastic!   Hoping my wood setup will have good longevity, but we'll see.

Can you elaborate on your soil comment? What about it was not good enough? And what did you change to improve things?
 
Peter Alewine
Posts: 16
3
  • Mark post as helpful
  • send pies
    Number of slices to send:
    Optional 'thank-you' note:
  • Quote
  • Report post to moderator

Mike Barkley wrote:I like the V2.0 concept. It would probably help to use some sort of wicking or drip irrigation.


Yes, drip irrigation is on my to-do list of garden improvements to add! Not sure when I'll get to it, but I definitely want to do it.

Your hugelkulture mound was interesting to read about!
 
Peter Alewine
Posts: 16
3
  • Mark post as helpful
  • send pies
    Number of slices to send:
    Optional 'thank-you' note:
  • Quote
  • Report post to moderator

William Bronson wrote:
Water at the base would need to wick a long way up through the separate pieces of terracotta in order to keep the top of the tower moist.
Maybe a terracotta sewer pipe or a sewer pipe cast from mortar mix would work as a single  seamless tower olla.


I actually had previously thought about a terracotta pipe, going down into a large olla at the bottom. But after reading a bit more about these towers, it seems the top is actually the part that dries out fastest, and thus would need the olla. So maybe a thin pipe going only about halfway down could help with that.

But I can't find anywhere to buy a terra cotta pipe. Do you know of a place?

Also I had thought that terra cotta would help with vertical wicking, but an internet search tells me it will only wick a few inches upward. So it won't solve that problem of mine. The current design just tries to slow down the water as much as possible on the way down, and not worry about upward wicking. But I would love to get upward wicking on the order of 5-6ft.
 
Nynke Muller
pollinator
Posts: 96
Location: Haarlem, The Netherlands
70
forest garden fungi trees urban writing ungarbage
  • Likes 2
  • Mark post as helpful
  • send pies
    Number of slices to send:
    Optional 'thank-you' note:
  • Quote
  • Report post to moderator

Peter Alewine wrote:... it looks like there's an outer band that is lighter in color and called the "sapwood" and this does the transporting. The inner ring, which is darker, does not, and is called "heartwood"...

Can you tell me about your own experiment?


Thanks Peter, for explaing about the sapwood. I think that is what I read originally, but I remembered it wrong.

My inspiration came from a post "Hugelpots:burried wood pot culture"
Now that I read it back, I see that I had not noticed a reply from Doctor Redhawk, who should be listened to. He warned me that rotten wood should be used, or at least dead wood, not fresh wood. I read as well that I should have used multiple sticks of different thickness.

So, I did it wrong. I cut down a hazelnut tree, because it started to block the sun. I cut the trunk, maybe 4"-6" diameter, in yard long pieces. I bundled them. I dug a hole approximately 1 foot deep. The bundle is put in the ground vertically. Space in between is filled with weeds. Sod (with roots), that needed to be removed was piled around it and on top of it, but upside down. I have planted some seeds and seedlings. Peas seem to do best, besides weeds.
The aim was a mini hugelculture bridging the gap between two raised beds. I had made one before in which the wood was piled horizontally. That one is very dry, hence I wanted to make one with vertical wood.
I hope that in a year or two my wood will rot anyway and the wicking will start. I intent to plant a 3 years old avocado seedling in top next spring.
 
Peter Alewine
Posts: 16
3
  • Mark post as helpful
  • send pies
    Number of slices to send:
    Optional 'thank-you' note:
  • Quote
  • Report post to moderator
UPDATE v2.5:

Instead of doing flat partitions to slow and guide the water, I'm now planning to use trays. This will actually hold on to water longer term, kind of like Ollas would have. They will be tilted so that after one tray fills, it runs over into the next one, then the next one, and so on. I bought some aluminum food trays from the store tonight to use in my test run. May just keep them for the real thing, not sure.

Also figured out how I want to join the sides. Initially I put some 90* metal pieces and screwed those in, from the inside. But I didn't like how that was turning out. So I changed gears and used thin wood at the corners, and joined those with screws from the outside. I think that's the winning strategy. Allows me to use variegated wood colors too, which is always a nice effect.

Here's a picture of how a tray would be tipped. Then, if you can imagine, below it, there would be another tray, starting on the left and tipped downward to the right. To make a stair-step effect.

QUESTION: do you think having a small pool of water in those trays is good or bad?

-- Possible reason for it being bad: having pools of water could lead to root rot.

-- Possible reason for it being good: the biggest problem I should worry about with these towers is drying out. This will help prevent that.
IMG_3205.jpeg
[Thumbnail for IMG_3205.jpeg]
 
Yes, my master! Here is the tiny ad you asked for:
building a permaculture community with hands on permaculture
https://wheaton-labs.com/bootcamp
reply
    Bookmark Topic Watch Topic
  • New Topic