• Post Reply Bookmark Topic Watch Topic
  • New Topic
permaculture forums growies critters building homesteading energy monies kitchen purity ungarbage community wilderness fiber arts art permaculture artisans regional education skip experiences global resources cider press projects digital market permies.com pie forums private forums all forums
this forum made possible by our volunteer staff, including ...
master stewards:
  • Carla Burke
  • Nancy Reading
  • John F Dean
  • r ransom
  • paul wheaton
  • Jay Angler
  • Timothy Norton
stewards:
  • Pearl Sutton
  • Tereza Okava
  • Nicole Alderman
master gardeners:
  • Christopher Weeks
gardeners:
  • M Ljin
  • Megan Palmer
  • Pete Podurgiel

Multi-function kitchen work station

 
Posts: 198
Location: 55 deg. N. Central B.C. Zone 3a S. Nevada. Hot and dry zone
60
  • Likes 15
  • Mark post as helpful
  • send pies
    Number of slices to send:
    Optional 'thank-you' note:
  • Quote
  • Report post to moderator
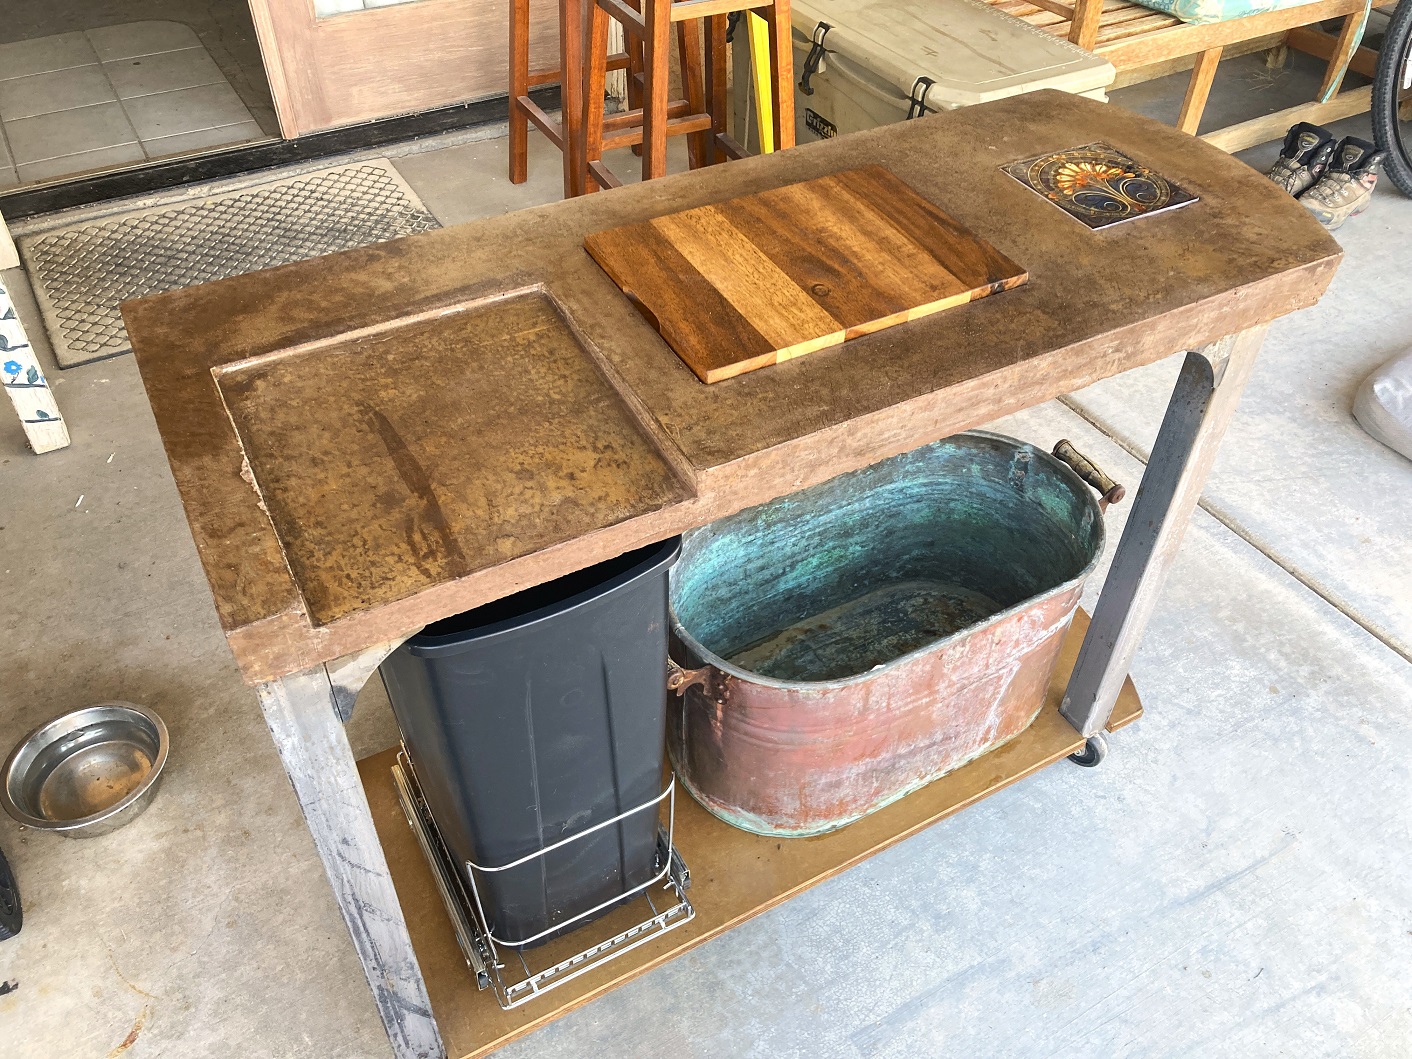
Lil'B is on the petite side and standard kitchen counter heights are uncomfortable for her to work on. We are also pressed for space in both our homes. I decided that a rolling prep table for the kitchen might help us out.
It was going to occupy the space we used for kitchen trash and recycle, so needed length to accommodate both, narrow enough not to intrude on walking path, be stable/solid, look old to match the old copper tub we use to hold recyclable drink containers, and make use of the pretty little Art Nouveau backsplash tile I had purchased second hand knowing I'd find a project for it someday.
I wanted a removable, cleanable, wood cutting board, a little slope to direct cuttings to the trash bin or compost bin, and a recess for the tile.
I had some 3/4"  MDO plywood around from a previous project. Stuff is a very stable, strong composite ply with a waterproof resin/kraft paper face. Originally designed for highway signs, I believe, takes paint well, and wears like iron, used in commercial concrete forms. Fairly easy to find through industrial suppliers, it is miles ahead of that disposable 'melamine' particle board juhnk the big orange sheeite box sells. Does nto cost a lot more. Takes/holds screws, cuts cleanly with power tools, holds a bevel without splintering, takes stain somewhat, reusable.
I cut a radius ended base form from MDO, bent some 1/4" ply around it, formed the straight sides with 1/2". Built positive molds for the cutting board, the slope and the tile. Caulked the corners and waxed the insides with beeswax as a release. The only concrete counters I ever poured were mechanically vibrated and wet ground afterwards to smooth them, I had no intention of tooling up for that.
I therefore hand mixed a slightly wet, small aggregate cement with added Portland for strength and water resistance. I added dark brown brick dye to get the base color. I have a 3/16 plate steel work table to set it up on, sturdy enough to beat with a rubber mallet from underneath. I rigged up a palm sander to make a vibrating screed to level the mix. I worked it until the air bubbles slowed.
Don't listen to the terror parrots shrieking about wet cement and shrinkage. Needs to be workable to settle into the form and around the moldings easily to avoid rock pockets and will set fairly quickly. You should get a bit of water rising as you float it, when it goes away, trowel it with steel.
Once it sets fairly hard the shrinkage slows dramatically and the water goes to work building the strength matrix. All that really happens is it pops a bit loose from the forms overnight.
I carefully stripped the form after about 16?hrs. watered the concrete and covered it with plastic to hold the wet in for 24 hrs, adding water once or twice.
I lost a few edges here and there, but that would be part of the 'old' look. I also knew I was going to skim coat the surface with cement/dye slurry for color and to fill little imperfections. I aged it for a few months while in Canada to fully cure it, dressed the edges and corners with a carborundum stone, then finished the surface. Sponged it after it set to get rid of the loose powder, sundried, dusted off and then worked some tan concrete stain to get that old leather or stone thing going. I sealed it with diluted, boiled Linseed oil, sun dried thoroughly and then beeswax.
I flipped the MDO form over to make the base shelf, stained and sealed it.
I welded up the cart from some tubing and scrounged casters I had around, short as possible, but tall enough to fit a roll out waste basket. The cutting board I made from some kind of asian hardwood salvaged from some discarded patio furniture. Edged, glued up, cut to size and run through the planer. Stained, sealed with Linseed oil and wax.
The copper 'Cream City' tub came from a very old town dump in Tonopah, Nevada, dates to WWI or so.
IMG_0275.JPG
A low kitchen workstation
IMG_0276.JPG
[Thumbnail for IMG_0276.JPG]
IMG_0277.JPG
[Thumbnail for IMG_0277.JPG]
IMG_0279.JPG
[Thumbnail for IMG_0279.JPG]
 
Tommy Bolin
Posts: 198
Location: 55 deg. N. Central B.C. Zone 3a S. Nevada. Hot and dry zone
60
  • Likes 4
  • Mark post as helpful
  • send pies
    Number of slices to send:
    Optional 'thank-you' note:
  • Quote
  • Report post to moderator
I think the finish for this project will be an appropriately old looking tapered wood trash bin.
 
master pollinator
Posts: 5456
Location: Due to winter mortality, I stubbornly state, zone 7a Tennessee
2430
7
forest garden foraging books food preservation cooking fiber arts bee medical herbs
  • Likes 2
  • Mark post as helpful
  • send pies
    Number of slices to send:
    Optional 'thank-you' note:
  • Quote
  • Report post to moderator
Beautiful work Tommy!
 
gardener
Posts: 445
Location: Southern Ontario, 6b
350
cat forest garden food preservation cooking writing ungarbage
  • Likes 2
  • Mark post as helpful
  • send pies
    Number of slices to send:
    Optional 'thank-you' note:
  • Quote
  • Report post to moderator
Great design and execution, and that tile is a stunner! So practical and pretty.
 
steward
Posts: 19525
Location: USDA Zone 8a
4915
dog hunting food preservation cooking bee greening the desert
  • Likes 2
  • Mark post as helpful
  • send pies
    Number of slices to send:
    Optional 'thank-you' note:
  • Quote
  • Report post to moderator
Nice!  Thanks for sharing!
 
Posts: 4
1
  • Likes 2
  • Mark post as helpful
  • send pies
    Number of slices to send:
    Optional 'thank-you' note:
  • Quote
  • Report post to moderator
Fantastic work! That would be such a time saver!
 
Posts: 110
Location: Mason County, WA USA:Ha; Harstine gravel ashy sandy loam
75
duck rabbit chicken medical herbs bee solar wood heat rocket stoves
  • Likes 7
  • Mark post as helpful
  • send pies
    Number of slices to send:
    Optional 'thank-you' note:
  • Quote
  • Report post to moderator
Tommy - your work is beautiful and inspiring!!
While I am glamping and building out tiny home here on my farm, I have been watching the forum posts related to kitchens: design, arrangement, style, components - and your work is such a great adaptation for height! Well done.  

I am gathering ideas for an outdoor kitchen which is my next priority, and found this - made from pallets and posted here https://www.facebook.com/photo.php?fbid=1982701269104288&set=p.1982701269104288&type=3

I like the way that both the undergirding supports and the top cross pieces have been used, and the integration with the corrugated metal.  And I have just gotten a delivery of 100 used pallets, so there is plenty to work with!

Thanks again for the inspiration.
Pallet-Outdoor-workspace.jpg
[Thumbnail for Pallet-Outdoor-workspace.jpg]
 
master steward
Posts: 16168
Location: Pacific Wet Coast
10641
duck books chicken cooking food preservation ungarbage
  • Likes 8
  • Mark post as helpful
  • send pies
    Number of slices to send:
    Optional 'thank-you' note:
  • Quote
  • Report post to moderator

Kara Ann wrote:...I like the way that both the undergirding supports and the top cross pieces have been used, and the integration with the corrugated metal.  And I have just gotten a delivery of 100 used pallets, so there is plenty to work with!


Kara, I would want much more roof overhang, if I was going to put work into the unit in your picture. It will neither keep the sun, nor the rain off the person working there!

However if you were to make a larger roof, it could potentially topple in the wind... everything's a tradeoff.
 
Jay Angler
master steward
Posts: 16168
Location: Pacific Wet Coast
10641
duck books chicken cooking food preservation ungarbage
  • Likes 7
  • Mark post as helpful
  • send pies
    Number of slices to send:
    Optional 'thank-you' note:
  • Quote
  • Report post to moderator

Tommy Bolin wrote:Lil'B is on the petite side and standard kitchen counter heights are uncomfortable for her to work on. We are also pressed for space in both our homes. I decided that a rolling prep table for the kitchen might help us out.


Counter height is so important, and it actually changes depending on the job being done. Kitchens used to have different work stations at different heights, before it was all modern, matching, and attached together. Good job meeting Lil'B's needs!
 
Kara Ann
Posts: 110
Location: Mason County, WA USA:Ha; Harstine gravel ashy sandy loam
75
duck rabbit chicken medical herbs bee solar wood heat rocket stoves
  • Likes 6
  • Mark post as helpful
  • send pies
    Number of slices to send:
    Optional 'thank-you' note:
  • Quote
  • Report post to moderator

Kara, I would want much more roof overhang


Hi Jay -   thanks for that - its a really good observation for this climate. I appreciate how practical you are!
I am glamping in a small RV trailer (no connections for water / sewer / electric - but an easy place to sleep and work my online day job with the solar power) while I continue to complete the tiny home projects. I am thinking that it could work well to set up an outdoor kitchen on the leeward side of the trailer, protected from wind and later day sun.
I liked the pic I posted earlier, and also saw several other options made from pallets on youtube....

And then I realized that I had picked up a scaffold unit at a local auction.  It is 6ft long 2.5ft deep, and very very sturdy..... maybe this would be much less work than building the pallet structure?  Work deck fully adjustable for height.... maybe cut a hole in the scaffold board to fit the sink that the neighbor was getting rid of, and matched to a bucket underneath... Some bars and a pot rack across the top to hang some things... a shelf across the upper bars... roll it in to place.  Easy to cover with a tarp when not in use. But that would not have ANY overhang.  

Possible? Crazy?  Any design suggestions?
Should I be discouraged from visualizing about this by the complete and total lack of any examples online where this appears to have been done?
scaffold.png
[Thumbnail for scaffold.png]
 
Jay Angler
master steward
Posts: 16168
Location: Pacific Wet Coast
10641
duck books chicken cooking food preservation ungarbage
  • Likes 4
  • Mark post as helpful
  • send pies
    Number of slices to send:
    Optional 'thank-you' note:
  • Quote
  • Report post to moderator
Kara Ann wrote:

Easy to cover with a tarp when not in use. But that would not have ANY overhang.  


I've added shed roofs to scaffold sections before.

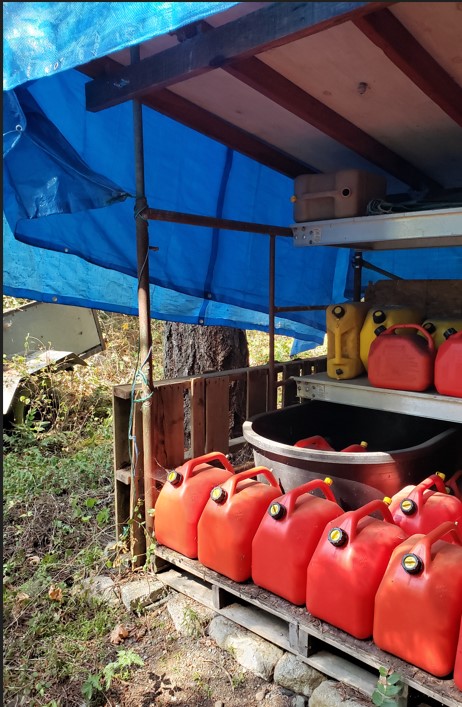
Our fuel shed is a 5ft x 10ft scaffold structure, but I only used the cross  piece at the back. I put vertical posts near the front, then support pieces at both the front and the back to support a shed roof.
The floor was made of pallets cut to fit with some salvaged, yucky fiber board on top (free is free...)

Your scaffold is much narrower and shorter. If you plan on using it beside your trailer, attaching some sort of tarp system to the trailer might make more sense in your situation.

I can take a few pictures tomorrow if you want to see how it turned out.
 
Kara Ann
Posts: 110
Location: Mason County, WA USA:Ha; Harstine gravel ashy sandy loam
75
duck rabbit chicken medical herbs bee solar wood heat rocket stoves
  • Likes 3
  • Mark post as helpful
  • send pies
    Number of slices to send:
    Optional 'thank-you' note:
  • Quote
  • Report post to moderator
Thanks Jay - and yes, I would love to see some pictures so I can follow your description.
 
Jay Angler
master steward
Posts: 16168
Location: Pacific Wet Coast
10641
duck books chicken cooking food preservation ungarbage
  • Likes 6
  • Mark post as helpful
  • send pies
    Number of slices to send:
    Optional 'thank-you' note:
  • Quote
  • Report post to moderator
Hubby bought a bunch of well-used scaffold end walls years ago, figuring they'd be useful and they have been, both for use as actual scaffold for both us and friends, and for a simple framework for temporary shelters.

One of the temporary permanent shelters did get disassembled and moved at one point, with some upgrades during the rebuild, and we call it the fuel shed as we have 3 different types of fuel used regularly with various bits of farm equipment.

https://permies.com/t/102665/a/294781/1-Fuel-shed-.jpg


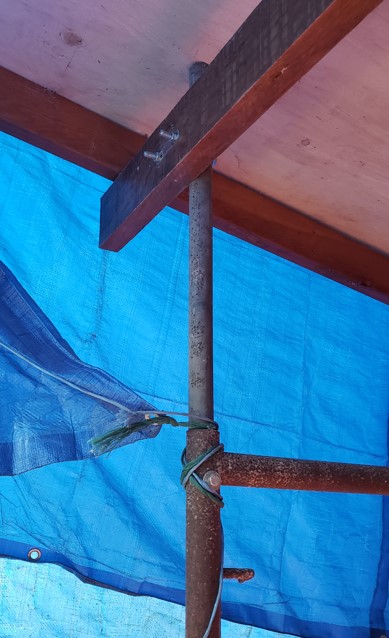
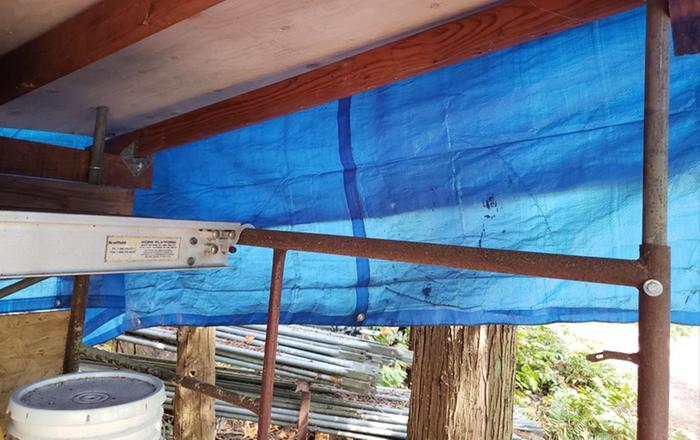
The tricky part is to find the right size of pipe to extend the top of the end walls so we can put a sloped roof on it, at a human friendly height. The front is shown in the picture below, and the shorter back  extension in the picture below that.

https://permies.com/t/102665/a/294783/3-fuel-shed-front-corner.jpg


https://permies.com/t/102665/a/294782/thumb-2-fuel-shed-back-corner.jpg


Fuel sheds need good air flow, but we do get some serious winds at times, and in the first location, the shed threatened to tip onto it's back and required guy ropes which can be a tripping hazard. When it needed to be moved anyway, I decided it needed an upgrade. Hubby bought a rock drill (we grow rocks better than just about anything else!) and a friend had given me a bunch of split pavers. So I very carefully drilled a hole in the chunk of paver, large enough that I could slide a piece of rebar through the hole and hammer it into the ground. The scaffold end frames slid over the rebar, which prevents it from moving more than part of an inch in any direction. Some wire attached to the rebar and the the end frame, stops it from tipping.  See the picture below.

https://permies.com/t/102665/a/294784/4-fuel-shed-base.jpg


Yes, it really could use a better roof, but that's never happened... too much else of higher priority.  

I grew up a city girl, so building anything has been a steep learning curve for me. I've been very happy with how well this shed does its job.
 
Tommy Bolin
Posts: 198
Location: 55 deg. N. Central B.C. Zone 3a S. Nevada. Hot and dry zone
60
  • Likes 3
  • Mark post as helpful
  • send pies
    Number of slices to send:
    Optional 'thank-you' note:
  • Quote
  • Report post to moderator

Kara Ann wrote:Tommy - your work is beautiful and inspiring!!
................. I have just gotten a delivery of 100 used pallets, so there is plenty to work with!
Thanks again for the inspiration.


Just an example, of kind thoughts, from everyone here, I really appreciate it.
Pallets, maybe not in WA, are often made of oak, maybe not of the best quality hardwood, but useful and beautiful. Keep an eye out, I've made a couple things over the years out of oak salvaged from what I found at work.
 
Tommy Bolin
Posts: 198
Location: 55 deg. N. Central B.C. Zone 3a S. Nevada. Hot and dry zone
60
  • Likes 4
  • Mark post as helpful
  • send pies
    Number of slices to send:
    Optional 'thank-you' note:
  • Quote
  • Report post to moderator
Those rolling Perry scaffolds are quite useful, consider having a parallel/replacement deck for when it's original purpose is needed.
The bolt holes drilled through the uprights look like a great way to attach any kind of roof or other structure.
 
What's a year in metric? Do you know this metric stuff tiny ad?
Willow Feeder Bundle: Movie, eBook and Plans
https://permies.com/wiki/359686/Willow-Feeder-Bundle-Movie-eBook
reply
    Bookmark Topic Watch Topic
  • New Topic