• Post Reply Bookmark Topic Watch Topic
  • New Topic
permaculture forums growies critters building homesteading energy monies kitchen purity ungarbage community wilderness fiber arts art permaculture artisans regional education skip experiences global resources cider press projects digital market permies.com pie forums private forums all forums
this forum made possible by our volunteer staff, including ...
master stewards:
  • Nancy Reading
  • Carla Burke
  • r ranson
  • John F Dean
  • paul wheaton
  • Pearl Sutton
stewards:
  • Jay Angler
  • Liv Smith
  • Leigh Tate
master gardeners:
  • Christopher Weeks
  • Timothy Norton
gardeners:
  • thomas rubino
  • Jeremy VanGelder
  • Maieshe Ljin

My shipping container cabin/shelter

 
Posts: 79
15
  • Mark post as helpful
  • send pies
    Number of slices to send:
    Optional 'thank-you' note:
  • Quote
  • Report post to moderator

jeannacav wrote:
Nice job.

I am doing this but with 2 x  20's in a train style.
They are separate with enough space for 1 set of cargo doors to be open.

How well is the composting toilet working?
Is it getting enough warmth and is it adding too much humidity to the room?
I am putting mine in the back corner sitting atop a box made of 2 pallets filled with insulation.
(I am without electricity also.)

Your wood interiors are so beautiful. I just love them. I will just use sheet rock.

I am using shellac to keep the toxic floors from off gassing into my breathing space.
I guess if you didn't notice it when the container was fresh, you won't have a problem now.
I need to shellac my floors before I even add the insulation.
Latex paint might work as someone suggested, but shellac definitely will work, and the pretty floors will be visible.

Thanks for posting your progress. I had given up looking for this kind of info on containers a while back and stopped by today on a whim.
I am insulating next week, and I am wondering if you have any moisture difficulties?

I love how solid the container feels.

You did a really nice job.

thanks,

jeanna

T
Thanks jeanna.
I have not put the composting toilet to work yet. The bathroom is the very last room I will finish. But I can tell you that because of the earth bank on the container walls, it is usually 40-45 degrees in the cabin without the heater on days when it is in the 20's outside, so I think it will not have a freezing issue, and it will be in a room next to the earth embankment.
On my floors I am going with hardwood and tile with an underlayment for a vapor barrier.
Wall moisture is not a problem where the exterior was sprayed with foam, the front wall had a slight problem but has been pretty much resolved using the plastic sheeting as a barrier.
The biggest moisture problem was under the container and I have now added vents and a crawl space fan to resolve that issue.
I will update my progress next week, with some new pics.
When you have time, show us some pictures of your project, I would like to see what you got going. Larry   


Posts: 52
  • Mark post as helpful
  • send pies
    Number of slices to send:
    Optional 'thank-you' note:
  • Quote
  • Report post to moderator
Thanks, Larry,

That temperature and moisture info is helpful.

I have some 'before' pix on some hard drive or other  , and when I can find them, I will post.

I am sooo glad someone else is doing this!

jeanna
 
Larry Schlicker
Posts: 79
15
  • Mark post as helpful
  • send pies
    Number of slices to send:
    Optional 'thank-you' note:
  • Quote
  • Report post to moderator
jeanna:
  It is interesting that you said you were going to do a train type theme. That is what I was originally going to do. I had planed on using corrugated tin in the ceiling corners to get the curved effect, then T&G in the middle of the ceiling then T&G in the upper part of the walls with corrugated tin along the bottom. But I got such a good deal on the T&G knotty pine that I ended up doing the whole thing in it.
I can hardly wait to see your project and please keep us posted on its progress.
 
                          
Posts: 52
  • Mark post as helpful
  • send pies
    Number of slices to send:
    Optional 'thank-you' note:
  • Quote
  • Report post to moderator
Larry,

I found this pic.
It is the front of the caboose, before the train car arrived.

You can see how the entire frame for the front door has been made inside the cargo doors.
If you squint your eyes you can see the studs inside.
This caboose has only 2 windows because it will be mostly bermed.

I plan to grow a wild flower garden on the roof when the soil is up there.

In front of the caboose in between the 2 cars is about 5 feet on one side and 6 feet on the other.
(The train is rounding a turn.)
This space will have a metal roof and the cargo doors will be opened under that roof. In this space which is open yet protected, I plan to set up an outdoor cook stove. The 20 footer is too small to cook inside.

Originally, I planned to have a 3rd and possibly a 4th car, but these were too hard to get onto the land and I am not sure they will work out. (Although, I am encouraged from your report!)


BTW, this is rain forest. It was clearcut about 12 years ago. Mostly I have the alders with their ferns and a very few firs. The life is abundant.
Since the upper story is not too dense, I am planting fruit trees in the forest, near the openings.
DSCF6756.JPG
You can see how the entire frame for the front door has been made inside the cargo doors.
 
                          
Posts: 52
  • Mark post as helpful
  • send pies
    Number of slices to send:
    Optional 'thank-you' note:
  • Quote
  • Report post to moderator
Just so that my description of the 2 containers makes more sense, Here is the train car being placed.

This back door is on the same side of the train as the door to the caboose, so I can take 2 steps from one to the other... just like a train!

jeanna
DSCF6780.JPG
Here is the train car being placed.
 
Larry Schlicker
Posts: 79
15
  • Mark post as helpful
  • send pies
    Number of slices to send:
    Optional 'thank-you' note:
  • Quote
  • Report post to moderator
That is a good looking container. Mine were a little beat up, but are still gone to work out fine.
I like the idea for your cooking area, sounds like you have some great ideas!
 
Posts: 77
  • Mark post as helpful
  • send pies
    Number of slices to send:
    Optional 'thank-you' note:
  • Quote
  • Report post to moderator
Larry - apologies if this has already been covered and I just missed it, but how did you seal the gap between the two containers along the top?  Did you just weld a bead along the frames?  Or did you have to put a sheet metal piece down to close the gap?

Thanks,
doug
 
pollinator
Posts: 1481
Location: Vancouver Island
60
  • Mark post as helpful
  • send pies
    Number of slices to send:
    Optional 'thank-you' note:
  • Quote
  • Report post to moderator

elsyr wrote:
Larry - apologies if this has already been covered and I just missed it, but how did you seal the gap between the two containers along the top?  Did you just weld a bead along the frames?  Or did you have to put a sheet metal piece down to close the gap?


The sides (ends) were single bead, but I don't think he showed the top.... speaking of which, I showed the pics to my Yf. She likes the inside, but doesn't like the flat top.... go figure
 
Larry Schlicker
Posts: 79
15
  • Mark post as helpful
  • send pies
    Number of slices to send:
    Optional 'thank-you' note:
  • Quote
  • Report post to moderator

elsyr wrote:
Larry - apologies if this has already been covered and I just missed it, but how did you seal the gap between the two containers along the top?  Did you just weld a bead along the frames?  Or did you have to put a sheet metal piece down to close the gap?

Thanks,
doug

doug:
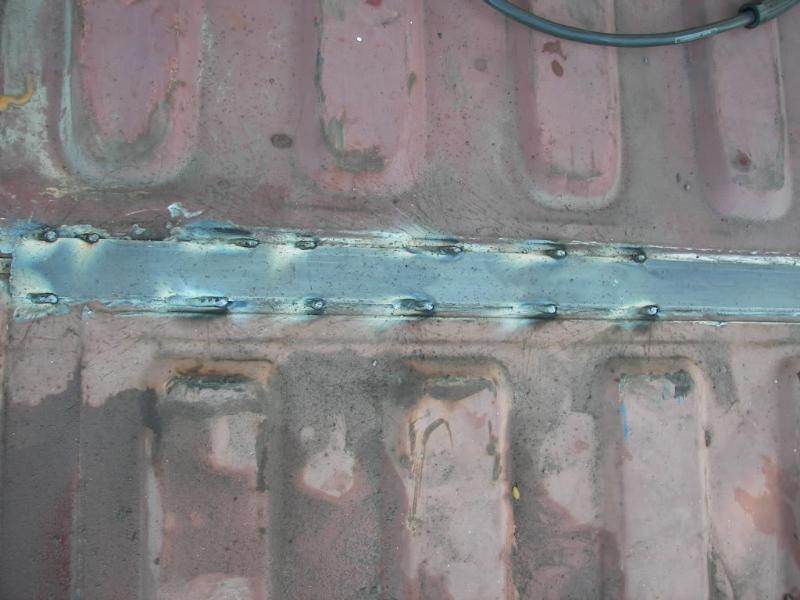
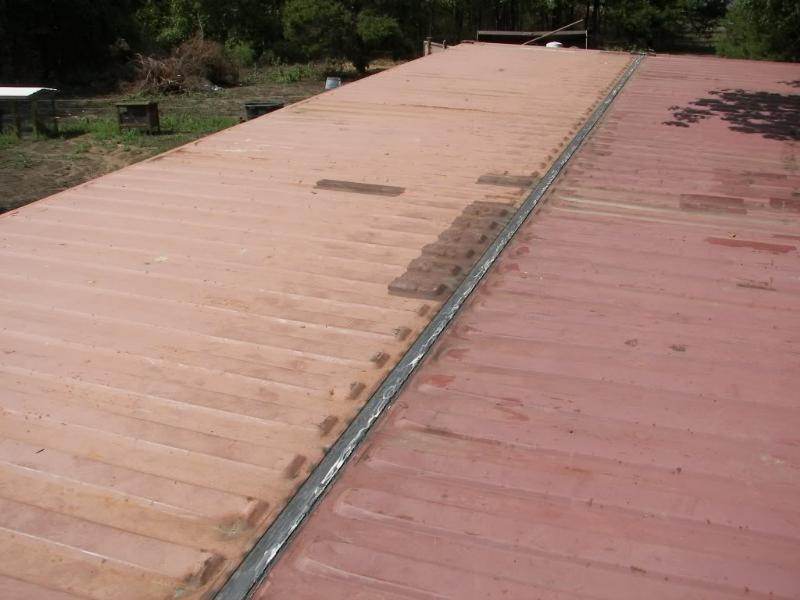
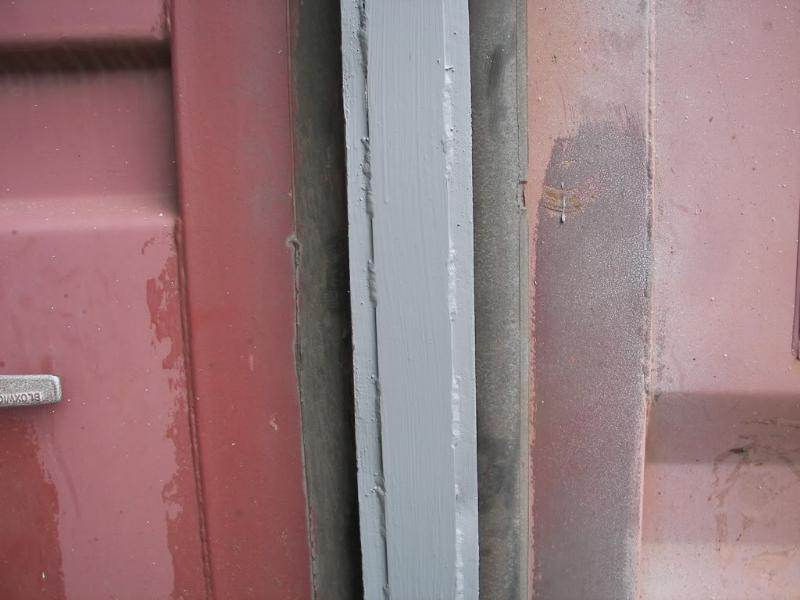
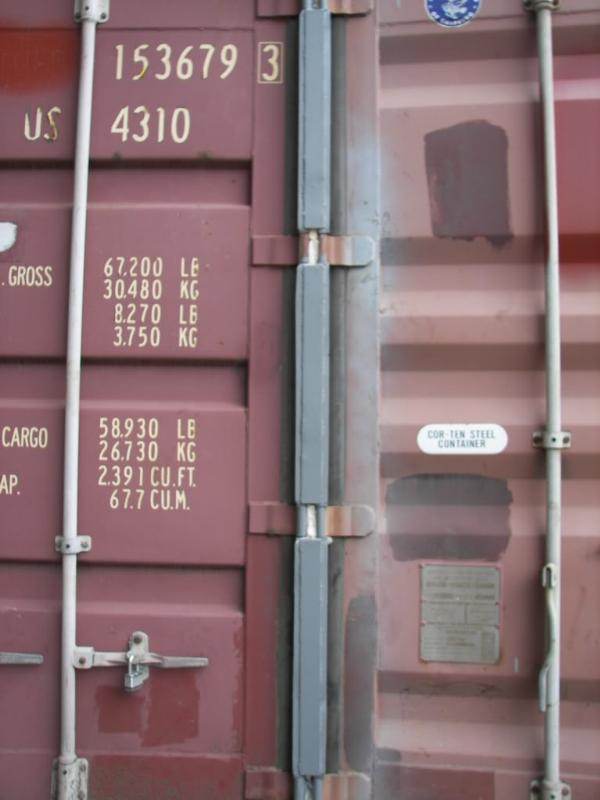
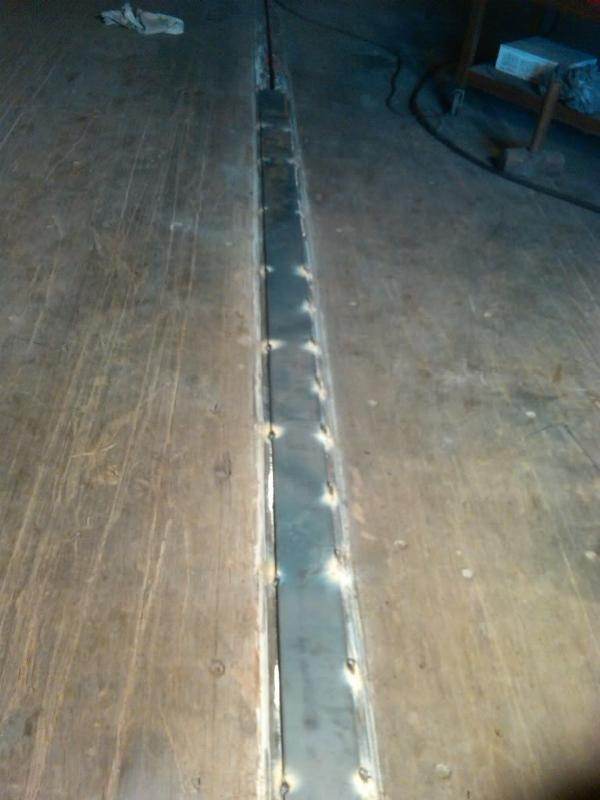
First I used the spray foam in a can to seal the gap between the two containers. The surface was then cleaned and welded. I used 1/8 X 2" flat sheet metal between the outer portion of the containers, and 1/8 X 3" on the interior floor. Pictures below. the first are the roof pictures followed by the end walls then the floor. The whole procedure is on my blog here http://seacontainercabin.blogspot.com/p/welding-containers-together.html


The bottom was not sealed with the spray foam, just welded together.
 
Larry Schlicker
Posts: 79
15
  • Mark post as helpful
  • send pies
    Number of slices to send:
    Optional 'thank-you' note:
  • Quote
  • Report post to moderator

Len wrote:
The sides (ends) were single bead, but I don't think he showed the top.... speaking of which, I showed the pics to my Yf. She likes the inside, but doesn't like the flat top.... go figure

I kind of like the flat roof, but I have seen many that have added a pitched roof and they look great.
 
Doug Gillespie
Posts: 77
  • Mark post as helpful
  • send pies
    Number of slices to send:
    Optional 'thank-you' note:
  • Quote
  • Report post to moderator
Thanks - that's about exactly as I'd pictured it!

Doug
 
                          
Posts: 52
  • Mark post as helpful
  • send pies
    Number of slices to send:
    Optional 'thank-you' note:
  • Quote
  • Report post to moderator
Nice job, larry.
I am impressed.

jeanna
 
                            
Posts: 5
  • Mark post as helpful
  • send pies
    Number of slices to send:
    Optional 'thank-you' note:
  • Quote
  • Report post to moderator
WOW!!! I hope your photos and blog inspire others to just get out there and start building...you've done a great job.
 
                          
Posts: 52
  • Mark post as helpful
  • send pies
    Number of slices to send:
    Optional 'thank-you' note:
  • Quote
  • Report post to moderator
We did more work, and I have some more pix.

This first one is taken inside the "traincar" looking out the front window.

The next is inside the caboose looking to the back.

I have another but I am not getting the option to add any more pix, so here are the 2 I just described.

jeanna
TraincarOutFront.JPG
inside the traincar looking out the front window
CabooseBackCorner.JPG
inside the caboose looking to the back
 
                          
Posts: 52
  • Mark post as helpful
  • send pies
    Number of slices to send:
    Optional 'thank-you' note:
  • Quote
  • Report post to moderator
Here is the third pic I have for you today...

The amount of the container you can see is about 10 feet, which is half of it.

As you can see the walls are all up in this direction.

The composting toilet is placed in its approximate final spot, for now, and I will put a stall shower on the right corner there with a zodi extreme shower.
Both of these will be raised above the floor level, The toilet needs 10 inches of insulation below it and the shower needs a removable water reservoir as there is no drain.
The water from the shower will be carried in and drain out into a pail which can be carried back out into the forest. (good permie!)

thank you,

jeanna
CabooseWallsUp.JPG
The composting toilet is placed in its approximate final spot
 
Larry Schlicker
Posts: 79
15
  • Mark post as helpful
  • send pies
    Number of slices to send:
    Optional 'thank-you' note:
  • Quote
  • Report post to moderator
That's looking great. I really like the side light!
 
                          
Posts: 52
  • Mark post as helpful
  • send pies
    Number of slices to send:
    Optional 'thank-you' note:
  • Quote
  • Report post to moderator
Thanks Larry,

Yeah, I had asked him for one of those front door arrangements with one stationary glass and one full glass door. He couldn't get the one that I saw (that was inexpensive) so he did this.
I think I like it better, in fact.

It is very interesting to me that the one that has the insulation and sheetrock is very much drier inside than the one still unfinished.

I am planning to go there in the morning this saturday to see how much time it takes to warm it with my little buddy propane heater. this will tell me what kind of permanent heater I will need.

I am quite sure wood will be too hot, but it is so drying, which is a good thing in the rain forest, I may look for a very tiny wood stove.
The problem there is where to cut the hole for the stove pipe in an 8 foot room!.
Maybe I will invent something for heating rocks outside and bringing them inside like a sweatlodge on a brick hearth.

Oh this is starting to sound like fun!

thank you,

jeanna
 
Larry Schlicker
Posts: 79
15
  • Mark post as helpful
  • send pies
    Number of slices to send:
    Optional 'thank-you' note:
  • Quote
  • Report post to moderator
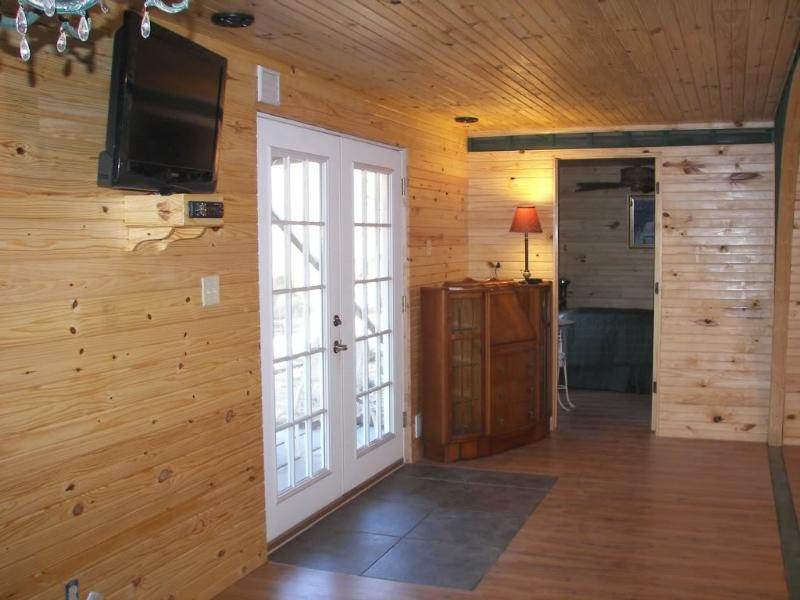
Living area is for the most part finished. I still need to finish the hearth for the stove, but other then that, it is done. My entertainment system is a 32" flat screen with a 12 volt car stereo with bluetooth and cd/dvd player, also takes SD cards, four ceiling mounted speakers.
The space in between the two floors has yet to be grouted and painted to match the flooring, but I will do that when I finish my other tile work.
The living area is 14'6"X 14'7"


Posts: 52
  • Mark post as helpful
  • send pies
    Number of slices to send:
    Optional 'thank-you' note:
  • Quote
  • Report post to moderator
Larry, that is so pretty.

I love the contrast you are playing with in the metal industrial with the honey colored wood, just brim full of sweetness and warmth.

What is that little room at the end? and what are its approximate dimensions? (both of them, I guess)

thank you,

jeanna

 
Larry Schlicker
Posts: 79
15
  • Mark post as helpful
  • send pies
    Number of slices to send:
    Optional 'thank-you' note:
  • Quote
  • Report post to moderator

jeannacav wrote:
Larry, that is so pretty.

I love the contrast you are playing with in the metal industrial with the honey colored wood, just brim full of sweetness and warmth.

What is that little room at the end? and what are its approximate dimensions? (both of them, I guess)

thank you,

jeanna


Thank you Jeanna!
Those are the bedrooms. Bedroom on the left is 7'3"X 12'3"
The bedroom on the right is 7'3"X 11' it is shorter because it houses the solar electric components in the rear portion of that room. The solar components are separated by a wall which is insulated and has a 4 mil plastic vapor barrier on both sides. 
 
EDIT: Also the solar components are at the door end so I have access to them. It consist of 5 deep cycle batteries, a 3,000 watt converter, fuse board and charger controller and hook up for a generator.   
 
Posts: 631
Location: NW MO
9
  • Likes 1
  • Mark post as helpful
  • send pies
    Number of slices to send:
    Optional 'thank-you' note:
  • Quote
  • Report post to moderator
I love it when people say "NO" to the conventional 30+ year mortgage and build something on their own... Beautiful ideas and jobs of building these places. Thanks for the pics.

I built my place from a burned out basement 30 years ago and had an 8 year mortgage that i paid off in 5 years.
(Interest was very high back then..i had a 12% note, but 20+% was not uncommon.)

I have a problem with moisture and will need to replace the roof someday. I see a problem in these steel units that i don't think the vapor barriers you mention will completely solve. If you are in the desert, this may not be a problem, but if in a place where summer humidity is high, I think you should consider a dehumidifier and some ventilation high on the outside that allows moisture to move from the living area to the outside.  Also be sure to vent all moisture producers like showers, cooking, clothes drying.

Maybe you have already considered this and have ventilated.

Anyway great JOB BOTH of you..

-=-=-=-=-=-=-=


Posts: 52
  • Mark post as helpful
  • send pies
    Number of slices to send:
    Optional 'thank-you' note:
  • Quote
  • Report post to moderator
Thanks Larry,
So this leaves around 30 x 16 for the remaining space.
Is it all open , or did you enclose  a room at the other end? (I am guessing the toilet has its own room and the shower might be near it too.)
I like those curved windows too.
I guess welding is your game! 

Thanks ronie,

I am very concerned with the moisture question.
I am not actually underground, which I think it different from berming-by-adding to the top, but I could be wrong.
This container I call the caboose never showed moisture problems in the winter freeze we had, but the train car did because there was water infiltration from the back door and the floor was sopped.
I am starting the train car today and rain is predicted, so I will be able to see if the changes I made will keep the water out.

As for showers, yes. I am using a zodi extreme which is portable.
I will be able to shower outside or in the greenhouse-to-be if shower moisture ever becomes too much of a problem.

We exhale a liter a night so this is significant moisture in a small closed environment esp with a cold outside wall.

A dehumidifier is out of the question with no electricity.

I like the vent suggestion you made.
Have you found this to be successful yourself? (I mean is this your next plan, or do you know it does enough to actually help?)

thank you,

jeanna
 
            
Posts: 79
  • Mark post as helpful
  • send pies
    Number of slices to send:
    Optional 'thank-you' note:
  • Quote
  • Report post to moderator
You could try a chemical dehumidifier.  RV supply stores sell these..  Basicly, it is a granular powder that absorbs moisture out of the air.  The powder can be 'recharged' by heating it in an oven or a solar cooker.  What you are doing is drying out the absorbant material, which is then put back into the container and put back into the moisture-rich environment.  Sometimes it changes color when it is full of water.
 
ronie dean
Posts: 631
Location: NW MO
9
  • Mark post as helpful
  • send pies
    Number of slices to send:
    Optional 'thank-you' note:
  • Quote
  • Report post to moderator
I came up with an answer to my ventilation problem, but it was too late. I am not going to use the idea with the 30 year old roof. The joists are good but the deck of the roof is going to need replaced - so i am going to replace with a slopped roof. 

In the center on top of your flat roof, make a pitched area all along the middle length ways get it ready to caulk down then before you caulk it down, open the center up drill it full of vent holes (or cut a section out all along the center) - put screen over the holes and then caulk the pitched part down over the vent holes. Then you could close both ends of the gable and either vent both ends with gable vents (very hard to find). or even put one of the whirley wind turned vents in the middle... 
The gable would look best if you covered the whole roof with it, but it would be expensive.

You might consider a rectangular box say 2 feet wide by six inches tall by 25 feet or the length of the unit. Placed in the center on top.  That might look better for your shape. (It wouldn't necessarily have to be 2 feet wide, just trying to imagine what would look good on your rectangular shape unit).

I would also do an over hang all along each long wall on the outside and vent it along there too. The over hang would keep rain out of your vent holes. Could be something as simple as edging steel.

You don't want the problem i have of having to replace the top and sides in 30 years. The moisture produced inside will most likely wet the insulation and rust from the inside out. (My walls are block so i don't have to replace the walls, but replacing the roof is going to be a trick with the insides finished and me living there).

I don't know how well PaulB's idea of using chemical absorber will work. Just don't cover the insul and do nothing. You have to get the moisture out or pay sooner of later.
 
Larry Schlicker
Posts: 79
15
  • Mark post as helpful
  • send pies
    Number of slices to send:
    Optional 'thank-you' note:
  • Quote
  • Report post to moderator

jeannacav wrote:
Thanks Larry,
So this leaves around 30 x 16 for the remaining space.
Is it all open , or did you enclose  a room at the other end? (I am guessing the toilet has its own room and the shower might be near it too.)
I like those curved windows too.
I guess welding is your game! 


The kitchen and dinning is pictured on the right side. It will be approx 7'3" X 13'. The bathroom is behind the door on the left and it is 7'3" X 8'. It will have the compost toilet, a wash stand and corner shower stall. Also in the bathroom will be a stacked washer and dryer and beside it will be the solar water heater. I am going to separate the washer and dryer combo and water heater with their own room inside the bathroom with folding doors for access.
Now behind the bathroom will be a good size walk in pantry, it will be accessed from the kitchen and will be about 4.5' 'X 8'
 
Larry Schlicker
Posts: 79
15
  • Mark post as helpful
  • send pies
    Number of slices to send:
    Optional 'thank-you' note:
  • Quote
  • Report post to moderator

ronie wrote:
I love it when people say "NO" to the conventional 30+ year mortgage and build something on their own... Beautiful ideas and jobs of building these places. Thanks for the pics.

I built my place from a burned out basement 30 years ago and had an 8 year mortgage that i paid off in 5 years.
(Interest was very high back then..i had a 12% note, but 20+% was not uncommon.)

I have a problem with moisture and will need to replace the roof someday. I see a problem in these steel units that i don't think the vapor barriers you mention will completely solve. If you are in the desert, this may not be a problem, but if in a place where summer humidity is high, I think you should consider a dehumidifier and some ventilation high on the outside that allows moisture to move from the living area to the outside.  Also be sure to vent all moisture producers like showers, cooking, clothes drying.

Maybe you have already considered this and have ventilated.

Anyway great JOB BOTH of you..

-=-=-=-=-=-=-=


Thanks for your suggestions and comments. I have been trying to address the moisture issues as I go. I think the one good thing other then looks is the fact that all the wood in my project will absorb a lot of moisture. My dryer will be vented to the outside, and I have installed a dual fan crawl space ventilator for drawing the moisture from underneath and between the walls of the container. I do have plans for awnings over the windows once I get everything else done.  And I have some ideas for the roof, but not sure what direction I am going to go on that yet.
 
                              
Posts: 1
  • Mark post as helpful
  • send pies
    Number of slices to send:
    Optional 'thank-you' note:
  • Quote
  • Report post to moderator
Now THAT is cool! Thank you for sharing all those pics and tips
 
Larry Schlicker
Posts: 79
15
  • Mark post as helpful
  • send pies
    Number of slices to send:
    Optional 'thank-you' note:
  • Quote
  • Report post to moderator

Gr8ful wrote:
Now THAT is cool! Thank you for sharing all those pics and tips

Thank you!
I am finishing the pantry right now, then I just have the kitchen and bathroom, then it is finished. I will still have a few things left like installing my solar panels and a couple awnings over the windows, but those can wait a while.
 
Posts: 0
6
  • Mark post as helpful
  • send pies
    Number of slices to send:
    Optional 'thank-you' note:
  • Quote
  • Report post to moderator

ronie wrote:
The moisture produced inside will most likely wet the insulation and rust from the inside out. (My walls are block so i don't have to replace the walls, but replacing the roof is going to be a trick with the insides finished and me living there).

I don't know how well PaulB's idea of using chemical absorber will work. Just don't cover the insul and do nothing. You have to get the moisture out or pay sooner of later.


Excessive moisture in the air can be a big problem in cool and cold weather. People are more comfortable with humidity from 30 - 50%. Buildings in cold weather might not like that much moisture in the air. Excess humidity should be vented to the outside. Water vapor must also be kept away from cold surfaces; cold enough for water vapor to condense on. If the moisture laden air can reach a cool enough surface the moisture will condense. It is not surprising that the walls with the exterior foam are not experiencing moisture problems.

Example: In a space at 70 degrees F with 66% humidity, moisture will condense on a surface at 58 degrees F.   The temperature at which condensation will occur is the dewpoint. At 30% the dewpoint is 37 F. At 90 % the dewpoint is only 67 F.

In cold weather climates a good vapor barrier is required on the interior walls/ceiling. This is placed on the warm side of the insulation. It is sometimes difficult to seal these vapor barriers well enough to do a proper job and prevent moisture from entering the wall or rafter cavities. Switch and outlet cutouts are a place where lots of air infiltration can occur. Builders in cold climates will often apply 1 inch rigid foam sheets to the exterior to help with this. Then the exterior finish material is applied over than after a weather resistant barrier is applied over the foam. The layer of insulation on the outside keeps the inside surface of the exterior wall warmer. If that wall surface does not get cold enough to reach the dewpoint condensation will not occur.

In the situation of a sloped roof above an insulated ceiling, an attic in other words, the best solution to preventing condensation on the underside of the roof sheathing is ventilation, in addition to an effective vapor barrier. Attics should have provision for air to air at/near the roof-wall overhang (soffits) and to exit at the ridge. In lieu of a ridge vent gable end vents work. A minimum of 1 sq ft of vent per 150 sq ft of floor space is what is recommended (code). That is slpit between upper and lower vents.


The wood will absorb some moisture. If it absorbs too much it will expand. If the moisture content rises too much there may be buckling. Moist wood is also a growth medium for mold, maybe where it can not be seen like in the walls.

A very rough rule of thumb is that for a change of 4% in the moisture content of wood, the dimension will change by 1%. It varies between species and how the lumber is sawn from the log.  Optimal conditions for mold growth include raw wood surfaces (the backside of a wall) above 20% moisture content, air temperatures from 66 to 90 degrees F, dark or dim light, and little to no air movement. (the inside of the wall cavity should have no air movement, and is dark)

That was rather long; hope it helps somebody.
 
Anonymous
Posts: 0
6
  • Mark post as helpful
  • send pies
    Number of slices to send:
    Optional 'thank-you' note:
  • Quote
  • Report post to moderator
I meant to add, it sure looks nicely finished
 
Larry Schlicker
Posts: 79
15
  • Mark post as helpful
  • send pies
    Number of slices to send:
    Optional 'thank-you' note:
  • Quote
  • Report post to moderator
Thank you, and thanks for all the info. I did pretty much wrap this cabin in 4 mil. plastic. I am also going to add more spray foam to the outside when the weather warms up again. And I have some new ideas for the roof, just not sure what direction I am going to go. I think it is fine as is, but I just want something different.
 
                          
Posts: 52
  • Mark post as helpful
  • send pies
    Number of slices to send:
    Optional 'thank-you' note:
  • Quote
  • Report post to moderator
Hi Mtn don, and welcome.

Thanks for the info.

when I lived in Massachusetts, I used shellac as a water barrier. It was sold as such with a bit of color and also worked as a primer.
I am planning to use that on the walls again.

Actually, the moisture seems fine right now. I guess the building materials absorb enough and the evaporation is fast enough that it is not building up inside!
I am relieved.
AND, I will use the shellac as primer even tho it isn't sold as primer out west afaI can tell. Maybe, I will add some pigment, maybe just plain.

--
Good progress Larry,
Your pantry is almost finished. I betcha it is pretty nice as all the rest so far sure is!

I guess you really did wrap it up too.
thanks for that pic.
--

I just finished the sheetrock in the traincar today.
So, now there is no more sheetrock to do except for the "bathroom" wall.

But first, I believe I will spackle all the seams.
My plan is to use silicon in the deep or wide seams and add spackle later on the top.
Silicon won't take paint, but it is a good binder with gypsum, so I think this should add a flexible spackle.
Frankly some of the seams are very wide.
Coming from the east coast where the houses were built 100 or so years ago, I have little experience with this wall board stuff!

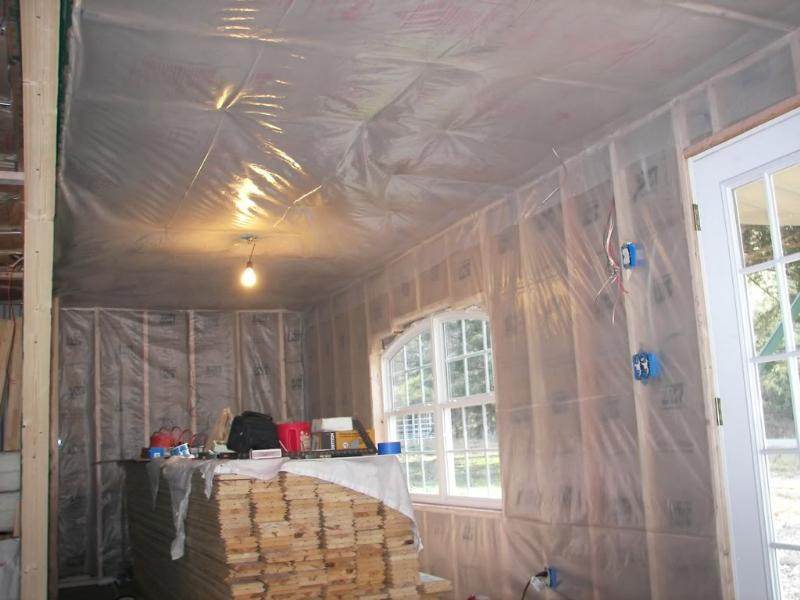
Here are 2 pix from today.
They are both of the traincar after adding the insulation and before starting the final sheetrock.
One is from the front and one from the back.
We sure had a beautiful day today.

jeanna
TraincarAlmostRocked.JPG
from the front of traincar after adding the insulation
TraincarAlmostRockedFront.JPG
from the back of traincar after adding the insulation
 
                        
Posts: 278
Location: Iowa, border of regions 5 and 6
  • Mark post as helpful
  • send pies
    Number of slices to send:
    Optional 'thank-you' note:
  • Quote
  • Report post to moderator
Jeanna, just one comment: You need to make sure the insulation is "fluffed out" enough so that it is touching the sheet-rock when you put it up.  As an example: suppose you're using 4 inches of insulation with a total R value of 20.  If you install the insulation so that it's mushed down making it only 3 inches thick, then you'll only have insulation worth R-15.  You'll have lost 25% of your insulation just by compressing it.

Also, you greatly increase the potential for moisture getting trapped behind the wall by creating spaces for the air to circulate, between the sheet-rock and the insulation.
 
                          
Posts: 52
  • Mark post as helpful
  • send pies
    Number of slices to send:
    Optional 'thank-you' note:
  • Quote
  • Report post to moderator
@Muzhik,
You are exactly correct on this!


In fact the insulation is very compressed in the bag and by the time we put the sheetrock on over it, we must push it back down to get it out of the way.
I suspect it keeps getting fluffier for a while.
And it is really quiet inside. This insulation makes a big sound difference. I have some extra, and I am tempted to put it behind some walls in my current house and get some sleep.

@all,
We mixed and mudded today. I guess this will take another week or so. It is much easier than putting the sheetrock up onto the wall, but more time consuming than I thought it would be.


jeanna
 
Larry Schlicker
Posts: 79
15
  • Mark post as helpful
  • send pies
    Number of slices to send:
    Optional 'thank-you' note:
  • Quote
  • Report post to moderator
Your train is coming along nice. I have done some sheet rock work in my time and filling in those seems is the part I never liked, (mud & tape) but it is also the part that makes it look nice. You have any ideas as to your interior colors? Thanks for taking the time to share your progress. I wished I lived in that rain forest right now 
 
Len Ovens
pollinator
Posts: 1481
Location: Vancouver Island
60
  • Mark post as helpful
  • send pies
    Number of slices to send:
    Optional 'thank-you' note:
  • Quote
  • Report post to moderator

Larry wrote:
I wished I lived in that rain forest right now 


gotta sweep that solar heater off.... well, at least a corner, then I guess the rest would be self clearing.

kidding aside, the fact that the snow is sticking and not melting says good things about your insulating.
 
Larry Schlicker
Posts: 79
15
  • Mark post as helpful
  • send pies
    Number of slices to send:
    Optional 'thank-you' note:
  • Quote
  • Report post to moderator

Len wrote:
gotta sweep that solar heater off.... well, at least a corner, then I guess the rest would be self clearing.

kidding aside, the fact that the snow is sticking and not melting says good things about your insulating.

I swept the snow off the heater right after taking the pic, and it was 39 degrees out and with the snow all around it, it was producing 112 degrees at the exhaust.  I thought that was pretty good for some free effortless heat.
 
                          
Posts: 52
  • Mark post as helpful
  • send pies
    Number of slices to send:
    Optional 'thank-you' note:
  • Quote
  • Report post to moderator
39 to 112 degrees is pretty darn great, I'd say!
And free to boot...
Wow!

I should think that 112 degrees of air coming in would heat the rooms pretty well.
Does it?

I am planning to do one of those can air heaters too, but 2 hours of sun is a sunny day around here 

The combo would be right, though, because when it is actually sunny in the winter, it is also the coldest it gets, so it is worth a go, but I am very curious about the effect of 112 on the temperature inside.


Colors?
I am leaning toward white with a breath of pinkish lavender.


There is still a bad smell in the traincar.
I only got one coat of shellac onto the floor before the insulation and sheetrock were delivered.
The caboose seems to smell OK.
It is hard to tell because I usually pass through the traincar on my way to the caboose.
Now there is a lot of gypsum powder on the floors and I want them really clean before I add any more shellac.

Do you have any tips for this? (washing all the white dust away, I mean)
I bet you do since you have done this before.

thanks,

jeanna
 
Len Ovens
pollinator
Posts: 1481
Location: Vancouver Island
60
  • Mark post as helpful
  • send pies
    Number of slices to send:
    Optional 'thank-you' note:
  • Quote
  • Report post to moderator

jeannacav wrote:

Now there is a lot of gypsum powder on the floors and I want them really clean before I add any more shellac.

Do you have any tips for this? (washing all the white dust away, I mean)
I bet you do since you have done this before.


I don't know if this will finish the job... but, sprinkle used coffee grounds on top (still damp) and sweep. Helps keep the dust down and the coffee is slightly acidic (gypsum is basic) so that may help.
 
Larry Schlicker
Posts: 79
15
  • Mark post as helpful
  • send pies
    Number of slices to send:
    Optional 'thank-you' note:
  • Quote
  • Report post to moderator
Saw dust also helps, or a vacuum cleaner.
On the solar heater, if you are really only getting about 2 hrs of good sunlight, I don't think you would benefit very much from one of these heaters. But if you want to give it a go, you might try one just using metal roofing. One of the video's shows a guy that built his using metal roofing with very good results. If I was going to do another, I would try that, way faster and easier, which is why I am suggesting it. If you don't benefit a lot from it, then at least you wont have a great deal of time and effort in it.
http://www.youtube.com/watch?v=5WGASsjNFmk&feature=player_detailpage ;      
 
I promise I will be the best, most loyal friend ever! All for this tiny ad:
2024 Permaculture Adventure Bundle
https://permies.com/w/bundle
reply
    Bookmark Topic Watch Topic
  • New Topic