posted 11 years ago
I'm cautious on this point. I too recommend an air gap under the fire box. It is what I have done.
At what temperature does a wood floor burn? There is a case cited of a hot water pipe causing a wall fire. Different circumstances, but that temperature was about 170 F. That's the lowest figure of which I am aware that actually caused a known fire in a home. Ernie Wisner recommends 125 F as the upper limit against wood structures, which I think allows a nice safety margin. For sure boiling temperature is going to be a real cause for concern (212 F/100 C), because as temperature approaches that level, moisture is driven out of the wood. Over time as the wood dries there is concern for lower burning temperatures.
As far as my mind is concern, there are two critical factors: 1) Temperature, and 2) Air Movement (or the lack thereof).
Insulation laid against the floor has no where for the heat to go, so it saturates the insulation. If the heat is not removed, the heat increases. Insulation does not stop the transfer of heat, it only slows it down. This is why walls/floors/etc may reach unsafe temperatures even with a layer of insulation between them and the heat source.
Air which is free to move (meaning a minimum of one-inch gap to my mind, although I do read of a 3/4-inch air gap being used in some cases), is able to carry the heat away, and that is what keeps the temperature from building up. Just like in heat shielding used to protect walls and ceilings. Look up examples of how those are built to get a good idea of the mechanics. They typically amount to a 22-gauge (or thicker) piece of metal with a one-inch air gap behind them, which allows the heat to rise behind the metal (therefore there are openings at the top and bottom to encourage this flow of air, and the mounting screws do *NOT* directly reach from the outer surface to the wall itself, because they would act as heat bridges, directly heating the wall through the screw).
I tried two prototype builds this winter. Both were built above a wooden floor. I built a "deck" out of 2x6's, to which I attached a perimeter "lip" made from 2x4's, and under the 2x6 deck I spaced it above the floor with a 2x4 on it's flat side every foot or so, providing about 1.5-inches of air gap under the deck and above the floor. The whole thing was built upon another 2x6 deck, which I laid directly on the floor; this bottom deck was there to protect the floor and distribute the weight across a larger surface area (support is another critical aspect of building upon a wooden floor - you have to know it can take the load, and really you should design for it to take at least twice the maximum load you even think will get piled up there: bricks, wood, people, etc).
I then filled the area of the upper deck which was enclosed by the 2x4 "lip" with a mixture of perlite and fire clay. This was my basic insulation. Obviously, it is 3.5 inches thick, the height of a 2x4 standing on edge, on top of the 2x6 deck. On top of that I have a fire brick floor made of full fire brick on their face, so it is 2.25-inches thick (or 2.5-inches, however thick my fire brick is).
For the first build, I used that fire brick as my firebox floor, and built a 6-inch J-style rocket heater on top of that. Heat immediately below that, runs up over 500 F, and at times if I recall correctly, I measured just below 600 F (I'm not looking at my notes right now, this is from memory). A temperature probe reaching down about 3-inches into the perlite-clay inslulation, below where the coals build up, and measuring approximately 1/2-inch above the 2x6 deck (which was lined with aluminum foil) ran up to 150 F to 170 F pretty quickly. And it would not always come all the way back to room temperature overnight (50 F is where I set the propane heat to kick on at, so 48 to 50 F is my indoor lowest low's) before I was ready to build the next fire; so I was concerned the temperature would steadily increase over time.
My concern was that the temperature against the 2x6 upper deck would reach or surpass 200 F, driving out the moisture and lowering the temperature at which the deck may burn. To be clear, the lower wooden 2x6 deck, which had the 3.5 1.5 air gap above it never got very hot, so there was never a concern with the floor burning (assuming the upper deck itself would not catch fire, heheh).
So I tore this down to the fire brick that made the floor (the full set of fire brick laying on top of 3.5 inches of perlite clay insulation). Then I built the second prototype on top of that, making an air gap space, open at three places, under the new fire brick floor of the fire box (the new fire brick floor was made of half fire brick / split fire brick). As expected, temperatures in the approximate 2-inch gap under the new fire box floor commonly rose higher than 500 F, and maybe into the 600's F (I never recorded a highest high into the 700's F in that air gap under the split brick floor of the fire box).
I believe the highest temperature I measured right in the opening of the fire chamber, where the feed tube enters the fire chamber, was 1925 F. So it was getting plenty hot in the burn chamber. However, the temperatures measured by that probe reaching 3.5 inches into the perlite fire clay insulation always remained low enough I never was concerned, never reaching over 95 F. These were spot measurements taken by hand, but they were taken regularly during the month of January. Early burns I took measurements every 15-minutes and later burns every 30- to 45-minutes. But the insulation tends to slow the heat penetration, so I'm sure they are representative temperatures with reasonable accuracy as well as precision.
I am a firm believer in providing an air gap under the fire box.
Edit: Corrected a typo, and added a couple words for better clarity (additions in bold, deletions struck through).


 1
1
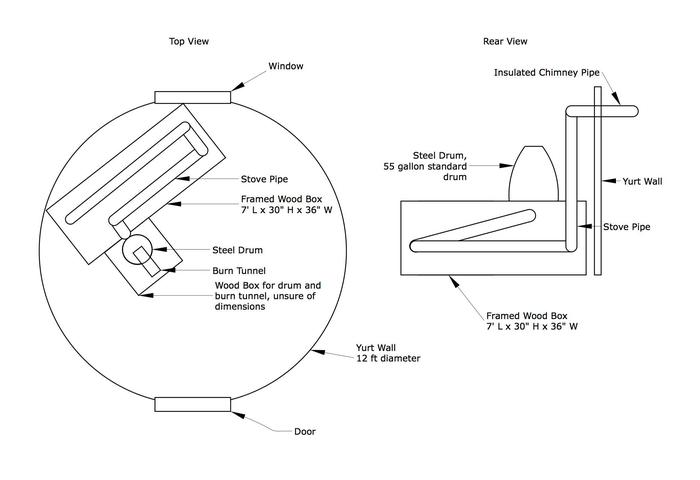
![[Thumbnail for Rocket-Stove1.jpg]](/t/45765/a/27157/Rocket-Stove1.jpg "Filename: Rocket-Stove1.jpg
Description: Concept")
![[Thumbnail for RMHBase.jpg]](/t/45765/a/27168/RMHBase.jpg "Filename: RMHBase.jpg
Description:")