• Post Reply Bookmark Topic Watch Topic
  • New Topic
permaculture forums growies critters building homesteading energy monies kitchen purity ungarbage community wilderness fiber arts art permaculture artisans regional education skip experiences global resources cider press projects digital market permies.com pie forums private forums all forums
this forum made possible by our volunteer staff, including ...
master stewards:
  • Nancy Reading
  • Carla Burke
  • r ranson
  • John F Dean
  • paul wheaton
  • Pearl Sutton
stewards:
  • Jay Angler
  • Liv Smith
  • Leigh Tate
master gardeners:
  • Christopher Weeks
  • Timothy Norton
gardeners:
  • thomas rubino
  • Jeremy VanGelder
  • Maieshe Ljin

Secondary burn not igniting


Posts: 238
Location: AR ~ozark mountain range~zone7a
9
  • Mark post as helpful
  • send pies
    Number of slices to send:
    Optional 'thank-you' note:
  • Quote
  • Report post to moderator
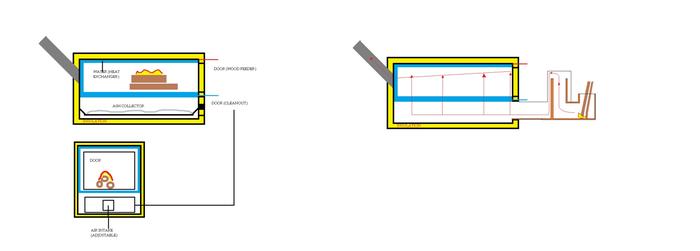
Hey david, well I finally got around to revisiting the very top of page 2, and I came up with a new 'dual burner' design, I made you a picture of it, hope you like, hope it is not too complicated to actually build. You may have to download the picture so you can see the notations.

As you can see, I chose dual burners positioned in the very belly of the beast. This should benefit charcoalizing of the batch in the primary chamber as well as heat the water. And I added a heavy grate similar to the one your using now, but you may opt for (2) removable grates one above the manifold (to support the batch wood), and one below the manifold (to support active coals). Also I incorporated a large ash tray, accessible from the secondary chamber access door {pretty cool, don't ya think} you need an easy to clean ash tray!

I'm basically using your idea from the cyclone mixer your currently running, but I really think if we can get a larger volume of fresh air surrounding the syngas delivery pipe, we should expect blue flame. Ya we probably could be preheating the fresh air somewhat, but I still stand on this design because it only modifies your secondary access door, without punching any new holes in the firebox, the primary door or additional pipes in the batch area. I would really like to have the air:fuel mixture on the order of 15:1 but the actual size of fresh air intakes must also fit within the idea of a smaller secondary chamber & the size of the secondary access door.

You might first think about constructing your fresh air vents in the access door, then as work progresses well, the final size (diameter) of the fuel intake manifold may be selected, depending on that mixture ratio of 15:1. Heck your fuel intake manifold pipe might end up being only 3/4" or possibly only 1/2" pipe...depending on your air intake size. Don't oversize your fuel pipe thinking 'bigger is better'...remember with this set-up we are experimentally running very high temperature fuel (I'm thinking 2000F should be the new normal, and possibly higher)(I think I read somewhere that propane burners typically run at 2300F). OMG I just had another funny idea, how about a couple huge MIXTURE NEEDLES, running thru the access door, threaded into the pipes, and adjustable from the outside...ROFL

That being said...you will notice that the dual burners are firing into completely bricked burn tunnels. The brickwork should promote low maintenance & high performance. From the diagram you can see how I fashioned the brickwork with a narrowing in the burn tunnels and an intentional brick divider as the flames reach into the exhaust stack manifold(diamond shaped). We need that divider well into the exh. manifold, to keep the two burners separate, at these high temperatures we can easily avoid any kind of back draft thru the other burn tunnel. I think your brickwork valley shaped floor, will get a little tricky building it, especially in the back of the box, I was hoping for a bit of a depression in the intake manifold area of the valley floor...arrgh, hope that makes sense.

As for the burners becoming worn from intense heat, I expect the flame to ignite at least 1/2" from the end of the pipe, the cool fresh air rushing around the outside of the pipe might also keep the pipe from melting. I think the venturi should be heavy enough material that you can weld your intake manifold to it, hopefully you can make it so the venturi is funnel shaped which should promote fresh air flow speed. I wouldn't try incorporating the turbo air flow effect, but you might have a great idea there. I'm not too worried about the syngas flow speed, because you have a blower running the primary chamber. There must be a good seal from the primary chamber to the secondary chamber, which may be a challenge. I think you could tilt the burners tips down to direct the flame into the floor of the unit.

Which brings up a point that was NOT considered in this diagram, you may have to make some kind of provision for cold starts & preheating the secondary chamber, which would be difficult to do with smaller size burner pipes only, maybe some sort of bypass port could be installed in the brickwork to allow the primary chamber to vent (at least 4" square) into the burn tunnels during cold starts. Once you get the thing warmed up, close the port or ports to pressurize the syngas thru the manifold. I'm thinking the cold start port or dual ports should be very close to the secondary chamber burners, hopefully providing live embers, inorder to promote cold ignition of the syngas and rekindled ignition in case of blowout at full operating temps. Ya I know easier said, than done, I haven't figured that part out yet, but I'm thinking some kind of passage/'coals hole' near the access door also...yanno so you can tend it easy. Of course you could always rig up a car coil & spark plugs, or piezio electric sparker, or maybe even a true thermocouple/glow plug like used on a propane furnace and that would do it up really nice.

Hey you were feeling a little sick, so I thought this might help you get better.

james beam;)
davidwillisdualburner.jpg
[Thumbnail for davidwillisdualburner.jpg]
 
Posts: 78
1
  • Mark post as helpful
  • send pies
    Number of slices to send:
    Optional 'thank-you' note:
  • Quote
  • Report post to moderator
Wow... You have put in a thought into this. It took me several times reading over that before I started to understand it.

I like it a lot, but I don't know if I am up for such a big modification right now. I just spend the last couple days moving my v bottom down to get more space for wood (I really hate running out of wood in the middle of the night). I hope my modifications still work. I have it all done except for getting the firebricks back in.

I think this design of yours could be great for a new boiler (one with a larger firebox so we don't have to drop the bottom down). Also I have found it is about 10 times harder to modify an already build boiler than is is to build it once. I have a friend of mine that wants me to build him a boiler like mine. Maybe I will try your design out for him.... or sell him mine build me a new one... man starting over makes me feel tired...


Posts: 238
Location: AR ~ozark mountain range~zone7a
9
  • Mark post as helpful
  • send pies
    Number of slices to send:
    Optional 'thank-you' note:
  • Quote
  • Report post to moderator
" or sell him mine build me a new one... man starting over makes me feel tired... " hahaha ~~sound like something I would do~~! Just make sure he is responsible for moving that monster LOL.

When you sell him yours just remember your selling 'a good working model' which should bring a decent price even if you have to build/install plan II before you remove prototype I.

Hey david, so you already dropped the floor, congratulation! & you got the turbo/mixer in there somehow, that would be interesting to see, as you have it now, post a picture or video if ya get a chance. I'm hoping we shall see some type of fancy brickwork or performance increases with the new floor set-up (other than just more capacity). If at all possible, you might try to get a second cyclone mixer in your prototype I, which might make creating plan II unnecessary.

About that plan II 'dual burner' set-up, I think you could probably revise those metal venturi by completely removing those, (the brick burn tunnel is venturi enough on it's own) just have the manifold pipe enter each burn tunnel as a stand alone nozzle centrally located in the burn tunnel.~~just a thought~~

I've been hoping we could achieve a reliable, reproduce-able blue flame set-up in prototype I before moving onto a different plan. Oh well, creating a plan II is not about giving up on prototype I performance, rather just another funny idea to throw out there! I'm confident in your ability, revision, & ingenuity either way.

james beam

 
david willis
Posts: 78
1
  • Mark post as helpful
  • send pies
    Number of slices to send:
    Optional 'thank-you' note:
  • Quote
  • Report post to moderator
That reminds me. I have been thinking about the blue flame, and I am not sure we are going to get it (at least any bluer than we have) without running the gas through a filter. When I was running my cutting torch inside the boiler to cut out the bottom, I noticed when I had it inside the boiler the flame went orange from all the dust particles. I have also tried forcing more air through (even using a second blower to force plenty of air through, and the color does not change). I have noticed after it has been running and is hot, there is a blue flame, but there are always some orange mixed in, and I think this is just ash, and other particles coming in.

Anyway, I have to go get that boiler going, my house is freezing......
 
david willis
Posts: 78
1
  • Mark post as helpful
  • send pies
    Number of slices to send:
    Optional 'thank-you' note:
  • Quote
  • Report post to moderator
Sorry it has taken me a while to post here. I have not put the mixer in yet. I simply added a burn tunnel with a secondary air line that injects fresh air into the tunnel. I will post more later, but for now, here is a video of the new burn tunnel design.

http://youtu.be/4WJraMwX4AI

by the way, I am getting a good 12 hours between load times, and it is fairly cold (it was 19 deg F this morning), however I am afraid I will need more wood this winter....


Posts: 238
Location: AR ~ozark mountain range~zone7a
9
  • Mark post as helpful
  • send pies
    Number of slices to send:
    Optional 'thank-you' note:
  • Quote
  • Report post to moderator
Hey david, OK great, I see you built your idea you developed in a the post from the October 20, 2013 with pixs...large side.png & large chamber.png.

Looks like you got it going all your way now, and really not much metal pipe inside either chamber, Way2go!

12 hour batch times seems awesome! Oh man I was totally hooked on your cyclone mixer prototype, but this newest set-up seems right too, the triangular burn tunnel is exciting with the night-time video.

Can't wait to hear how you arranged your secondary air, although it looks good to me with just the secondary door wide open. What is the size of the port between the two chambers? I would say whatever your fuel/air mixture ratio is, it looks great, how is it adjustable? I really like seeing the flame equally split both left & right, should utilize both of your stacks optimally. I noticed you did not brick the metal walls where the flame travels toward the twin stacks. Is the primary chamber floor...flat?

james beam;)
 
                    
Posts: 238
Location: AR ~ozark mountain range~zone7a
9
  • Mark post as helpful
  • send pies
    Number of slices to send:
    Optional 'thank-you' note:
  • Quote
  • Report post to moderator
Ok one more funny idea I'm going to throw at ya, so hang on! LOL

You know how you have your secondary air injection probably located near the primary port in the burn tunnel...which is great. But I want to see additional secondary air injection in the (2) side wall passages where the very tip of the flames are supplied additional air. Crazy, I know...but if you find at some point this winter that you need an 'hi-performance fix'...add additional air to both side wall passages (do not disrupt the secondary air your currently using in the burn tunnel), the additional air might be introduced near your secondary door.

The only reason I mention this additional air, is that fire/flames naturally lunges toward any additional air supply, much like your video shows... flames licking out the burn chamber, but also generally flowing toward the twin stack chimney. The flames look great because the secondary door is wide open providing additional air & furthering combustion. So if the secondary door is normally operated in the closed position, perhaps some additional air would enhance the flame.

~~~just another funny thought~~~

james beam;)
 
david willis
Posts: 78
1
  • Mark post as helpful
  • send pies
    Number of slices to send:
    Optional 'thank-you' note:
  • Quote
  • Report post to moderator
thanks james.

What is the size of the port between the two chambers?


I may make it a little smaller, but right now it is totally open for the back 6", other than a metal grate over it.

I would say whatever your fuel/air mixture ratio is, it looks great, how is it adjustable?


I have a "y" connector to split off the secondary air, and have a valve for each pipe (one for the primary and one for the secondary). If my testing I tried it with a separate blower on each line, and wow did it burn....

I noticed you did not brick the metal walls where the flame travels toward the twin stacks. Is the primary chamber floor...flat?


No, it is a v shape, but it is flat where the secondary burn tunnel is. See picture


front_view.png
[Thumbnail for front_view.png]
 
david willis
Posts: 78
1
  • Mark post as helpful
  • send pies
    Number of slices to send:
    Optional 'thank-you' note:
  • Quote
  • Report post to moderator
I also like your idea of injecting more air, and it will actually be fairly easy (in fact it already doe this). Basically I did not totally seal off the primary/second area at the front, so some primary air just goes directly out through three. I could easily increase how much leaks in that area by moving a firebrick.

I am not sure if the secondary burn burns as well when the door is closed, but I do hear it burning.
 
                    
Posts: 238
Location: AR ~ozark mountain range~zone7a
9
  • Mark post as helpful
  • send pies
    Number of slices to send:
    Optional 'thank-you' note:
  • Quote
  • Report post to moderator
Hey david, thanks for taking the time to answer my questions & show your latest design diagram.

12 hours batch time with a 6" port,{wow} that is hard to believe, could you verify that practice/statistic please.

Is one batch approximately 1 heaping wheel barrow full of wood?

Is any type of ash tray installed yet? Is it easier to maintain ( is cold start-up fast/ is as ash removal or build-up a problem ) now with the much larger primary chamber configuration?

About adjusting your port size.., obviously the smaller the port... the longer the batch time, but I can also see the need for a large port if using green wood, or during cold start-up, would you agree?

I can imagine a couple 1" pipe type auxiliary fuel ports/nozzles with your current set-up, located near the front secondary door, somewhat like I proposed in that latest previous diagram I submitted, and because your 'T" primary air supply is already near the front...might get increased flame length not only from the centralized triangle burn tunnel, but further blasting along those lower side walls that flow to the dual stacks. ~~~just a funny idea~~~

james beam;)

 
david willis
Posts: 78
1
  • Mark post as helpful
  • send pies
    Number of slices to send:
    Optional 'thank-you' note:
  • Quote
  • Report post to moderator

12 hours batch time with a 6" port,{wow} that is hard to believe, could you verify that practice/statistic please.


Maybe I worded that wrong. I fill with wood twice per day. That does not mean it is burning the whole time, as it shuts off when the water hits 185 deg


Is one batch approximately 1 heaping wheel barrow full of wood?


Even with the larger size, I don't put that much wood in each fill.

I am uploading a video of how much wood I put in. http://youtu.be/jV8GExHO4OM

I Have been doing this twice a day, however yesterday I only did it the one time, and this morning there was still a lot of wood left over. It is a little warmer this week, so that may have something to do with it. I also put a cover over the chimneys, and also put some dampers in, to help keep the hot air next to the pipe and heat the water faster. It seems to have helped.


Is any type of ash tray installed yet? Is it easier to maintain ( is cold start-up fast/ is as ash removal or build-up a problem ) now with the much larger primary chamber configuration?


I have not installed an ash tray yet, however with the open ports, it seems to push all the ash out at the end of the burn tunnel Yesterday I scraped it out, but I plan on leaving the primary burn area alone, and see if it keeps itself clean. But I do want to put in a couple of trays, and a baffle to trap the ash better.


About adjusting your port size.., obviously the smaller the port... the longer the batch time, but I can also see the need for a large port if using green wood, or during cold start-up, would you agree?


I don't think the port size makes much difference (to a point), because the limit is the amount of air the blower pushes into the primary burn area. Obviously if the port is too small then it will limit this, but now the limit is the air the blower blows in.


I can imagine a couple 1" pipe type auxiliary fuel ports/nozzles with your current set-up, located near the front secondary door, somewhat like I proposed in that latest previous diagram I submitted, and because your 'T" primary air supply is already near the front...might get increased flame length not only from the centralized triangle burn tunnel, but further blasting along those lower side walls that flow to the dual stacks. ~~~just a funny idea~~~


That reminds me. I was going to video that part of the boiler, so you could see what I mean. I can easily slide a firebrick, open that up, or even drill some holes up into the primary manifold (it goes right above the end of the burn tunnel).


Posts: 238
Location: AR ~ozark mountain range~zone7a
9
  • Mark post as helpful
  • send pies
    Number of slices to send:
    Optional 'thank-you' note:
  • Quote
  • Report post to moderator
Wow, I'm impressed only 6 sticks of wood for approx. 12 hrs, and your getting household hot water too, I wouldn't change a thing!

james beam
 
david willis
Posts: 78
1
  • Mark post as helpful
  • send pies
    Number of slices to send:
    Optional 'thank-you' note:
  • Quote
  • Report post to moderator
Thanks James, however like I said earlier, it is warm this week (low of 26, high of 58 today). A week ago we were having nights getting down to 18, and highs in the 40's. I only ran my in floor heat for about 2 hours in my kids rooms. We will know more when it gets cold, but it is encouraging.
 
david willis
Posts: 78
1
  • Likes 1
  • Mark post as helpful
  • send pies
    Number of slices to send:
    Optional 'thank-you' note:
  • Quote
  • Report post to moderator
I just thought I would give a little update.

It is colder now (21 deg low, 40 deg high), and it is going through a little more wood, but not much more, and our house is warmer than ever, and we have all the hot water we can use (also our power bill was the lowest we have ever had). It will still last all night on one fill, but it is low by morning (just about 4 inches of hot coals left). But it only does one burn during the day(one burn heats from 160 to 185, but it usually keeps heating up to 200 after the blowers shut down), which means I don't put in much wood at night.

On another note to anyone using a boiler... Be very careful with water that is around 200 deg!!!

I added a second circulation pump for my in floor heating, and thought I could quickly disconnect and reconnect it before the hot water got to me (I have shark bite quick connects). I almost got it, but the tubing was bent a little, and I could not get it to go back in. Soon I had 200 deg water poring into my room (I have a drain, so it is not too big of a deal). But when I ran outside to turn the water off at the boiler, my wife tried to stop it by pushing in something to plug the line off, and burn her arm very badly (1st and second degree burns on her hand wrist, and part of her arm). I should have told her not to touch anything while I shut the water off, or better yet, shut the water off before I disconnected it!!! She had no idea it would burn her that bad so quickly. So lesson learned... be extra careful, and don't do stupid things like I did. Also tell everyone else how dangerous the hot water is.

 
pollinator
Posts: 4154
Location: Northern New York Zone4-5 the OUTER 'RONDACs percip 36''
67
hugelkultur fungi books wofati solar woodworking
  • Mark post as helpful
  • send pies
    Number of slices to send:
    Optional 'thank-you' note:
  • Quote
  • Report post to moderator
David Willis /'Permies Cloud' : I hope that your Wife is recovering from her ordeal without any complications, which can so easily occur where there is a joint and movement
involved !

Thank you for the courage and honesty to come forward and report on this incident ! Many would have simply felt that their mistakes were something they do not wish
to share !

M.L. King said " It is not the words of our enemies that hurt us most, it is the silence of our friends !"

This does raise a couple of points, This is mostly outside my skill set but, the lowest temperature that gives you floors you are comfortable with, would seem to be best for
longevity of the system> I am not questioning whether the temperatures ~200dF~ are safe for 'PEX', merely longevity, this would be much higher than what 'Levittown'
floors were ever expected to 'run' at!

There are many totally mechanical mixing valves that need no energy input to provide a tempered water flow at small or very large volumes, they are a Set and forget
control that will give many years of service, if and when they give problems, it is usually related to 'hard water' and mineral deposits/scale !

I am hoping someone more familiar with 'PEX' and in floor heating will chime in here and report on ' best practices' operating temperatures and flows ! BIG AL !
 
                    
Posts: 238
Location: AR ~ozark mountain range~zone7a
9
  • Mark post as helpful
  • send pies
    Number of slices to send:
    Optional 'thank-you' note:
  • Quote
  • Report post to moderator
Oh man that was a preventable accident, I know you feel bad about that.

I would expect you might contemplate installing various 'in house' shut off valves useable in times of accident or maintenance. I know my kitchen water faucet has hot & cold supply line shut-off valves in the sink cabinet below the faucet, they rarely get used, but when they are used they are absolutely worth the installation. A suggest: never buy the cheapest shut-off valves that have a plastic valve stem!

So you have water tubing snaked around on the floor, embedded in a concrete like mass, or perhaps floor mounted radiators? Perhaps you could include a clear diagram/flow chart of the heating system, include various fixtures, valves, & function. It is difficult for me to imagine what your actual set-up is beyond the boiler itself which you have already explained fairly well. Did you ever find or install a mechanical thermostat valve & housing that is rated to work/bypass at the temperature you want? I think I remember you posting a few specifications beyond the boiler somewhere in this thread, or maybe at your website, but a diagram/flow chart should be easier to identify what your doing.

Oh & by the way, you may have noticed in the news EPA & woodstove emissions regulation is coming into focus lately, not sure about all the fullest extent of regulation, but I heard, that primarily the EPA is seeking to 'clean up outdoor wood stoves in particular'.~~~

james beam;)
 
allen lumley
pollinator
Posts: 4154
Location: Northern New York Zone4-5 the OUTER 'RONDACs percip 36''
67
hugelkultur fungi books wofati solar woodworking
  • Mark post as helpful
  • send pies
    Number of slices to send:
    Optional 'thank-you' note:
  • Quote
  • Report post to moderator
James Beam / 'The Permies Cloud' : The E.P.A. seems to have written new rules about commercial wood stoves, as reported in other threads here at Permies .

However, We are talking about bureaucrats,and they long ago gave themselves extensive powers to interpret their new rules as they see fit, It will bare watching -Big AL
 
david willis
Posts: 78
1
  • Mark post as helpful
  • send pies
    Number of slices to send:
    Optional 'thank-you' note:
  • Quote
  • Report post to moderator

This does raise a couple of points, This is mostly outside my skill set but, the lowest temperature that gives you floors you are comfortable with, would seem to be best for
longevity of the system> I am not questioning whether the temperatures ~200dF~ are safe for 'PEX', merely longevity, this would be much higher than what 'Levittown'
floors were ever expected to 'run' at!


The floors this is heating are mostly carpet, and some tile. I am not sure what temperature would damage my sub floor or carpet, but I would guess it would be higher than 200 deg??? The only thing I could think of that it could damage would be the 3/4" floor board, since it is compressed board. However they use this same board on roofs that go under black shingles. I would not be surprised if this reaches 200 deg, but I am not sure about this.

The circulation pumps are designed to go up to 240 deg, so we should be ok there.

However I do agree the lower the temperature we can run, it should be easier on everything. The problem is that I have found it heats hot water and the floors better if it is above 150 deg, and the boiler is more efficient running longer runs. If I had it run from 150-160 deg, it would just get the secondary burn running good, then it would shut down (this is probably an exaggeration, because the secondary burn only takes about 10-15 min to get going, but it does smoke a little when it starts up). So to take advantage of the clean burn, I am heating it up to 180 deg (I was going up to 185, but I am down to 180 now). However even when the blower shuts off at 180, it continues to heat up about another 15 deg. Because of this, I have very hot water at times.

I may do some testing with going from 150-160 though, and see how it goes.


There are many totally mechanical mixing valves that need no energy input to provide a tempered water flow at small or very large volumes, they are a Set and forget
control that will give many years of service, if and when they give problems, it is usually related to 'hard water' and mineral deposits/scale !


This would work great for my house hot water, and I plan on getting one for that. But it would not work for my boiler water running through my floors, because it would end up adding too much water to my boiler, and would overflow it.

I am hoping someone more familiar with 'PEX' and in floor heating will chime in here and report on ' best practices' operating temperatures and flows !


That would be great. Please if anyone knows more, let us know.

I would expect you might contemplate installing various 'in house' shut off valves useable in times of accident or maintenance. I know my kitchen water faucet has hot & cold supply line shut-off valves in the sink cabinet below the faucet, they rarely get used, but when they are used they are absolutely worth the installation. A suggest: never buy the cheapest shut-off valves that have a plastic valve stem!


Very true and I planned on doing that, but ran out of valves, so didn't add this one... I will for sure add it now.

So you have water tubing snaked around on the floor, embedded in a concrete like mass, or perhaps floor mounted radiators? Perhaps you could include a clear diagram/flow chart of the heating system, include various fixtures, valves, & function. It is difficult for me to imagine what your actual set-up is beyond the boiler itself which you have already explained fairly well. Did you ever find or install a mechanical thermostat valve & housing that is rated to work/bypass at the temperature you want? I think I remember you posting a few specifications beyond the boiler somewhere in this thread, or maybe at your website, but a diagram/flow chart should be easier to identify what your doing.


I have some infloor heating that was placed in the cement floor, but I have not been using that, because I am not sure they put insulation under it, and the floor holds so much heat, that is is hard to regulate. So right now I am using some aluminum fins that connect the pex tubing the the subfloor, and I am just running the the circulation pumps on trimmers. I plan on getting it setup better, but I just want to make sure it works for now, then I will make it more automated.

I will work on some diagrams, and pictures to help explain it better.


david willis
Posts: 78
1
  • Likes 1
  • Mark post as helpful
  • send pies
    Number of slices to send:
    Optional 'thank-you' note:
  • Quote
  • Report post to moderator

I hope that your Wife is recovering from her ordeal without any complications, which can so easily occur where there is a joint and movement
involved !


Yes, she is doing good, we spend a night with her arm in cold water, and putting aloe Vera on her arm (we have a live aloe Vera plant that comes in handy for burns). It was only painful for that one night, but some skin is coming off, and it is itchy... It could have been much worse, so I am grateful for that, and plan on being much more careful from now on.

Thanks for the kind words.

 
david willis
Posts: 78
1
  • Mark post as helpful
  • send pies
    Number of slices to send:
    Optional 'thank-you' note:
  • Quote
  • Report post to moderator
So it has been running for a a while, and working great.

I do think it would be good to have a way to remove the ashes though. Today is the first day I cleaned them out of the primary chamber since I dropped it down, and there were a lot of ashes. It was strange, because some of them were compacted, and hard (not light fluffy ashes like on top). I wonder if this is due to using wet wood? I have run out of my dry wood, and have been using wood that has only cured a few months, and came from very wet wood. It has dried a little, but it is still wet. It seems to work ok, but takes a little longer for the secondary burn to start working. It wouldn't be too hard to clean this out, but I like to keep coals going all the time, and that makes it a little harder to clean out. Next time I will just let it burn all out before I clean it, but that takes a little more planning....

Anyway, just thought I would update... Also my wife's burns are all better now.
 
                    
Posts: 238
Location: AR ~ozark mountain range~zone7a
9
  • Mark post as helpful
  • send pies
    Number of slices to send:
    Optional 'thank-you' note:
  • Quote
  • Report post to moderator
Hey david, glad to hear she is getting thru a bad burn.

I think the ash compaction can probably be prevented with routine maintenance. The moisture from the latest fire wood may be contributing, because each stick is heavier than normal wood, I would say a lot heavier.

My stove shovel blade is flat, about 4" or 5" wide, it has turned up sides which helps with scooping, the scoop sides are only an 1" tall. I clean my regular wood stove daily while the thing is down to charcoal only, just before loading the next batch of wood. Usually it has a 5" deep bed of coals and 1" of ash under that. While the bed is glowing very hot, I start on the left side, scoop and pitch the coals to stack up high on the right side. Run shovel along the floor to get the ash on the left side, the remaining hot coals will stack up in the scoop above the sides, stop, lift, & tilt the shovel toward the right side & let the coals on top of the scoop fall in the right side stack. Withdraw & dump the remaining ash in the scoop into the ash bucket. Repeat until you get to the back of the stove, sorting the coals quickly to the right, and ash into the bucket.

Once I get the left side clean, shovel the coal stack to the clean area on the left, maintain the right side ash in similar fashion till most of the ash is in the bucket. I usually end up with a bed 4" deep and very hot & clean, ready to be processed as charcoal, or left in there and a new batch of firewood placed on top.

I keep my ashes in an sandy protected area that remains fairly dry, large enough to hold several different batches of ash, to cool for weeks. I try to keep the leaves out of there, I sift the ash for any remaining charcoal pieces, bag the cold dry ashes in a feed sack. Run an strong magnet or lawnmower flywheel thru the ashes if you know there is some metal in there.

If I could change my shovel/scoop... I would make mine with 2" tall sides, instead of 1"... and probably make the handle 6' long, instead of 4'.

Firewood, especially green firewood, is crude fuel not refined or distilled like gasoline...therefore time is something to think about while tending a fire. If you have a decent bed of hot coals in the box and you load a new batch of green wood, close the door & let it work 15 minutes without blowers. This time delay allows the hot coals time to drive off a lot of water, then crank up your blower. I would expect better combustion after a rather brief heat curing. You might even experiment tending the fire by batch loading 4 sticks instead of 8. Perhaps cycle the blower off occasionally in the middle of a perfectly good batch, allowing the firewood time to charcoalize without blower pressure, maybe even regulating some of those overheating situations, and I think saving some electricity.

james beam


david willis
Posts: 78
1
  • Mark post as helpful
  • send pies
    Number of slices to send:
    Optional 'thank-you' note:
  • Quote
  • Report post to moderator
Thanks James for the ideas.

It looks like we will see how well my boiler works this week. Look at the temperatures:

Screenshot-from-2013-12-02-19-35-32.png
[Thumbnail for Screenshot-from-2013-12-02-19-35-32.png]
 
david willis
Posts: 78
1
  • Mark post as helpful
  • send pies
    Number of slices to send:
    Optional 'thank-you' note:
  • Quote
  • Report post to moderator
Just a quick update:

This morning when I woke up it was 0 deg F outside, but it was nice and warm at 73.9 - 75 (depending on the room) in my house. I am just barley getting by with filling the boiler up at night, by morning, it just has some coals at the bottom. So I fill it up in the morning, then by night it is usually about half empty.

I can't wait to see my power bill this month. Without the wood boiler it would be over $200, but I bet it is only about $30
 
david willis
Posts: 78
1
  • Mark post as helpful
  • send pies
    Number of slices to send:
    Optional 'thank-you' note:
  • Quote
  • Report post to moderator
The boiler was put to the test the last couple of weeks. One morning it was -19, and our house was nice and warm. The only thing I need to improve on is the removal of the ash. I only clean it out once a week, but it would be nice to have a tray or something a little easier.

I also thought I would post how this has reduced my power consumption.... The last two months on the attached image shows you the last two years. As you can see Nov and Dec would normally be way higher, and this December has been extra cold, so it would be very high.

power.JPG
[Thumbnail for power.JPG]
 
david willis
Posts: 78
1
  • Mark post as helpful
  • send pies
    Number of slices to send:
    Optional 'thank-you' note:
  • Quote
  • Report post to moderator
I am not sure if I have explained how the secondary burn tunnel is setup or not, but I cleaned out my stove today, and made a video of it.

https://www.youtube.com/watch?v=LsmZ8qrLeSA
 
david willis
Posts: 78
1
  • Mark post as helpful
  • send pies
    Number of slices to send:
    Optional 'thank-you' note:
  • Quote
  • Report post to moderator
sorry, for some reason youtube thinks that video contains copy write material. I uploaded it again, and now they like it.


Posts: 238
Location: AR ~ozark mountain range~zone7a
9
  • Mark post as helpful
  • send pies
    Number of slices to send:
    Optional 'thank-you' note:
  • Quote
  • Report post to moderator
Hey david, is this diagram approx. what your primary & secondary air plumbing looks like? If there are cut-off or mixture valves not shown, or if this does not represent your present blower plumbing layout... could you alter this diagram, or make a new one to show where they are properly located?

tks

james beam
davidwillisblowerairplumbing.jpg
[Thumbnail for davidwillisblowerairplumbing.jpg]
davidwillisairplumbing2.jpg
[Thumbnail for davidwillisairplumbing2.jpg]
edited diagram
 
david willis
Posts: 78
1
  • Mark post as helpful
  • send pies
    Number of slices to send:
    Optional 'thank-you' note:
  • Quote
  • Report post to moderator
Good to hear from you again James.

Yes that is actually very accurate. The only thing that is a little different it that the blower splits the air into the primary and secondary sooner than you have, and I do have ball valves to adjust the amount of air for each.

I attached a picture of how it I have it connected.

Other than that you have it.

I am still planning my second boiler for my friend (he wants the new version with a larger primary burn box). I want to make it so it is easier to clean and can run a 24 hour burn... When I have some plans I will post them.
blower.png
[Thumbnail for blower.png]
 
                    
Posts: 238
Location: AR ~ozark mountain range~zone7a
9
  • Mark post as helpful
  • send pies
    Number of slices to send:
    Optional 'thank-you' note:
  • Quote
  • Report post to moderator
Hey david, that is so cool you already have made a sale of your next model, Way2Go! Let us here at Permies in on it, if you want, I would be glad to help as time allows, would love to see your plans for the next version. I hope you haven't completely given up on your cyclone mixer, that thing was totally awesome, but as you have your stove now, seems hard to beat for simplicity & performance if nothing else. You know your going to wish you had sold your original & kept the next prototype......hahahaa

Fortunately, I happen to have a couple funny ideas for you & any BRICK MASONS out there that can give us some brickwork suggestions... I think you could improve your brick work ceiling of the firebox if it were changed to a dome shaped ceiling. Maybe you have seen some professional masonry freestanding domed ceilings that use the compatible angles cut into the sides of the brick that relates to the dome shape...and cannot cave in as long as the bricks don't break. ~~~just a funny thought, that might help you hold the ceiling & inner wall brickwork in place, better than saggy steel strapping~~~ (Hey your saggy steel strapping looks just right to me, but yanno if you want to make the high dollar sales, the ancient cathedral archway brickwork style is something to think about...check this page out http://claudiafox.hubpages.com/hub/-How-to-build-an-arch-the-beauty-mathematics-and-history-of-the-arch-in-architecture

The other funny idea I have for ya is two (2) ash trays, low profile but easily slipped within each L & R burn tunnels, yanno open your access door and simply slide each tray out. From your video it looks as tho a lot of ash accumulates in those side tunnels leading toward the chimneys. If you had room, a third ash tray could be made to fit between the two other ash trays, just secure your 'blast brick' to the access door, and the brick will swing away whenever the access door is opened.

james beam


david willis
Posts: 78
1
  • Mark post as helpful
  • send pies
    Number of slices to send:
    Optional 'thank-you' note:
  • Quote
  • Report post to moderator
I will definitely start a new thread when I start working on the second boiler. I have a lot of thoughts on what to do, but for sure I need a better way to hold up the firebricks. Those strips of metal get hot, expand, then warp, or crack the welds (they were just a quick fix to see if keeping the heat in the primary burn are would help, which it did). I really like the idea of a dome top... I wonder what I could use for the steel on the dome???

I also like my cyclone mixer, I think it did give a little better burn, but this new design works well, and is so simple. When I get a chance I will draw up my current thoughts into some plans, and start a new thread on it.

I also plan on doing some modifications to my boiler this summer, but yes, I do think the second version will be nicer and bigger. I can currently almost get 24 hours out of one fill (unless the temperature gets too low), and this is using wood that has not cured. I think with a few modifications and good wood (I am going to fill my wood shed in the spring, and let it cure all summer) I will be fine with my old boiler too.

Thanks for your comments, I always look forward to your ideas.


Posts: 238
Location: AR ~ozark mountain range~zone7a
9
  • Mark post as helpful
  • send pies
    Number of slices to send:
    Optional 'thank-you' note:
  • Quote
  • Report post to moderator
Hey david, yanno that reminds me of an old house furnace I saw once, made out of a 500 gal. propane tank...the thing was huge! But the curvature and thickness of such a tank might be more tempting in a smaller version tank tho...250 gal. might be a more manageable size. The problem with those old tanks is...they never wear out and people are still getting top dollar for one that's 60 years old! Down here a used one costs around $1/gal. for a used tank...$250 for a 250 gal. or $500 for a 500 gal. , but that is for 'working models'...maybe your scrap yard has some deals on something with that shape.

I think the beauty of the arch is naturally pleasing, but most importantly the arch roof will hold the wall bricks fast against the walls, I think if you had the proper masonry very little steel brick support would be used. I think the square sides accents the single arched roof for beauty, prettier than a simple bottleshaped firebox. Hey yanno the natural curve of propane tank might...are ya ready for this...the lower curvature might structurally support the "V" burn tunnel area...albeit you lose some of your easy to clean out horizontal areas, that you currently have with the 'square firebox' style.

Here is another funny one for ya, you know all that extra bacon grease, chicken fat, or used motor oil laying around, why not a dripper spout to add to the 'deluxe models only' hahaaha

You know me I'm just throwing some funny ideas out there, all to be taken with huge dose of salt.

james beam
 
david willis
Posts: 78
1
  • Mark post as helpful
  • send pies
    Number of slices to send:
    Optional 'thank-you' note:
  • Quote
  • Report post to moderator
haha... that is funny, I have already been poring my used motor oil over my pile of wood. I don't know if it helps the burn, but it can't hurt. I like the idea of a dripper to feed that right into the second burn chamber, but I suspect bacon grease would harden up when it is -10 deg out... we would need to put it someplace warm....

I have always been afraid to use a used propane tank, because I am afraid it would blow up when I try to cut it, and they are kind of expensive.... I will have to think some more on that, but I do like the arch idea.
 
                    
Posts: 238
Location: AR ~ozark mountain range~zone7a
9
  • Mark post as helpful
  • send pies
    Number of slices to send:
    Optional 'thank-you' note:
  • Quote
  • Report post to moderator

david willis wrote:I have always been afraid to use a used propane tank, because I am afraid it would blow up when I try to cut it, and they are kind of expensive.... I will have to think some more on that, but I do like the arch idea.


Good answer!

Hey david, if you have time & any constructive suggestions, could you give this thread a look? https://permies.com/t/31150/rocket-stoves/wrong-rocket-stove-aka-smoke#242984

james beam
 
david willis
Posts: 78
1
  • Mark post as helpful
  • send pies
    Number of slices to send:
    Optional 'thank-you' note:
  • Quote
  • Report post to moderator
Thanks James. I looked at that thread, but I don't really know enough about the stove to have any good comments, and It looks like they have it working. But I still don't know what they did to fix it..? I would think they would need a taller insulated chimneyt to pull a stronger draft. All I know is my chimneys are not tall enough to pull a draft, especially since the exaust hast to go down first before it goes up.


Anyway, I took some chimney temperature readings to see how hot the burn is, and how much of that heat is used to heat the water.

I found the hottest part of the pipe after it leaves the boiler is under 300 deg F, and it looks like my secondary burn is probalby over 2000 deg. Maybe I am wrong though...

Assuming the burn temperature is 2000 Deg, and my water temperatue is 160 deg (that is the temparture of the water when I took the video), At 100%, I could cool the air down to 160 deg (or lower it 1840 deg). If I lowerd it down 1700 deg (2000-300), then it is converting 92
% of the heat to the water.... Not bad!

https://www.youtube.com/watch?v=wsL6F_xnNyc
 
                    
Posts: 238
Location: AR ~ozark mountain range~zone7a
9
  • Likes 1
  • Mark post as helpful
  • send pies
    Number of slices to send:
    Optional 'thank-you' note:
  • Quote
  • Report post to moderator
Hey david, "not bad" hahaha that's awesome! seems the most efficient set-up, especially when you consider that wood boilers are generally considered less efficient than conventional wood stoves, primarily due to the intense heat extraction...of which I was always confident that your radiator/water jacket in the exhaust area would collect as much heat as possible. I don't know if you could be any more practical with heat extraction as your exhaust temps now stand around 300F under load. At this point, I wouldn't increase the coolant circulation just to collect a few more BTUs.

But you know me, LOL, another funny idea comes your way, hand on to your hat! If you could extract the heat in the exhaust area, faster via the radiator & coolant circulation...then it stands to reason, possible even, to cool the exhaust temps even further, yielding even more heat extraction. But I think your set-up is just great the way you have it now.

The problem with that funny idea, and which exists in your unit as it is now, becomes 'structural metal erosion' due to the increased coolant circulation in a harsh environment. Which leads me to just another funny suggestion: 'sacrificial anode' made of soft metal such as zinc, aluminum, lead.

It will develop at some point, coolant leaks due to cavitation either in the steel water jackets, soldered copper structure, or metal impellers. At some point you need to address the reality of cavitation/galvanic erosion and I think you need, very soon, a sacrificial anode that is consumed instead of structural components of the system. Funny idea on the cheap: find an scrap small engine, often the 'aluminum alloy' they are made of has a zinc content within that alloy, but any zinc (or other soft metal) anode will do, you might want to just purchase a commercial 'sacrificial anode'.

Just as rust in your chimney is not your friend, pinholes in your structure due to galvanic action is not your friend either.

james beam
 
david willis
Posts: 78
1
  • Mark post as helpful
  • send pies
    Number of slices to send:
    Optional 'thank-you' note:
  • Quote
  • Report post to moderator
I like your sacrificial anode idea, and have heard about it, but am not very familiar with it.

Are you saying I could get a chunk of 'sacrificial anode', and throw it in my boiler, and it would corrode away instead of my steel boiler and water pumps?

I am very curious about how long the boiler will last due to high heat and water. I know there is some rust, because it was rusty inside even before I put the water in, due to snow, and rain while I was finishing it up. I can only imagine what it looks like inside now after having that hot water in there for months... All internal steel (firebox, pipes, etc) are made of 1/4" steel, and the outside water jacket is made of 10 gauge. I also have a copper heat exchanger in there. I know they make some stuff to put in boilers to reduce corrosion (a water treatment), which I have been thinking about getting. But currently I am just using water from my tap (soft water, which may even be worse because of salt). I plan on flushing it out in the spring....
 
                    
Posts: 238
Location: AR ~ozark mountain range~zone7a
9
  • Likes 1
  • Mark post as helpful
  • send pies
    Number of slices to send:
    Optional 'thank-you' note:
  • Quote
  • Report post to moderator
Ya, that's what I'm saying. Any soft metal you have laying around, a sheet of foil out of your kitchen would work right away, and also prove to you, probably in less than 24 hrs, pitting, and eventual consumption of the piece of foil. You might use a magnet or something to secure the foil from floating around in your system and possibly clogging up a pipe. But really you want a sacrificial anode that is 'softer' than the softest component in your system, which is probably the solder in the copper joints. So I would look for zinc or something compatible/softer than your softest system material (solder), you will have to do your internet research to figure out the best 'sacrificial anode' for your set-up.

Long time ago they used 'coolant filters' on big trucks, they were spin-on disposable units that looked just like an little oil filter. The 'convenience' of servicing the coolant system was reduced to an in-line 'filter adapter with shut off valves' & the disposable filter which did not contain a paper element, simply inside the 'filter' was a blob of sacrificial metal, that wears away as coolant circulates thru it. This routine maintenance item was expected to prevent serious & expensive component failures due to galvanic action. Also if at all possible, monitoring your water PH value helps, and avoiding/balancing salty contaminates is generally a sound practice.

james beam
 
david willis
Posts: 78
1
  • Mark post as helpful
  • send pies
    Number of slices to send:
    Optional 'thank-you' note:
  • Quote
  • Report post to moderator
Do they still make those 'coolant filters'. That would be nice to run inline, and if it was clear, you could see when it was gone. I still need to get something in place, but have not had time to get it in place yet.

I did however remove the top and side firebrick (because they fell out due to my temporary saggy metal). Anyway, I found it works fine without it, and lets me put in more wood, which lasts up to 24 hours. I also did a video of me cleaning the ashes out. I would like a tray, but for now this is not too bad.

https://www.youtube.com/watch?v=RXxZuP757dU

 
allen lumley
pollinator
Posts: 4154
Location: Northern New York Zone4-5 the OUTER 'RONDACs percip 36''
67
hugelkultur fungi books wofati solar woodworking
  • Mark post as helpful
  • send pies
    Number of slices to send:
    Optional 'thank-you' note:
  • Quote
  • Report post to moderator
David Willis :A trick I learned doing over the road trucking, many small towns were bedroom communities, all the men were off working in the middle of the day
and It was hard to find out find out if there was a shop that could handle big trucks in the next town over, but ALL the Moms had the PHONE NUMBER for the local
school, and I could call there ask to be connected to the mechanic at the local school bus garage, and he could always tell me who what when exactly where what
time and telephone numbers, International, Cummins, Mack, Caterpillar, Jimmy, if you can't get a quick answer elsewhere try the School Bus garage! Big AL
 
Posts: 15
Location: Livermore, CA
  • Mark post as helpful
  • send pies
    Number of slices to send:
    Optional 'thank-you' note:
  • Quote
  • Report post to moderator
Seems like you might have it all worked out by now. But here are my thoughts anyway. You're on the right track by adding firebrick at key points in the firebox. Since I didn't read all of the comments, I'm wondering if you have figured out a way to preheat the combustion air before it gets to the primary burn. That may be difficult if you have surrounded the unit with a water jacket. Primary combustion gases typically ignite to produce the so-called secondary burn in the 1500 to 1800 degree (F) range...in the presence of enough oxygen. Preheating will definitely help, but be careful not to remove heat from the vent stack, or you'll end up with excessive creosote. Units I've seen with heat extractors on the stack were typically built up with thick accumulations of 3rd degree creosote, the hard glazed type that is extremely difficult to remove. I saw one unit with water tubing around the connector which completely blocked a brand new Metalbestos brand chimney with the glaze in under 24 hours. Since I'm not familiar with your unit, I'll refrain from further comment.
 
Always look on the bright side of life. At least this ad is really tiny:
Rocket Mass Heater Jamboree And Updates
https://permies.com/t/170234/Rocket-Mass-Heater-Jamboree-Updates
reply
    Bookmark Topic Watch Topic
  • New Topic