• Post Reply Bookmark Topic Watch Topic
  • New Topic
permaculture forums growies critters building homesteading energy monies kitchen purity ungarbage community wilderness fiber arts art permaculture artisans regional education skip experiences global resources cider press projects digital market permies.com pie forums private forums all forums
this forum made possible by our volunteer staff, including ...
master stewards:
  • Nancy Reading
  • Carla Burke
  • r ranson
  • John F Dean
  • paul wheaton
  • Pearl Sutton
stewards:
  • Jay Angler
  • Liv Smith
  • Leigh Tate
master gardeners:
  • Christopher Weeks
  • Timothy Norton
gardeners:
  • thomas rubino
  • Jeremy VanGelder
  • Maieshe Ljin

composting wood chips with chicken litter and fungi

 
gardener
Posts: 5444
Location: Southern Illinois
1491
transportation cat dog fungi trees building writing rocket stoves woodworking
  • Likes 14
  • Mark post as helpful
  • send pies
    Number of slices to send:
    Optional 'thank-you' note:
  • Quote
  • Report post to moderator
Hello all and a great big thanks in advance,

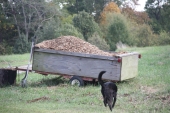
I was convinced via this forum to abandon a plan to use excess 10-10-10 to jump-start wood chip decomposition.  Instead I have opted for a combination of chicken litter and fungi.  The dimensions of the pile are approximately 8'x5'x3.5-4'.  I left the rake handle in the picture for scale.  Thus far I have been able to incorporate chicken bedding (and possibly one more load of chicken bedding) and hamster bedding.  I think this will take care of my nitrogen and micro organism needs.  I have been inspired to use fungi to assist decomposition, perhaps even fungi dominated compost by the time it is finished.  My main question is how to go about adding in the fungi.  I have never done this before but I am leaning towards wine cap mushrooms.  I can't seem to get a good, reliable grip on how much mushroom spawn/spores I am buying.  Some sites list by grams, others by volume of sawdust infused with spores.  Can anyone give me firstly a good source wine caps, and secondly, what do I need to do to get this fungi off the ground.  As the picture suggests, the pile is completely exposed.  The tubes on the pile are drip lines that I have used to keep the pile evenly moist.  The chicken bedding is really beginning to heat up--it steams when I turn it.

Thank you so much in advance.  I always appreciate the high quality info I get here.

Eric


Edited 2/4/22
I linked this thread to a set of step-by-step instructions and a list of other mushroom threads HERE: https://permies.com/t/174807/Wine-Cap-Growing-Central-great
IMG_5664.JPG
A mound of aging woodchips
 
pollinator
Posts: 867
218
  • Likes 4
  • Mark post as helpful
  • send pies
    Number of slices to send:
    Optional 'thank-you' note:
  • Quote
  • Report post to moderator
look at fungi perfecti. They seem to be about the gold standard as far as quality mycelial products go. I know they sell straphoria spawn in sawdust as well as several other species.
 
steward
Posts: 4837
Location: West Tennessee
2438
cattle cat purity fungi trees books chicken food preservation cooking building homestead
  • Likes 13
  • Mark post as helpful
  • send pies
    Number of slices to send:
    Optional 'thank-you' note:
  • Quote
  • Report post to moderator
Hi Eric, there's a couple ways to go about getting fungi in your compost pile there, which by the way, looks great and I think you will have good success with the chicken litter as your nitrogen source (I use chicken litter in my compost). Buying mushroom spawn/spores is one way to go about it, but another way is to get mushrooms from the grocery store or pick wild mushrooms, any mushrooms, and put them in the blender with a little clean non-chlorinated water, whir it up into a slurry, and pour that on your wood chip compost pile there. You can certainly get a wine-cap kit, eat the delicious mushrooms, and then whir up the exhausted mycelium in the blender again and pour that on the pile too.

Permies resident soil scientist Redhawk has written about this and graciously shared other fascinating soil & compost information here on permies. Here in this gateway to his threads: https://permies.com/wiki/77424#637639
 
Eric Hanson
gardener
Posts: 5444
Location: Southern Illinois
1491
transportation cat dog fungi trees building writing rocket stoves woodworking
  • Likes 5
  • Mark post as helpful
  • send pies
    Number of slices to send:
    Optional 'thank-you' note:
  • Quote
  • Report post to moderator
James,

Thanks for getting back to me.  I certainly appreciate your input.  Earlier this morning I went ahead and bought a pair of wine cap kits from fieldforest.net. They were very knowledgeable and quite helpful.  At present, the plan is to dig little holes around the base of the chip pile (maybe make 2-3 rings around the base) and stuff the infused sawdust into the holes.  I will get the kits around 4/4 and I will plant soon after.  For the summer I will have to keep the pile moist and we will see about maybe creating a little bit of shade--I just don't know how important shade will be if I keep the pile moist.  Anyhow, with luck this fall. I will have the beginnings of some good mushroom compost.  Additionally, thanks for the Redhawk links.  I agree that he is a fountain of knowledge on all things permaculture.

Again, thanks for the info and helping me get started in the right direction--I will keep this updated as I continue work this summer/fall.

Eric
 
James Freyr
steward
Posts: 4837
Location: West Tennessee
2438
cattle cat purity fungi trees books chicken food preservation cooking building homestead
  • Likes 1
  • Mark post as helpful
  • send pies
    Number of slices to send:
    Optional 'thank-you' note:
  • Quote
  • Report post to moderator
Eric-

Happy to be of help. Yes, please keep us informed on how this goes! Good luck!
 
Posts: 72
Location: Berkshire County, Ma. 6b/4a. Approx. 50" rain
17
  • Likes 4
  • Mark post as helpful
  • send pies
    Number of slices to send:
    Optional 'thank-you' note:
  • Quote
  • Report post to moderator
Hello Eric, I wish I had first hand knowledge of inoculating piles with mushroom spawn.

Alas, I have to settle for the high quality videos of the Edible Acres youtube page;
https://www.youtube.com/watch?v=XAfiUuy-Ekg&list=PLihFHKqj6JerqOGegzgVgGHu3z7VBNlJF&index=7

That's not exactly inoculating a pile of wood chips, but I imagine those inoculated sacks could be used to inoculate wood chip piles in a similar way. I'm going to attempt such this growing season--we can share notes.

I must have missed it in the previous thread, but I thought I'd ask again, what's the finished pile destined for?


Eric Hanson
gardener
Posts: 5444
Location: Southern Illinois
1491
transportation cat dog fungi trees building writing rocket stoves woodworking
  • Likes 6
  • Mark post as helpful
  • send pies
    Number of slices to send:
    Optional 'thank-you' note:
  • Quote
  • Report post to moderator
Kamaar,

Thanks for the video link.  I would love to share notes with you once our projects are on their way.  I guess that I did not state my intentions earlier regarding the ultimate use of the wood chips.  The ultimate goal is to use them as a high quality soil/bedding material.  I know this goal is a long ways off.  My reasoning is partially revealed in the picture.  Several years ago we had a terrible storm that blew down approximately 20 large red oak and hickory trees on our 3 acres of wooded land (9 acres total).  It was heartbreaking to see so many trees felled by sustained 100 mph winds.  A part of my solution to them was to cut the trunks into about 8-10 ft sections and use them as borders for a raised bed (the trunks are about 12 inches in diameter).  I now have several beds that have tree-truck borders, but I never got them enough material to fill them completely.  I know this is a rather long-term project, but I would like to start chipping up the invasive autumn olives that grow like mad around here and each year start another chip pile until the beds are full of high-quality mushroom compost.  I optimistically hope that each bed will be a two-year project, but the wood-chip material is free and I kinda need to clear out the autumn olives anyway or they will take over my grassland.  In the fall I will rent a chipper, collect all of the cut bushes, feed them in and dump the resulting chips on another bed.  I hope to harvest at least some of the resulting compost by fall at which point I will start the composting process over again.

Let me know how your project progresses,

Eric
 
Posts: 672
Location: Northern Maine, USA (zone 3b-4a)
81
  • Likes 6
  • Mark post as helpful
  • send pies
    Number of slices to send:
    Optional 'thank-you' note:
  • Quote
  • Report post to moderator
i have wine caps coming up all over my property. i started out w/ a 6 by 6  bed w/ fresh hardwood sawdust then mixed in 2 sawdust inoculated kits from  field and forest. after 6 months i mulched around my trees and berry plants with this inoculated sawdust , then covered with 3in of fresh sawdust and kept well watered. the shrooms popped up everywhere! more than i could ever eat! 3 yrs later, I'm still getting shrooms. i give fresh sawdust every spring.
 
Eric Hanson
gardener
Posts: 5444
Location: Southern Illinois
1491
transportation cat dog fungi trees building writing rocket stoves woodworking
  • Likes 2
  • Mark post as helpful
  • send pies
    Number of slices to send:
    Optional 'thank-you' note:
  • Quote
  • Report post to moderator
Steve,

I don't suppose you know how well your bed was composted after the harvest?  If you need to add more sawdust each spring, it sounds like the wine caps really break down the wood quickly.

Eric
 
steve bossie
Posts: 672
Location: Northern Maine, USA (zone 3b-4a)
81
  • Likes 3
  • Mark post as helpful
  • send pies
    Number of slices to send:
    Optional 'thank-you' note:
  • Quote
  • Report post to moderator

Eric Hanson wrote:Steve,

I don't suppose you know how well your bed was composted after the harvest?  If you need to add more sawdust each spring, it sounds like the wine caps really break down the wood quickly.

Eric

yes they do. nearly all the 3in. i put on in the spring is gone by fall. left over is beautiful black soil full of worms. when i fertilize with compost , i place that down then cover with the sawdust. i use only organic and the wine caps love it as well as the plants. I've mixed in some blewit spawn in composted sawdust and did the same and now i get a mix. wine caps in summer, blewits in fall.
 
Eric Hanson
gardener
Posts: 5444
Location: Southern Illinois
1491
transportation cat dog fungi trees building writing rocket stoves woodworking
  • Likes 3
  • Mark post as helpful
  • send pies
    Number of slices to send:
    Optional 'thank-you' note:
  • Quote
  • Report post to moderator
Steve, since I am not growing mushrooms for harvest as much as I am growing them for their composting abilities, this sounds absolutely perfect!  To be able to break down 3 inches of woody material in one season sounds amazing!  And worms to boot.  I am curious as to how this will work in my wood chip pile.  I imagine that my first ring of Mushroom spawn should be right near the base of the pile where hopefully they will decompose sufficiently close to the ground level that they bring worms into the pile itself.  My plan then is to plant in successively higher rings up the pile until I run out of spores.  Perhaps by the end of the summer I can peal off the outer layer of material and distribute it as a garden bedding material.  I don't think I can break down my entire pile in one season, but then I don't expect this to be a 1 year project.  Thanks for the insight, this thread is really giving me high-hopes!

Eric
 
steve bossie
Posts: 672
Location: Northern Maine, USA (zone 3b-4a)
81
  • Mark post as helpful
  • send pies
    Number of slices to send:
    Optional 'thank-you' note:
  • Quote
  • Report post to moderator

Eric Hanson wrote:Steve, since I am not growing mushrooms for harvest as much as I am growing them for their composting abilities, this sounds absolutely perfect!  To be able to break down 3 inches of woody material in one season sounds amazing!  And worms to boot.  I am curious as to how this will work in my wood chip pile.  I imagine that my first ring of Mushroom spawn should be right near the base of the pile where hopefully they will decompose sufficiently close to the ground level that they bring worms into the pile itself.  My plan then is to plant in successively higher rings up the pile until I run out of spores.  Perhaps by the end of the summer I can peal off the outer layer of material and distribute it as a garden bedding material.  I don't think I can break down my entire pile in one season, but then I don't expect this to be a 1 year project.  Thanks for the insight, this thread is really giving me high-hopes!

Eric

the quickest way to spread the mycelium is to make your pile  flat 12in. after mixing in the spawn. then turn your pile every few months till all the chips turn white, which means its colonized. the mycelium needs soil contact and air. too big/tall a pile and it won't colonize properly. once your chips are all white you can mix in the same amount of these,  as the original spawn you started with, to start another pile. if your not growing out the shrooms use elm oyster spawn. it colonates a lot faster than wine caps. your pile could be colonized in 3 months or less.
 
Eric Hanson
gardener
Posts: 5444
Location: Southern Illinois
1491
transportation cat dog fungi trees building writing rocket stoves woodworking
  • Likes 1
  • Mark post as helpful
  • send pies
    Number of slices to send:
    Optional 'thank-you' note:
  • Quote
  • Report post to moderator
Steve,

So knock down that pile before I inoculate?  I do have room for it if that would work better.  
 
steve bossie
Posts: 672
Location: Northern Maine, USA (zone 3b-4a)
81
  • Likes 1
  • Mark post as helpful
  • send pies
    Number of slices to send:
    Optional 'thank-you' note:
  • Quote
  • Report post to moderator
yes . spread it out . otherwise it won't colonize completely. trust me , i know. the heat caused by the decomposition will kill the mycelium. remember the spawn needs to have soil contact and o2 to spread and thrive.
 
Eric Hanson
gardener
Posts: 5444
Location: Southern Illinois
1491
transportation cat dog fungi trees building writing rocket stoves woodworking
  • Likes 1
  • Mark post as helpful
  • send pies
    Number of slices to send:
    Optional 'thank-you' note:
  • Quote
  • Report post to moderator
Steve,

Just so I am clear, after I flatten the pile, I add spores and then stir?  I have never worked with fungi before and I have read that you want to leave the little mycelium alone.  On the other hand, If I have moldy bread, breaking the bread in half does not stop the mold from spreading.  I was originally planning on poking the spawn into little holes on the side, but now I should drop this idea and spread on the pile itself.  Should anything go on top of the spawn (cardboard, etc,)?  By the way, thanks very much for your input, it has been very helpful.

Eric
 
steve bossie
Posts: 672
Location: Northern Maine, USA (zone 3b-4a)
81
  • Likes 1
  • Mark post as helpful
  • send pies
    Number of slices to send:
    Optional 'thank-you' note:
  • Quote
  • Report post to moderator

Eric Hanson wrote:Steve,

Just so I am clear, after I flatten the pile, I add spores and then stir?  I have never worked with fungi before and I have read that you want to leave the little mycelium alone.  On the other hand, If I have moldy bread, breaking the bread in half does not stop the mold from spreading.  I was originally planning on poking the spawn into little holes on the side, but now I should drop this idea and spread on the pile itself.  Should anything go on top of the spawn (cardboard, etc,)?  By the way, thanks very much for your input, it has been very helpful.

Eric

the more contact the mycelium has with the sawdust the better. wet your sawdust well. break up your spawn into tiny pieces then mix thoroughly .can cover it with straw , chopped up cardboard or burlap. make sure your ground is cleared down to the dirt as soil contact is important. mycelium spreads quicker if disturbed occasionally. so turning the pile every couple months speeds up the process. for shrooms to grow you would need to leave it alone . don't turn more often as it will weaken the spawn. also , going back to your 1st post, don't add any manure because too much nitrogen kills mycelium. compost that separately. also for your 1st. run only use a 6' by 6' by12'' high pile to start w/ those 2 kits. once that is colonized you can use that pile as a starter to start other piles. you need at least 1/4 your pile amount total to be spawn or it won't colonize. get some oyster spawn if you want results in half the time.  good luck!
 
Eric Hanson
gardener
Posts: 5444
Location: Southern Illinois
1491
transportation cat dog fungi trees building writing rocket stoves woodworking
  • Likes 1
  • Mark post as helpful
  • send pies
    Number of slices to send:
    Optional 'thank-you' note:
  • Quote
  • Report post to moderator
Steve,

So per your recommendations, I will not add any more chicken litter, but I will thoroughly mix up the existing litter into the chips.  I don't think I can effectively un-mix the litter already mixed in.  I will take a couple of scoops off the pile to use for mulch and spread out the rest to get a broader, flatter "pile," add the spores when they arrive and cover with something carbonaceous and organic.  The pile is located directly on ground so ground contact should not be a problem.  After I start seeing more white mycelium, I will stir/turn the pile to really get the pile inoculated.  Also, turning the pile does not really harm the fungi but will inhibit mushroom production.  As far as moisture, there has been so much rain lately that I can't imagine that it would be dry anywhere, but I will monitor the chip moisture.

does this sound about right?

Thanks again,

Eric
 
steve bossie
Posts: 672
Location: Northern Maine, USA (zone 3b-4a)
81
  • Mark post as helpful
  • send pies
    Number of slices to send:
    Optional 'thank-you' note:
  • Quote
  • Report post to moderator

Eric Hanson wrote:Steve,

So per your recommendations, I will not add any more chicken litter, but I will thoroughly mix up the existing litter into the chips.  I don't think I can effectively un-mix the litter already mixed in.  I will take a couple of scoops off the pile to use for mulch and spread out the rest to get a broader, flatter "pile," add the spores when they arrive and cover with something carbonaceous and organic.  The pile is located directly on ground so ground contact should not be a problem.  After I start seeing more white mycelium, I will stir/turn the pile to really get the pile inoculated.  Also, turning the pile does not really harm the fungi but will inhibit mushroom production.  As far as moisture, there has been so much rain lately that I can't imagine that it would be dry anywhere, but I will monitor the chip moisture.

does this sound about right?

Thanks again,

Eric

you got it. just don't turn more than every few months as it won't t allow good colonization. think of mycelium like roots. small roots separated from the plant won't regrow but bigger ones will . needs to be well established before disturbing. good luck Eric.
 
Eric Hanson
gardener
Posts: 5444
Location: Southern Illinois
1491
transportation cat dog fungi trees building writing rocket stoves woodworking
  • Likes 1
  • Mark post as helpful
  • send pies
    Number of slices to send:
    Optional 'thank-you' note:
  • Quote
  • Report post to moderator
I just got back from my chip pile.  I took three 4-foot tractor buckets from the pile and transferred them to another bed.  Amazingly I was able to get out the majority of the original chicken bedding which is now helping a smaller batch of wood chips decompose. Next I will rake the pile into a flatter mound.  Some good observations.  Firstly, the chips were evenly moist throughout the pile.  Secondly and more importantly, I actually spotted an earthworm crawling around inside the upper quarter of the pile so I think that the biota and micro-biota are thoroughly at work within the pile.  The mushroom spores are due in next weekend, though I may have to wait to spread them based on weather.  I will update as I get more info.

Eric
 
Eric Hanson
gardener
Posts: 5444
Location: Southern Illinois
1491
transportation cat dog fungi trees building writing rocket stoves woodworking
  • Likes 1
  • Mark post as helpful
  • send pies
    Number of slices to send:
    Optional 'thank-you' note:
  • Quote
  • Report post to moderator
So I got my Wine Caps this week--just in time for a snowfall!  In this region we never get snow this late, but it happened this year.  I still want to get that garden bed of wood chips inoculated as soon as practical, but I had yet another thought on this project.  Would it be possible to dig fertile holes on the wood chips and plant tomatoes?  My thought was that the tomatoes would help add some dappled shade for the mushrooms and I could still get use of the garden bed this year.  I would still have the mulch inoculated 6-8 weeks before the tomatoes would go in.  Would the fertile hole interfere with the wine caps growing or would they grow independently of each other?  I am thinking fertile holes as the wood chips are 12 inches thick.  If anyone has a thought or a different version of this plan, please let me know.

Thanks again in advance,

Eric
 
steve bossie
Posts: 672
Location: Northern Maine, USA (zone 3b-4a)
81
  • Likes 1
  • Mark post as helpful
  • send pies
    Number of slices to send:
    Optional 'thank-you' note:
  • Quote
  • Report post to moderator

Eric Hanson wrote:So I got my Wine Caps this week--just in time for a snowfall!  In this region we never get snow this late, but it happened this year.  I still want to get that garden bed of wood chips inoculated as soon as practical, but I had yet another thought on this project.  Would it be possible to dig fertile holes on the wood chips and plant tomatoes?  My thought was that the tomatoes would help add some dappled shade for the mushrooms and I could still get use of the garden bed this year.  I would still have the mulch inoculated 6-8 weeks before the tomatoes would go in.  Would the fertile hole interfere with the wine caps growing or would they grow independently of each other?  I am thinking fertile holes as the wood chips are 12 inches thick.  If anyone has a thought or a different version of this plan, please let me know.

Thanks again in advance,

Eric

as long as you don't mix the chips in with the soil, i don't see why not. wine caps grow well around plants and vice versa.
 
Eric Hanson
gardener
Posts: 5444
Location: Southern Illinois
1491
transportation cat dog fungi trees building writing rocket stoves woodworking
  • Likes 1
  • Mark post as helpful
  • send pies
    Number of slices to send:
    Optional 'thank-you' note:
  • Quote
  • Report post to moderator
Steve, thanks again for the quick reply,

No, I won't mix up the soil and chip.  I will fully inoculate the chip bed soon, and plant the tomatoes later.  When I inoculate, I will gently mix the spawn into the upper layers of the chip pile and then let them sit.  When I put in tomatoes, I will dig little holes in the pile, re-fill with a good tomato soil mix and then cover with the chips once again.  I thought this would be an extra "permie" step as the mushrooms and the tomatoes will be assisting each other--the mushrooms make good soil and release nutrients for the tomatoes while the tomatoes make shade for the mushrooms.  With luck, by the end of the season I will have some pretty good garden bedding.  Incidentally, I am giving some very serious consideration to your suggestion of adding in some oyster spawn to the shroom mix.  Thanks again,

Eric
 
steve bossie
Posts: 672
Location: Northern Maine, USA (zone 3b-4a)
81
  • Mark post as helpful
  • send pies
    Number of slices to send:
    Optional 'thank-you' note:
  • Quote
  • Report post to moderator

Eric Hanson wrote:Steve, thanks again for the quick reply,

No, I won't mix up the soil and chip.  I will fully inoculate the chip bed soon, and plant the tomatoes later.  When I inoculate, I will gently mix the spawn into the upper layers of the chip pile and then let them sit.  When I put in tomatoes, I will dig little holes in the pile, re-fill with a good tomato soil mix and then cover with the chips once again.  I thought this would be an extra "permie" step as the mushrooms and the tomatoes will be assisting each other--the mushrooms make good soil and release nutrients for the tomatoes while the tomatoes make shade for the mushrooms.  With luck, by the end of the season I will have some pretty good garden bedding.  Incidentally, I am giving some very serious consideration to your suggestion of adding in some oyster spawn to the shroom mix.  Thanks again,

Eric

your welcome. good luck and let us know how it goes.
 
Eric Hanson
gardener
Posts: 5444
Location: Southern Illinois
1491
transportation cat dog fungi trees building writing rocket stoves woodworking
  • Likes 3
  • Mark post as helpful
  • send pies
    Number of slices to send:
    Optional 'thank-you' note:
  • Quote
  • Report post to moderator
Chip Pile Update,

I thought I would add some pictures to more visually describe the evolution of this thread.

The first, mini "hot" pile is the remnants of the old pile I was able to scoop out.  I was able to find most of the chicken bedding in this part and some especially hot parts.  I will find a use for this somewhere in the garden as a mulch/fertilizer, or maybe the beginnings of another hot pile.

The second, flattened out chip bed is the old pile flattened out to a height of about 12".  I plan to plant 8 tomato plants here with the help of some new tomato ladders I just got through the mail.  hopefully this pile can both grow vegetables and grow compost all in the same season.

And finally, I have plans to make yet another pile of chips.  I think I still have enough weedy/invasive brush around my house that I can make a new pile that will go straight on a bed this spring and start decomposing right away (no extended down time sitting in a trailer), have good ground contact to encourage earthworms and other critters to get in and do their jobs and hopefully I can inoculate this pile either in summer of fall of this year and be slowly decomposing over winter.

As always, any suggestions are mighty welcome,

Eric
IMG_5667.JPG
A miniature hotpile
A miniature hotpile
IMG_5669.JPG
Flattened out wood chip pile about 1 foot thick
 
Eric Hanson
gardener
Posts: 5444
Location: Southern Illinois
1491
transportation cat dog fungi trees building writing rocket stoves woodworking
  • Likes 4
  • Mark post as helpful
  • send pies
    Number of slices to send:
    Optional 'thank-you' note:
  • Quote
  • Report post to moderator
Hello,

It has been a while since this thread has been updated and I thought I would do so now.  I finally got my wine cap spawn "seeded" into my chip bed.  The process took about 2 hours.  Firstly, I went out into the chip-bed and placed 8 tomato ladders in the places that I want my tomato plants to grow.  Then, one-by-one I removed a ladder and dug out a hole in the chips down to soil about 15 inches across and about 1 foot deep.  Each hole received about 3 shovels of a manure mix for the tomatoes.  I kept the chips from the tomato holes separate for use later.  After the tomato spots were filled with their mix, I dug up mini holes in between and around the tomato holes.  Each mini hole was about 5 inches deep.  Then I connected all of the mini holes with 2 inch deep trenches.  Between the mini holes and trenches I substantially covered the bulk of the bed.  I then broke open one of the mushroom packages and began crumbling up them into the holes which were partially refilled, covered in more spawn and then completely covered.  All of the trenches were coated in spawn and covered.  I was actually surprised that I still had about 1/4 package left which I sprinkled over the surface.  I broke open over the second package and liberally covered the surface.  I then took all of the chips I removed from the tomato holes and sprinkled them over the entire surface of the bed to a depth of about 1 inch.  finally I got some straw and covered the bed with a layer about 2-4 inches deep.  Lastly, I thoroughly watered the entire bed to make certain that I had good moisture for the mushrooms.  

Some good observations already:  I saw LOTS of worms crawling throughout the chips while I was digging holes.  From what I have read, Wine Caps like wood that already has some decomposition going on and hopefully all of these worms are proof of just this.  Also, we have had nice gentle rains for the two days after the bed was inoculated.

Steve, you wanted an update, so here it is.  I wish I had some pictures to show, but the rain prohibits a good shot.  I will give a picture as soon as weather permits.

I think all I have to do now is sit back and wait, but being as impatient as I am, if anyone has any suggestions, fire away,

Thanks in advance,

Eric
 
steve bossie
Posts: 672
Location: Northern Maine, USA (zone 3b-4a)
81
  • Mark post as helpful
  • send pies
    Number of slices to send:
    Optional 'thank-you' note:
  • Quote
  • Report post to moderator
did you notice any white mycelium already in the pile? reason why i use fresh green swadust is it doesn't have any fungus in it. fresh is always best but if you put a good amount of spawn it should take. you're 3 zones warmer than me so i bet by early fall it will be colonized. don't touch it for 1 month, then dig down in the middle of the pile with your had and look at the chips. they should be whitish colored. that means its colonized. might even fruit for you this fall if not disturbed.
 
Eric Hanson
gardener
Posts: 5444
Location: Southern Illinois
1491
transportation cat dog fungi trees building writing rocket stoves woodworking
  • Mark post as helpful
  • send pies
    Number of slices to send:
    Optional 'thank-you' note:
  • Quote
  • Report post to moderator
Steve,

I did notice two larger pieces of wood in the mulch that were already growing white ribbons from them.  I tossed those out of the pile altogether.  Other than those two pieces, I saw no evidence of competing fungi.  Make no mistake, I am certain that there are other types of fungi already growing--after all, how could it possibly not have some fungal activity after sitting around for almost a year.

Eric
 
steve bossie
Posts: 672
Location: Northern Maine, USA (zone 3b-4a)
81
  • Mark post as helpful
  • send pies
    Number of slices to send:
    Optional 'thank-you' note:
  • Quote
  • Report post to moderator
well your goal is to break down the chips with fungi anyway so if you don't want shrooms, it doesn't mater what fungi is doing the work for you.
 
Eric Hanson
gardener
Posts: 5444
Location: Southern Illinois
1491
transportation cat dog fungi trees building writing rocket stoves woodworking
  • Likes 4
  • Mark post as helpful
  • send pies
    Number of slices to send:
    Optional 'thank-you' note:
  • Quote
  • Report post to moderator
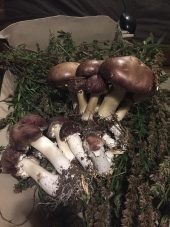
Here is a quick picture of the bed that I snapped during a brief break in the clouds.  I will try to get better ones shortly.  It shows the bed as an as-of-now finished compost bed waiting for mushrooms and tomatoes to grow.

Eric
IMG_5671.JPG
Wine Cap Mushrooms tucked in under some straw used as cover
 
Eric Hanson
gardener
Posts: 5444
Location: Southern Illinois
1491
transportation cat dog fungi trees building writing rocket stoves woodworking
  • Likes 4
  • Mark post as helpful
  • send pies
    Number of slices to send:
    Optional 'thank-you' note:
  • Quote
  • Report post to moderator
Here are some better pictures of the finished off bed
IMG_5673.JPG
View of mushroom bed topped with straw
IMG_5674.JPG
View or wine cap mushroom bed topped off with straw
 
Eric Hanson
gardener
Posts: 5444
Location: Southern Illinois
1491
transportation cat dog fungi trees building writing rocket stoves woodworking
  • Likes 1
  • Mark post as helpful
  • send pies
    Number of slices to send:
    Optional 'thank-you' note:
  • Quote
  • Report post to moderator
Is this a good sign?

I "Planted" my garden bed with wood chips and wine cap mushroom spawn about 6 weeks ago.  The chip bed is about one foot deep with the spawn mixed in throughout the depth of the bed fairly evenly, with an additional covering on the surface.  That surface was then covered with about one inch of additional wood chips (total depth about 13") and finally a layer of straw.  I just went out to check and after digging through the straw I saw chips that were crisscrossed with white fibers and were slightly dry.  I dug a little further in and the fibers seemed to have disappeared, but the once blonde colored wood chips turned black.  The deeper chips were moist and quite warm.  Should I be seeing fungal fibers in the mulch or are they simply black like the rest of the chips?  It is a little late now, but I can send a picture in the morning.  Incidentally, as the top layer of chips were warm I did give them a nice watering.  Thanks for the info,

Eric
 
Eric Hanson
gardener
Posts: 5444
Location: Southern Illinois
1491
transportation cat dog fungi trees building writing rocket stoves woodworking
  • Likes 2
  • Mark post as helpful
  • send pies
    Number of slices to send:
    Optional 'thank-you' note:
  • Quote
  • Report post to moderator
I am open to more suggestions here,

I have not posted for several months and I am wanting to pick brains for the upcoming spring.  So I went ahead and inoculated my pile (now a long bed) of chips with wine caps, but by fall I only found 4 small mushrooms.  The woodchips do have decomposition on them, but they are a LONG ways from being compost and they are still 12 inches deep--really too deep for planting much.  I would really like to speed their decomposition next spring/summer and am wondering if I should add more spawn to the mix.  Moreover I am wondering if there is anything else I can do to speed the fungal action and get compost any faster.

Complicating matters is the fact that two of my other 3 beds are absolutely heaping full of chips from my chip harvesting project last spring (the piles are 5 feet tall) and I will get more chips this spring.  At this rate I will have chips faster than they break down.  What else can I do to speed up decomposition?  For the record,  beneath the top 3-4 inches they are nice and moist and I do water them when the weather gets dry.

Thanks in advance,

Eric
 
gardener
Posts: 6814
Location: Arkansas - Zone 7B/8A stoney, sandy loam soil pH 6.5
1647
hugelkultur dog forest garden duck fish fungi hunting books chicken writing homestead
  • Likes 6
  • Mark post as helpful
  • send pies
    Number of slices to send:
    Optional 'thank-you' note:
  • Quote
  • Report post to moderator
hau Eric, great workings you have there.

What I'm going to recommend at this point in your wood chip compost is to add bacteria, most likely you have plenty of mycelium growing in that heap but fungi like to feed on bacteria left overs and bacteria use enzymes to break down lignin which is what gives wood its structure.
If you have some fermented vegetable matter going (bokashi) or if you don't, it is fairly easy to grow some good bacteria to add to your wood chip heap, this will speed up the breakdown.

Ways to grow bacteria:

Rice Base (EM) - rinse and part cook about a cup of rice (boil 2 cups water and use 1 1/2 cup rice), this is less water than that much rice needs to fully cook, when the water is almost adsorbed by the rice, turn off the heat and add cool water to stop the cooking process.
Pour that rice/water mixture into a pail and add 1 cup soured milk (have an almost out of date jug in the fridge? that is perfect if you do), stir this mixture and set a lid on the pail, put in a fairly warm spot. Check in three days, it should be ready to pour onto the wood chip heap.

The Bokashi style - use a 5 gal pail and toss your scrap vegetable materials in at every prep session, once there is enough to fill the pail 3/4 full add some (1. near out or out of date milk, or 2. one single serving of plain yogurt), stir in and again set a cover on the pail and place in a warmish spot. (this takes about a week)

Fridge clean out method -  have any fuzzy items in the fridge? this is a good time to simply toss those onto the wood chip heap and work them under the surface a bit.

There are three easy peasy methods to get some good bacteria into that wood chip heap.
Once the bacteria are multiplying along, the fungi will be able to get more of the foods it loves and needs to grow quickly.
This will work on all your wood chip heaps.

I wrote up some faster methods for making the biodynamic style preparations (they are easy access on the soil forum at the top)

Redhawk
 
gardener
Posts: 1774
Location: Los Angeles, CA
562
hugelkultur forest garden books urban chicken food preservation
  • Likes 3
  • Mark post as helpful
  • send pies
    Number of slices to send:
    Optional 'thank-you' note:
  • Quote
  • Report post to moderator
Eric,

Thanks for updating this thread.  It's cool to see what you're doing and learn vicariously through you.

I wouldn't worry about having too many chips.  That's like having too much money or too many friends.  It looks like you've got the land to pile them up and just let them decompose in place.  I wish I could leave mine in place and let them slowly break down, but unfortunately, I just don't have the space.  If it takes them 2 or more years to break down, so be it.

It's always interesting to me when and why fungal networks decide to flush and push up a crop of mushrooms.  Often its after the first really big rainstorm after a dry period, but that's not always the case.  It sounds like you've done everything you can do to create an ideal habitat for your wine caps.  But there are so many variables out of your control, including the fact that there are most likely all sorts of other fungal species growing in those wood chips.  Unless you start with a growing medium that's been sterilized, you're going to get contamination from all the other fungal spores floating around in the air and even fungi that was growing on the tree before it went through the chipper.  If you never get a decent crop of wine cap mushrooms, you'll still be building soil and growing lovely tomatoes.  So you're a winner, regardless of how the fungal experiment turns out.
 
steve bossie
Posts: 672
Location: Northern Maine, USA (zone 3b-4a)
81
  • Mark post as helpful
  • send pies
    Number of slices to send:
    Optional 'thank-you' note:
  • Quote
  • Report post to moderator
probably had the mycelium of other species already established in there before you added the wine caps. do like Dr. Redhawk said. i also add my urine and some diluted molasses to my piles. the sugar and N really gets the bacteria going . turn the pile every few weeks to get some air in there. flatten your piles to about 15in. so there is more surface exposed to the air and soil. keep moist by covering w/ burlap or some shade cloth. good luck!
 
Eric Hanson
gardener
Posts: 5444
Location: Southern Illinois
1491
transportation cat dog fungi trees building writing rocket stoves woodworking
  • Likes 2
  • Mark post as helpful
  • send pies
    Number of slices to send:
    Optional 'thank-you' note:
  • Quote
  • Report post to moderator
RedHawk,

Thanks for the quick input.  I like your idea of using the rice and milk as a source of bacteria.  Is the basic idea here that the rice serves as both a source of simple sugars and as a growing medium for the the bacteria in the milk?  Also, When applying this, should I just drop it all in a hole or spread it out?  Lastly, since it is winter right now and temperatures will be between the 20's and 50's for the next few months, does it matter if I apply this concoction now or should I wait till the temperatures get warmer?  Part of me wants to go ahead and add it now (use my winter time to do something in the garden), knowing that the bacterial action will  be extremely slow/unnoticeable till warmer weather arrives.  If I take this approach, an advantage I see is that the bacteria will be already in place as conditions improve, and additionally I won't forget to apply it/get distracted by the premium conditions when they arrive.

I almost forgot to ask, if the rice is a source of carbohydrates and a growing medium, then would mashed potatoes, oatmeal or flour serve much the same purpose?

I always like your suggestions and appreciate your input greatly.

Eric
 
Eric Hanson
gardener
Posts: 5444
Location: Southern Illinois
1491
transportation cat dog fungi trees building writing rocket stoves woodworking
  • Likes 3
  • Mark post as helpful
  • send pies
    Number of slices to send:
    Optional 'thank-you' note:
  • Quote
  • Report post to moderator
Marco,

It's good to hear from you after all of these months.  I am happy that you get something meaningful from this topic and not simply responding to my posts out of a sense of obligation.  And if you can learn vicariously, so much the better.

You are right that I am lucky to have land on which to potentially spread my woodchips (if you get me on a really talkative day I will tell how I got that land).  If I have to I will find a spot on which I will spread out the pile.  You are also no doubt right that the chips were colonized well before I added wine caps.  If only I could somehow sterilize the chips as they came out of the chipper (wink, nod).

Any ideas about what I might do with the pile over winter.  In Southern Illinois winters are fairly mild and wet but we do get freezing temperatures commonly.  I was thinking about adding some bacteria via hamster and rabbit bedding.  Maybe there is some way to encourage the bacterial growth a bit over winter.

At any rate, I always appreciate your input.  I will try to attach pictures soon.

Eric
 
steve bossie
Posts: 672
Location: Northern Maine, USA (zone 3b-4a)
81
  • Mark post as helpful
  • send pies
    Number of slices to send:
    Optional 'thank-you' note:
  • Quote
  • Report post to moderator
adding urine and molasses will cause your piles to heat up. it won't break down as fast as in the summer but it will still continue to break down esp. if you continue to add over the winter. also adding veg. and fruit scraps will help the process even more and turn your chips into a nice black compost. i start with coarse hardwood sawdust as sawdust breaks down quicker because its smaller than chips..
 
Eric Hanson
gardener
Posts: 5444
Location: Southern Illinois
1491
transportation cat dog fungi trees building writing rocket stoves woodworking
  • Likes 1
  • Mark post as helpful
  • send pies
    Number of slices to send:
    Optional 'thank-you' note:
  • Quote
  • Report post to moderator
Steve,  

Thanks for the input.  I might try this idea on my mountains of chips.  I have no problem using urine in the garden under the right circumstances (though I am a bit squeamish using urine on root crops).  Urine does seem like a great option for breaking down the woodchips.

By the way,  does molasses mean any simple sugar?  For instance, could I add sugar from the store or add pancake syrup or is there something special about molasses?  Thanks in advance for clearing this up for me.

Eric
 
Time is mother nature's way of keeping everything from happening at once. And this is a tiny ad:
turnkey permaculture paradise for zero monies
https://permies.com/t/267198/turnkey-permaculture-paradise-monies
reply
    Bookmark Topic Watch Topic
  • New Topic