|

|
|
|
|

|

|

|

|

|


![[Thumbnail for Before-2018-01.jpg]](/t/86683/a/61280/Before-2018-01.jpg "Filename: Before-2018-01.jpg
Description: Before")
![[Thumbnail for Before-2018-02.jpg]](/t/86683/a/61281/Before-2018-02.jpg "Filename: Before-2018-02.jpg
Description: Before - Front")
Invasive plants are Earth's way of insisting we notice her medicines. Stephen Herrod Buhner
Everyone learns what works by learning what doesn't work. Stephen Herrod Buhner
Bryan Paul wrote:It doesn't seem like much work is required. Does the inside need finishing to make it habitable? It looks like it has electricity although the light fixture above the door is not the best choice. Does it have insulation or internal fixtures?
Anne Miller wrote:Cute shed! I'm looking forward to hearing more about your plans.
![[Thumbnail for Eaves.jpg]](/t/86683/a/61328/Eaves.jpg "Filename: Eaves.jpg
Description: No flashing under shingles")
![[Thumbnail for Drywall-inside.jpg]](/t/86683/a/61329/Drywall-inside.jpg "Filename: Drywall-inside.jpg
Description: Old interior, dirty walls")


 1
1

![[Thumbnail for Drywall-inside-old.jpg]](/t/86683/a/61754/Drywall-inside-old.jpg "Filename: Drywall-inside-old.jpg
Description: The hole is the ceiling is partly covered, but visible.")
![[Thumbnail for Interior-Walls-Ants.jpg]](/t/86683/a/61755/Interior-Walls-Ants.jpg "Filename: Interior-Walls-Ants.jpg
Description: Ants inside the wall, munching on mystery organic matter.") 3
3
Joylynn Hardesty wrote:I am following this with interest, as we have a shed we want to convert to an apartment. Ours will be a multi year conversion though. I hope to learn through others mistakes.
1
![[Thumbnail for No-drywall.jpg]](/t/86683/a/66395/No-drywall.jpg "Filename: No-drywall.jpg
Description: Drywall and insulation removed")
![[Thumbnail for skylights1.jpg]](/t/86683/a/66396/skylights1.jpg "Filename: skylights1.jpg
Description: Skylight installed")
![[Thumbnail for skylight-installed-inside.jpg]](/t/86683/a/66397/skylight-installed-inside.jpg "Filename: skylight-installed-inside.jpg
Description: Skylight - interior")
![[Thumbnail for Bathroom-replace-walls.jpg]](/t/86683/a/66398/Bathroom-replace-walls.jpg "Filename: Bathroom-replace-walls.jpg
Description: Bathroom wall replacement") 1
1
![[Thumbnail for replace-wall.jpg]](/t/86683/a/66400/replace-wall.jpg "Filename: replace-wall.jpg
Description: Wardrobe wall, uninstalled and replaced with real walls")
![[Thumbnail for More-skylights.jpg]](/t/86683/a/66401/More-skylights.jpg "Filename: More-skylights.jpg
Description: More skylights!") 1
1
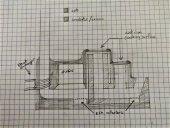
![[Thumbnail for Layout-Rev100-floorplan.JPG]](/t/86683/a/66402/Layout-Rev100-floorplan.JPG "Filename: Layout-Rev100-floorplan.JPG
Description: First concept - with full sized bed") 1
1
Gail Moore wrote:
two kinds of insulation I like to use are Roxul/ Rock Wool and the free closed cell/rigid foam
which I can get from a local SIPS/Structural Insulated Panel manufacturer. they give away discards,
so it is being reused/repurposed. You may be able to find SIPs making compnies in the Atlanta area.
the rock wool insulation is made from waste products. is awesome because it repel water, insects and rodents don't burrow.eat it piss and poop in it. has many advantages. is super easy to install.
it cuts down on air passage. and it compresses, so it pops right in between the studs and holds tightly.
Rockwool.com Roxul makes numerous
Rufus Laggren wrote:Maybe you have, but JIC: Give the roof, windows and door(s) a really thorough water test before closing the walls and ceiling. MUCH easier now.
Electrical before insulation. Probably nice to have a little breaker-box, but read up carefully about remote sub-panels and how they are wired and grounded. IIRC, the 4-wire service is what's required in many places now. Grounding in particular is not just a matter of "common sense".
Caulk all the seams before insulating. Meaning the bottom plate, the rafter plate, around the windows & doors (low expansion foam). You want to stop major drafts. If you can see roof sheathing joins (that don't fall on top of rafters) caulk them. A house is just like a really wide chimney - hot air rises, escaping on the top and sucking more air in all the holes at the bottom. Think breezes and more fresh air than you might wish. Caulk or foam anything (pipe, wire...) coming up from underneath through a hole in the bottom plate (or anywhere else, for that matter). Go around the bottom and try to find holes. Anything dime size and up can let in "guests" as well as air.
That looks like a ridge vent on the roof...? Is there a plan? Are you going to insulate the rafter bays or insulate a flat ceiling over the room (in which case the "attic" is "unconditioned", ie. outside temp). If insulating the ceiling, it's important, again, to seal all air leaks at the ceiling. You also need to frame down "light wells" under the skylights. It's also important to try to keep moisture controlled - interior moisture, that is. Moisture control is not the same thing as air (draft) control; moisture goes _through_ many materials. Reams of stuff online about this. Probably want to limit you searches to things published in the last couple years.
How much insulation can you put in? More insulation = less interior space. But enough insulation in the right place is an important part of moisture control as well as temp control. Simplest moisture control system is two open windows, but that kind of goobers up the temp control...
When you get into the "mad money", might put a little rain-roof over the door. Saves the door and makes fumbling w/the keys a calmer moment.
>bed
Hammock?
Cheers,
Rufus

|
I didn't do it. You can't prove it. Nobody saw me. The sheep are lying! This tiny ad is my witness!
montana community seeking 20 people who are gardeners or want to be gardeners
https://permies.com/t/359868/montana-community-seeking-people-gardeners
|