• Post Reply Bookmark Topic Watch Topic
  • New Topic
permaculture forums growies critters building homesteading energy monies kitchen purity ungarbage community wilderness fiber arts art permaculture artisans regional education skip experiences global resources cider press projects digital market permies.com pie forums private forums all forums
this forum made possible by our volunteer staff, including ...
master stewards:
  • Nancy Reading
  • Carla Burke
  • r ranson
  • John F Dean
  • paul wheaton
  • Pearl Sutton
stewards:
  • Jay Angler
  • Liv Smith
  • Leigh Tate
master gardeners:
  • Christopher Weeks
  • Timothy Norton
gardeners:
  • thomas rubino
  • Jeremy VanGelder
  • Maieshe Ljin

Advice on Crushing Biochar

 
Posts: 6
1
  • Mark post as helpful
  • send pies
    Number of slices to send:
    Optional 'thank-you' note:
  • Quote
  • Report post to moderator

John Suavecito I have been using the meat grinder. [/quote wrote:

I tried it. The char was wet from when i put out the fire in the restort. It took about a half hour to go through a 5 gallon bucket at about 90rpm as you have to trickle it in.  It stops with any brands or if you overload it and you have to grease the contact parts. But I like the consistency of it as it is like a medium sand.   If it is damp it comes out fine then it will ball up as it dries, but it breaks up easily. If it is wet, it comes out of the grinder as goo. It squeezes a lot of water out of it.  I didn't bother to sift out any of the ash first. It is straight from the retort.

 
pollinator
Posts: 3756
Location: 4b
1358
dog forest garden trees bee building
  • Mark post as helpful
  • send pies
    Number of slices to send:
    Optional 'thank-you' note:
  • Quote
  • Report post to moderator
Add me to the list of people that run over the charcoal with a pickup truck.  I put it in a bag and run over it a few times.  The plywood idea is interesting, I may try that and see if it works as well or better than the "charcoal in a bag" method.  I mix mine with my compost as I am making it to inoculate some of it.  In new areas I am starting, I broad fork the area and spread charcoal around.  Some stays on the surface of the ground and lots falls into the holes left by the broad fork.  I spread compost and wood chips after.  I usually don't have enough.  My thinking is that the charcoal will help drainage and sooner or later will be inoculated.  When I plant, I use more compost, but it's possible the charcoal can cause a nutrient suck for some period of time. If it takes a couple years to reach full production, I can live with that.
 
gardener
Posts: 4269
636
7
forest garden fungi trees food preservation bike medical herbs
  • Likes 2
  • Mark post as helpful
  • send pies
    Number of slices to send:
    Optional 'thank-you' note:
  • Quote
  • Report post to moderator
Here in the PNW, it's dry as a bone in summer. I'm finally getting a good timing pattern on this.  I cut the wood during the summer, fall, winter mostly, especially when it's in a dry window to prevent entrance of disease.  Then when summer starts, (June), I fire up my first biochar burn, because it's dry enough to burn efficiently and the wood I cut is internally dried out.  After each burn, I put it in between panels of plywood as I've been explaining.  During the wet part of the year, I urinate in the yard, because it's wet enough to be diluted. In summer, it's too dry to urinate directly on the plants.  Then I have the biochar, mostly in 5 gallon buckets.  I put compost on top first, then worm"castings".  Then I urinate on them so there is rich fertilizer inoculating the biochar for a few months while it is dry out in the yard.  When the rains start to come, usually October,  the soil gets wet enough, that I can dig out a ring around the drip line easily in soggy soil to not tear up the roots.  I put in the biochar just after the rain, going down 4-8 inches or so with the inoculated crushed biochar.  When it dries out, I wait until the next rain.  We have normally acidic soil, so I am starting with the most alkaline soil friendly trees in my food forest. Currently they are pie cherry, persimmon, and Asian plum.  I do that until I'm done with that summers' biochar.  Then I start again the next summer.

John S
PDX OR
 
Posts: 52
3
  • Likes 2
  • Mark post as helpful
  • send pies
    Number of slices to send:
    Optional 'thank-you' note:
  • Quote
  • Report post to moderator
If the immersion blender would be okay, a kitchen blender would probably be able to handle more, and faster.  You can often find used ones at thrift shops for just a few dollars (mine was $4).

The removable pitcher holds about a quart+.  

Half fill the pitcher with water, and add some biochar.  If the char is dry, it will just sit on the top.  Put the lid on, push the button for a medium grind.  Run for about 10 seconds, check the level (the dry char is now wet, suspended in the water).  If there's room, add another scoop of char and repeat.  I can usually add three or four scoops before I have to dump it.

When the pitcher is fairly full, you can either dump the whole batch (liquid and all) into a bucket, or you can strain it through some mesh (I used aluminum window screening), and then return the black liquid to the pitcher and add more water to bring it up to the halfway level, and repeat the process.

These blenders were built to be used with liquids, and aren't intended for grinding dry materials.  You can try it, of course, but be prepared for the motor to burn out.

Yes, it does take time to do a larger batch, but there are a few advantages:

* You don't have to manually grind it except to get it into a reasonable size to fit into the pitcher.

* The amount of char dust floating around is minimal.

* You don't have to fight to get the char moistened, as the whirling process does it very nicely.

* Now that it's thoroughly moistened, you can easily mix in your additives: compost, worm tea, sea minerals, urine, etc.

* Since it's electric, you can sit in the shade in the heat of the day, just scooping, adding water, and dumping, but you're still accomplishing something useful without excessive exertion.

DON'T TRY TO DO IT WITHOUT THE LID! ..... And we don't need to get into how I know this...
 
pollinator
Posts: 820
Location: South-central Wisconsin
329
  • Likes 1
  • Mark post as helpful
  • send pies
    Number of slices to send:
    Optional 'thank-you' note:
  • Quote
  • Report post to moderator
Has anyone ever tried something along these lines? https://www.amazon.com/Ultra-Dura-Grinder-Kneader-110-volt/dp/B00AFR0ILE/ref=sr_1_4?keywords=wet+grinder&qid=1567632735&s=home-garden&sr=1-4

It seems like it would be simple to make if you weren't making it for use with food.  Some ferrocement for the rollers, a steel bucket for the chamber. It could even be run by pedal power if need be.

Opinions?
 
master pollinator
Posts: 1744
Location: Ashhurst New Zealand (Cfb - oceanic temperate)
533
duck trees chicken cooking wood heat woodworking homestead
  • Likes 3
  • Mark post as helpful
  • send pies
    Number of slices to send:
    Optional 'thank-you' note:
  • Quote
  • Report post to moderator
Here is my current solution:


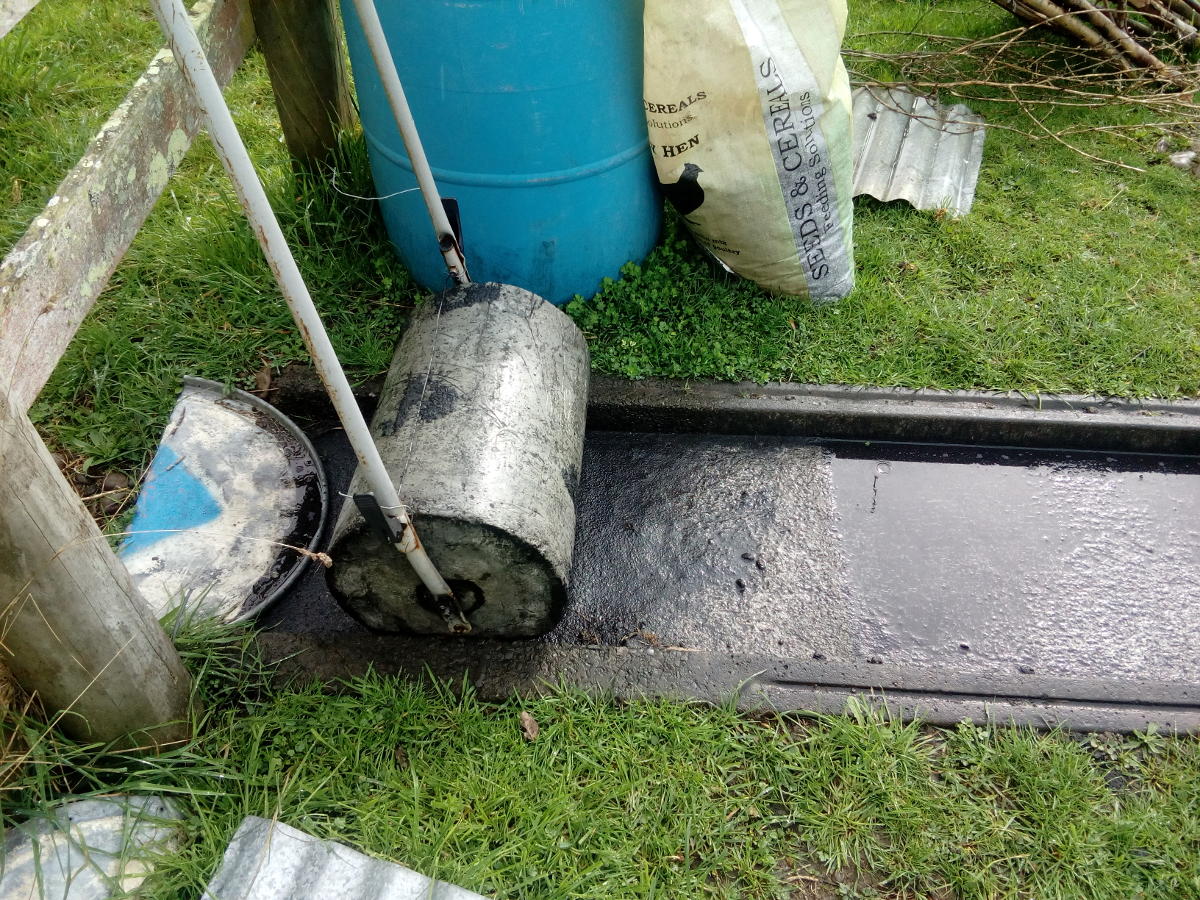
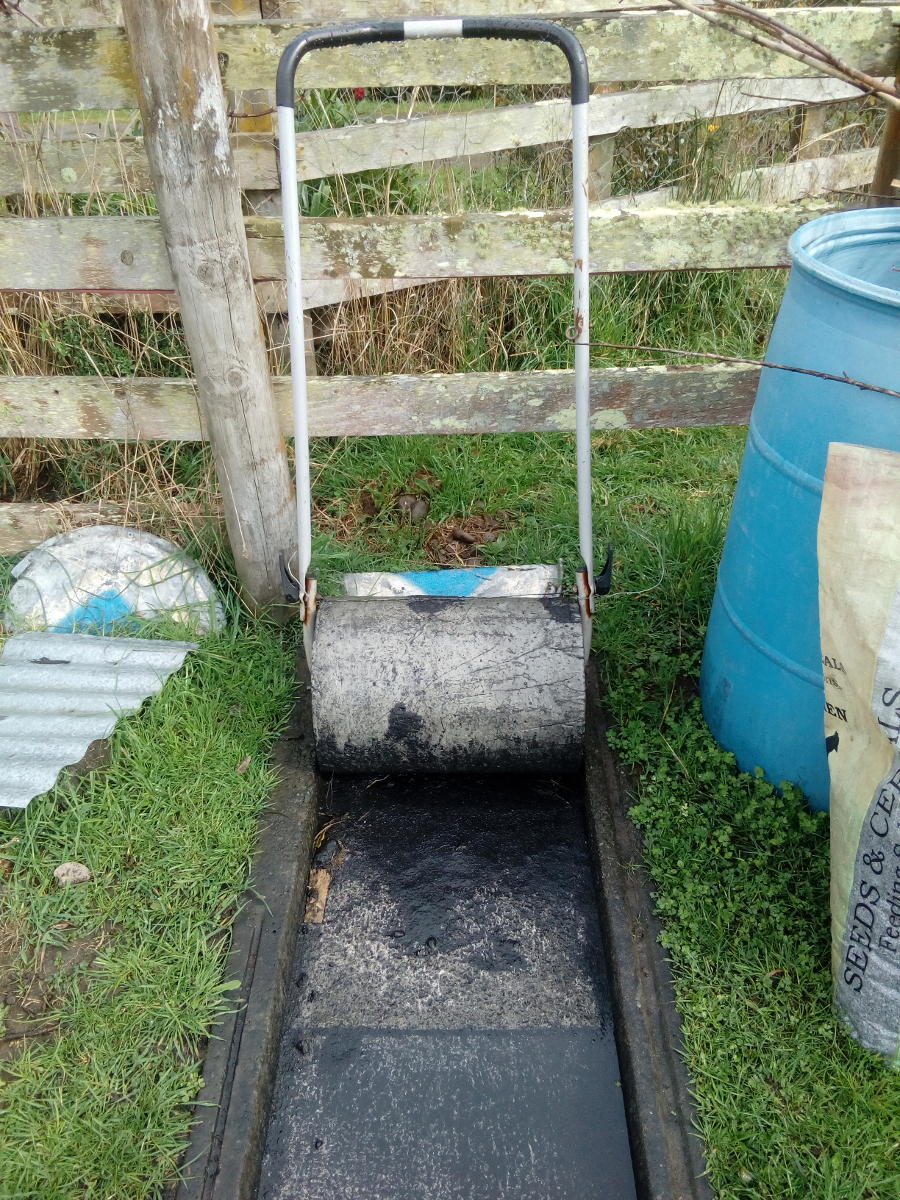
The surface is four 90x45 cm concrete pavers with fenceposts for containment. If I make another one of these (I spent a couple of months looking for a lawn roller in the area but no luck -- people give them away all the time) I'll make sure that the axle is centred properly so that my scraper makes consistent contact with the roller. When the material is damp it tends to stick to the surface and build up, making the contact patch less effective.

Technique is bog simple: Spread the chunks out on the pavers, roll a couple of times, scoop up and sieve out the fines. Lather, rinse, repeat. I tend to start off with pieces up 6-8 cm in at least one dimension. After four passes I've usually reduced everything to 5mm or less. And the best part is that the occasional rock (or big chunk of torrefied wood impersonating a rock) does not ruin my day or break any machinery. I just throw it off to the side and keep rolling.

When I scale up operations to the point that I need to mechanise the grading process, I think an old road roller will be the ticket.
 
John Suavecito
gardener
Posts: 4269
636
7
forest garden fungi trees food preservation bike medical herbs
  • Mark post as helpful
  • send pies
    Number of slices to send:
    Optional 'thank-you' note:
  • Quote
  • Report post to moderator
Ellendra-that's a really intriguing idea.  It could be really convenient if it works.  I love how people are all spontaneously trying things and seeing how they work.
It is one of the most expensive options I've seen.  Since it's probably not designed for biochar, I'd hate to see it break in a month and void the warranty.  I would love to hear how it works.

John S
PDX OR
 
Sue Monroe
Posts: 52
3
  • Mark post as helpful
  • send pies
    Number of slices to send:
    Optional 'thank-you' note:
  • Quote
  • Report post to moderator
Phil, that is both brilliant and quite simple.  What is the roller made of?
 
Phil Stevens
master pollinator
Posts: 1744
Location: Ashhurst New Zealand (Cfb - oceanic temperate)
533
duck trees chicken cooking wood heat woodworking homestead
  • Mark post as helpful
  • send pies
    Number of slices to send:
    Optional 'thank-you' note:
  • Quote
  • Report post to moderator
That's concrete, Sue. Plain old ready-mix, cast in a rubbish tin.
 
Sue Monroe
Posts: 52
3
  • Mark post as helpful
  • send pies
    Number of slices to send:
    Optional 'thank-you' note:
  • Quote
  • Report post to moderator
Well, that should certainly give it enough weight to be useful!
 
pollinator
Posts: 814
Location: Appalachian Foothills-Zone 7
202
  • Likes 1
  • Mark post as helpful
  • send pies
    Number of slices to send:
    Optional 'thank-you' note:
  • Quote
  • Report post to moderator
Any other nifty (and economical) ways of grinding large amount of biochar?  I am looking for ways to produce several tons...
 
Posts: 70
Location: Algarve, Portugal
23
duck forest garden tiny house bike wood heat homestead greening the desert
  • Likes 1
  • Mark post as helpful
  • send pies
    Number of slices to send:
    Optional 'thank-you' note:
  • Quote
  • Report post to moderator
Im still struggling with ginding an efficient grinding method and haven't had the time to build anything myself yet.

I've recently tried a hammer mill and the issue was that the char is still to wet and now in winter, which is my main production period, I struggle to dry it out.

I make char in two ways, outdoor in a large trough kiln and indoors in TLUD'S using stove pellets. The latter produces char that crushes easily and I'm going to make a small roller crush for that similar to a grape crusher.
 
John Suavecito
gardener
Posts: 4269
636
7
forest garden fungi trees food preservation bike medical herbs
  • Mark post as helpful
  • send pies
    Number of slices to send:
    Optional 'thank-you' note:
  • Quote
  • Report post to moderator
I haven't found anything easier than driving over it when I place it between two panels of plywood in the driveway. You definitely hear the crunch as you roll over it. I will often crunch it several times each time I drive somewhere.  After a week, I can usually remove the more crunched part, and crunch it again for a week.  Very easy and efficient for my home suburban garden.  Might not be enough volume for a real farmer on lots of acres, though.
John S
PDX OR
 
Phil Stevens
master pollinator
Posts: 1744
Location: Ashhurst New Zealand (Cfb - oceanic temperate)
533
duck trees chicken cooking wood heat woodworking homestead
  • Likes 6
  • Mark post as helpful
  • send pies
    Number of slices to send:
    Optional 'thank-you' note:
  • Quote
  • Report post to moderator
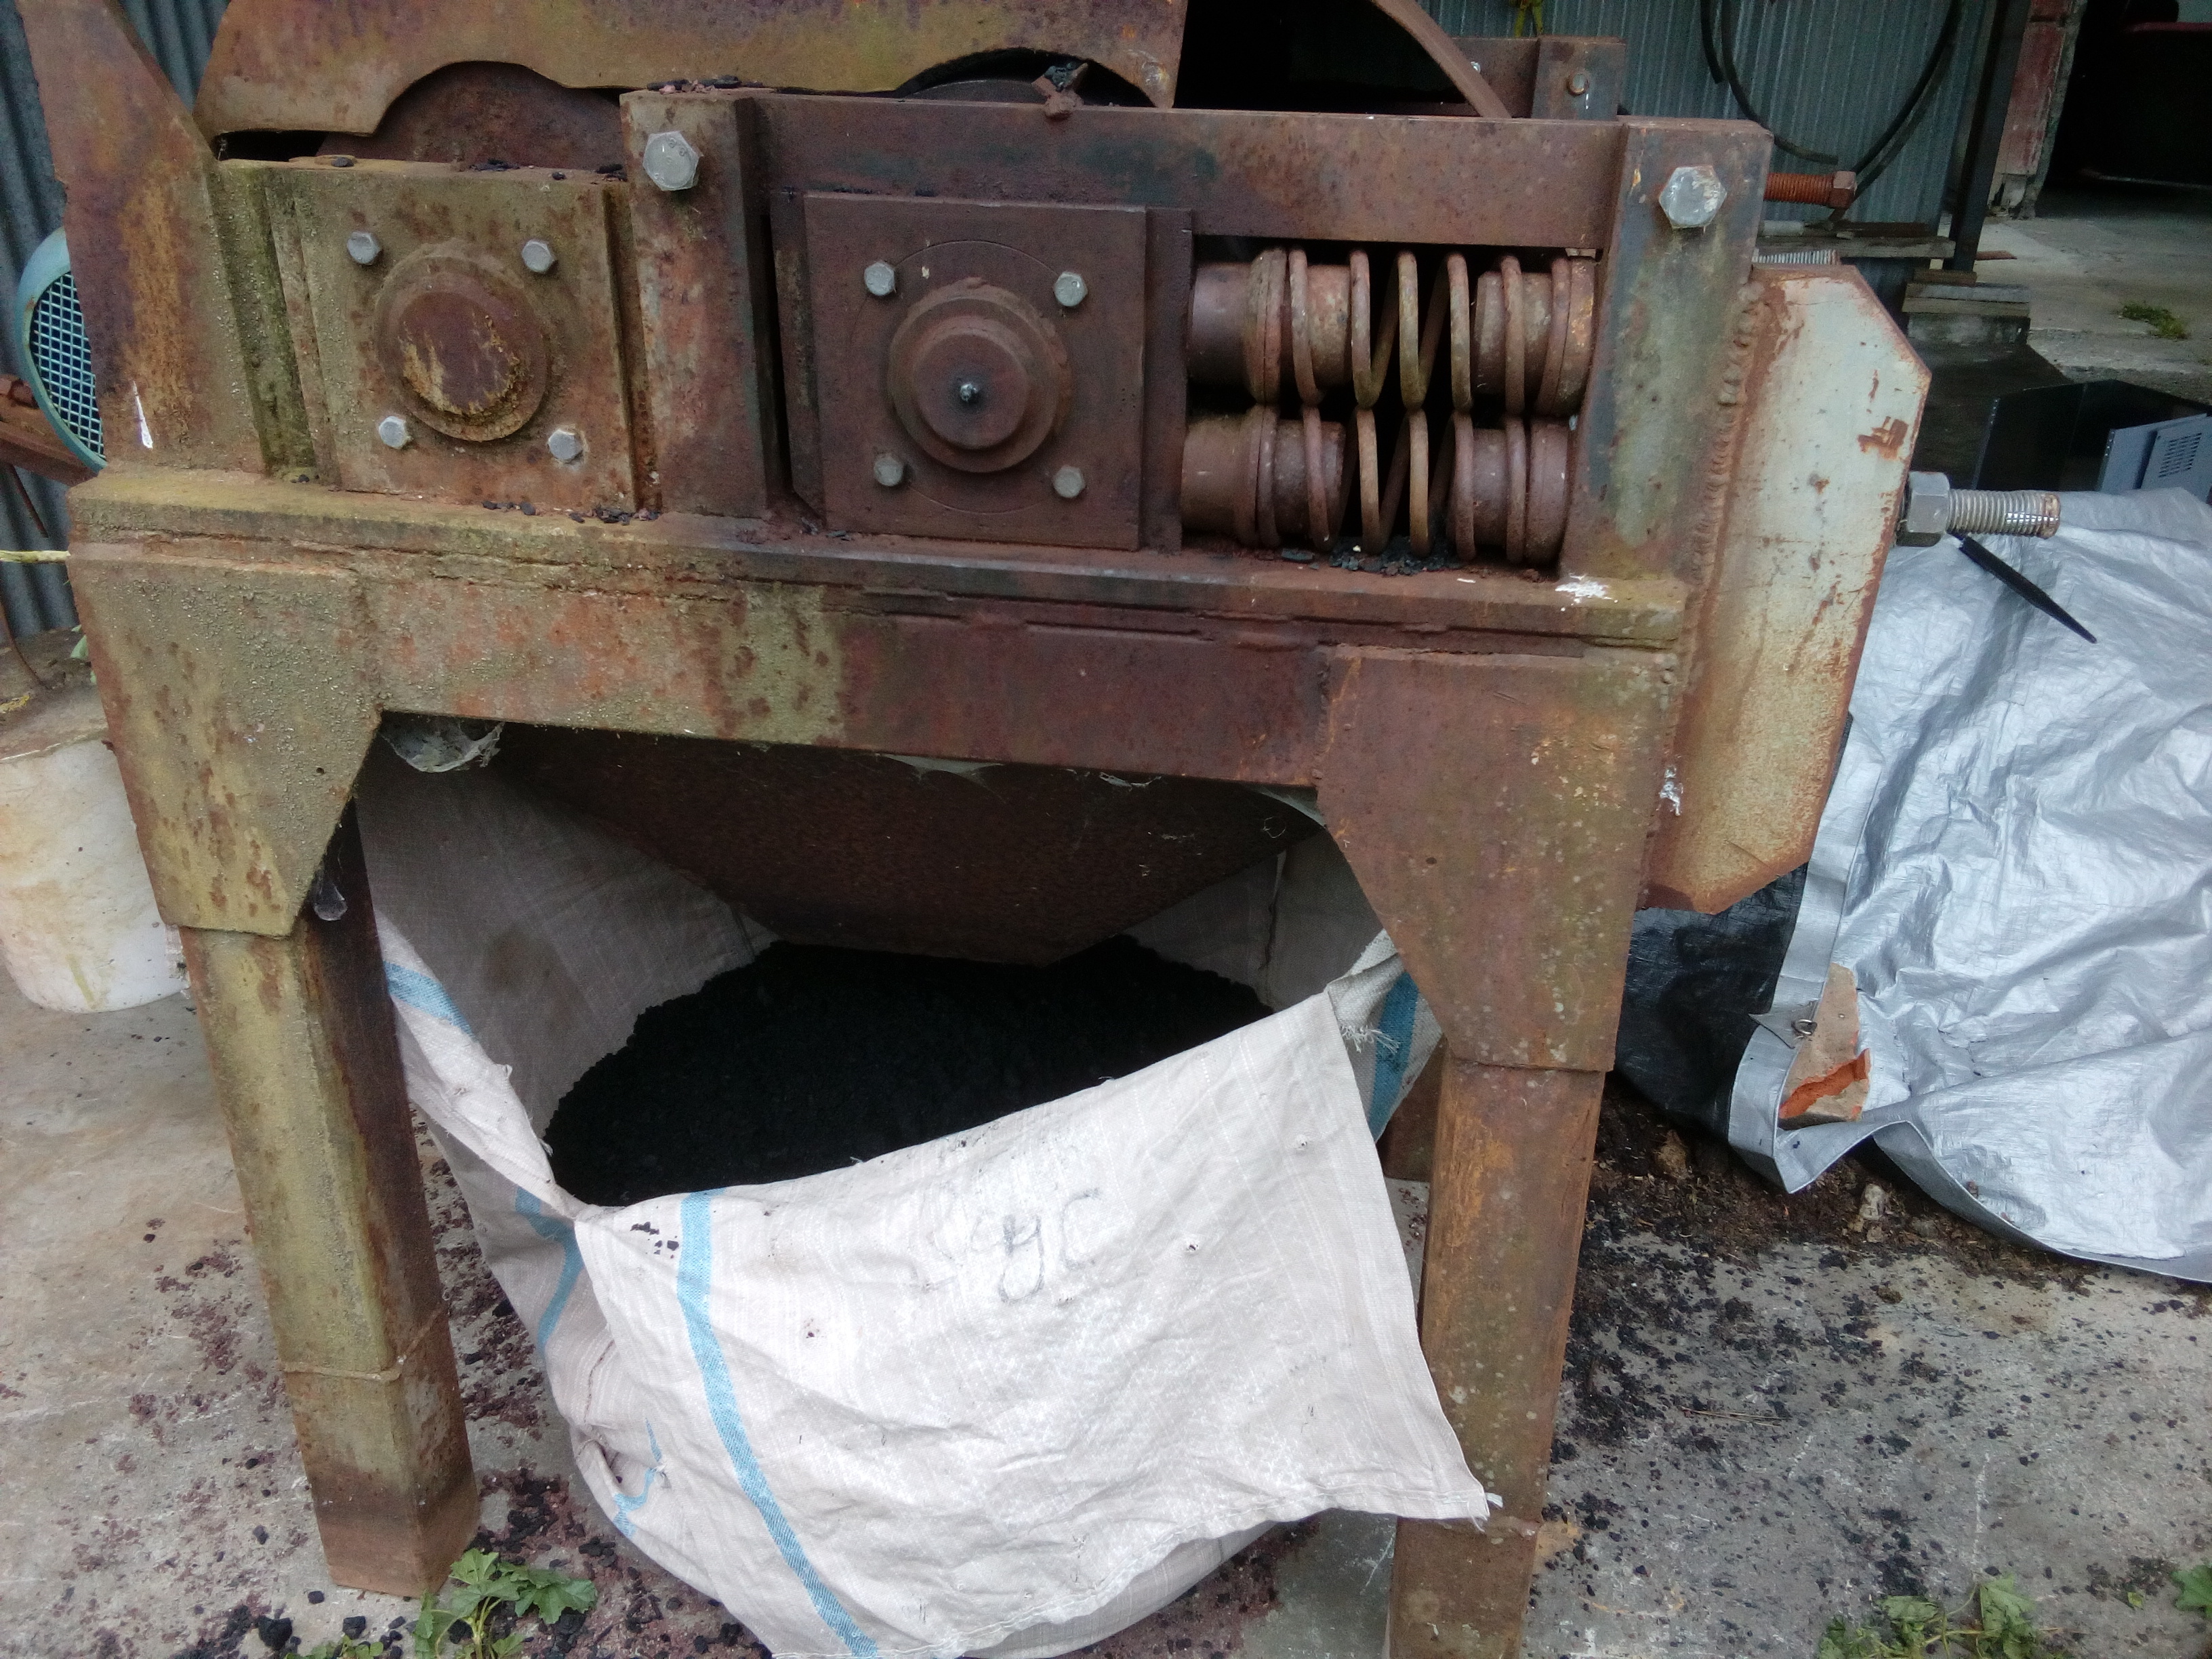
Gray, I outgrew the roller and pavers. I was in the process of talking to a Chinese manufacturer of flail mills for crushing charcoal when I had a stroke of luck. Through a chain of serendipitous connections, I scored a machine that was originally built to crush glass bottles and then did a tour of duty pulverising volcanic scoria. It is awesome...a 5 HP three phase motor driving a pair of 300 mm steel rollers. One of the drums is mounted on preloaded springs so that if a rock or chunk of unburnt wood gets in there, it doesn't jam up the works.


I can do a trailer load (approximately half a cubic metre) in about 20 minutes feeding it a shovelful at a time, and if I can rig up a conveyor or auger feed that will give me at least 2-3 times the throughput. The finished product is a blend of flnes up to 5mm chunks and flakes, an ideal range of sizes for potting mixes and incorporation into soil. I take each load of crushed material, fill a wool fadge with it, and pour several buckets of dilute aerated manure and seawees tea over it to inoculate.

As I continue scaling up operations, this machine is looking like it will be a massive time saver. I was incredibly lucky to have it find me. I met an engineer and fellow biochar enthusiast back in the spring who had just built a similar rig and was getting the same sort of results. Wouldn't be too hard to fab something like this if you have (or know someone who has) welding and fabrication chops.

 
Martijn Jager
Posts: 70
Location: Algarve, Portugal
23
duck forest garden tiny house bike wood heat homestead greening the desert
  • Mark post as helpful
  • send pies
    Number of slices to send:
    Optional 'thank-you' note:
  • Quote
  • Report post to moderator
That's awesome Phil!
 
pollinator
Posts: 3842
Location: Kent, UK - Zone 8
696
books composting toilet bee rocket stoves wood heat homestead
  • Likes 1
  • Mark post as helpful
  • send pies
    Number of slices to send:
    Optional 'thank-you' note:
  • Quote
  • Report post to moderator
I sidestepped the problem by adapting the way I did my burns. My current systems - using a trench and a really hot fire that gets continually fed for an hour or so, tends to make fine and crumbly char. Typically about 5 to 10mm across.  I get a few partially burnt ends, but they get chucked in to start the next batch off.

5 to 10mm size works great for me; i use it directly as a part of my diy potting mixes, and when mulching the garden.  We have also got chickens more recently too, so now my biochar gets chucked in to their deep litter woodchip run and they incorporate it into the litter where it gets broken down further and inoculated.

The combination of a more aggressive charring system and chickens makes this a complete non-issue. I much prefer, in a general sense, a solution that side steps rather than solves a problem.
 
Martijn Jager
Posts: 70
Location: Algarve, Portugal
23
duck forest garden tiny house bike wood heat homestead greening the desert
  • Likes 1
  • Mark post as helpful
  • send pies
    Number of slices to send:
    Optional 'thank-you' note:
  • Quote
  • Report post to moderator
I totally agree Micheal and that's mostly my approach with the biochar that I use myself as well but to sell it I want it to be <3mm because not everyone has livestock to do the work for them.
 
Posts: 11
Location: SOUTH AFRICA
2
trees wood heat homestead
  • Likes 3
  • Mark post as helpful
  • send pies
    Number of slices to send:
    Optional 'thank-you' note:
  • Quote
  • Report post to moderator
Just to add to this thread a new Biochar Crusher has been launched in South Africa and will be marketed as the BIO PROCESSOR.  All enquiries can be directed to me at biocharkilns@gmail.com or ask questions here (except price which can only be disclosed privately). International delivery can be arranged.

These are the specs as received:

-220V
-140 RPM
-Can handle any size char
-Can crush down to 2 mm particle size
-Fully Adjustable and choose output between 2 and 20 mm


Here's a short video:


Cheers

Kobus
https://wa.me/27788189330
 
Phil Stevens
master pollinator
Posts: 1744
Location: Ashhurst New Zealand (Cfb - oceanic temperate)
533
duck trees chicken cooking wood heat woodworking homestead
  • Likes 1
  • Mark post as helpful
  • send pies
    Number of slices to send:
    Optional 'thank-you' note:
  • Quote
  • Report post to moderator
Looks great, Kobus!
 
Posts: 8
Location: N California
3
  • Likes 3
  • Mark post as helpful
  • send pies
    Number of slices to send:
    Optional 'thank-you' note:
  • Quote
  • Report post to moderator
Anyone have experience using an apple scratter  a.k.a.  fruit grinder ? :  
       backyard small scale manual:   https://winemakerscorner.com/wine-products/manual-grape-and-fruit-crushers/
       motorized:   https://happyvalleyranch.com/Item/Grinders

My target size range is 1/8-3/8" (to offset some non-renewable ingredients in my potting mix),  and to layer the sifted out granular dust into the compost pile/worm barrel.  I understand most are trying to create granular dust with the idea of maximizing surface area as a field soil additive - but that is not my objective.  For example 'how particle size affects drainage in pots' : https://deepgreenpermaculture.com/2020/10/06/how-to-improve-drainage-in-plant-pots-the-proper-way-to-do-it/

Everyone should protect against breathing biochar dust:  wear an N95 particulate mask.  For this reason I appreciate the reduction-in-liquid methods, not so much the driveway approach -- at least in my dry climate area.  Nor the 2x4/sledge in a bucket method - and I'm not looking to work out my bad back at age 60+.  Please consider your cohabitants and neighbors who didn't choose to breath that - some of my neighbors already suffer emphysema.

I've tried mitigating the limitations of those methods, and have also used an antique bar/restaurant ice crusher https://tooltiques.net/Photos13LGS/Nov20th13LGS_018.JPG , which is useful to reduce size to under 1" and may serve as a first pass before running the 3/8"-1" pieces through an apple scratter - I'm hoping?   Please advise if you have tried that.

Or, another approach for my backyard operation targeting production of 1/8-3/8" size biochar?

Thanks for your great ideas!                    

[ I use a modified version of the controlled forced air Jolly Roger 30g retort in 55g retort oven over a 55g TLUD with a 6' afterburner:  https://biochar-international.org/wp-content/uploads/2019/07/J-ROs_Jan_2012.pdf  ]

 
John Suavecito
gardener
Posts: 4269
636
7
forest garden fungi trees food preservation bike medical herbs
  • Likes 2
  • Mark post as helpful
  • send pies
    Number of slices to send:
    Optional 'thank-you' note:
  • Quote
  • Report post to moderator
Good post! This is the direction we need to go in, James. People need to experiment and find out what works, especially for their scale.  I have been using the "drive over the char between panels of plywood in my driveway" method.  For me, I still think it will work better than these devices.  But my land and system aren't exactly like everyone else's.  I'm sure at some point, people will use something like this and let people know how it worked.

That article on soil drainage was fantastic! It went through lots of great detail and showed models so people could understand the concepts.  

John S
PDX OR
 
Phil Stevens
master pollinator
Posts: 1744
Location: Ashhurst New Zealand (Cfb - oceanic temperate)
533
duck trees chicken cooking wood heat woodworking homestead
  • Likes 3
  • Mark post as helpful
  • send pies
    Number of slices to send:
    Optional 'thank-you' note:
  • Quote
  • Report post to moderator
James - the gap between the rollers on my machine is about 5 mm and one side is spring-loaded. This means I get a mix of particle sizes that depends somewhat on whether I'm crushing soft or hard biochar, but the range is from fines up to 5mm on average, with a fair few chunks slipping through. It's easy to screen that for a given grade, although since I always work with it wet, the smaller sizes tend to clump together. I'm not after powder and the end result is ideal for most applications I've got.

A hand grinder will give similar results owing to the tendency of chunks to shatter, but probably deliver a more homogeneous product. If you really want to get the fines out I'd suggest washing through a screen, and starting with damp char is a good idea as long as it doesn't clog the machinery.
 
James Dempsey
Posts: 8
Location: N California
3
  • Likes 2
  • Mark post as helpful
  • send pies
    Number of slices to send:
    Optional 'thank-you' note:
  • Quote
  • Report post to moderator
Followup:   I tried this inexpensive apple scratter a.k.a. fruit crusher  https://ejwox.com/products/fruit-and-apple-crusher-with-wheel

apple crusher review

Context:  my goal in crushing (backyard scale operation) is to replace/reduce non-renewable nursery pot media ingredients (perlite, peat moss), and use any granular dust that sifts out to layer into compost/worm barrels (for details see my 7/9/23 post).  Secondary purpose is to productively dispose of woody debris -- in part, I was curious if I could offset carbon from travels with my backyard biochar operation:  a back-envelope calculation was that a trip to Europe from California would require me to scale up my operation to process the entire residential block's woody debris for a year -- I 'could' have done that with the retort-on-TLUD barrel kiln I have, ok probably burning out the barrels a couple of times.  Donate that productivity to community gardens, City tree-plantings, the neighbors' French drain?  Instead I paid the C offset of $80.42 for the two of us   https://sustainabletravel.org/our-work/carbon-offsets/   -- I did notice at the time that C offsets could be applied towards industrial scale biochar operations through a different agency.

The fruit crusher-with-wheel is better constructed than I was expecting given the shipped cost of $130.  I bolted the crusher (using the predrilled holes on the crusher frame arms) onto a sturdy old workshop table made of 4x4 legs, 2x4s and 1" plywood, by cutting out a pass-through hole adjacent to one side of the table using a rotary then jig saw.  I created a dust chute using a heavy 2-gallon plastic shipping bag with end cut off  (long enough chute to extend loose into nested receiving sieves over a 5 gallon bucket), then used aluminum foil duct tape to carefully secure the top opening of the chute to the inside bottom of the hopper around the grind blades .. would have been easier to secure the chute prior to mounting the crusher to the table.  
    In operation I was glad to have purchased the wheeled-handle version, which has 3 heavy metal welded spokes that I ended up using as a two-handed crank operation to go through my wet feedstock, since just using the handle on the wheel seemed to be on the verge of lateral force bending the 'spindly' crank axle.  Also I pushed the limits of this device to go a bit faster, which resulted in a broken tooth -- two-handed operation is necessary with attention to being responsive to the most resistant biochar chunks -- ok, I was using the oldest biochar feedstock on hand which came from the early part of learning curve on kiln operation, so I did have some underpyrolyzed chunks in that batch.  Nevertheless given my variable albeit seasoned, tree/yard waste feedstock wood variety, and without actually measuring moisture content at <15% prior to pyrolysis, the crushing operation should be attentive to the most resistant (perhaps 1 in 100) bits and take care of the tool.  Very doable.  The crank movement is reversible, which is necessary to extract any recalcitrant bit.  The missing tooth is on the outside edge so doesn't seem to compromise ongoing function.  So far I have only tested to 10 gallons of crushed and sifted product, so we will see how durable this grind tool is over time, now that I'm adjusting to resistance sensitivity.
    The resulting particle size distribution is very satisfying to my purpose:  for every 5 gallon bucket of 1/8-3/8" wet particles, I got about 1 g of <1/8" passing through -- placing the >3/8" chunks back into the feedstock (about 2 gallons).  I use 'gold panning classifiers' a.k.a. soil sieves, three nested over a 5g receiving bucket under the crusher dust chute:  sizes 8-mesh (i.e. 8 holes per inch = slightly less than 1/8" size passing through, some longer but thin bits), under a ~2.3-mesh (different brand using plastic not wire, ~7/16" holes), under a 2-mesh (1/2") that sifts out the larger pieces that need to go through again.  Using the three sieves rather than just the 8-mesh under 2-mesh, makes sifting through much easier and quicker.     https://www.prospectingplanet.com/best-classifiers-for-gold-panning-and-gold-prospecting/

    re feedstock and biochar treatments.   My current wood feedstock mix consists of material all split to maximum 2" thickness (pieces may be up to 27" long, 14" wide) and seasoned at least 1 summer (Northern California interior dry and hot), approximately 85% hardwood/15% softwood guessing by volume:    65% tulip tree (Liriodendron tulipifera), 15% gingko or pine (Pinus sabiniana and ponderosa), 10% chinese pistache, 10% miscellaneous hardwood prunings -- generally if branch is thicker than 1/2" it goes to biochar rather than compost  (Western redbud=Cercis occidentalis, maples, crepe myrtle=Lagerstroemia, firethorn=Pyracantha, Photinia, dogwood=Cornus, camelia, etc.).
    I 'innoculate' biochar using three methods, hopefully complementary -- ?  1. anaerobic fermentation soaking fresh biochar immersed in freshly mixed solution of livestock molasses in water, typically at least 6 weeks if 80degF (longer if cooler season).  2. anaerobic fermentation soaking fresh biochar immersed in freshly mixed solution of urine (mine saved in bathroom jugs, arbitrarily whatever I've saved up by the time I need to immerse a kiln-load) in water, similar incubation period.  3. fresh biochar soaked in worm barrel tea (red worms actively processing kitchen scraps + fall leaves, shredded paper; hole in bottom of 30g barrel over a 5g bucket allows water pass-through for a 'tea', have to be careful how to use this directly on plants although roses consistently love it sprinkled over the whole plant) immersed for a couple of days to weeks as convenient.  I recently got ahold of a pH meter to ensure adequate fermentation.  The sugar fermented biochar I understand is employed to absorb substrate-volatile ammonia (for example as used in animal bedding to reduce smell and capture nitrogen), which should be complementary to the other two innoculation methods.. (?)     My neighbor has recently obtained chickens, so I will be employing some ground molasses-fermented biochar in her coops (recover some of that phosphorus-rich poop to enter the mix) and see if she notices any difference in smell, cockroaches, etc.
    My intent is to sample equal portions of these innoculant treatments to drain in a barrel for a day before grinding, and store covered but aerated to retain moisture ("activated") until use.
    Part of the interest in fermentation developed from my concern about adding supposedly alkaline biochar to my modestly alkaline native garden soil (I generally sift or rinse ash out of the TLUD product as it is removed from the kiln; there is no ash to remove from the retort product).   I generally add agriculture sulfur (S) when I amend garden soil in any case, and I dust the ground biochar component going into nursery pot media with sulfur as well - perhaps now with fermentation that is not needed.   Always: use an N95 mask when handling S or biochar!
   
Your expert thoughts appreciated -- especially constructive advise  ..  ?


[   I use a controlled forced air Jolly Roger 30g retort in 55g retort oven over a 55g TLUD with a 6' afterburner, informed by:
          https://biochar-international.org/wp-content/uploads/2019/07/J-ROs_Jan_2012.pdf
          https://biochar-us.org/sites/default/files/presentations/3_4_2_Baker_Norman_0_USBI_TLUD_biochar_2016.pdf
]


John Suavecito
gardener
Posts: 4269
636
7
forest garden fungi trees food preservation bike medical herbs
  • Likes 1
  • Mark post as helpful
  • send pies
    Number of slices to send:
    Optional 'thank-you' note:
  • Quote
  • Report post to moderator
Great details! Your specific information will help people to evaluate your project and to adapt it to their circumstances. I have a much smaller scale, so I may not be as helpful as others.  My main concern is the use of anaerobic composting, which will probably be creating the kind of microbes in your soil that are unhelpful for the plants that most people grow.
John S
PDX OR
 
James Dempsey
Posts: 8
Location: N California
3
  • Likes 1
  • Mark post as helpful
  • send pies
    Number of slices to send:
    Optional 'thank-you' note:
  • Quote
  • Report post to moderator
The anaerobic fermentation of sugar (livestock molasses is quite cheap) is intended to acidify the bio char through lactofermentation, in other words production of lactic acid, like making kimchi or sauerkraut.    I understood somewhere that this acidified biochar is then particularly good at absorbing ammonia, the stinky nitrogen gas of livestock litter or urine, for example.  Keeping hold of nitrogen in the biochar I expect is probably the one most valuable asset of biochar as a soil amendment, aside from improving tilth with respect to moisture retension at the same time as aeration.  Microbial benefits go along with all that.  Just my simplified understanding, poorly articulated..
 
John Suavecito
gardener
Posts: 4269
636
7
forest garden fungi trees food preservation bike medical herbs
  • Likes 2
  • Mark post as helpful
  • send pies
    Number of slices to send:
    Optional 'thank-you' note:
  • Quote
  • Report post to moderator
You make a good point.  In alkaline soils, acidifying can be useful. I have a very acidic soil.  Nitrogen is important, but IMHO the biggest value of biochar is as hotels for microbes.  Microbes hold onto all the needed nutrients in general, especially when there is biochar in the soil.   Elaine Ingham has demonstrated that the microbes are what gives your plants what they need if you support them. Plants give off exudates to foster certain microbes, and biochar makes that happen more.  Also, biochar is a great storage of moisture in the soil.

John S
PDX OR
 
Posts: 63
6
  • Likes 4
  • Mark post as helpful
  • send pies
    Number of slices to send:
    Optional 'thank-you' note:
  • Quote
  • Report post to moderator
I bought an old stick and leaf chipper off Facebook marketplace for $150 and that thing destroys everything you put in it. The way it’s designed it almost appears to be a lawnmower that’s closed off on the bottom with a chute on top, mabie you can make something out of a lawnmower.
 
Posts: 2
2
  • Likes 6
  • Mark post as helpful
  • send pies
    Number of slices to send:
    Optional 'thank-you' note:
  • Quote
  • Report post to moderator
For crushing the finished char, we use an old electric cement mixer with a few palm sized rocks thrown in. It makes a racket, but will grind the char to complete dust if you that's what you want. It usually takes about an hour to get 1 inch to half inch pieces, a little more if you start with larger pieces.
 
pollinator
Posts: 968
Location: Greybull WY north central WY zone 4 bordering on 3
284
hugelkultur trees solar woodworking composting homestead
  • Likes 3
  • Mark post as helpful
  • send pies
    Number of slices to send:
    Optional 'thank-you' note:
  • Quote
  • Report post to moderator
It sounds like everyone is working towards powder or close.  Why are you crushing it that fine?  I can understand breaking it down to say inch chunks but why go finer?
 
John Suavecito
gardener
Posts: 4269
636
7
forest garden fungi trees food preservation bike medical herbs
  • Likes 4
  • Mark post as helpful
  • send pies
    Number of slices to send:
    Optional 'thank-you' note:
  • Quote
  • Report post to moderator
I'm not trying to get it anywhere near powder. I use the driving over it between panels of plywood in driveway method.  Finer biochar leads to more surface area, so greater amount of microbe hotels, but it doesn't provide for as much moisture retention. If you have very hot, dry summers, you don't want powder. You want chunks. We have over a month of no rain in the hottest part of the summer with no rain at all.  We get temps in the 100's during that time, and lots of 90's F.  I had trees die last year from heat and drought.  I aim for a balance between the two.  Chunks of about a centimeter are about right for me.

John S
PDX OR
 
Phil Stevens
master pollinator
Posts: 1744
Location: Ashhurst New Zealand (Cfb - oceanic temperate)
533
duck trees chicken cooking wood heat woodworking homestead
  • Likes 2
  • Mark post as helpful
  • send pies
    Number of slices to send:
    Optional 'thank-you' note:
  • Quote
  • Report post to moderator
Two years of working with that beast of a crusher has led me to some tweaks. First, I made a basher with a scrap of 2x6, with two quarter circles cut out and a handle pressed into the middle. This is my tool of gentle persuasion for the bigger pieces that skate along in the crease between the drums but don't go through of their own accord. The next will be to use an arc welder to lay down a bunch of thick beads on one of the rollers. I think this will provide the extra traction and hopefully allow me to retire the basher, because the process is not as smooth as it could be when I have to stop scooping and switch to coaxing.

Someday I want to set up infeed and outfeed conveyors, and maybe a trommel to grade the biochar coming out. That will happen when it lands at a more permanent location...it's still at a friend's farm because I don't have three-phase power here. But it's still way quicker than anything else I've used, just a lot of shovel work involved.

Another thing that I have come to appreciate is the hooves of grazing animals. I have spread a few cubic metres on some of the paddocks already, and will keep doing this as long as I have surplus. I put big chunky stuff (3-5 cm and more) right on the surface and after about a year there are no large pieces visible anywhere.
 
Posts: 4
  • Mark post as helpful
  • send pies
    Number of slices to send:
    Optional 'thank-you' note:
  • Quote
  • Report post to moderator
Sorry for replying to an old post but I have to ask Bruce Taylor about his post. You wrote that you put biochar in a bucket with water, grind it up, and then pour it on your garden. Are you saying that you don't charge the biochar before adding it to your garden? That can make the condition of the garden worse since the biochar would adsorb nutrients out of the soil.
 
PaulL Davis
Posts: 4
  • Likes 2
  • Mark post as helpful
  • send pies
    Number of slices to send:
    Optional 'thank-you' note:
  • Quote
  • Report post to moderator
Sorry for replying to an old post but I have to ask Bruce Taylor about his post. You wrote that you put biochar in a bucket with water, grind it up, and then pour it on your garden. Are you saying that you don't charge the biochar before adding it to your garden? That can make the condition of the garden worse since the biochar would adsorb nutrients out of the soil.
 
Posts: 9
  • Likes 3
  • Mark post as helpful
  • send pies
    Number of slices to send:
    Optional 'thank-you' note:
  • Quote
  • Report post to moderator
Tim Ries, I am also in Arkansas zone 8a, in Logan County. If not too far, I like to collaborate with you on Biochar topic. At the present time, I have a local guy rig up a huge kiln like a round cone shape size 3ft bottom by 3ft tall and 6ft diameter round top. It's pretty big. It has handled on both sides and metal tubes at bottom for my husband's tractor to lift and dump once charcoal is done. My challenge is finding a way to crush charcoal on a huge volume. If I have to guess, probably a good 2 to 3 yards of charcoal. I have a woodchipper/leaves shredder that can handle about 3inch diameter wood branch but not sure if that will be enough. I need to try to see if it will work. I am new to Permies site and not sure how to post pictures but will try. If you want to contact me, please send email to "fitnesstohealth@gmail.com. Thank you.
20241124_093908.jpg
[Thumbnail for 20241124_093908.jpg]
20241123_164942.jpg
[Thumbnail for 20241123_164942.jpg]
 
Why is your dog always so ... moist? Check this tiny ad for some sort of cure:
2024 Permaculture Adventure Bundle
https://permies.com/w/bundle
reply
    Bookmark Topic Watch Topic
  • New Topic