• Post Reply Bookmark Topic Watch Topic
  • New Topic
permaculture forums growies critters building homesteading energy monies kitchen purity ungarbage community wilderness fiber arts art permaculture artisans regional education skip experiences global resources cider press projects digital market permies.com pie forums private forums all forums
this forum made possible by our volunteer staff, including ...
master stewards:
  • Nancy Reading
  • Carla Burke
  • r ranson
  • John F Dean
  • paul wheaton
  • Pearl Sutton
stewards:
  • Jay Angler
  • Liv Smith
  • Leigh Tate
master gardeners:
  • Christopher Weeks
  • Timothy Norton
gardeners:
  • thomas rubino
  • Jeremy VanGelder
  • Maieshe Ljin

Better 8" brick layout with first RMH

 
Posts: 225
Location: Estonia, Zone 5/6
5
  • Mark post as helpful
  • send pies
    Number of slices to send:
    Optional 'thank-you' note:
  • Quote
  • Report post to moderator
Today I assembled my first brick layout with uninsulated heat riser. Quite happy with the way it worked, but I think there could be some improvements.

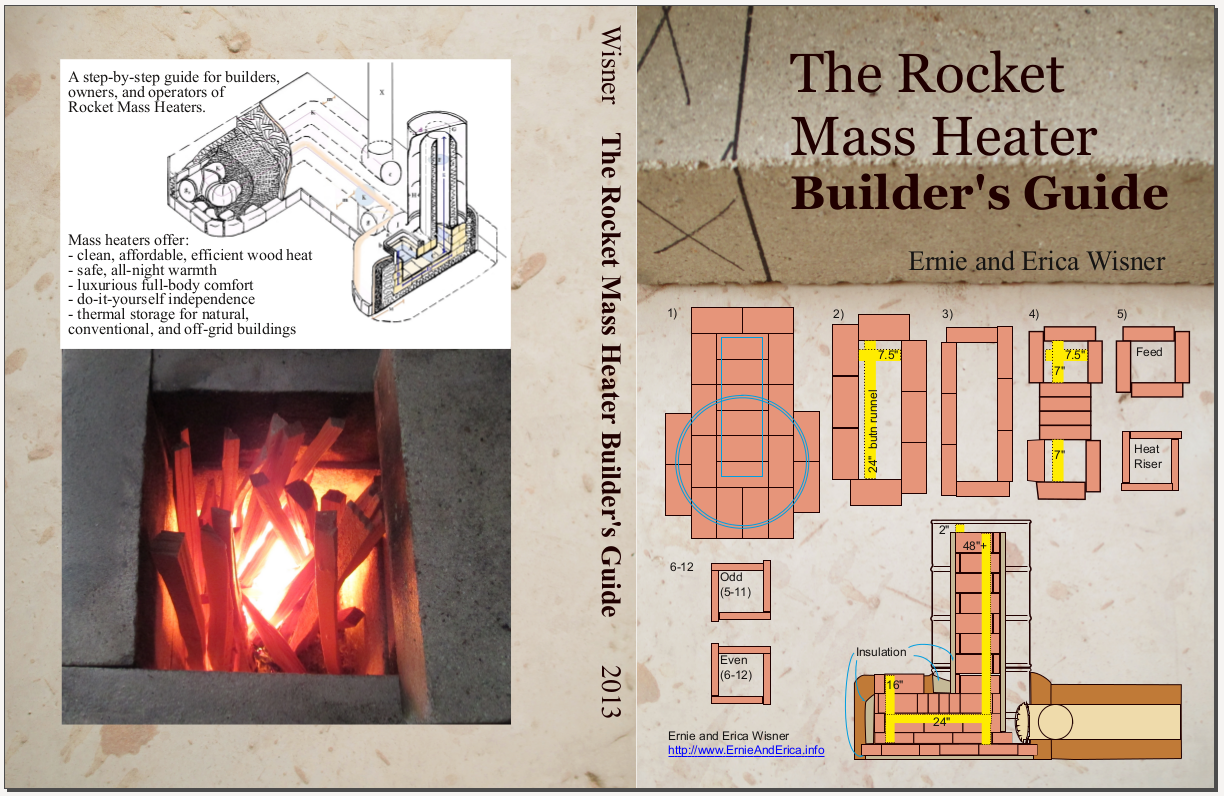
I used a brick layout which was on the front cover of a book by Ernie and Erica, 'The Rocket Mass Heater Builder's Guide' this blog (see below)


Only thing is I haven't done a brick riser, I just made a temporary test one out of a bunch of tin coffee canisters left behind from the old tenants. Stove pipe is a bit expensive so I wanted to test the initial 'rocket' burn to make sure I wasn't somehow unable to get it working.

Here is what I have so far (see attachment).

I ran it for an hour and I am surprised by how little smoke there was, only really at the start and end of the burn. I experimented and threw some wet wood, and even green trimmings from some spruce I had laying around and even still it chewed through it with ease without the regular smoking I would expect.

I'm not really one to say as I'm a beginner to this, but is there a better brick layout which a) has a catchment below where the sticks burn for accumulating ash and/or b) doesn't require cutting bricks? I have an angle grinder, and could get a diamond tipped blade for etching into the Fire Clay bricks but would prefer not to.

Many thanks,
Rob


IMG_20140122_125756.jpg
[Thumbnail for IMG_20140122_125756.jpg]
first RMH burn
 
rocket scientist
Posts: 6320
Location: latitude 47 N.W. montana zone 6A
3193
cat pig rocket stoves
  • Mark post as helpful
  • send pies
    Number of slices to send:
    Optional 'thank-you' note:
  • Quote
  • Report post to moderator
Hi Rob; Cutting firebrick is very easy & quick . Your 4" angle grinder and a (cheap) masonary blade will cut them like butter. Be sure to have a dust mask on and use a face shield and gloves .
 
pollinator
Posts: 4154
Location: Northern New York Zone4-5 the OUTER 'RONDACs percip 36''
67
hugelkultur fungi books wofati solar woodworking
  • Mark post as helpful
  • send pies
    Number of slices to send:
    Optional 'thank-you' note:
  • Quote
  • Report post to moderator
Rob Irish : Ernie and Erica Wisner have thoroughly tested Rocket Mass Heaters RMHs, both with and with out ash pits directly under the feed tube, and are pretty
much telling you this is the way they think RMHs should be built, AND they are the Experts ! You certainly can learn to use your RMH w/out a clean out!

You may have noticed that their design for the Heat Riser uses 'Splits', half thickness bricks, to make up the Heat Riser*, referring back to the cover of the book
it is easy to take out Two of the the full thickness bricks directly under the Feed Tube, and substitute splits! This gives you a little half thickness Ashpit that helps
in the clean up.

A couple of things, First I have not seen the book yet, will order one today, I am sure that they have covered the need for insulation under and surrounding the
Firebrick, and I only mention that because someone just looking at the cover might miss the idea that insulation Should be under there !

Second, and this is merely my adaptation that I am throwing out there, and not a general recommendation, referring back to the #2 stack of bricks, during a re-
build I added a staggered layer of splits, making that layer 1.25 inches higher, This is a compensation for the Extra Ash That I leave within my Burn Tunnel all
the time, adding additional protection as insulation and cushioning to protect my fire brick, effectively it does not increase the Constant Cross Sectional Area of my
Burn Tunnel while the Rocket burner is firing ,I only clean down to the crunchy sintered bits !

Tomas Rubino : I think you have fallen into the same trap that snared me! Actually there are two grades of brick, the soft brick is easy to cut, the harder Firebrick
should be soaked in water and then cut on a diamond wheel with a stream of water jetting onto the spot where the cutting is happening, a cut off wheel will work,
but you will go through a lot of Blades ! A Quick second on T.R's suggestion for face mask and gloves !

A much more in-depth look at Firebrick Types is covered in Erica Wisners Dec 20th Thread Extention/Answer to my Thread "fake fire brick'',my part contains
some factual errors, so her Answer is the part you want until I re-write my posting. Thank You, Erica ! For the Good of the Craft !

Think like Fire, Flow like a Gas, Don't be the marshmallow! As always, your comments and questions are solicited and are welcome ! PYRO - Logically BIG AL !

* Using thiner 'Splits' for your fire brick makes for a much smaller diameter Heat Riser and gives you more room for insulation and for passage of your hot exhaust
gases, it also makes you a much more skilled brick layer instantly -or else !!! This is a small grumble, as the result is some thing you can be proud of, be generous
with the curing/drying time !!! A. L.

 
Rob Irish
Posts: 225
Location: Estonia, Zone 5/6
5
  • Mark post as helpful
  • send pies
    Number of slices to send:
    Optional 'thank-you' note:
  • Quote
  • Report post to moderator
allen I hope I didn't imply that Ernie and Erica's plan on the front cover was no good, I just wondered if there is alternative plans in the arsenal perhaps without brick cutting. Maybe in their 8" Cabin plan or 8" bonnie convection.

I wasn't sure if those were splits or not on the cover, but your suggestion makes perfect sense to use splits on the foundation under the burn tube! I have seen so many plans with ash pits I didn't realise you didn't need one.

Do you ever clean out the ash in that initial burn tunnel? Or does your ash only ever stay at about 1 1/4"

Do you mean a layer of insulation underneath the foundation bricks? Is this to reflect the heat so it isn't sending the heat downwards into the earth?

I'm just wondering what the next thing is I should get as far as plans / instructions goes. I can see there's a dvd series, a book by e &e, various plans for 8" RMH etc. I have Rocket Mass Heaters by Ianto Evens, which is filled with awesome information and knowledge, but as far as the plans are concerned I find them hard to follow in this book and differentiate when it talks about using brick riser plans or steel riser plans as it seems to jump between these plans intermittently without giving exact instructions. That could just be me and my lack of understanding the lingo yet.

I don't wish to use a brick heat riser.

Thanks for that thread regarding fake fire bricks. Quite a lot to take in there! Who'd have thought there would be so much to bricks!


Many thanks,
Rob
 
allen lumley
pollinator
Posts: 4154
Location: Northern New York Zone4-5 the OUTER 'RONDACs percip 36''
67
hugelkultur fungi books wofati solar woodworking
  • Mark post as helpful
  • send pies
    Number of slices to send:
    Optional 'thank-you' note:
  • Quote
  • Report post to moderator
Rob : No Problems, Referring back to the cover, those are splits that make up the Heat Riser. As "splits'' and full thickness bricks are within pennies of each
other you could go back to using the thicker brick to make the Heat Riser, and have enough room for rockwool insulation as long as you use a 55 gal drum.

Some people are now using splits under their burn tunnels, I was only talking about swapping out the two bricks directly under the Feed Tube, if you were
constructing a Rocket Mass Heater RMH< directly over a concrete floor you would have too much heat transference with a long burn and could "Cook' the Lime
out of your Concrete (BAD) without the insulation ! Re-read your E & E book I am sure they must cover it !

I HAVE to leave the ash in the burn tunnel, or am at least not willing to experiment with less ash as less ash means a bigger burn tunnel and tradition if nothing
else tells us the burn tunnel should have the smallest Cross Sectional Area !

We really want a Heat Riser that comes up to 'working temps' quickly to get the high temperature burn that gives us the efficiencies that we love, heavy steel
takes to long, and thin steel will not last in the high temperatures ,Perlite which is a 'puffed-up' volcanic rock can be mixed with Clay slip to make the cheapest
Heat Riser that with care will last 4-5 years, ( that is what I am using ) and by then I am hoping for something cheap in the D.I.Y./Aftermarket !

After you leave the Rocket Burner and Transition your vertically falling hot exhaust gases at right angles to flow horizontally into your Cob Thermal Mass you can
then use the lightest and cheapest ductwork you can find, consider this pipe to be sacrificial form that the Cob wrapped completely around the Pipe takes
up, this is a great place to go as cheap as you can !

As you have not said much about Your building and your initial plans to integrate a RMH into it, it is a little hard to advise you ! but try this, goto ->
Villagevideo.org and clickon-> the U-Tube IKon. On the next page, you will see a rank and file of short videos, the first file is named rocket mass heater scenes
and just to the right is a flashing play button, clickon-> and it should automagically load al 19 short videos to 3/8ths of an entire E & E RMH build, any problems
loading them repeat the steps starting with goto-> village video

If you Identify many things in that build that are common to what you want to have, consider buying the video ! I hope this helps and was timely, For the Good of
the Craft! Think like Fire!, Flow like a Gas! Don't be the Marshmallow! As always your comments and Questions are welcome and solicited PYRO-logically Big AL !
 
Rob Irish
Posts: 225
Location: Estonia, Zone 5/6
5
  • Mark post as helpful
  • send pies
    Number of slices to send:
    Optional 'thank-you' note:
  • Quote
  • Report post to moderator
Thanks for clarifying Big Al!

I watched all 19 videos there tonight. Appreciate that and all your help!

I did understand you meant only to swap 2 of the full bricks for splits, just under Feed Tube, so no confusion there.

We are putting in the RMH in a house we are redoing the floors on this year, so there is no cement under there, just rotting wood on dirt. Exactly how we do the floor is still being planned.

It sounds like you're not a fan of using a stove pipe for the heat riser? I thought the consensus was around here that this was the ideal thing for the job, that it was better than bricks. What will you go for after your pelite clay riser? Interesting solution btw!
 
allen lumley
pollinator
Posts: 4154
Location: Northern New York Zone4-5 the OUTER 'RONDACs percip 36''
67
hugelkultur fungi books wofati solar woodworking
  • Mark post as helpful
  • send pies
    Number of slices to send:
    Optional 'thank-you' note:
  • Quote
  • Report post to moderator
Rob : The inside of the Heat Riser can be made from the kind of sonotube that gets used as a form to pour concrete into, or you can find some old light weight
cold air return ductwork, these are cheap sacrificial forms, why spend good money to let it just get burned up, I would use any metal that was the right size
and shape on the outside of the heat riser ,here the temps should not be so high !

Oh, Yes that's right to you can get aluminized stove pipe over there, because it refracts 80%-ish off the heat back, it is often more durable than stainless at high
temperatures ! If you took two pieces of these metals and buried them in the coals of a hot fire the Stainless steel would last longer, but just by a few minutes.
thats just trivia, use ether them or galvanized to make up your Transitional area and first 30'' after the clean out at your transitional area then go as cheap as
you can, the clean outs and caps should both come from the same place and fit tightly, and they will probably be pricey too !

Not having seen ether the New Book from E & E, or the new 3rd addition of the Rocket Mass Heater book I am holding back on commenting, but thats O.K.
you've got time, For the Crafts Big AL !
 
gardener
Posts: 3471
Location: Southern alps, on the French side of the french /italian border 5000ft elevation
194
  • Mark post as helpful
  • send pies
    Number of slices to send:
    Optional 'thank-you' note:
  • Quote
  • Report post to moderator


Rob, use whatever round you want if you make a cob riser. On a cast refractory, i would choose a cardboard tube which would burn away. Because the refractory mixes using "ciment fondu" (most of them) retract and if you put a metal pipe in there it will expand and crack your heat riser.

But i think you have a way simpler solution in estonia.

I BET YOU CAN FIND SOMETHING SIMILAR TO THIS

http://www.svk.be/fr/autres/boisseaux_refractaires_intro

Just pile a pair of thoses, suround by rockwool, perlite vermiculite or superwool and you're done. You put a bent sheet of thin steel to hold your insulation, and you'e good to go.

This is for a batch rocket, but will give you the idea.

 
Rob Irish
Posts: 225
Location: Estonia, Zone 5/6
5
  • Mark post as helpful
  • send pies
    Number of slices to send:
    Optional 'thank-you' note:
  • Quote
  • Report post to moderator
I think somewhere along the way I got confused about the Heat Riser that it needed to be like stove pipe in strength. But you're saying that temperatures actually don't get so hot here? That I could even use my tin coffee containers here? I know after an hour burning my test model above with the tin riser it didn't get as hot as I thought it would. Is the heat mostly projected upward from the heat riser? And is it then the barrel drum which really gets hot?

When you say 'burned up' Allen, do you mean that it will be burnt / gone, as in the insulation is all that will remain as the heat riser? Or do you just mean it is going to be burnt marked?

Samatax: any chance you know the estonian word for those things you linked? Or what are they called in English? I switched to english mode on that site but they didn't seem to be linked. I will definitely see if those are an option here.


With all this being said, what is the overall consensus on a riser that a) does the job most effectively and b) lasts the longest?

Many thanks,
Rob
 
allen lumley
pollinator
Posts: 4154
Location: Northern New York Zone4-5 the OUTER 'RONDACs percip 36''
67
hugelkultur fungi books wofati solar woodworking
  • Mark post as helpful
  • send pies
    Number of slices to send:
    Optional 'thank-you' note:
  • Quote
  • Report post to moderator
Rob : W.o.w., somehow I led you done the garden path, Basically, because of the freakishly high temps possible, 1330dC, any metal on the inside of the
Heat Riser is Doomed, if it is 3/4'' it is still Doomed, just taking longer to fail, as we KNOW it will fail, go cheap with a sacrificial form that will get burned
up when it is fired ! When I typed burned up i meant it will ether disappear or look like overcooked and blacked pork rinds, or Taco chips !

This is assuming your are Not going to use Firebrick !

The form for the outside of the Heat Riser Can ether be a sacrificial form of some kind or due to the lower temps found on the Outside of the Heat
Riser and still in the barrel, a high Temperature steel, I used cheap cold air return duct work and expected it to fail.

While I was successful in using a metal sandwich to hold my Perlite and Clay Slip heat riser, for firing, '' Satamax '' is right! There can be a danger that the
expanding metal on the inside of the Heat Riser might Crack the Perlite and Clay slip Heat Riser causing you to have to start over and re-make it !

Specifically there are two camps on light or heavy Firebrick, and which one makes the best Heat Riser, but a well made Fire brick heat riser wrapped
with RockWool, should out last every thing else ! I hope i have cleared up the earlier misconception, w/out adding more! For the Craft ! Big Al
 
Rob Irish
Posts: 225
Location: Estonia, Zone 5/6
5
  • Mark post as helpful
  • send pies
    Number of slices to send:
    Optional 'thank-you' note:
  • Quote
  • Report post to moderator
I don't think you lead me down the garden path Allen, I think I might just be a slow learner!

I have only just understood we are simply using the inside and outside metal to hold in place a perlite & clay thing that is to be fired! I didn't connect they were sacrificial until now. A while back I asked about the difference between brick and steel riser and I was told the steel was best because it heated up quicker. Therefor made the assumption the steel sticks around.

Thanks for getting me there allen!

So just confirming, stove pipe is really only necessary for the first part after transitioning from the barrel drum into the exhaust for the first 30".

Do you have any thoughts about a square based riser versus a cylindrical one, like what Satamax suggested?

Thanks for your time,
Rob
 
allen lumley
pollinator
Posts: 4154
Location: Northern New York Zone4-5 the OUTER 'RONDACs percip 36''
67
hugelkultur fungi books wofati solar woodworking
  • Mark post as helpful
  • send pies
    Number of slices to send:
    Optional 'thank-you' note:
  • Quote
  • Report post to moderator
Rob : Not to dodge your question but to answer it must directly, it is more about keeping a constant cross sectional area through out your Rockets innards
than it is about shape, I have made some rather off the wall remarks about going cheap, I am aware that not all materials so readily obtainable here in The States
are as available where you are, my comments about cheap should be taken to mean that you should not always blindly follow an exact list of materials for your
RMH while still staying very close to the pattern for your 1st build, after you progress from them that's doing to them that's done it go crazy ! BIG AL
 
Satamax Antone
gardener
Posts: 3471
Location: Southern alps, on the French side of the french /italian border 5000ft elevation
194
  • Likes 1
  • Mark post as helpful
  • send pies
    Number of slices to send:
    Optional 'thank-you' note:
  • Quote
  • Report post to moderator
Rob, i'm definitely better than you at searching the web in estonian, which i know nothing of!

http://www.floyd.ee/est/ehitusmateralid/moodulkorstnad/fibo-korsten/fibo-korsten-samott-toru-160-mm/?mid=467&id=2503

http://www.osta.ee/fibo-korstna-samott-torud-3tk-12539217.html

 
Rob Irish
Posts: 225
Location: Estonia, Zone 5/6
5
  • Likes 1
  • Mark post as helpful
  • send pies
    Number of slices to send:
    Optional 'thank-you' note:
  • Quote
  • Report post to moderator
Allen: I appreciate your off the wall remarks. I will try and follow the plans as closely as possible with the things available here. I'm sure a lot of the things exist here, it is just finding the stores. Still finding my footing here in Estonia. The next thing I will be looking for is this duct pipe that is quite cheap.

Satamax: I even had the help of my Estonian wife and couldn't find these 'Fibo korstna samott toru' you found! That first link you gave even supplies 200mm (8") so that is perfect, and they have the 200mm rockwool (Tulekindel kivivill -> http://www.floyd.ee/est/ehitusmateralid/moodulkorstnad/fibo-korsten/fibo-korsten-isolatsioon-200-mm-2m-pakk/?mid=467&id=2515) to wrap around it easily.

I am lucky to have all your help gentlemen!

gift
 
Companion Planting Guide by World Permaculture Association
will be released to subscribers in: soon!
reply
    Bookmark Topic Watch Topic
  • New Topic